Configuring in-app notifications
1. Overview
To be able to send notifications to the user’s inbox in the citizen portal, the regulations administrator must first define the template for the inbox communication channel and add it to the structure of the registry regulations.
2. Regulations settings
The regulation deployment repository registry-regulations includes the base directory called inbox/business-process-notification-template. This directory contains template files for in-app messages that users can receive through the inbox communication channel in their account.
The registry administrator can design and add any number of templates to the regulations structure, depending on business needs.
| The business-process-notification-template is the default template for this communication channel. You can have multiple templates. The names of each template within the same communication channel must be unique. |
To support sending notifications to users, the regulations structure contains an additional directory called <registry-regulations>/notifications.
- Here is the path to the template:
-
registry-regulations/notifications/inbox/<template-directory>
- A typical template for in-app notifications has the following structure:
Where:
-
<template-directory> is the directory containing the template resources. The directory name must be unique for the corresponding communication channel.
-
<template-directory>/notification.ftl is the text-based FreeMarker template for generating the message body.
Example 1. A FreeMarker template with placeholders inside the message bodyInformation about a new credit agreement was added to the credit history: effective date - ${dateCredOpen}, creditor - ${creditor}. In case of fraud or creditor's mistake, you can file a dispute in the credit history.
-
<template-directory>/notification.yml is the configuration file with template metadata that contains the message title.
Example 2. A configuration file with the message titletitle: "A notification from the Bureau of Credit Histories"
The administrator can edit templates and create new ones. When a new template is added to the regulations structure, the deployment pipeline calls an additional step to publish the new template to the repository.
| Each published template must have a unique name that can be used later when modeling business processes. |
3. Modeling in-app notifications
There are two main scenarios for sending notifications when modeling business processes:
3.1. Notifying a single user
After deploying the regulations and publishing the notification template to the repository, you can use the unique template name in the Notification message template field when modeling the push notification step in a business process.
When modeling a business process, you can use a standard send task extension called Send User Notification.
The Send User Notification extension is a delegate for sending messages to citizens through a configured communication channel using a specified template.
|
Before configuring templates in Camunda Modeler, make sure the resources > element-templates application folder contains the sendUserNotification.json file. |
- To model sending notifications to a user, perform these steps:
-
-
Open the business process modeling interface.
-
Create a Send Task.

-
In the settings panel on the right, click the
Open Catalogbutton and select the Send User Notification delegate template. ClickApplyto confirm your action.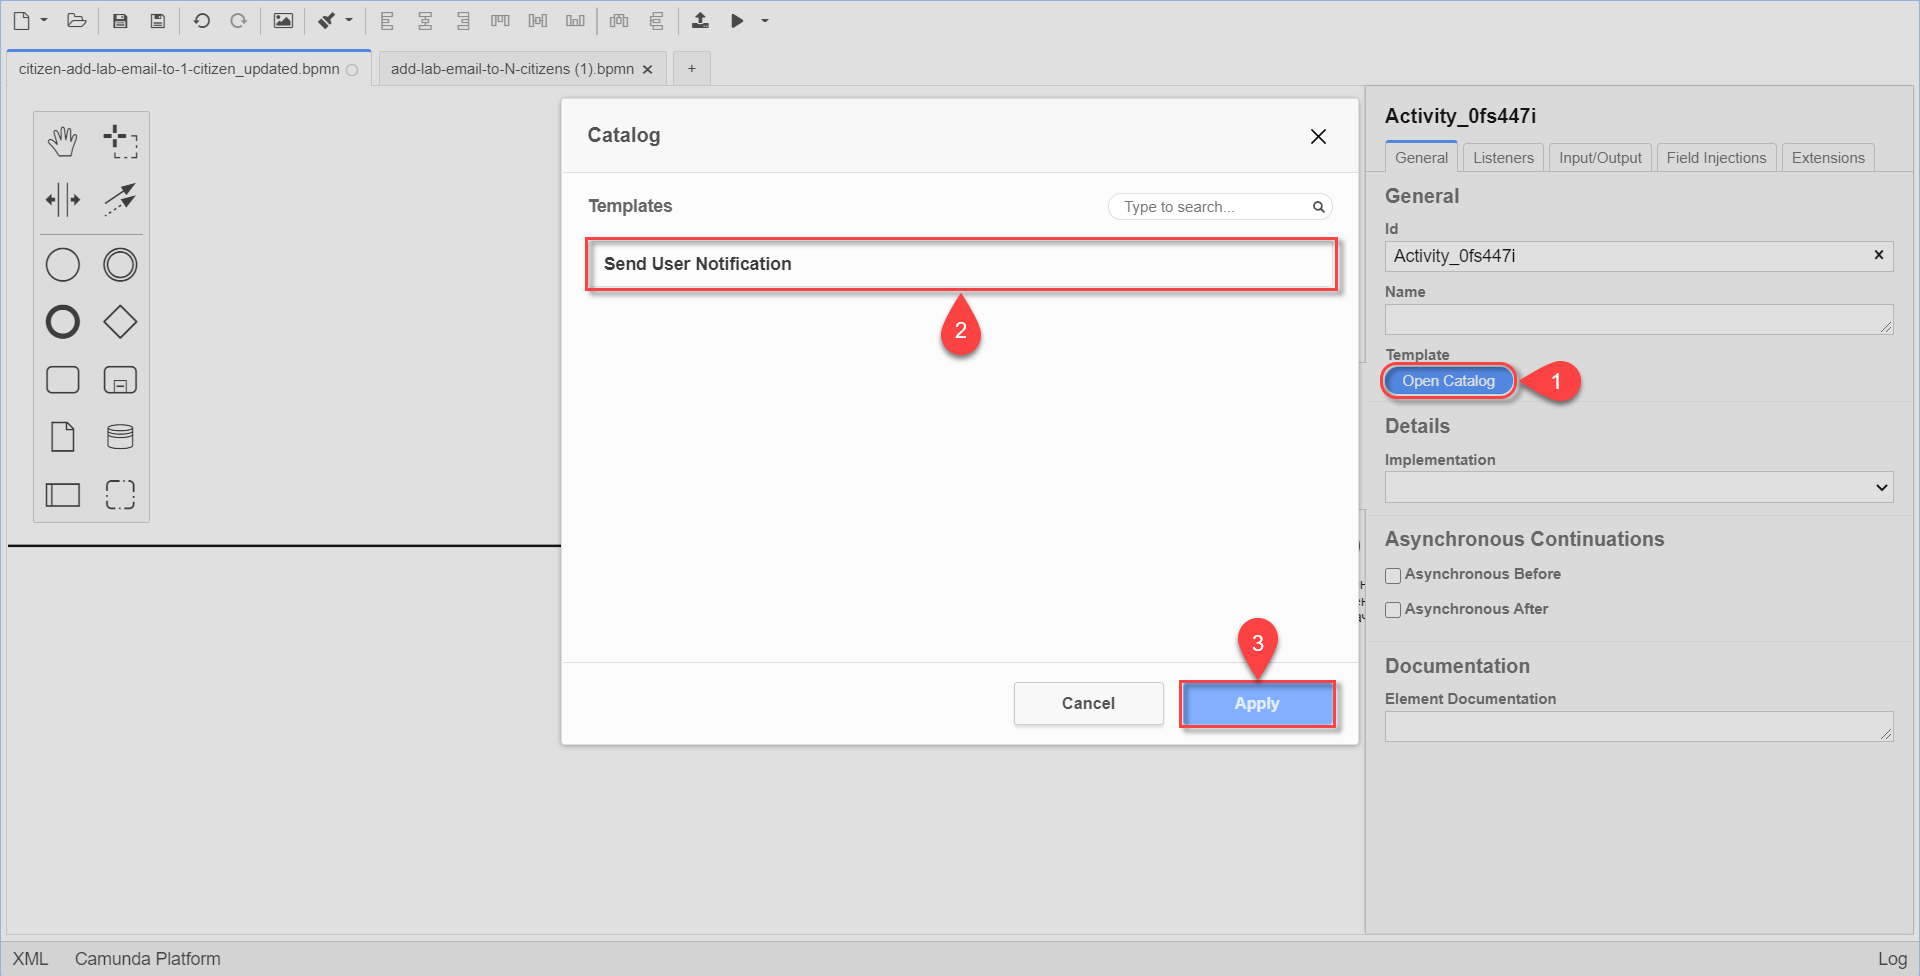
-
Set up the following options:
-
Name: Specify the task name. For example,
Sending an in-app notification. -
Recipient: Specify the notification recipient’s unique identifier (
<username>). For example,${initiator().userName}.In this case, the recipient is the user who initiated the process, specified as ${initiator().userName}. Alternatively, you set the recipient to the user who completed the task by specifying${completer('<taskDefinitionId>').userName}, where<taskDefinitionId>is the identifier of the user task. -
Subject: Specify the text subject of the notifications. For example,
Notification is generated successfully. -
Notification message template: Specify the unique name of a template to use for the body of the message. The template name must match this template’s directory name in the regulations (for example,
business-process-notification-template). -
Notification template model: Specify the variable to use for template processing —
${templateModel}.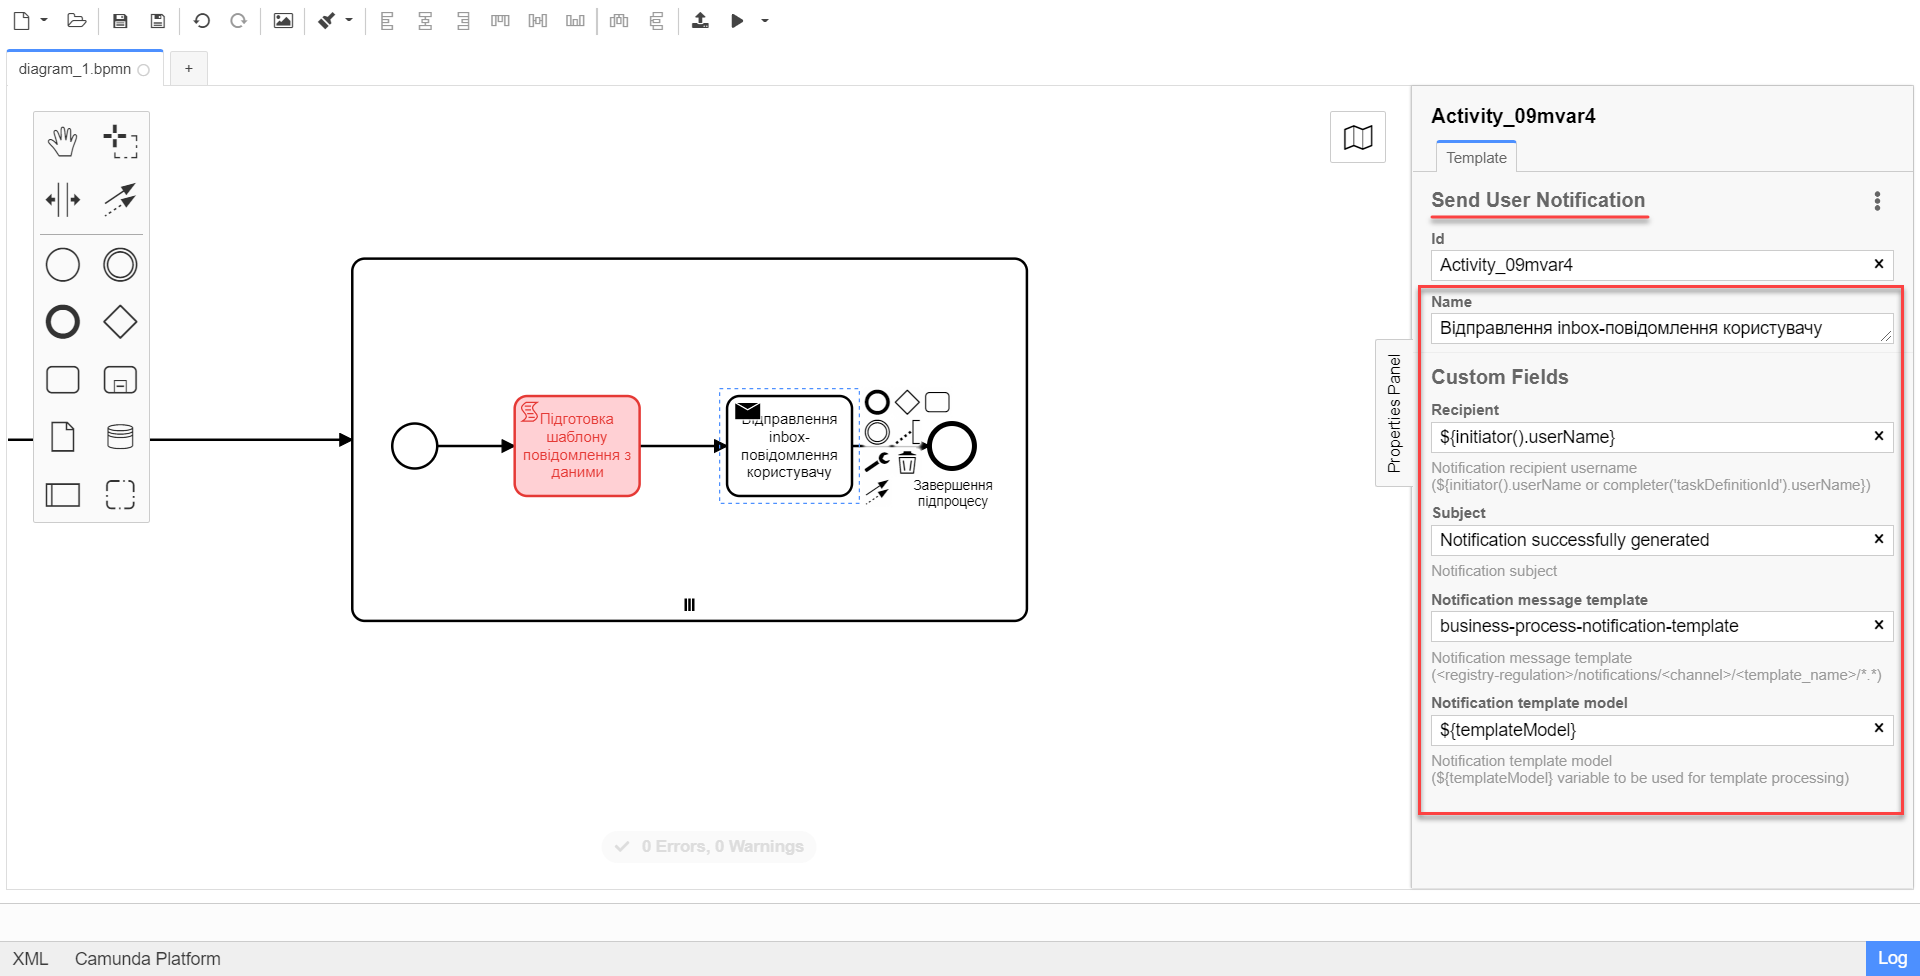
A user can read the notifications in the citizen portal in the Notifications section.
-
For details, see Sending inbox messages to users.
-
3.2. Notifying multiple users
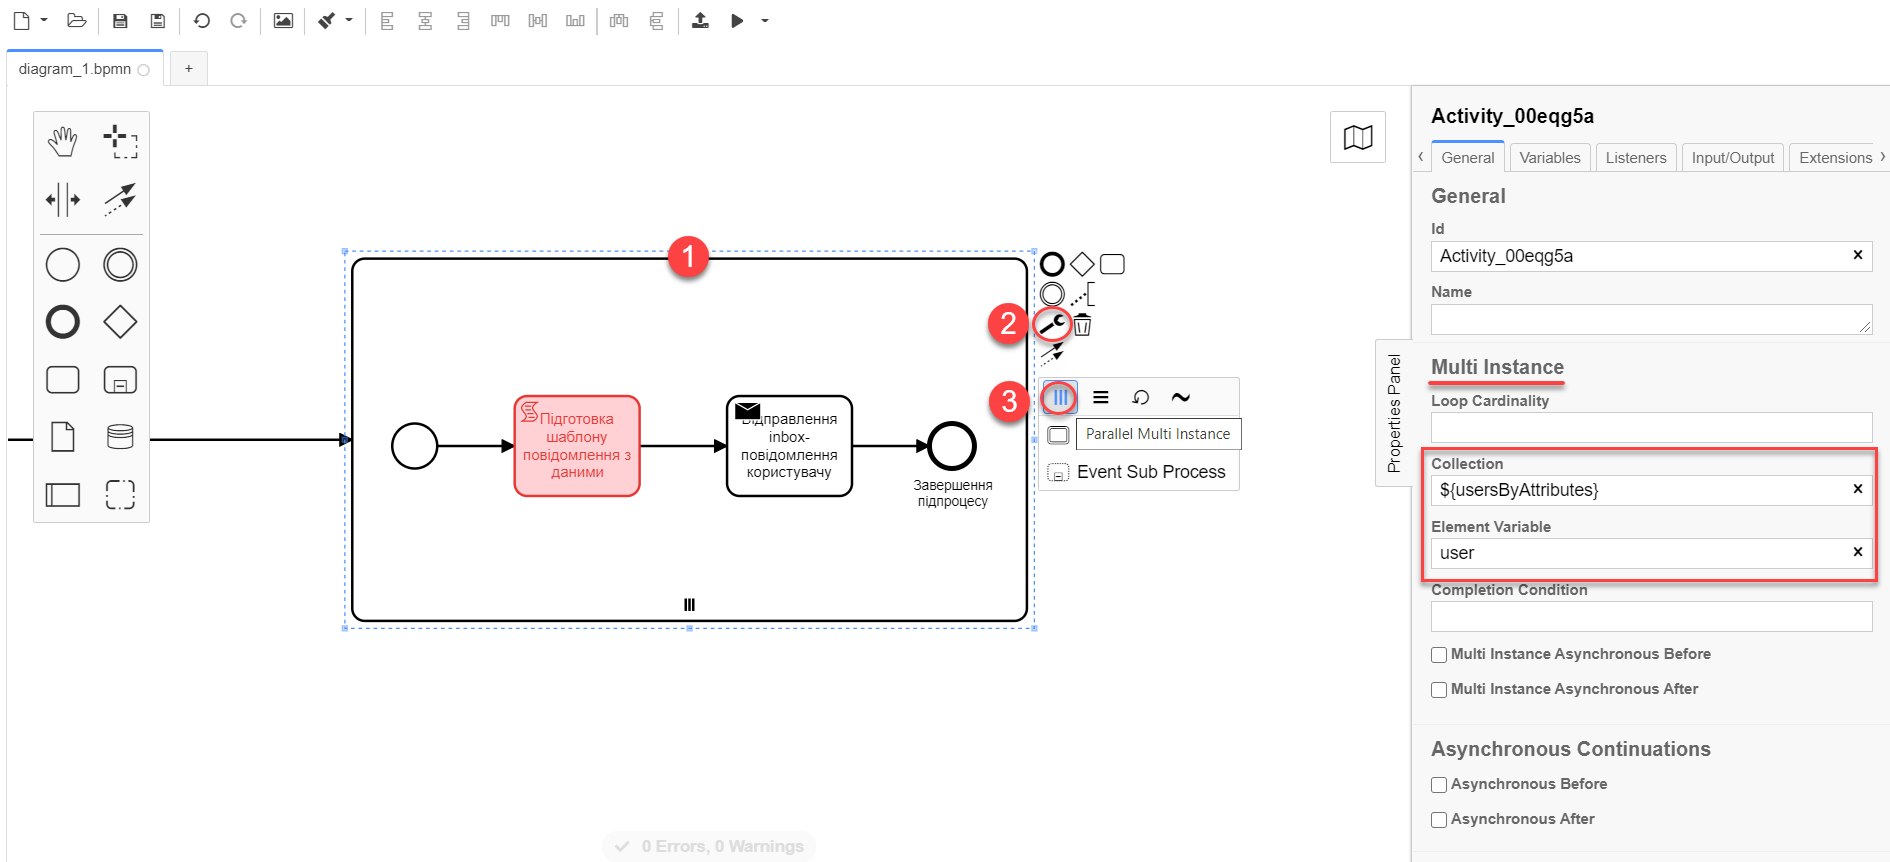
To notify multiple users, you need to model a business process similarly to notifying a single user, but this time using the Multi-Instance function. This function allows sending messages to all users in an array simultaneously.
-
In the Collection field, specify the array of users obtained via Keycloak service attributes. In our example, the array is stored in the
${usersByAttributes}variable, so we enter it here.In our example, we use the ${usersByAttributes}variable, which already contains an array of usernames from the business process. Alternatively, you can provide usernames as comma-separated values. For example:username1,username2,username3. -
In the Element Variable field, specify the local instance variable under the given name.
The message-sending process does not block the main flow of the business process and runs asynchronously.
|
For details on the |
3.3. Related delegates for getting usernames
You can obtain a list of citizens to send notifications to using the following standard extension for service tasks:
-
The
getCitizenUsersByAttributesFromKeycloakdelegate is used to find citizen portal users in Keycloak by their attributes.
|
For details on setting up the delegate, see Finding citizens in Keycloak by their attributes. |
4. Notifications logging
Successful or failed attempts to send a notification are logged in the audit log and saved to the audit database.
|
You can manually view notification events in the |
Logging a successful notification event in the audit DB
{
  "result": "SUCCESS",
  "notification": {
    "channel": "inbox",
    "subject": "A notification from the Bureau of Credit Histories",
    "message": "Information about a new credit agreement was added to the credit history:\neffective date - Wed Jul 26 12:54:51 UTC 1978, creditor - auto-user-notification-f278366.\nIn case of fraud or creditor's mistake, you can file a dispute in the credit history.",
    "recipient": {
      "id": "auto-user-notification-f",
      "email": null
    }
  },
  "delivery": {
    "channel": "inbox",
    "status": "SUCCESS",
    "failureReason": null
  },
  "action": "SEND_USER_NOTIFICATION",
  "step": "AFTER"
}
Where:
-
The
resultparameter indicates the result of sending the message. -
The
channelparameter specifies which communication channel was used. -
The
subjectparameter indicates the subject of the message. -
The
messageparameter is the message body with business data created from the template. -
The
recipientattribute provides information about the recipient, namely their ID and email. -
The
deliveryattribute reflects the delivery status for the corresponding communication channel.
Logging a failed notification event in the audit DB
{
  "result": "FAILURE",
  "notification": {
    "context": {
      "system": "Low-code Platform",
      "application": "ddm-bpm",
      "businessProcess": "bpmn-send-inbox-with-form",
      "businessProcessDefinitionId": "bpmn-send-inbox-with-form:2:1f54abab-65b2-11ed-8fda-0a580a822841",
      "businessProcessInstanceId": "b84ceb8f-65b8-11ed-8fda-0a580a822841",
      "businessActivity": "Activity_0l2g5sf",
      "businessActivityInstanceId": "Activity_0l2g5sf:b84e9948-65b8-11ed-8fda-0a580a822841"
    },
    "notification": {
      "title": null,
      "templateName": "inbox-template-ubki111",
      "ignoreChannelPreferences": false
    },
    "recipients": [
      {
        "id": "auto-user-citizen",
        "channels": [
          {
            "channel": "diia",
            "email": null,
            "rnokpp": "1010101014"
          },
          {
            "channel": "email",
            "email": "auto1-user-citizen@inbucket.inbucket.svc.cluster.local",
            "rnokpp": null
          }
        ],
        "parameters": {
          "dateCredOpen": "inbox-template-ubki",
          "creditor": "inbox-template-ubki"
        }
      }
    ]
  },
  "delivery": {
    "channel": "inbox",
    "status": "FAILURE",
    "failureReason": "Notification template inbox-template-ubki111 not found"
  },
  "action": "SEND_USER_NOTIFICATION",
  "step": "AFTER"
}
Where:
-
The
resultparameter indicates the result of sending the message. -
The
contextparameter provides details about the business process for which the message is modeled and its components. -
The
templateNameparameter indicates which template was used to send the message. -
The
recipientsarray shows information about the recipients and communication channels. -
The
deliveryattribute reflects the delivery status for the corresponding communication channel and the failure reason.