Modeling business processes for generating excerpts in csv and docx format
| 🌐 This document is available in both English and Ukrainian. Use the language toggle in the top right corner to switch between versions. |
The description of the business process modeling mechanism is given in the example of the Registry of certified laboratories, namely in creating the "Laboratory report in csv format" excerpt. Modeling a business process for generating excerpts in the docx format is similar, except for the step where the file format is selected.
| Fulfil the required preconditions for creating a business process, follow the link for instructions. |
1. Initial steps for creating a business process
-
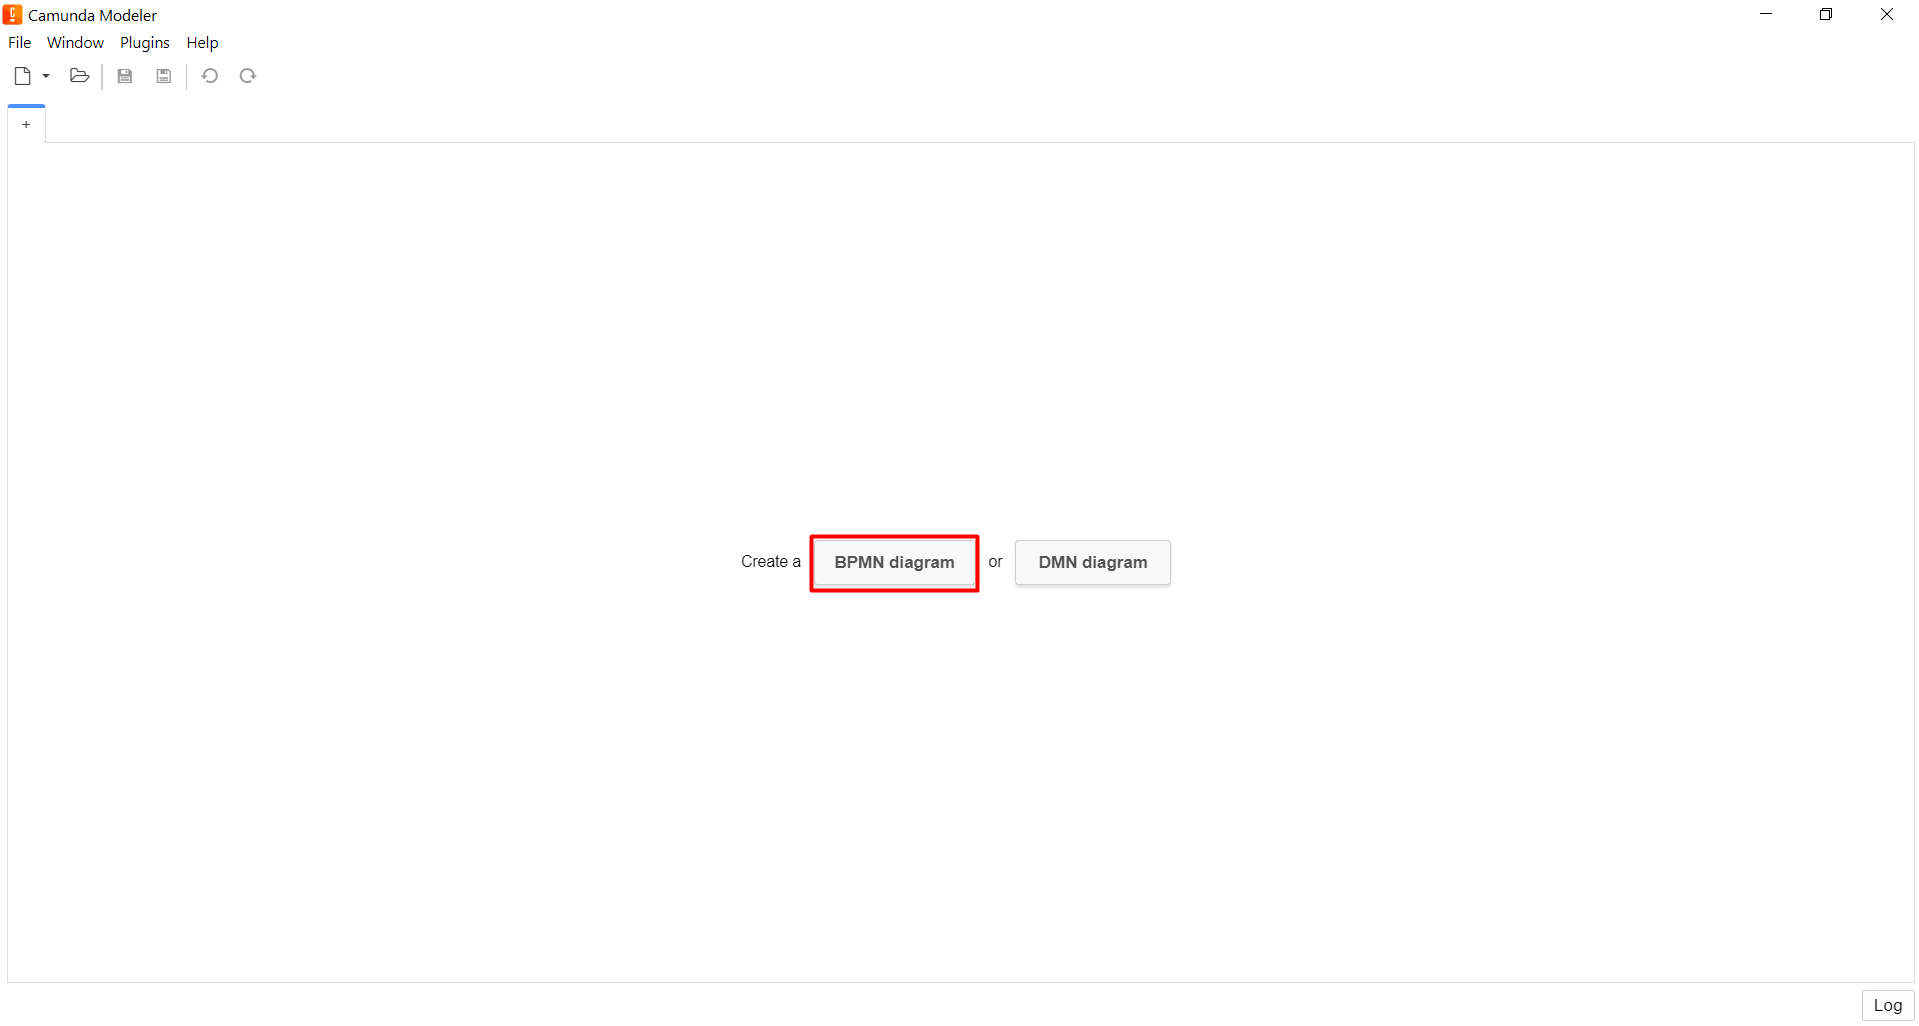
Create a new BPMN diagram.
-
Add the Create pool/Participant element.
In the right-hand side window with parameters, you have to enter the appropriate values into the fields:
-
In the
Participant Namefield, enter the pool name —Generate a report on laboratories in csv format. -
In the
Process idfield, enter the ID of the business process —zvit-csv-bp. -
In the
Process namefield, enter the business name of the process —Generate a report on laboratories in csv format.

-
-
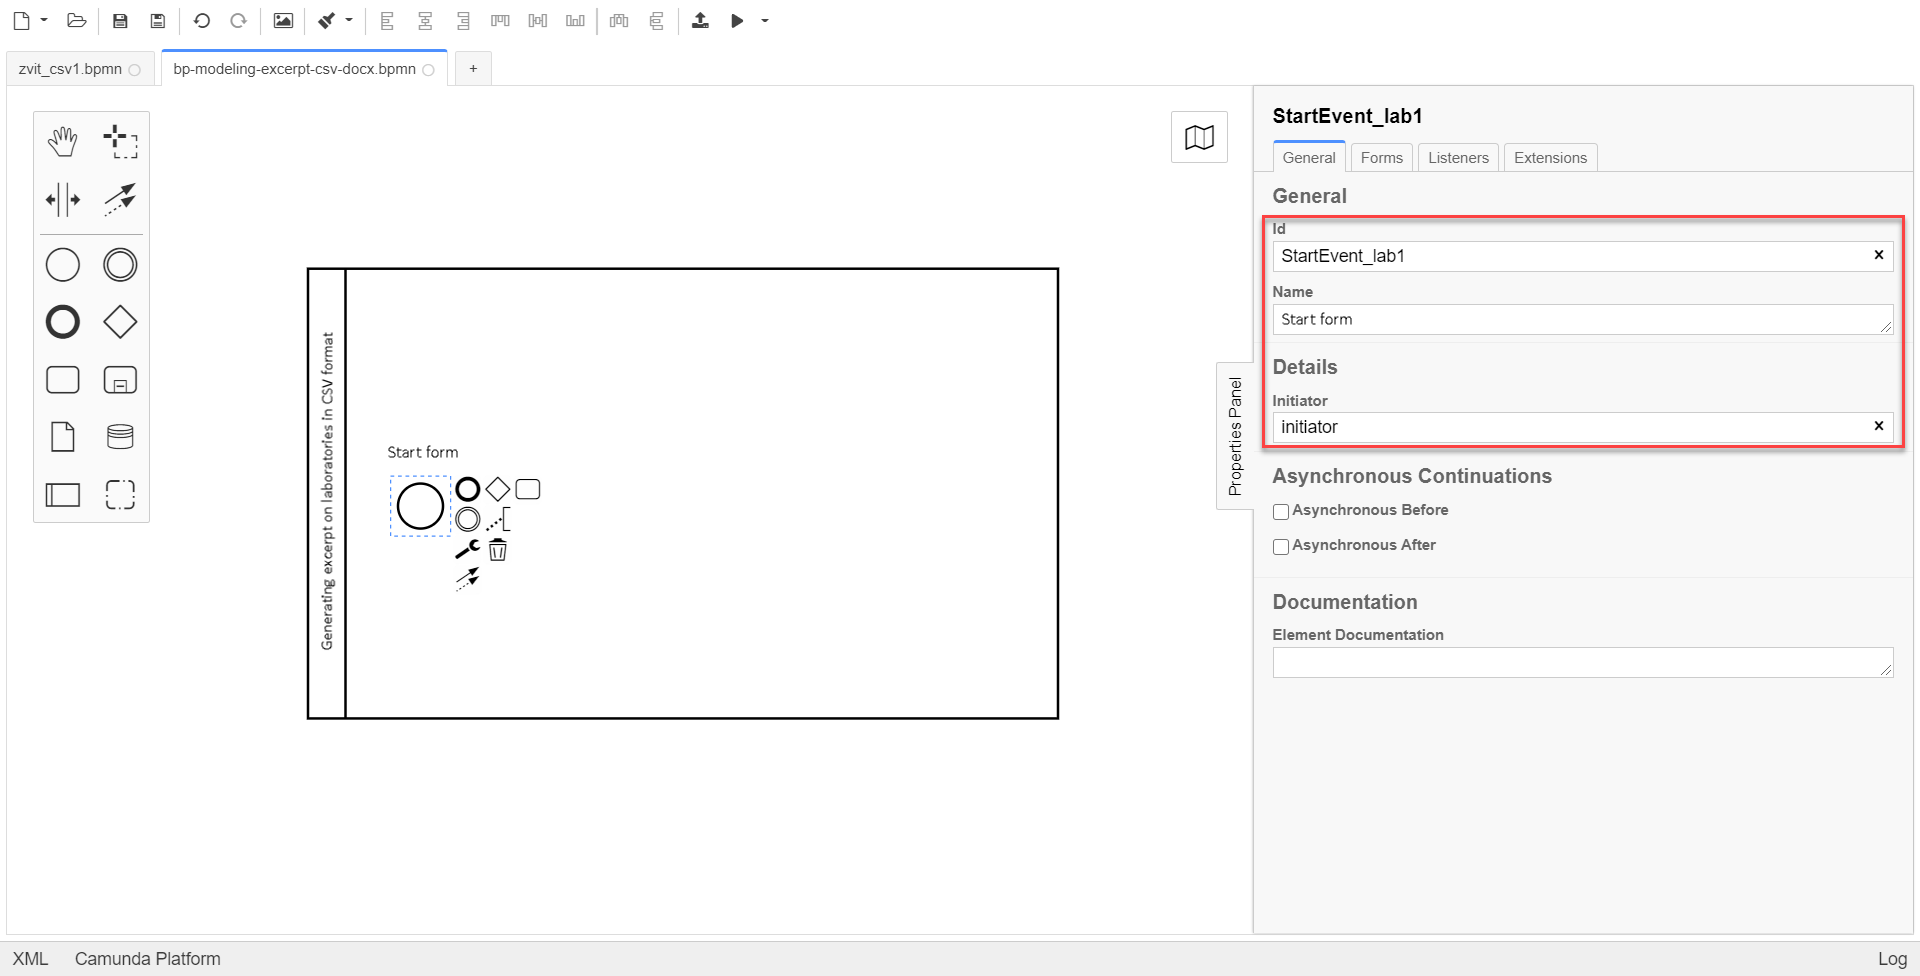
Create the start event for starting the business process by a user.
In the settings panel on the right-hand side, enter the appropriate values into the following parameters:
-
In the
Generaltab:-
In the
Idfield, enter theStartEvent_lab1value. -
In the
Namefield, enter the name of the start event —Start Form. -
in the
Initiatorfield, enter theinitiatorvalue.initiatoris a special variable set for the user, which initiated the process.
-
-
In the Form tab:
-
in the
FormKeyfield, enter the form ID —add-startform-zvit.
-
In the
FormKeyfield, enter the service name of the created UI form in the Regulations administrator portal.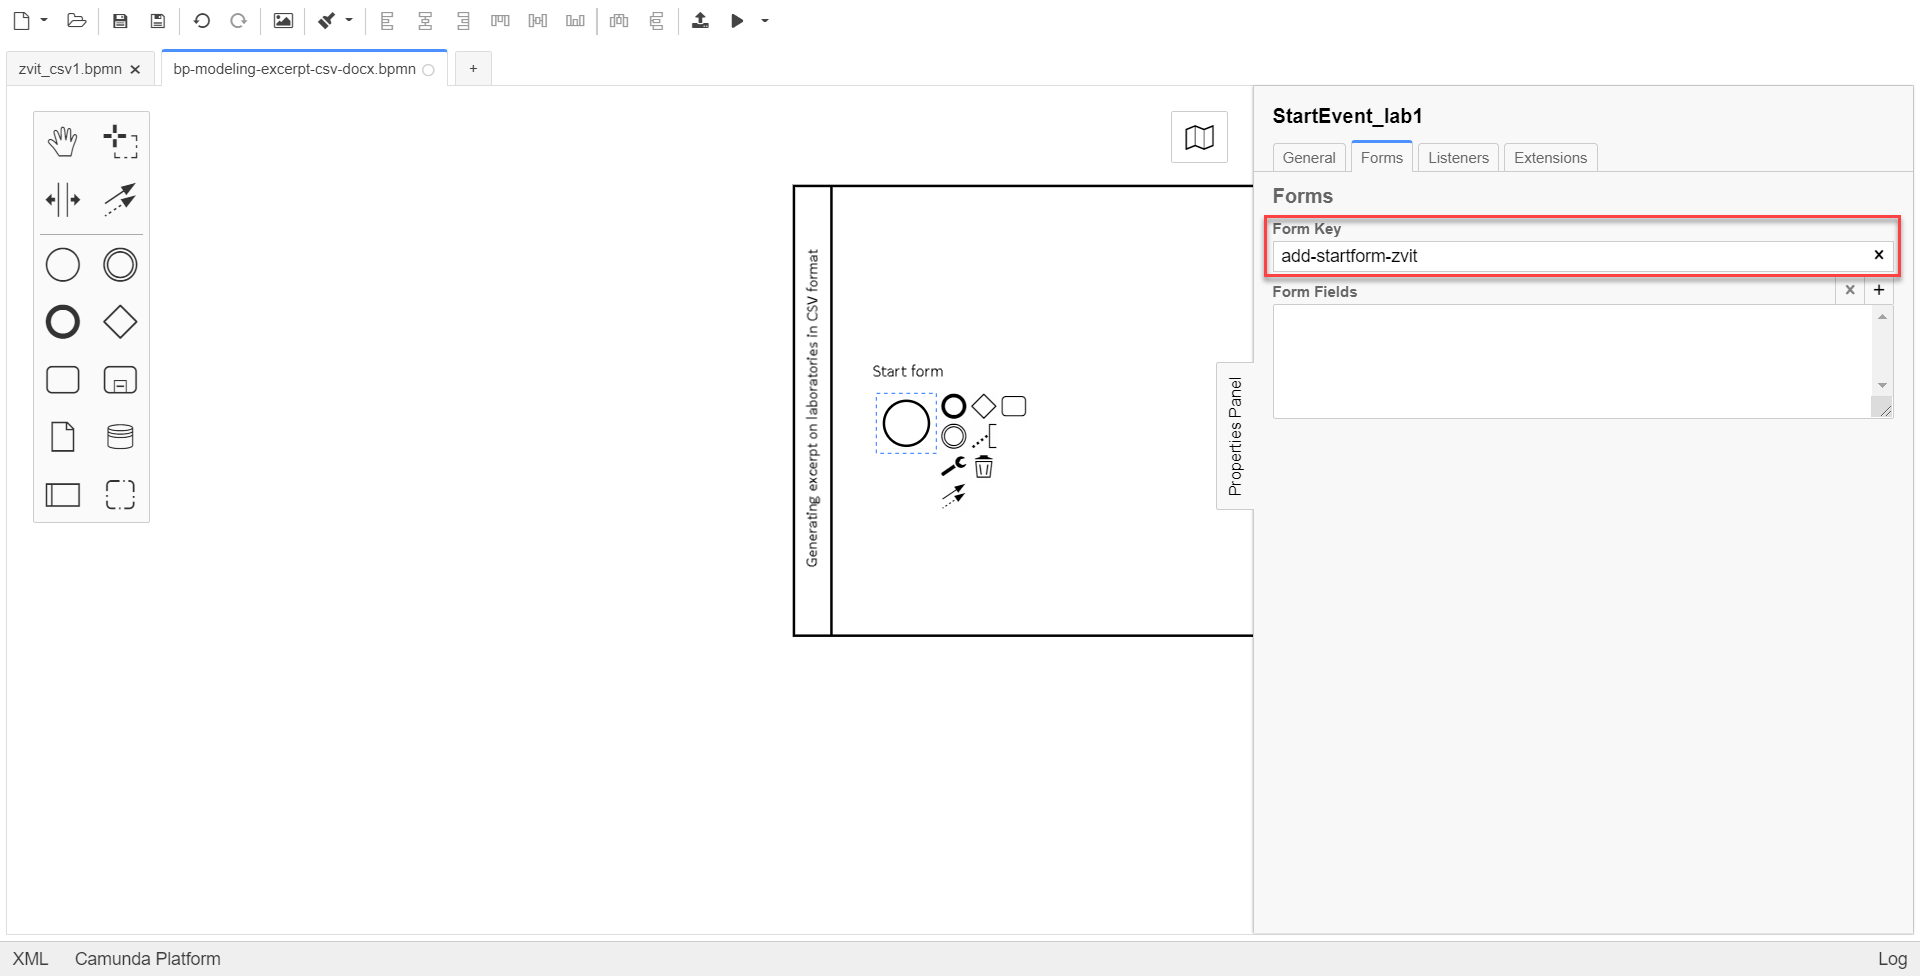
The following steps describe modeling of the start form.
-
2. Data preparation and signing
-
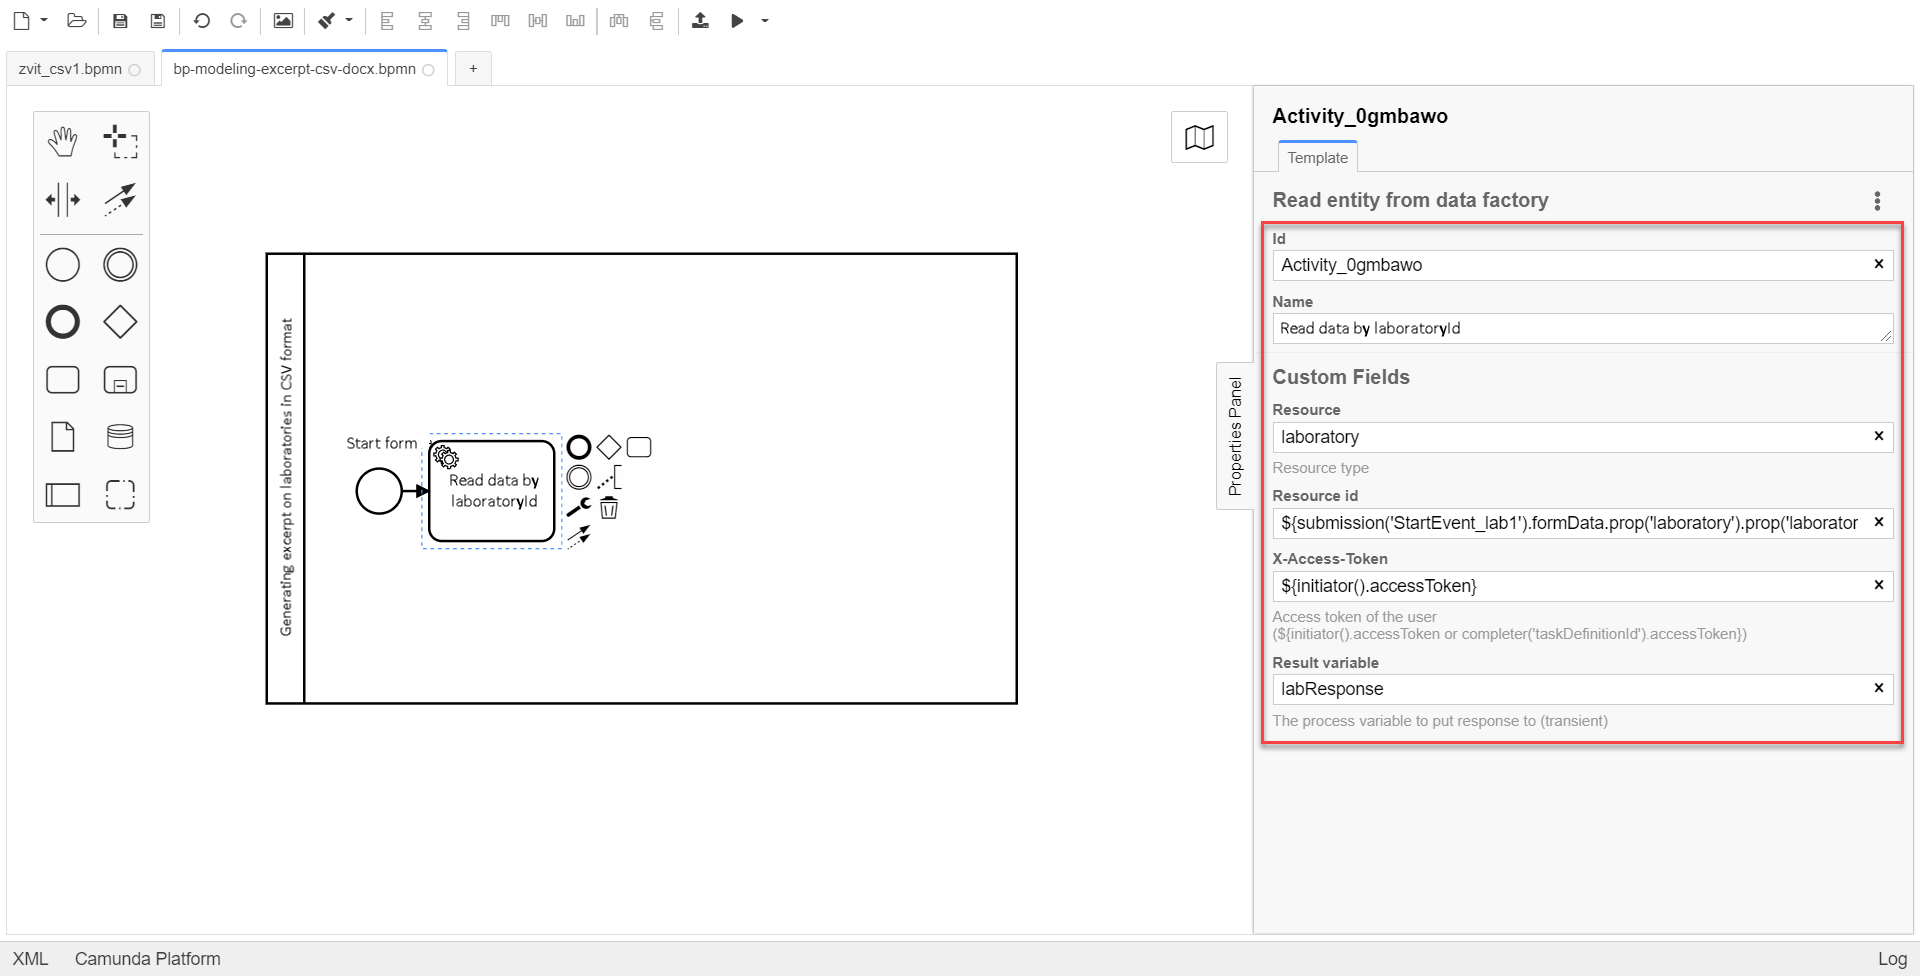
Create a service task Read data by laboratoryId.
Select the customized Read entity from data factory template.
You can find more details about this delegate on the page Read entity from data factory.
In the settings panel, enter the following values:
-
In the
Namefield, enter the name of the task —Data reading by laboratoryId. -
In the
Resourcefield, enter thelaboratoryresource. -
in the
Resource idfield, enter the resource ID —${submission('StartEvent_lab1').formData.prop('laboratory').prop('laboratoryId').value()}.In our case, we pass the
StartEvent_lab1resource identifier from the start form of the business process using thesubmission()function. -
In the
X-Access-Tokenfield, specify the access token to the user’s system that is used to perform the${initiator().accessToken}operation. -
In the
Result Variablefield, enter the output parameter name —labResponse.
-
-
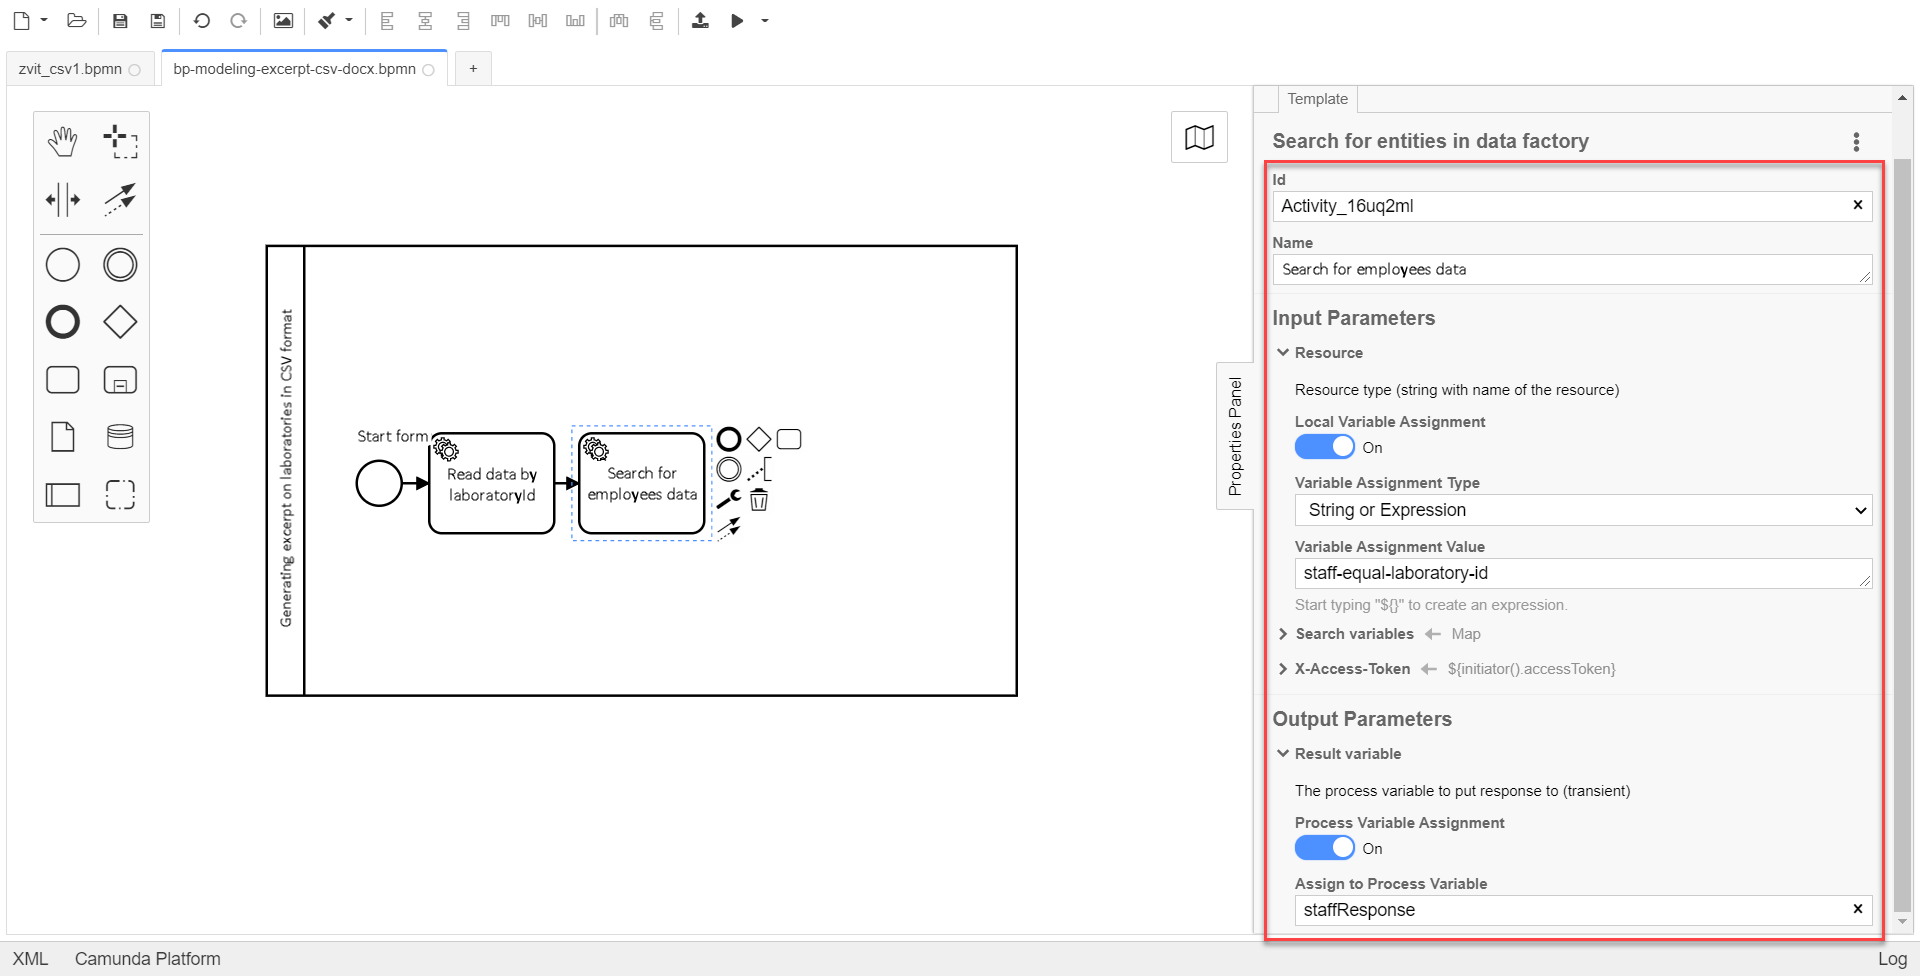
Create the Search for employees data service task.
Select the configured Search for entities in data factory template.
You can find more details about this delegate on the page Search for entities in data factory.
In the settings panel, enter the following values:
-
In the
Namefield, enter the name of the task —Search for employees data. -
In the
Input Parameterssection:-
Expand the
Resourceblock:-
Local Variable Assignmentis set toon. This allows creation of a local variable for the request body. -
Variable Assignment Type, select theString of Expressionvariable assignment type from the dropdown list. -
Variable Assignment Value, enterstaff-equal-laboratory-id.
-
staff-equal-laboratory-idis the endpoint name for the search criteria, where a request is made to find entities.-
Expand the
Search variableblock:-
Local Variable Assignmenthas theonvalue. -
Variable Assignment Type, selectMap. -
Add Entry, enterlaboratoryIdinKey, and enter${submission('StartEvent_lab1').formData.prop('laboratory').prop('laboratoryId').value()}inValue.
-
-
Expand the
X-Access-Tokenblock:-
Local Variable Assignmenthas theonvalue. -
Variable Assignment Type, selectString of Expression. -
Variable Assignment Value, enter${initiator().accessToken}.
-
-
-
In the
Output Parameterssection:-
Expand the
Result variableblock:-
Local Variable Assignmenthas theonvalue. -
Assign to Process Variable, enter the value of the variable used for writing the request result —staffResponse.
-
-
-
-
Create the Prepare data for displaying script task.
In the settings panel, enter the following values:
-
In the
Namefield, enter thePrepare data for displayingname. -
In the
Script Formatfield, enter the script type (language) —groovy. -
In the
Script Typefield, select the script type —Inline Script. -
In the
Scriptfield, insert the following groovy script:def labResponseBody = labResponse.responseBody def payload = [:] def personnelGrid = [] def addPersonPropClosure = { person, staffIt, key -> if (staffIt.hasProp(key)) { if (!staffIt.prop(key).isNull()) { person[key] = staffIt.prop(key).value() } } } staffResponse.responseBody.elements().each { def person = [:] addPersonPropClosure(person, it, 'fullName') addPersonPropClosure(person, it, 'specializationDate') addPersonPropClosure(person, it, 'salary') addPersonPropClosure(person, it, 'hygienistFlag') addPersonPropClosure(person, it, 'fullTimeFlag') personnelGrid.add(person) } payload['name'] = labResponseBody .prop('name').value() payload['edrpou'] = labResponseBody .prop('edrpou').value() payload['address'] = labResponseBody .prop('address').value() payload['headName'] = labResponseBody .prop('headName').value() payload['personnelGrid'] = personnelGrid execution.removeVariable('payload') set_transient_variable('payload', S(payload, 'application/json'))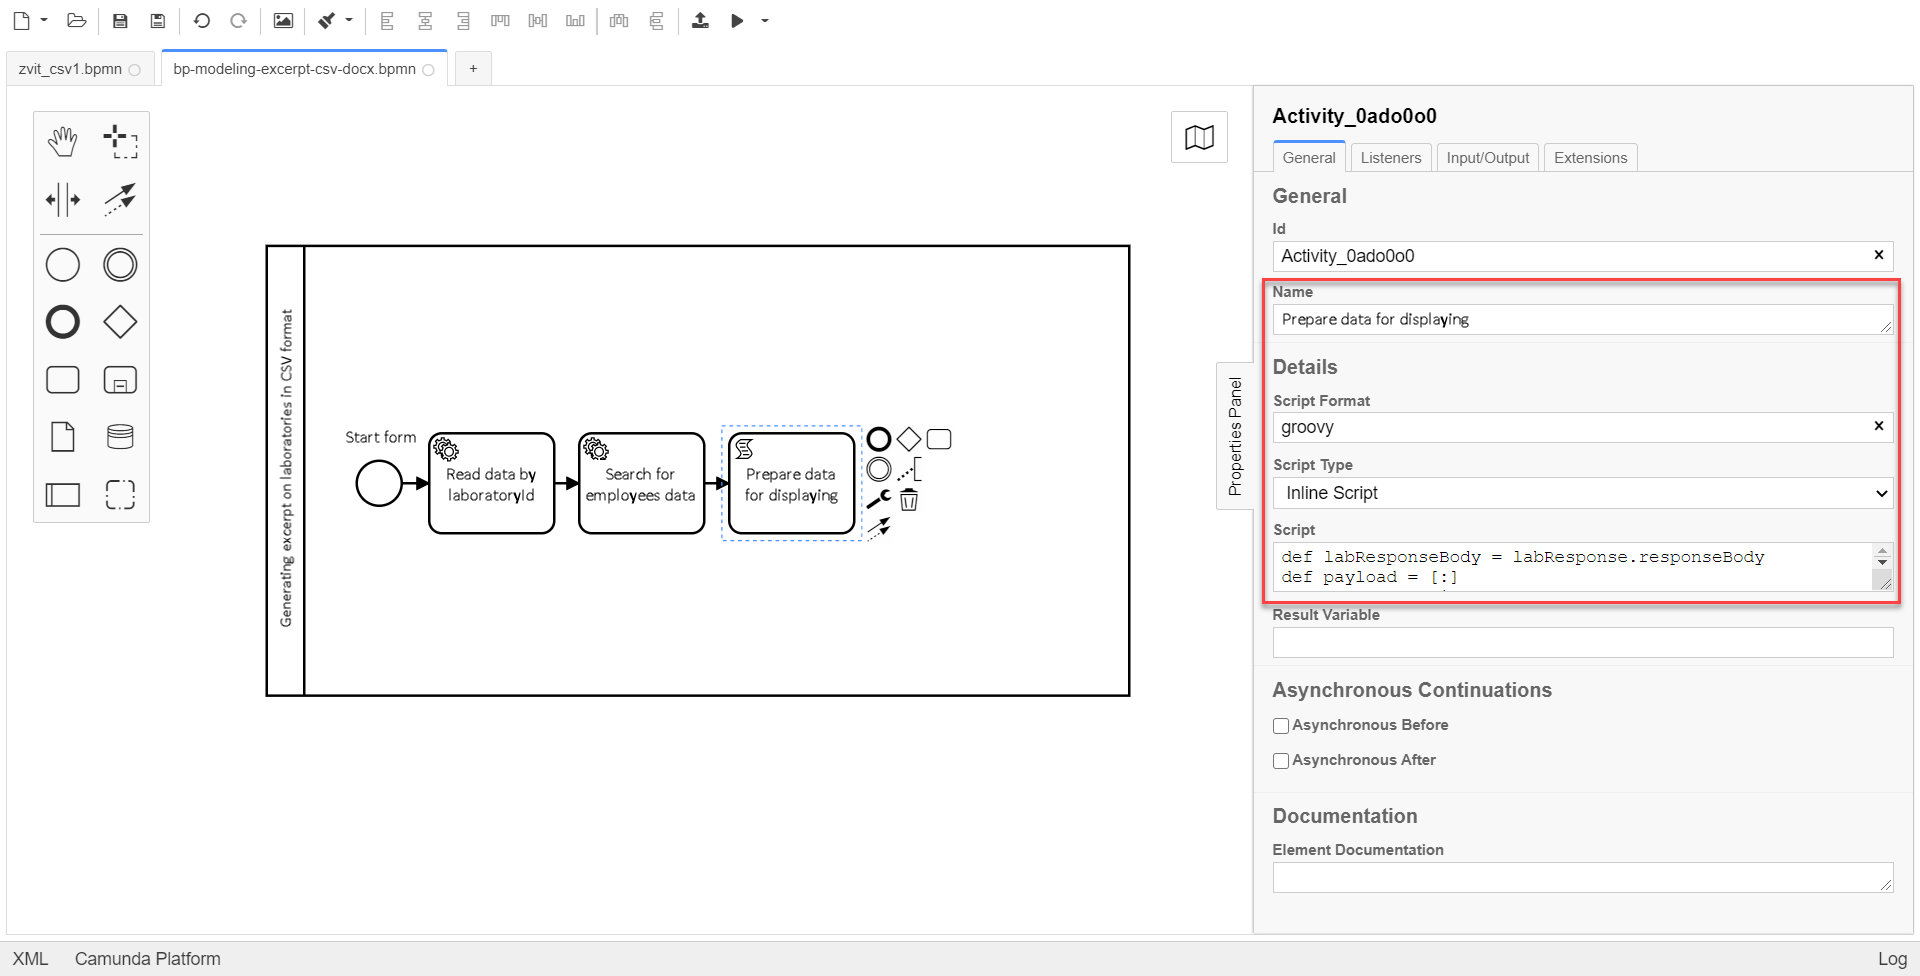
-
-
Create the Display personnel data custom task.
In the settings panel, set the following values:
-
In the
Idfield, enter thepersonnelDataZvitFormvalue. -
In the
Namefield, enter theDisplay personnel dataname. -
In the
Form keyfield, enter theread-personnel-data-zvitvalue.
In the
FormKeyfield, you have to enter the service name of the created UI form in the Regulations administrator portal.The following steps describe modeling of the personnel data display form.
-
In the
Assigneefield, enter the${initiator}value.${initiator}indicates that the business process will be assigned to the user who initiated the business process. -
In the
Form data pre-populationfield, enter the${payload}value.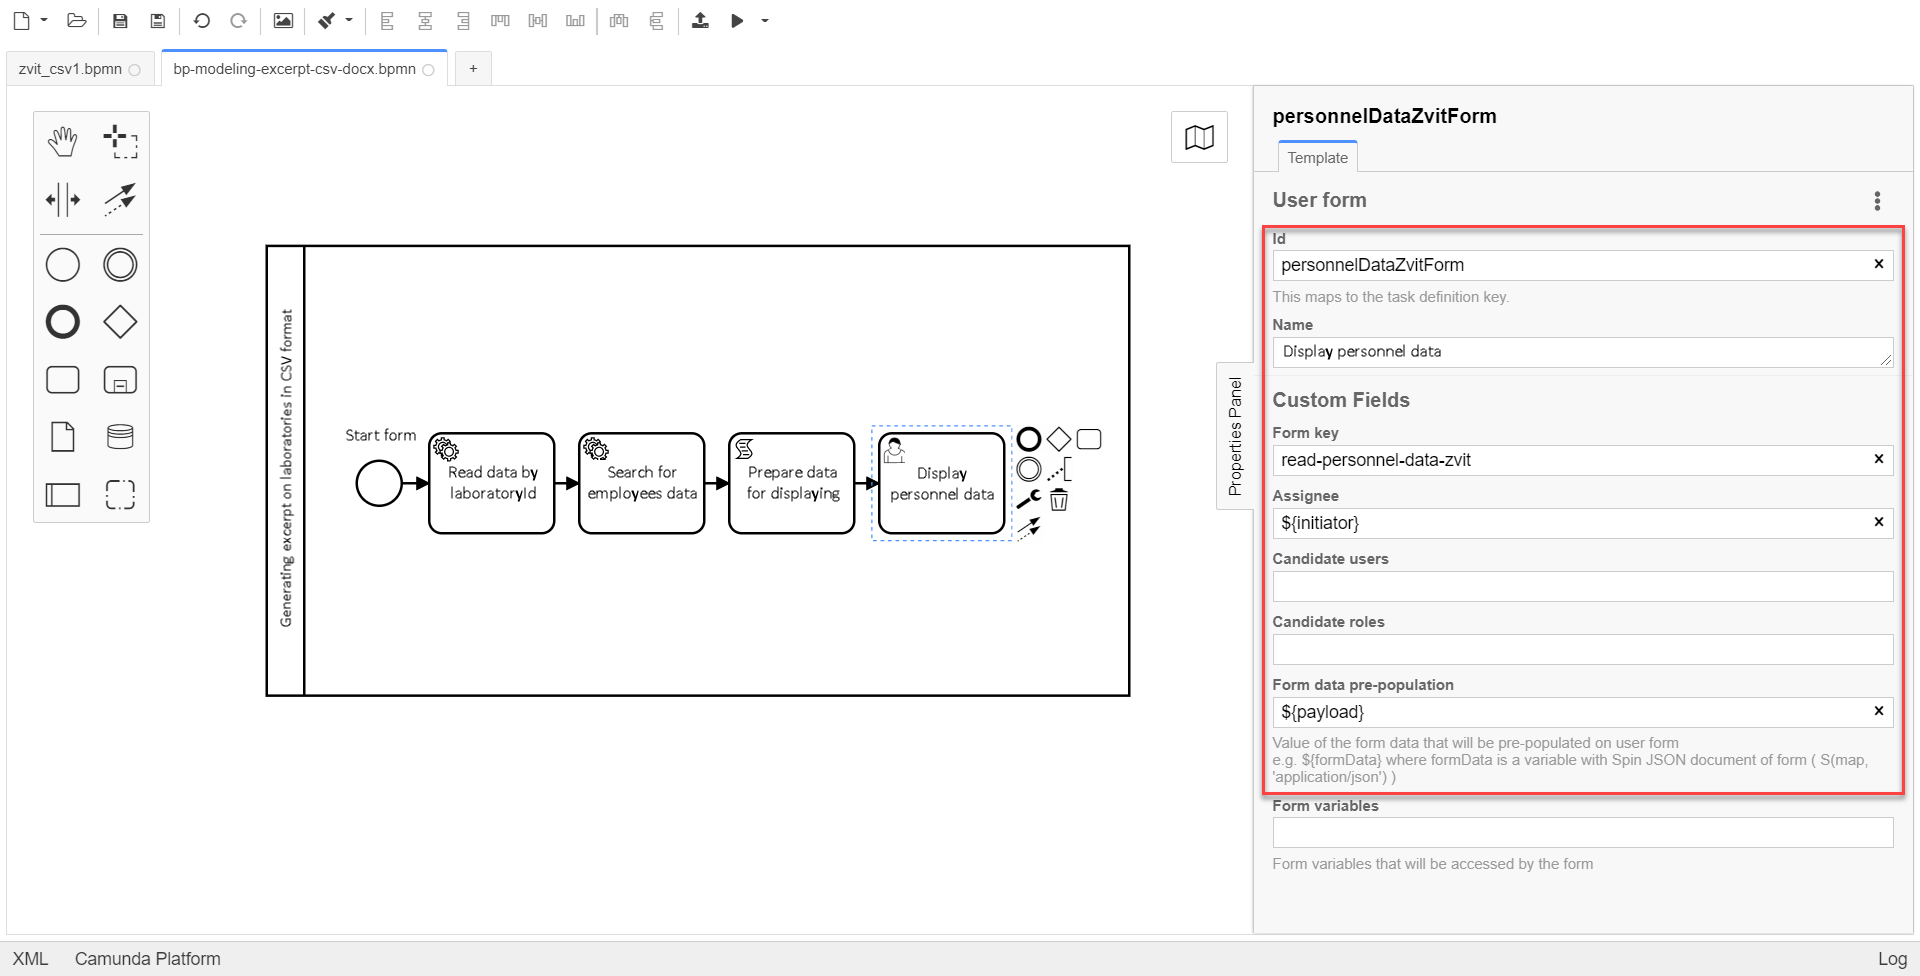
-
-
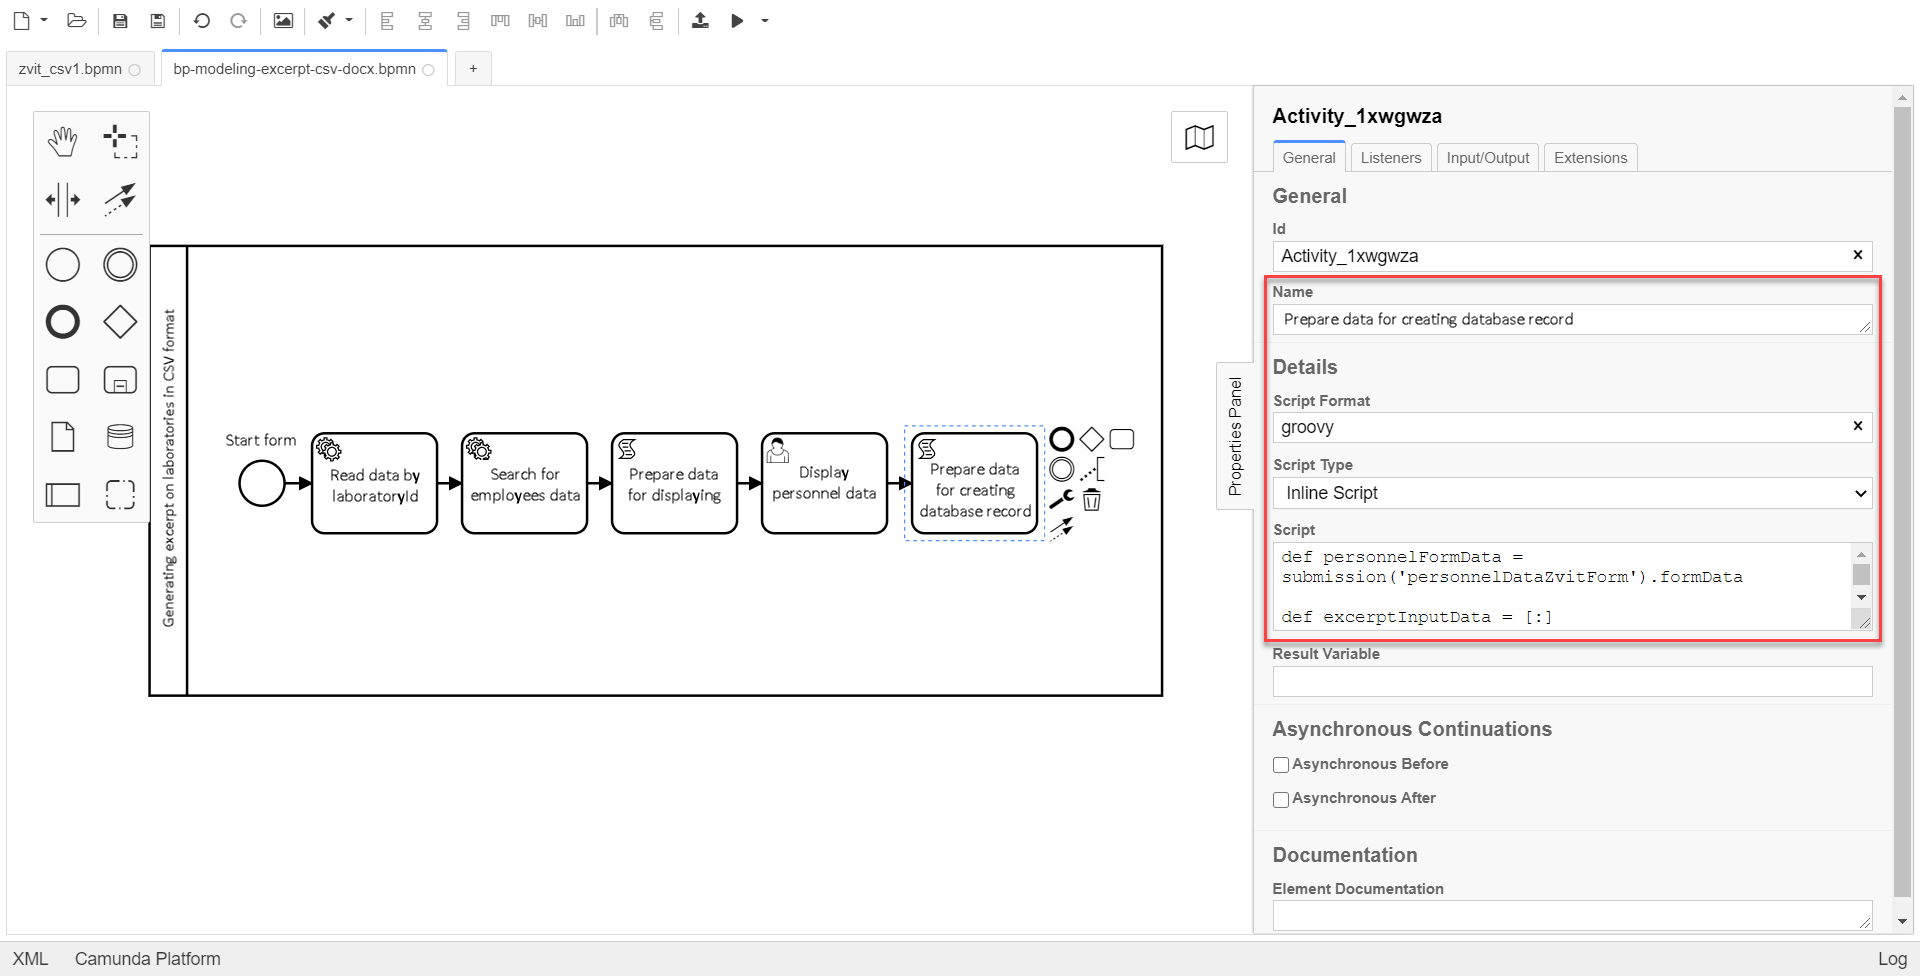
Create the Prepare data for creating database record (transient var) script task.
In the settings panel, set the following values:
-
In the
Namefield, enter thePrepare data for creating database record (transient var)value. -
In the
Script Formatfield, enter the script type (language) —groovy. -
In the
Script Typefield, select theInline Scriptscript type. -
In the
Scriptfield, insert the following groovy script:def personnelFormData = submission('personnelDataZvitForm').formData def excerptInputData = [:] def requests = [] def prepopulatedDataMap = [:] prepopulatedDataMap['name'] = personnelFormData.prop('name').value() prepopulatedDataMap['address'] = personnelFormData.prop('address').value() prepopulatedDataMap['headName'] = personnelFormData.prop('headName').value() prepopulatedDataMap['edrpou'] = personnelFormData.prop('edrpou').value() personnelFormData.prop('personnelGrid').elements().each { def request = [:] request.putAll(prepopulatedDataMap) it.fieldNames().each { fieldName -> request[fieldName] = it.prop(fieldName).value() } request['hygienistFlag'] = it.prop('hygienistFlag').boolValue() ? '1' : '0' request['fullTimeFlag'] = it.prop('fullTimeFlag').boolValue() ? '1' : '0' requests.add(request) } excerptInputData['requests'] = requests def request = [:] request['recordId'] = null request['excerptType'] = 'lab-staff-excerpt-csv' request['excerptInputData'] = excerptInputData request['requiresSystemSignature'] = false def payload = S(request, 'application/json') execution.removeVariable('payload') set_transient_variable('payload', payload) execution.removeVariable('excerpt') set_transient_variable('excerpt', excerptInputData)
-
-
Add a service task for data signing with the system key.
For a detailed overview of the delegate description for signing data with the system key, follow this link.
Select the configured template Digital signature by DSO service.
In the settings panel, specify the following values:
-
In the Name field, indicate the task name
Sign data with the system key. -
In the Payload field, enter the data to be signed —
${payload}. -
In the X-Access-Token source field, indicate the user access token under which the operation is performed —
${initiator().accessToken}. -
In the Result variable field, specify the variable name
system_signature_ceph_key, to which the system signing key should be saved.
-
3. Generating a report
-
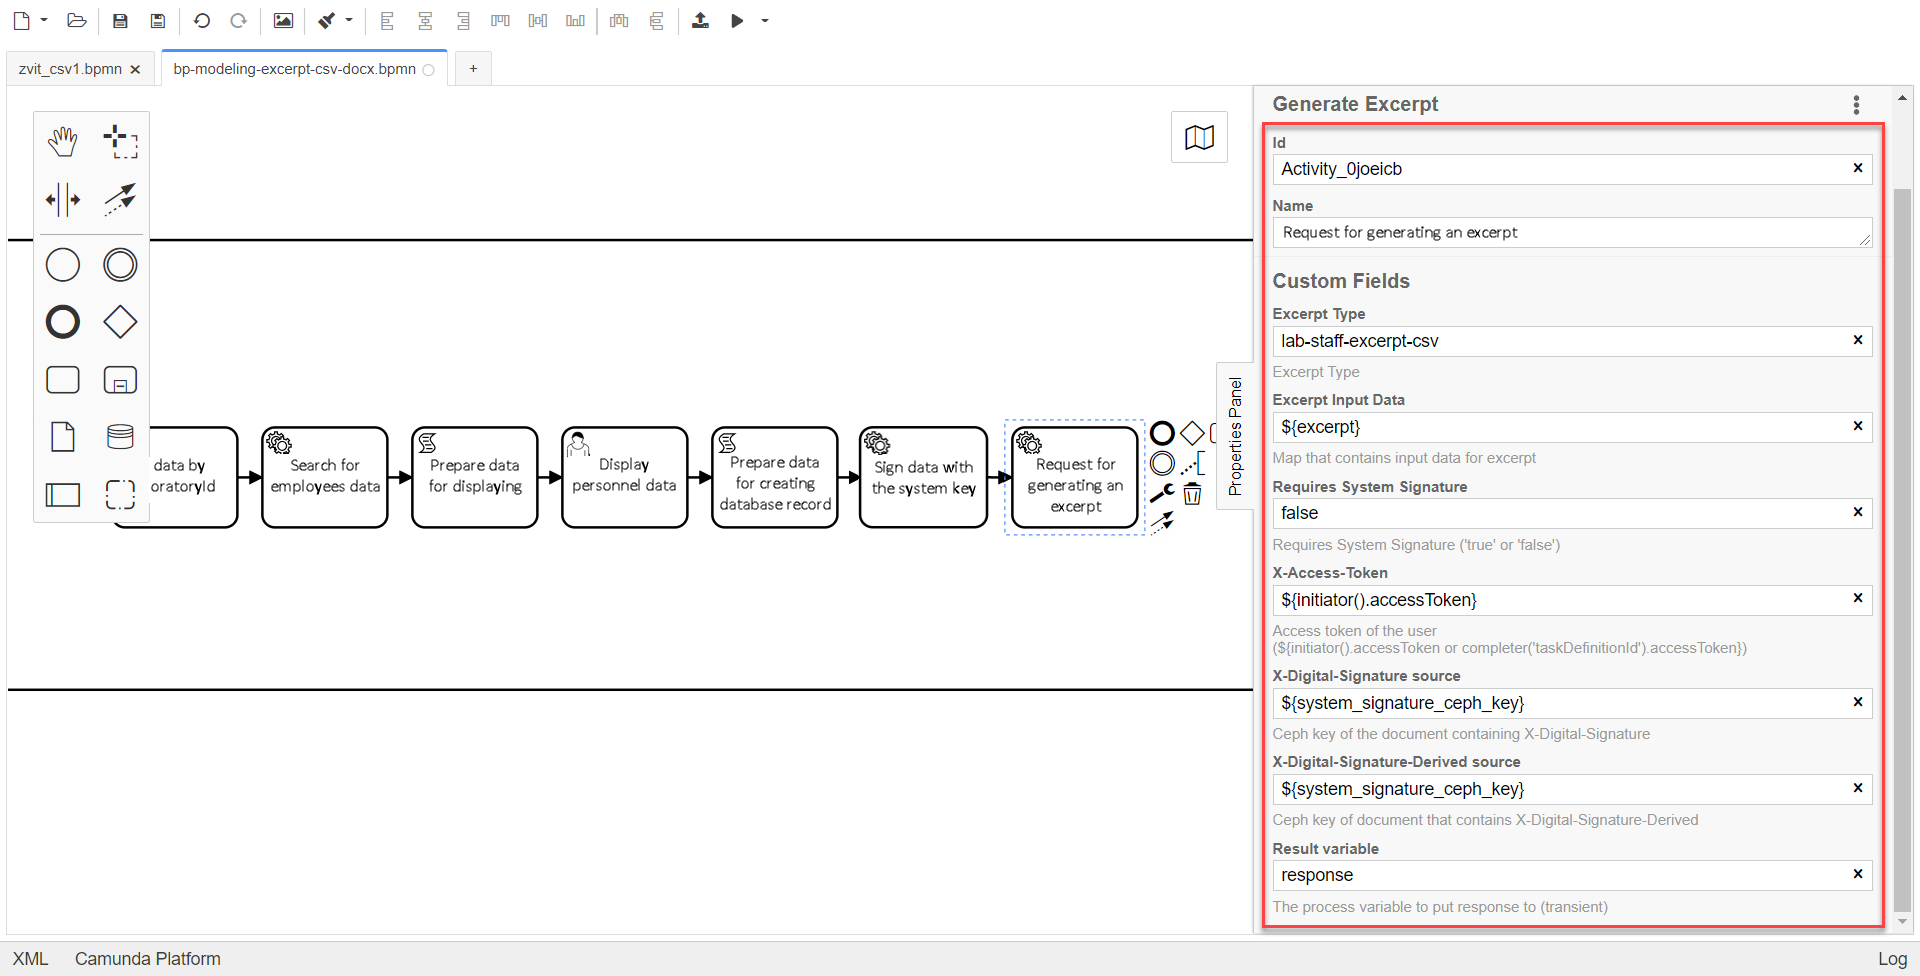
Create a service task Request for generating an excerpt.
Select the `Generate Excerpt' configured template.
-
In the
Name field, enter theRequest for generating an excerptname. -
In the
Excerpt Typefield, enter the name of the file that defines the format —lab-staff-excerpt-csv. -
In the
Excerpt Input Datafield, enter the${excerpt}value. -
In the
Requires System Signaturefield, enter thefalsevalue.A possibility to sign excerpt data in .csv and .docx formats using a system key is not available. Therefore, the
Requires System Signatureparameter should contain thefalsevalue by default. Iftrueis set, the business process will not run. Signing using the system key is only available for the .pdf format. -
In the
X-Access-Tokenfield, enter the token to access the user system, which is used to perform the${initiator().accessToken}operation. -
In the
X-Digital-Signature sourcefield, enter the source of the digital signature —${sign_submission('StartEvent_lab1').signatureDocumentId}. -
In the
X-Digital-Signature-Derived sourcefield, enter the source of the system digital signature —${system_signature_ceph_key}. -
In the
Result variablefield, enter theresponseoutput parameter name.
-
|
The data transmitted to generate the |
-
Create a file in the root of the cluster, placing it in the corresponding project directory.
The file name has to be identical to the name entered in
Excerpt Type(at the previous step). In our example, that islab-staff-excerpt-csv.csv.At this stage, the .csv and .docx file format is determined.
-
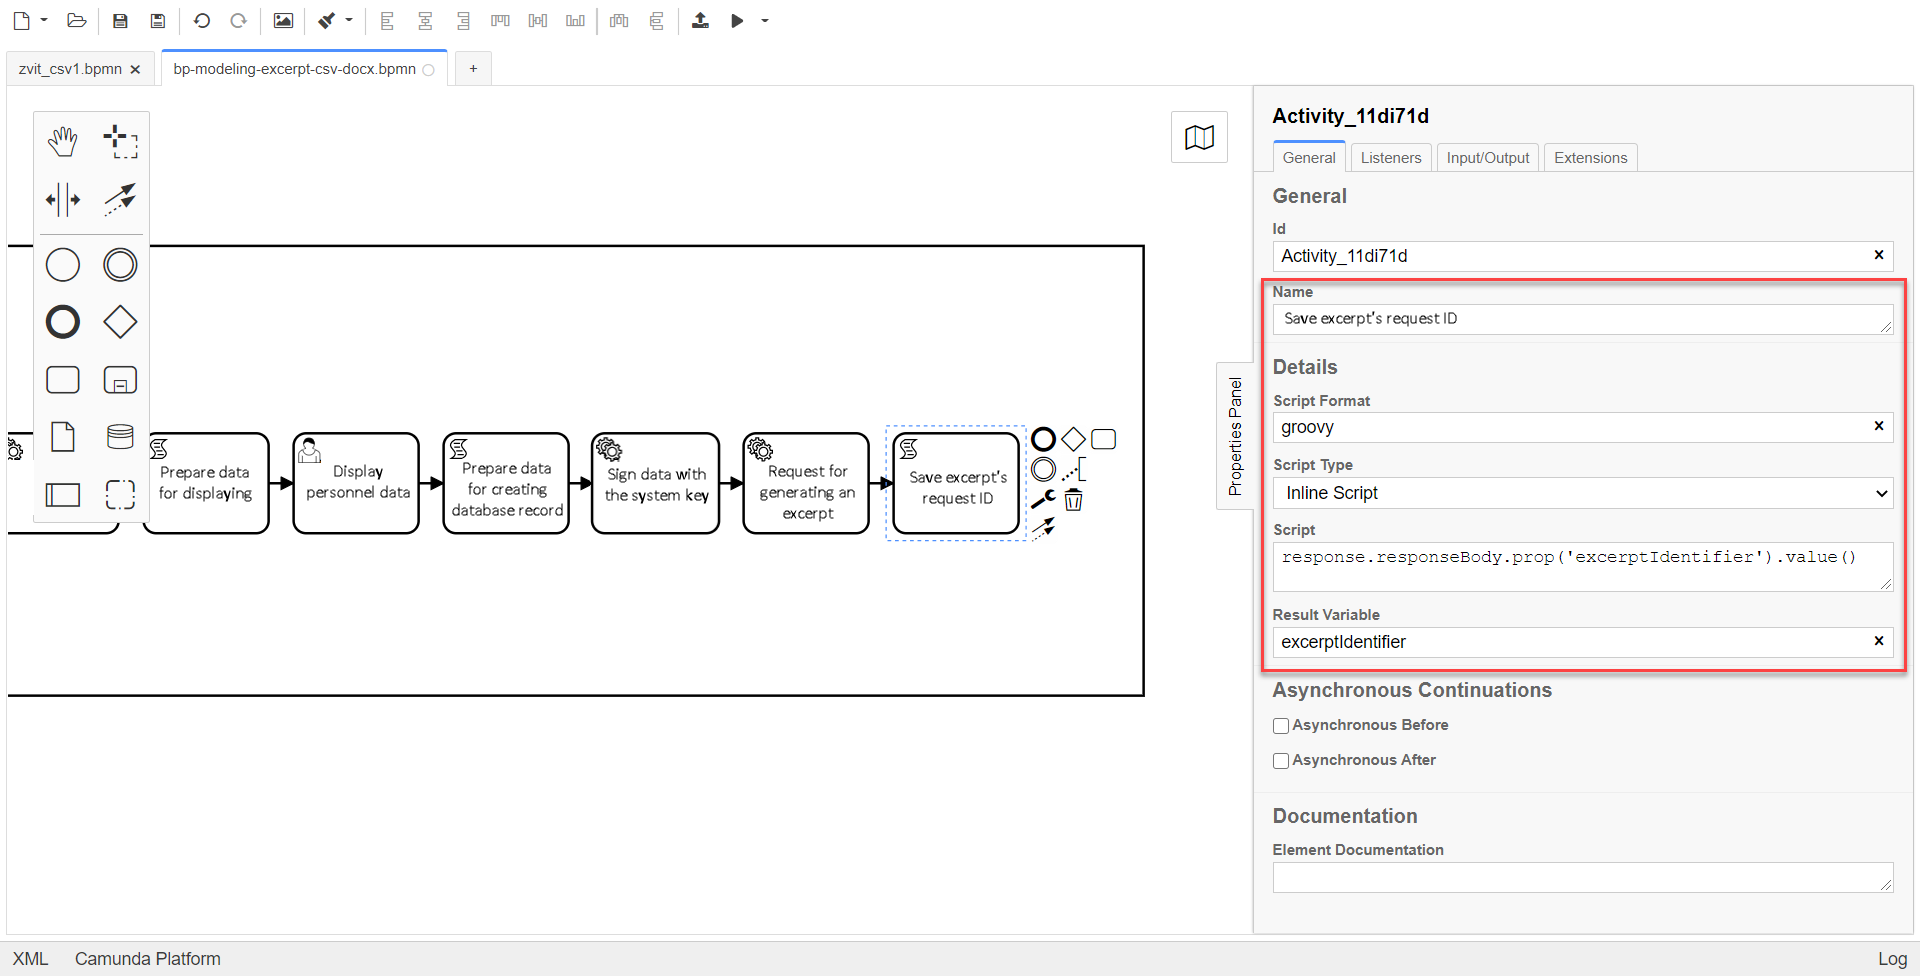
Create a "Save excerpt’s request ID" script task.
In the settings panel, set the following values:
-
In the
Namefield, enter the name of the task — Save excerpt’s request ID. -
In the
Script Formatfield, enter the script type (language) —groovy. -
In the
Script Typefield, select theInline Scriptscript type. -
In the
Scriptfield, insert the following groovy script:response.responseBody.prop('excerptIdentifier').value() -
In the
Result Variablefield, enter the name of the variable to which the extract identifier will be written, —excerptIdentifier.
-
4. Setting the conditions of the output generation result checks
-
Add the task for calling an external business process (Call Activity) "Check excerpt generation status".
Select the configured
Check excerpt statustemplate.Follow the link to find more details about the
Check excerpt statusdelegate.In the settings panel, enter the following values:
-
In the
Namefield, enter the name of the task —Check the status of excerpt generation. -
In the
Input excerpt identifierfield, enter the excerpt ID that has to be passed to the called business process —${excerptIdentifier}. -
In the
Output variable namefield, enter theexcerptStatusvariable, where the excerpt status, recived as the result of a sub-process execution, has to be saved.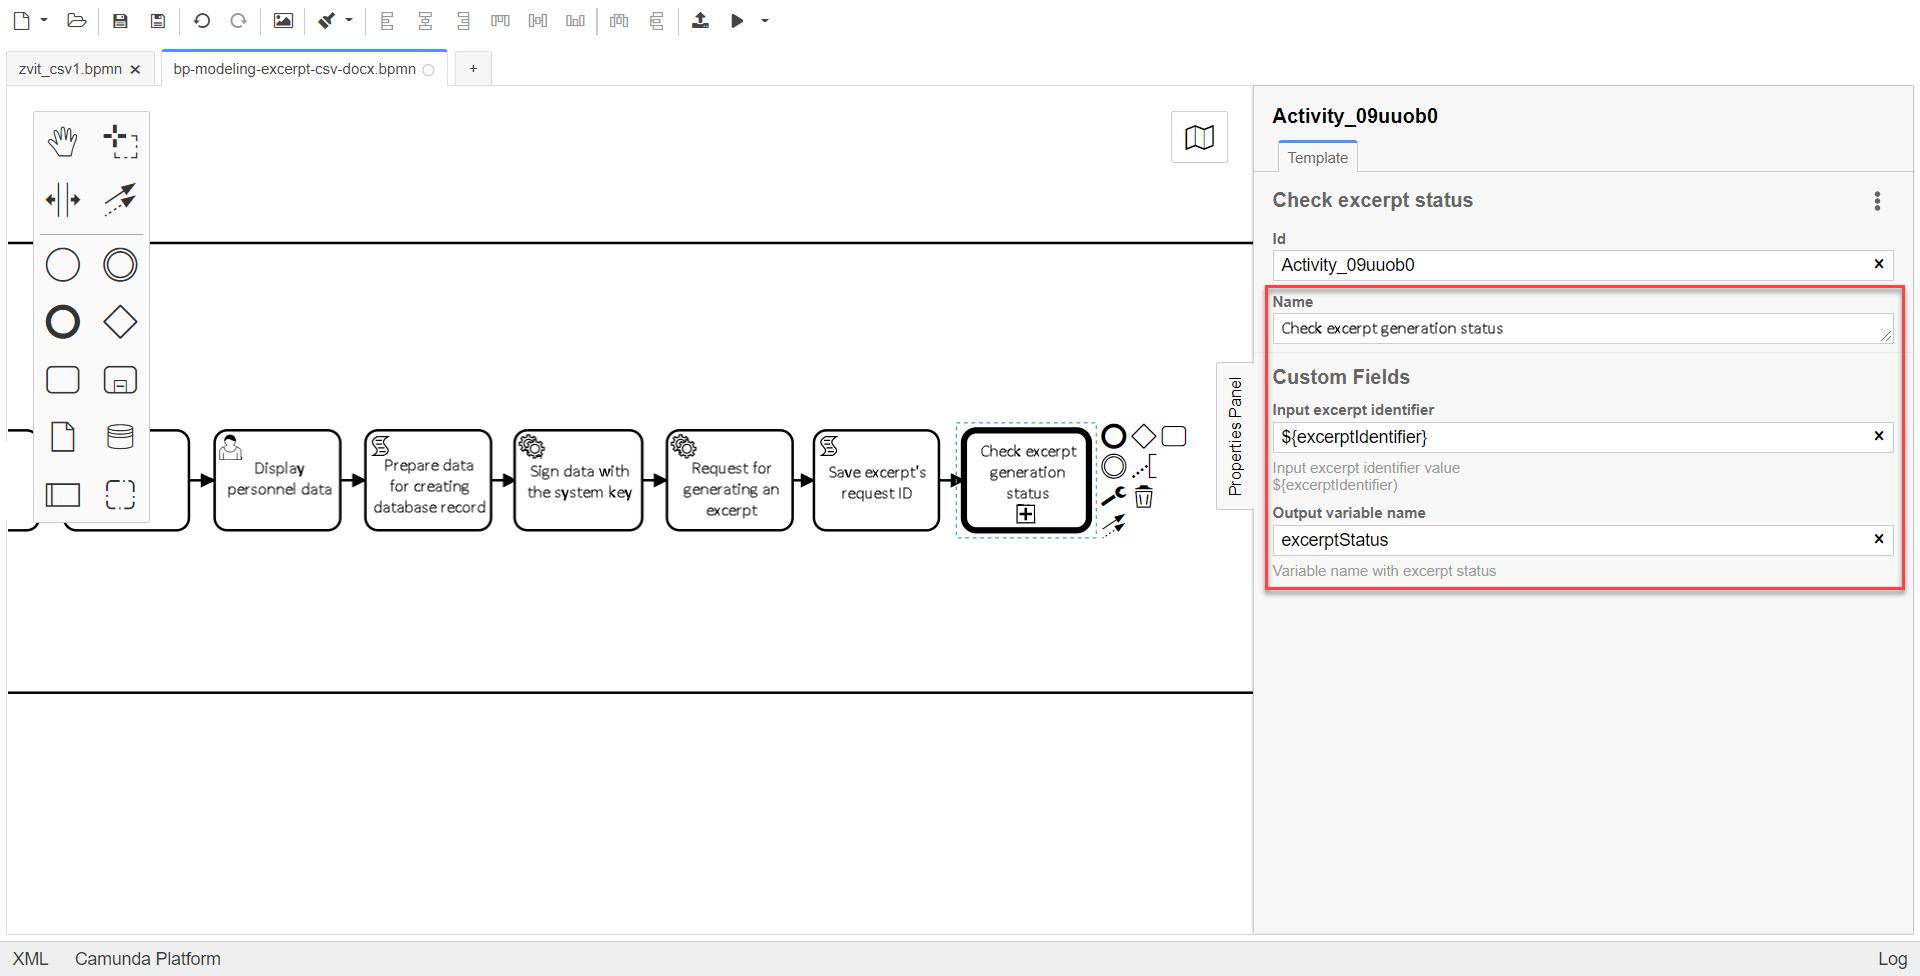
Example 1. "Check excerpt generation status" business process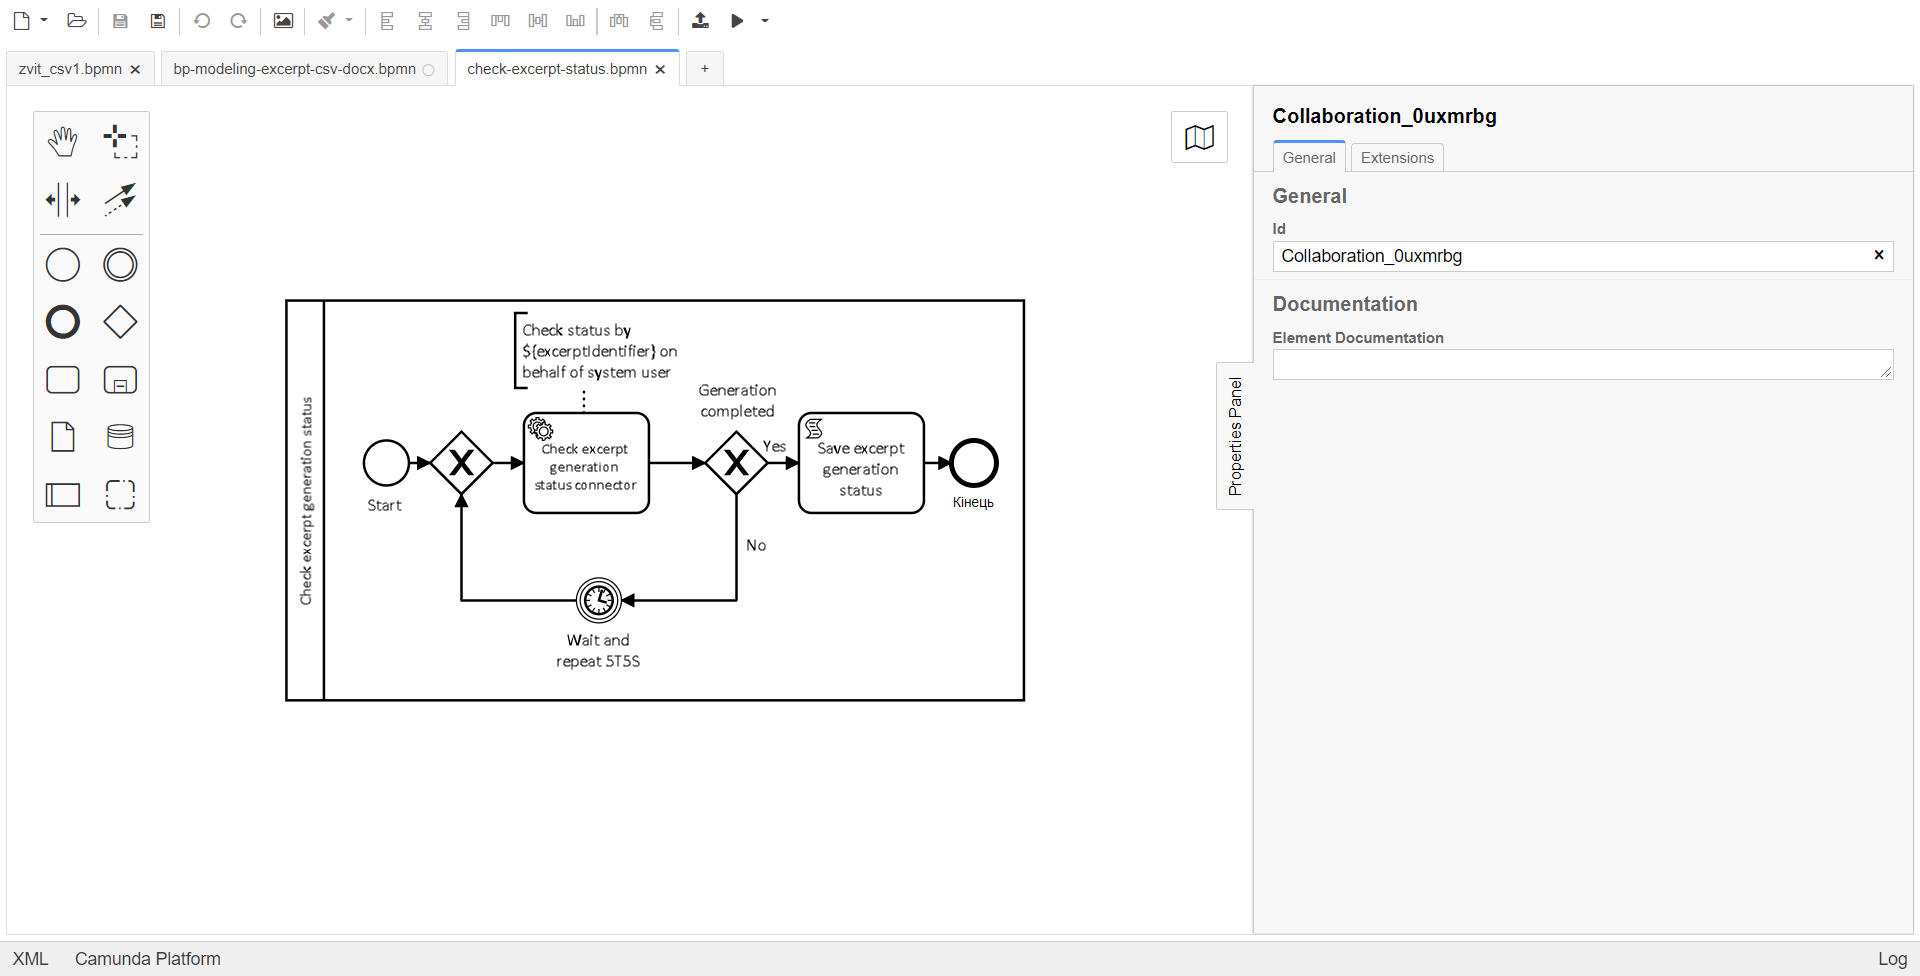
-
-
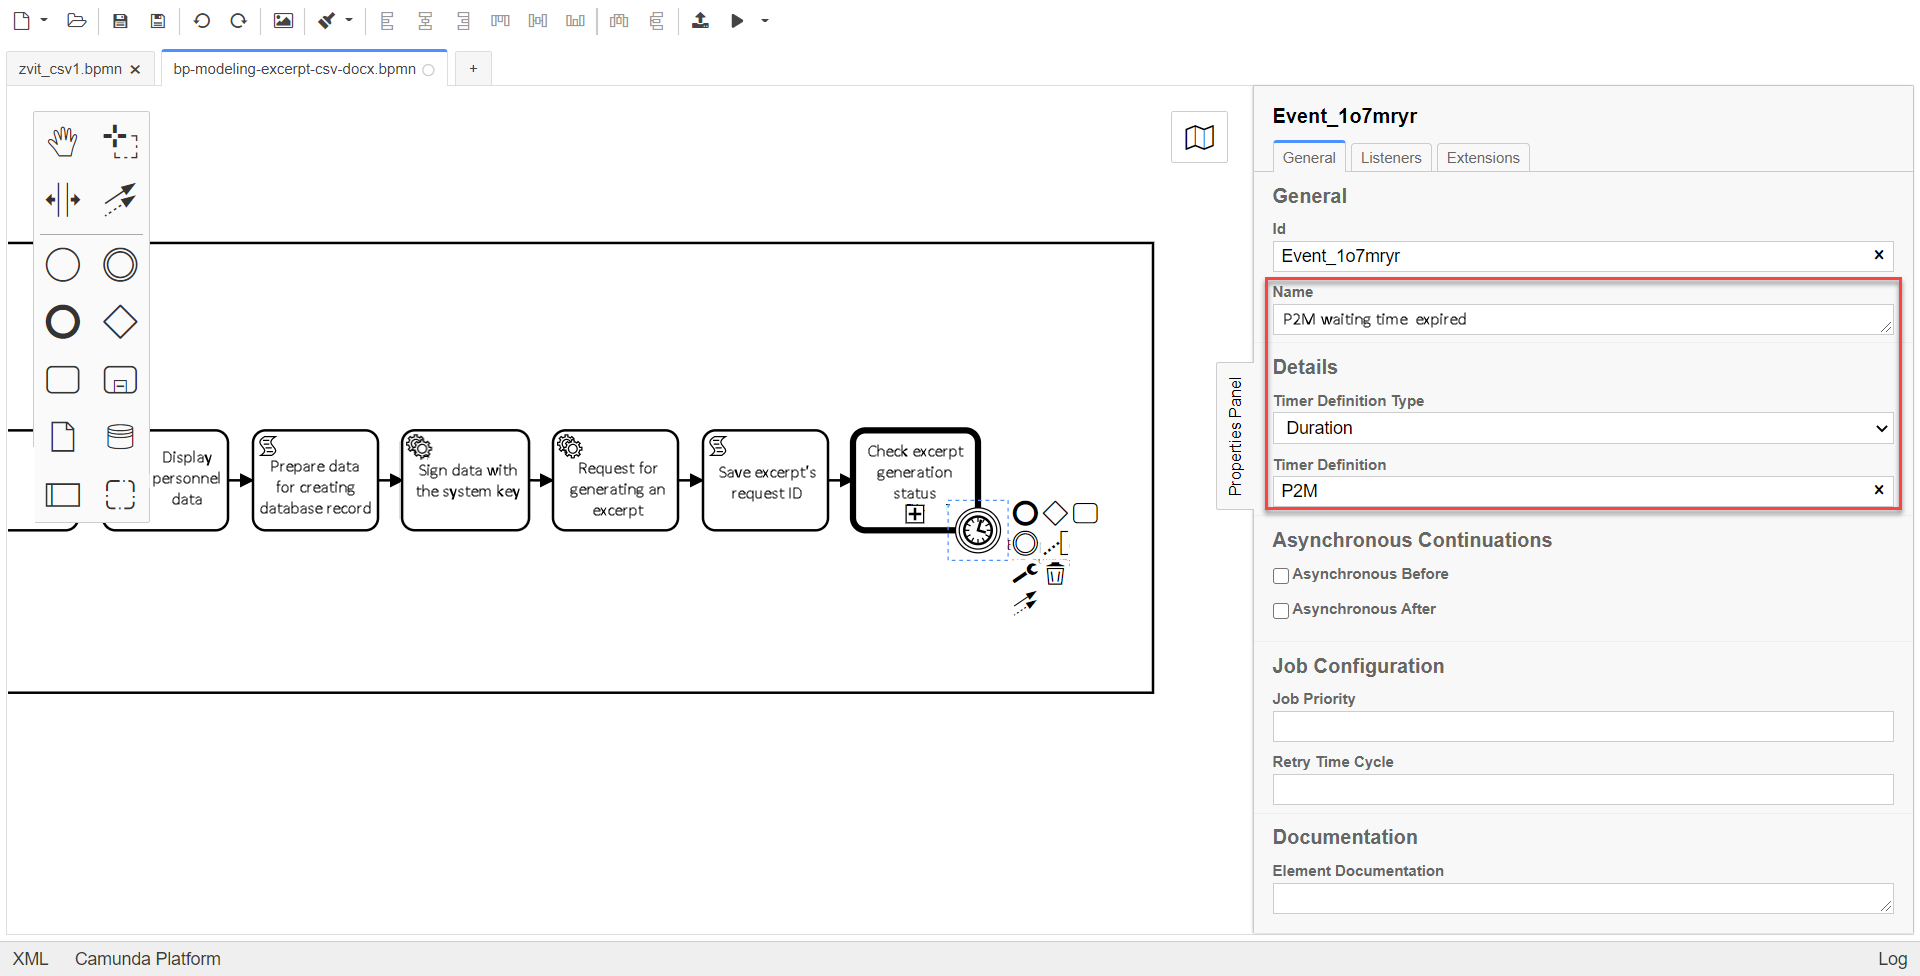
Add the Create Intermediate/Boundary Event element, define its type by clicking the key icon (Change type) and selecting the Timer Boundary Event item from the menu.
Follow the link to find more detailed description of the Timer event modeling element.
Go to the settings panel and configure the event:
-
In the
Namefield, enter theP2M waiting time expired. -
In the
Timer Definition Typefield, set theDurationtimer type; -
In the
Timer Definitionfield, set theP2Mtimer duration.
-
-
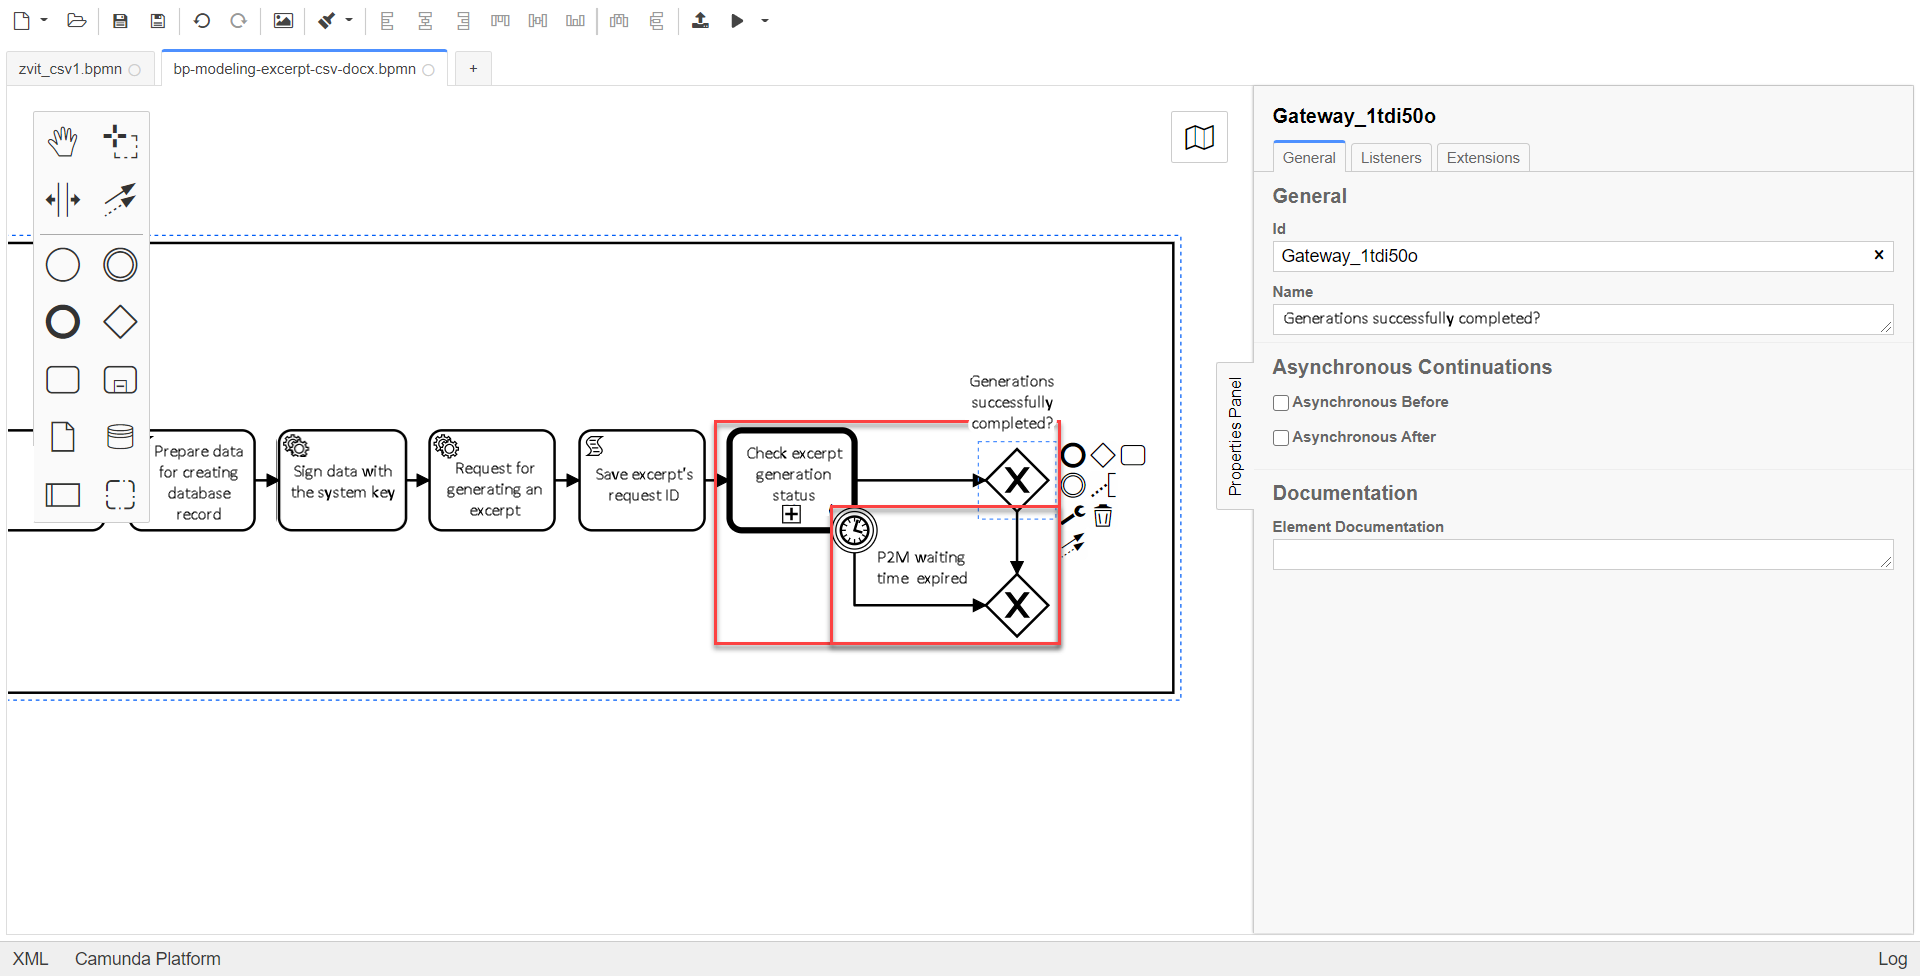
Add XOR gateways for the "Check excerpt generation status" Call Activity and for the "P2M Timed Out" Timer Boundary Event.
-
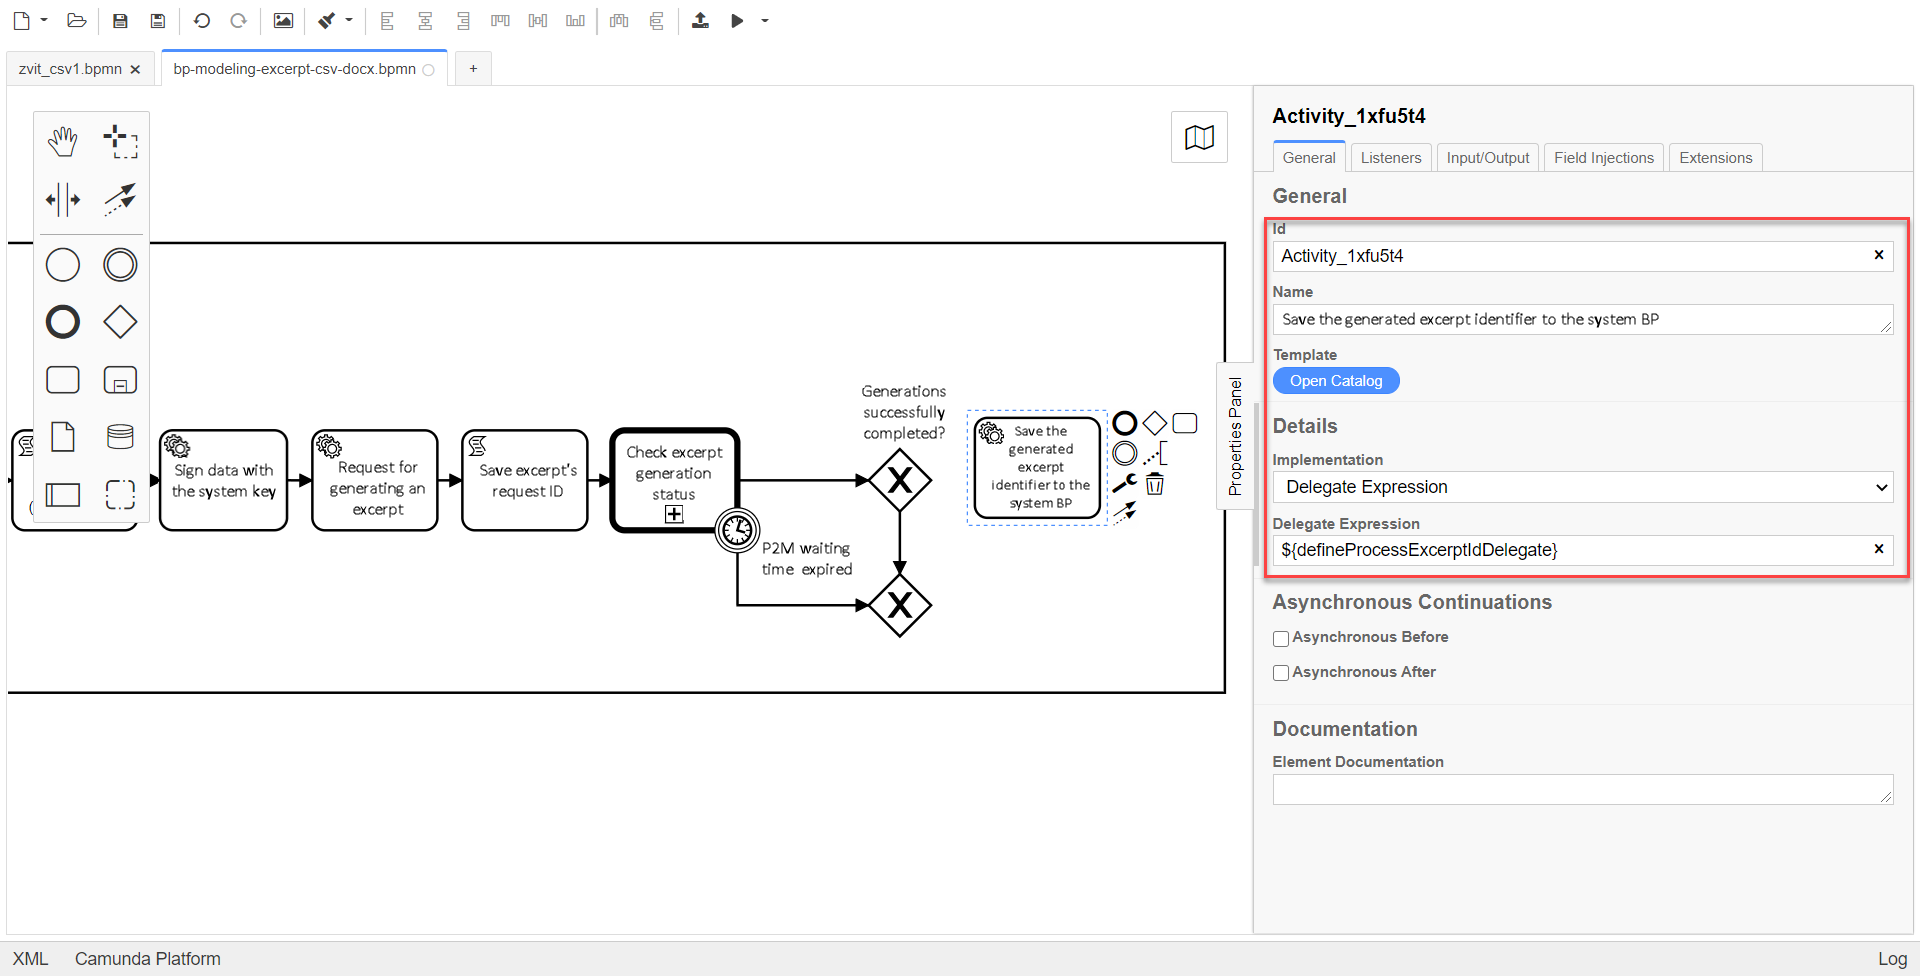
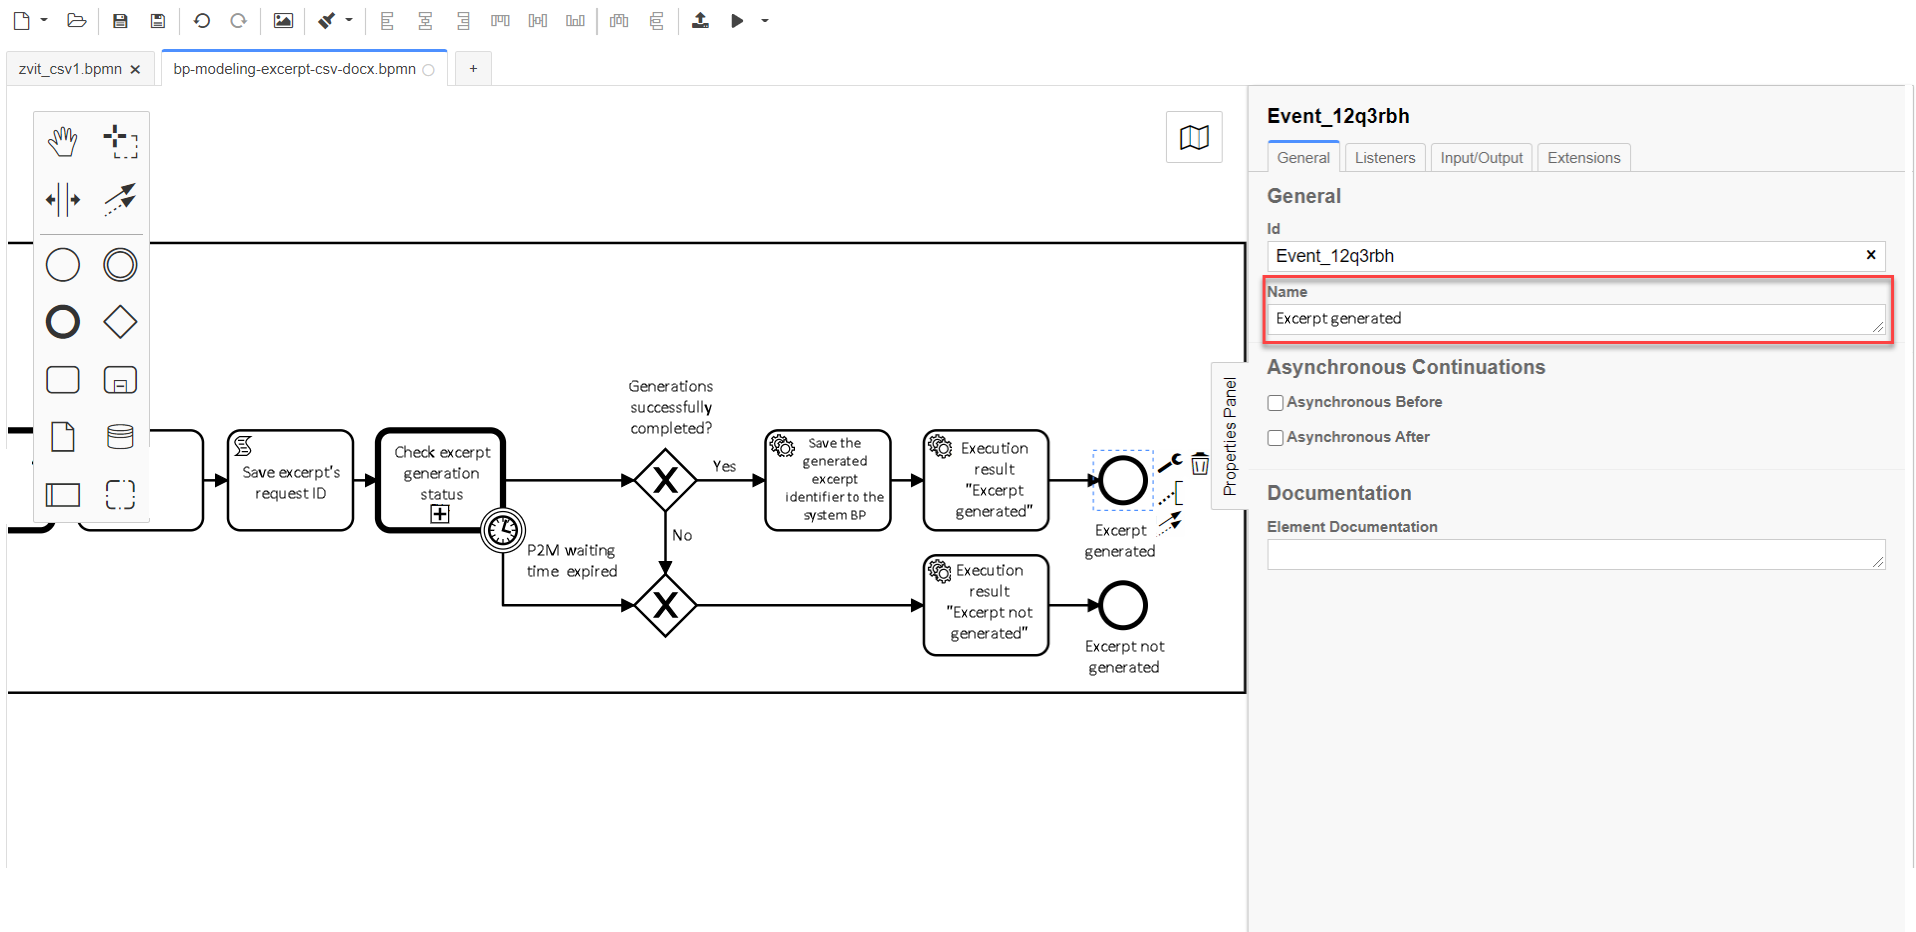
Create the "Save the generated excerpt identifier to the system BP" service task.
In the settings panel, set the following values:
-
In the
Generaltab:-
In the
Namefield, enter the valueSave the identifier of the generated excerpt to the system BP. -
in the
Implementationfield ,select theDelegate Expressionvalue. -
In the
Delegate Expressionfield, enter${defineProcessExcerptIdDelegate}.
-
-
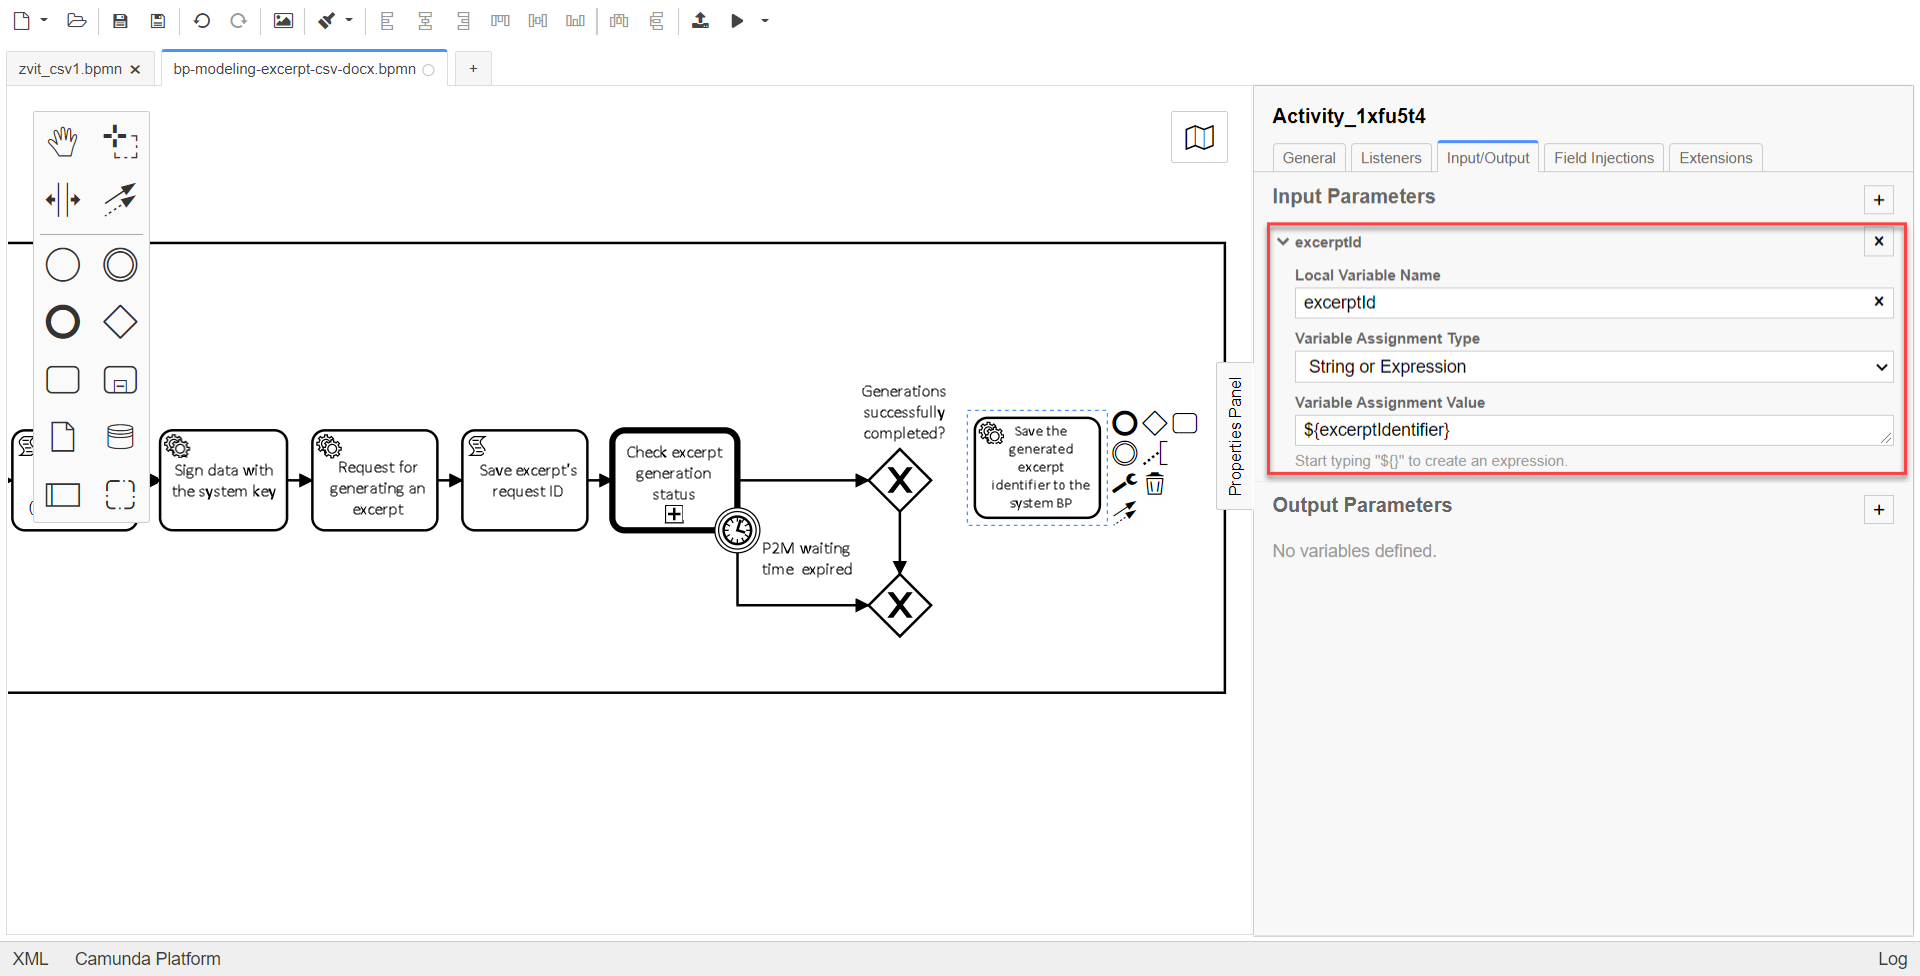
In the
Input/Outputtab:-
In the
Local Variable Namefield, enter theexcerptIdvalue. -
In the
Variable Assignment Typefield, selectString or Expression. -
In the
Variable Assignment Valuefield, enter${excerptIdentifier}.
↓
-
The value specified in the
Idfield is used as the name of the file that a user downloads from the portal. -
-
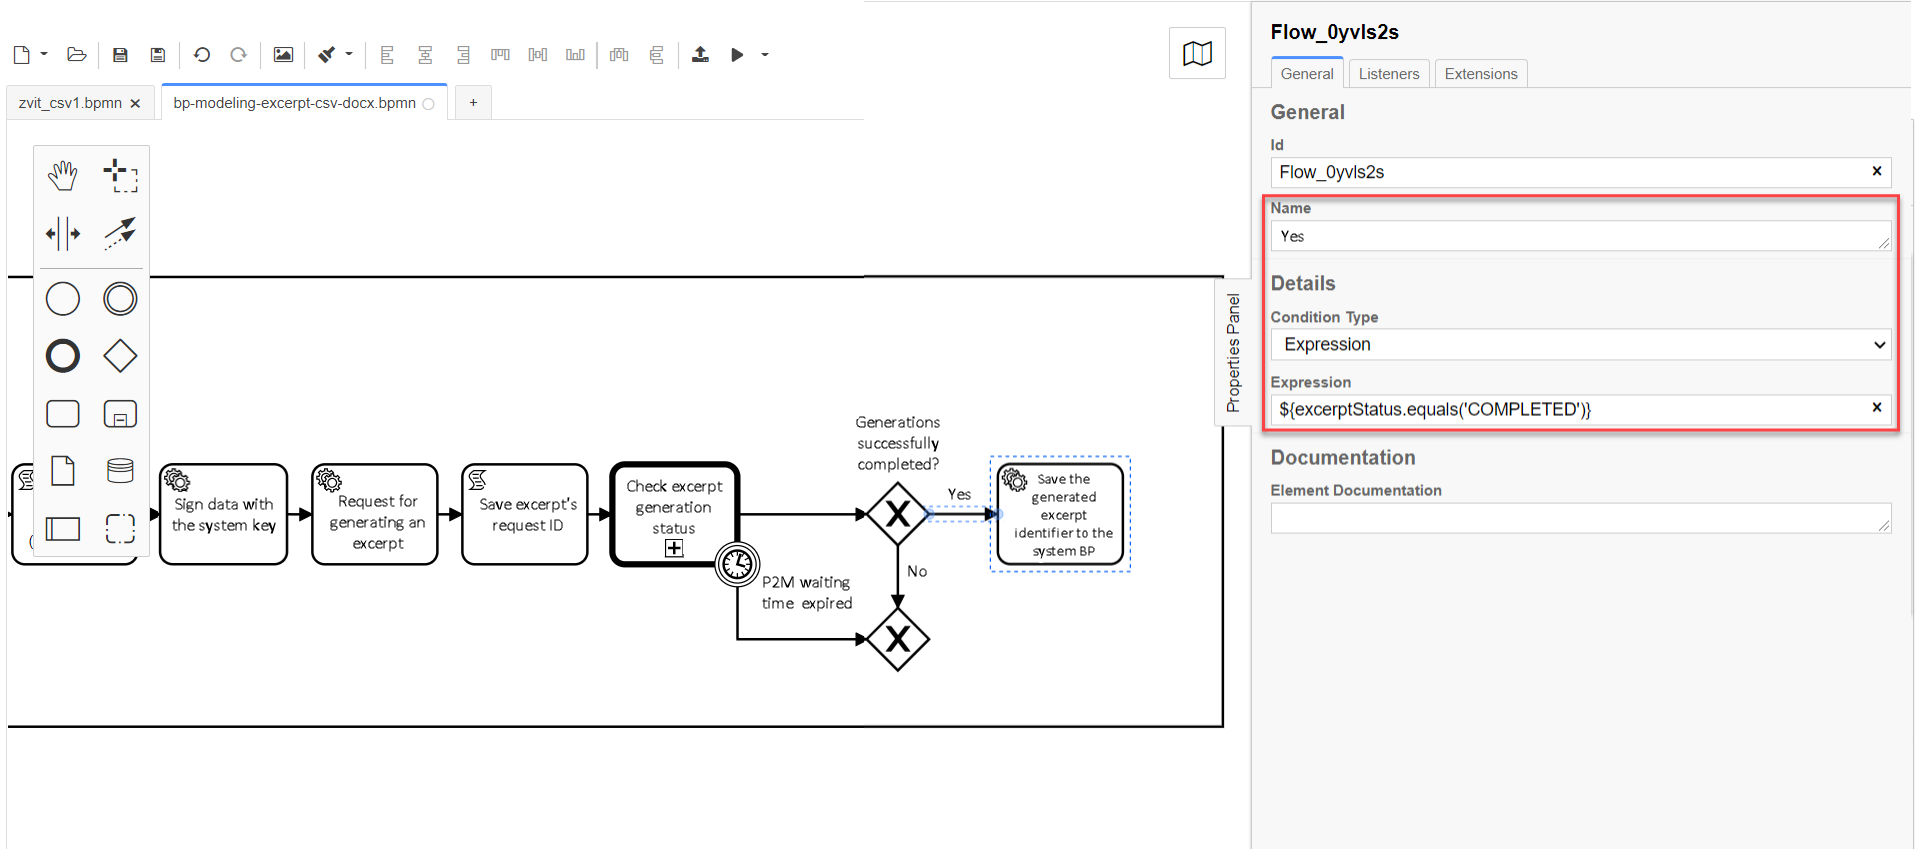
Configure the flow process for the XOR gateway.
Create Connect using sequence (branches):
-
To the "Save the identifier of the generated excerpt to the system BP" service task:
-
Enter
yesin theNamefield. -
In the
Condition Typefield, selectExpression. -
In the
Expressionfield, enter the${excerptStatus.equals('COMPLETED')}value.
-
-
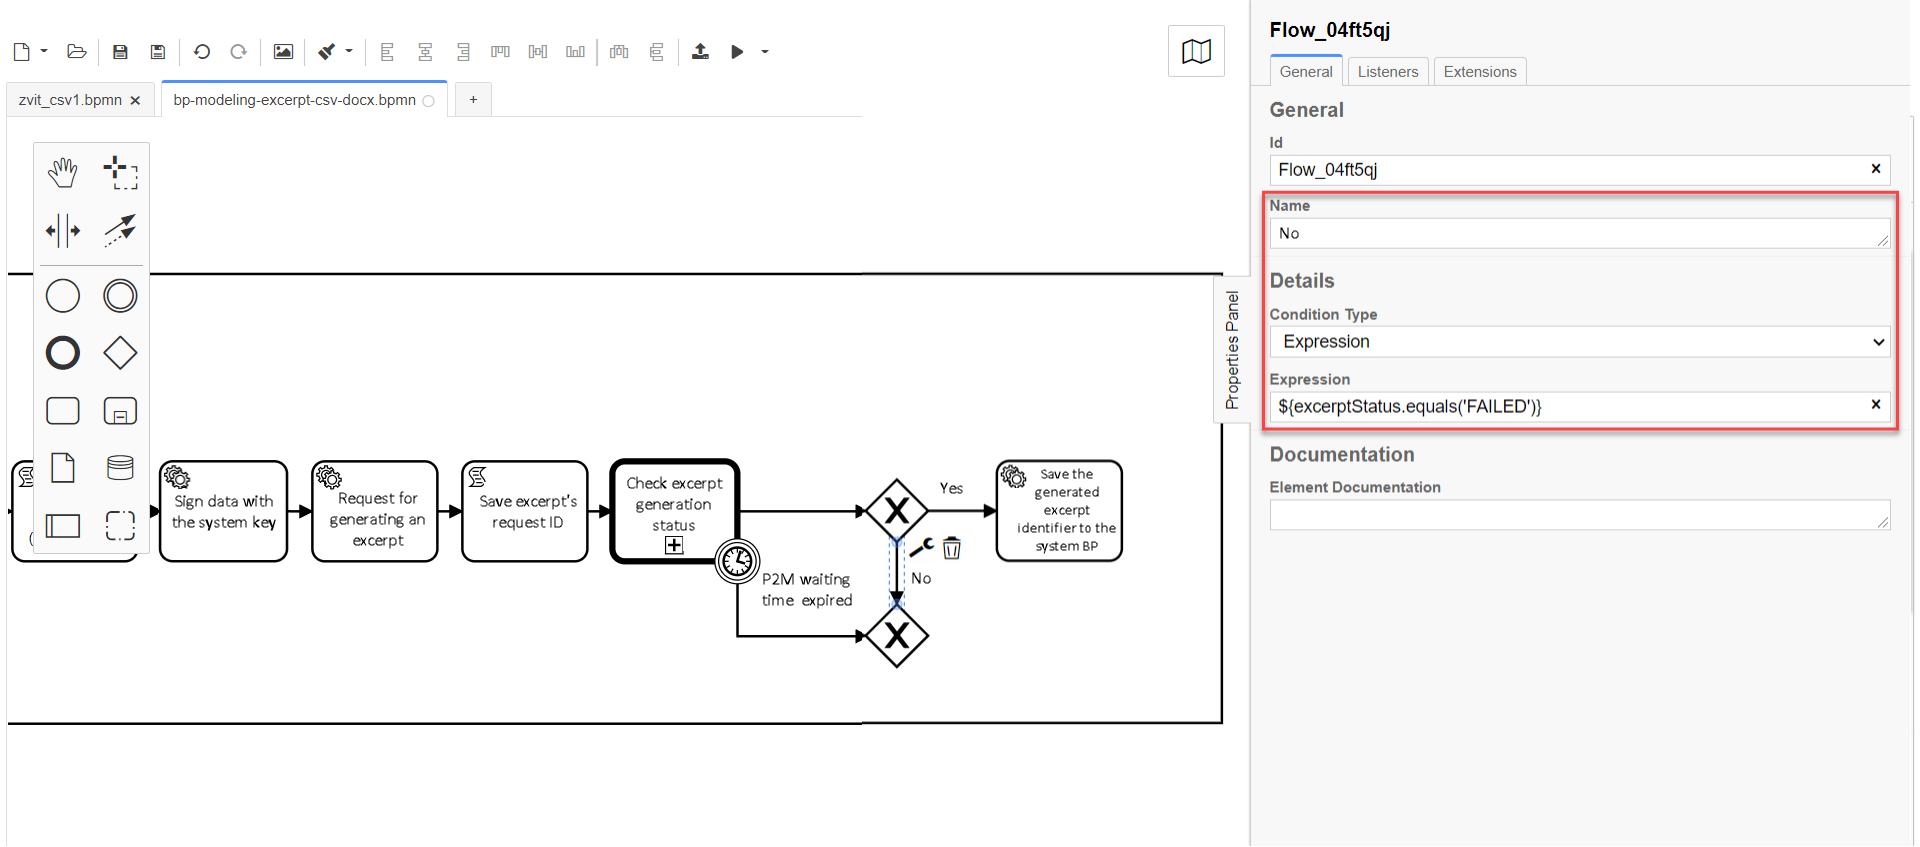
To another XOR gateway:
-
In the
Namefield, enterno. -
In the
Condition Typefield, selectExpression. -
In the
Expressionfield, enter${excerptStatus.equals('FAILED')}.
-
-
5. Process execution result
5.1. Unsuccessful result of business process execution
-
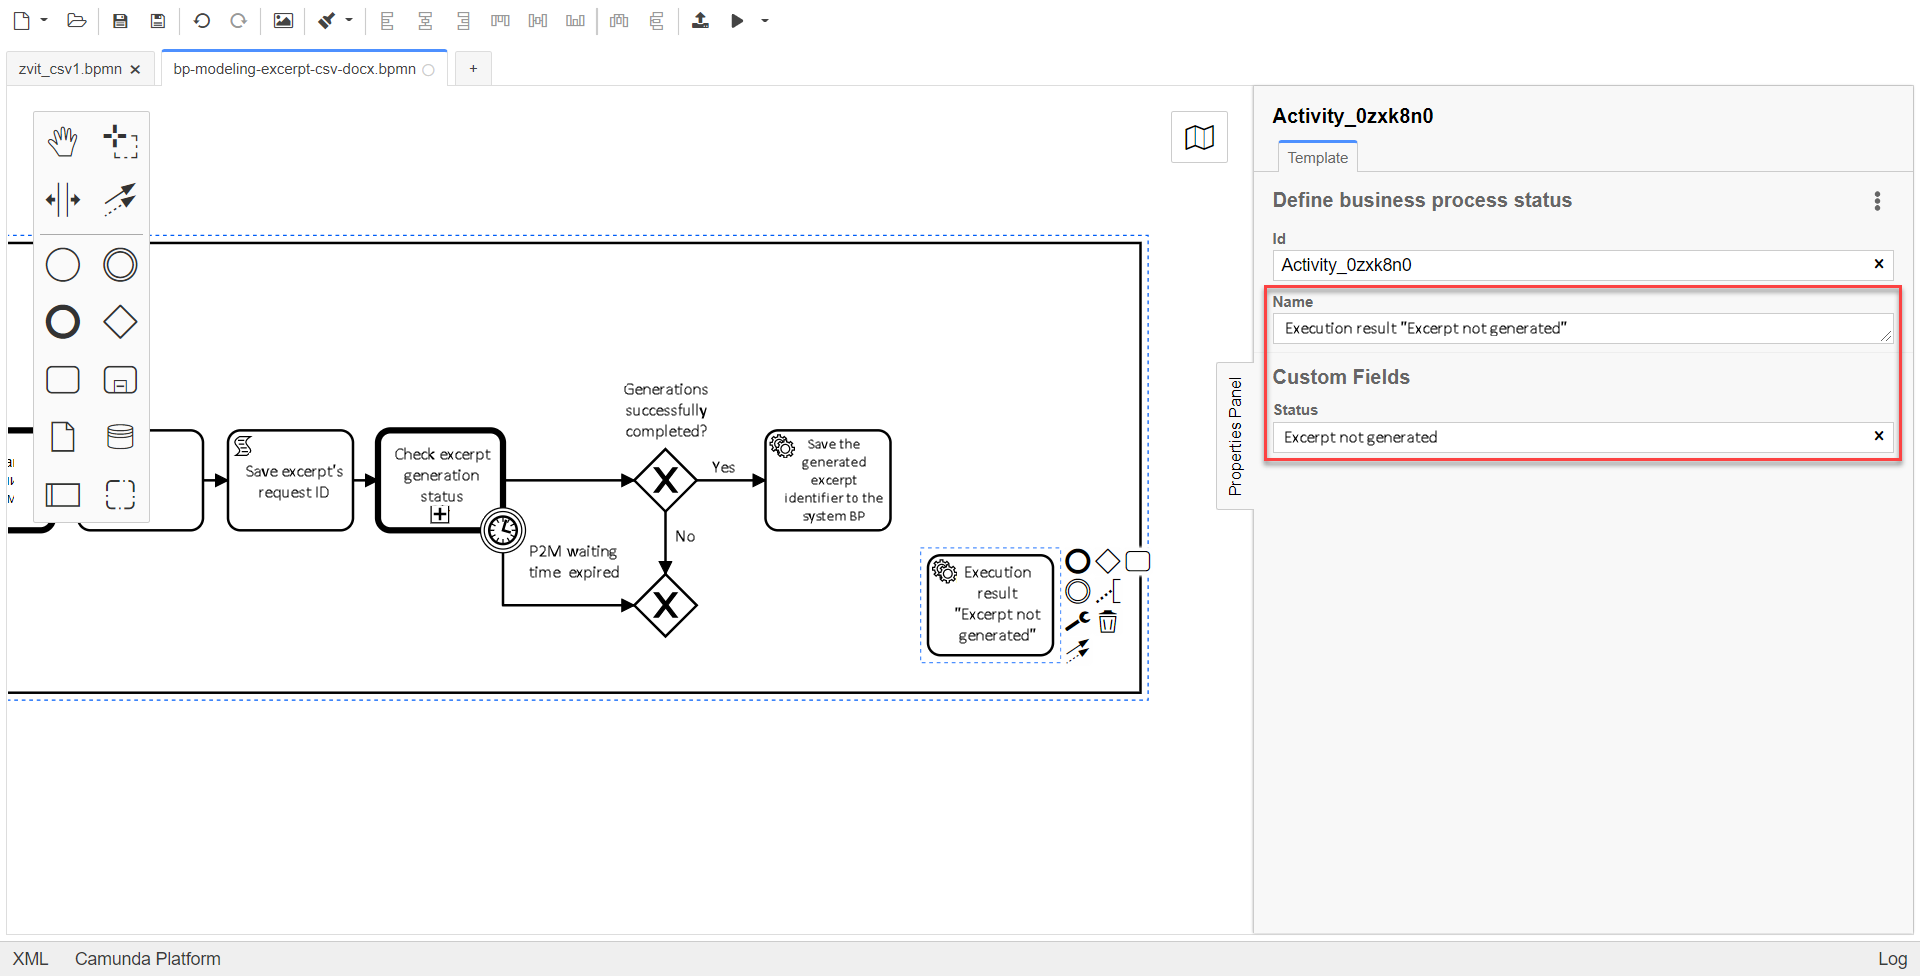
Create the "Execution result "Excerpt not generated"" service task.
Choose the
Define business process statusconfigured template.+ In the settings panel, set the following values:
-
In the
Namefield, enter theExecution result "Excerpt not generated"value. -
In the
Statusfield, enter theExcerpt not generatedvalue. This status is displayed after process completion.
-
-
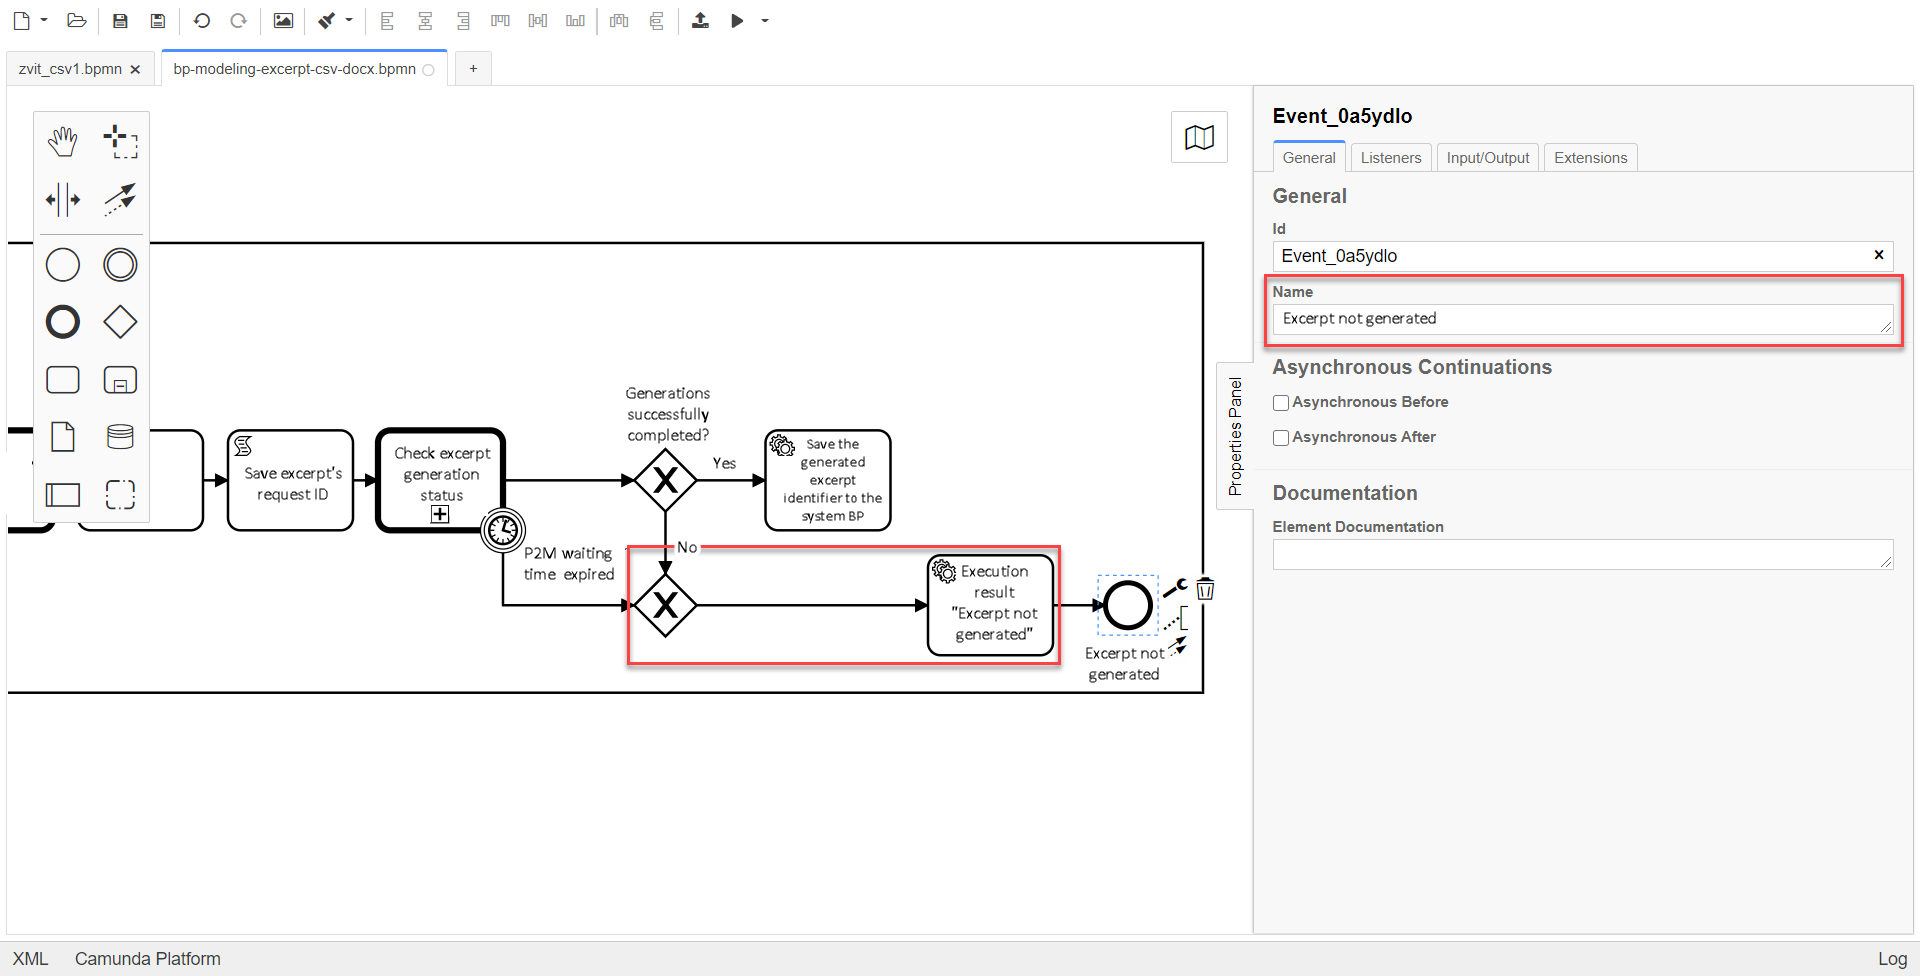
Configure the flow process from the XOR gateway to the service task "Execution result "Excerpt not generated"" by creating a Connect using sequence (branch).
And create the business process completion event.
-
In the
Namefield, enter theExcerpt document not generatedvalue.
-
5.2. Successful result of business process execution
-
Create the "Execution result "Excerpt generated"" service task.
Choose the
Define business process statusconfigured template.In the settings panel, set the following values:
-
In the
Namefield, enter theExecution result "Excerpt generated"value. -
In the
Statusfield, enter theExcerpt generatedvalue. This status is displayed after process completion.
-
-
Create the business process completion event.
-
In the
Namefield, enter theExcerpt document generatedvalue.
-
6. Modeling forms
Model the forms in accordance with the instructions at the link.
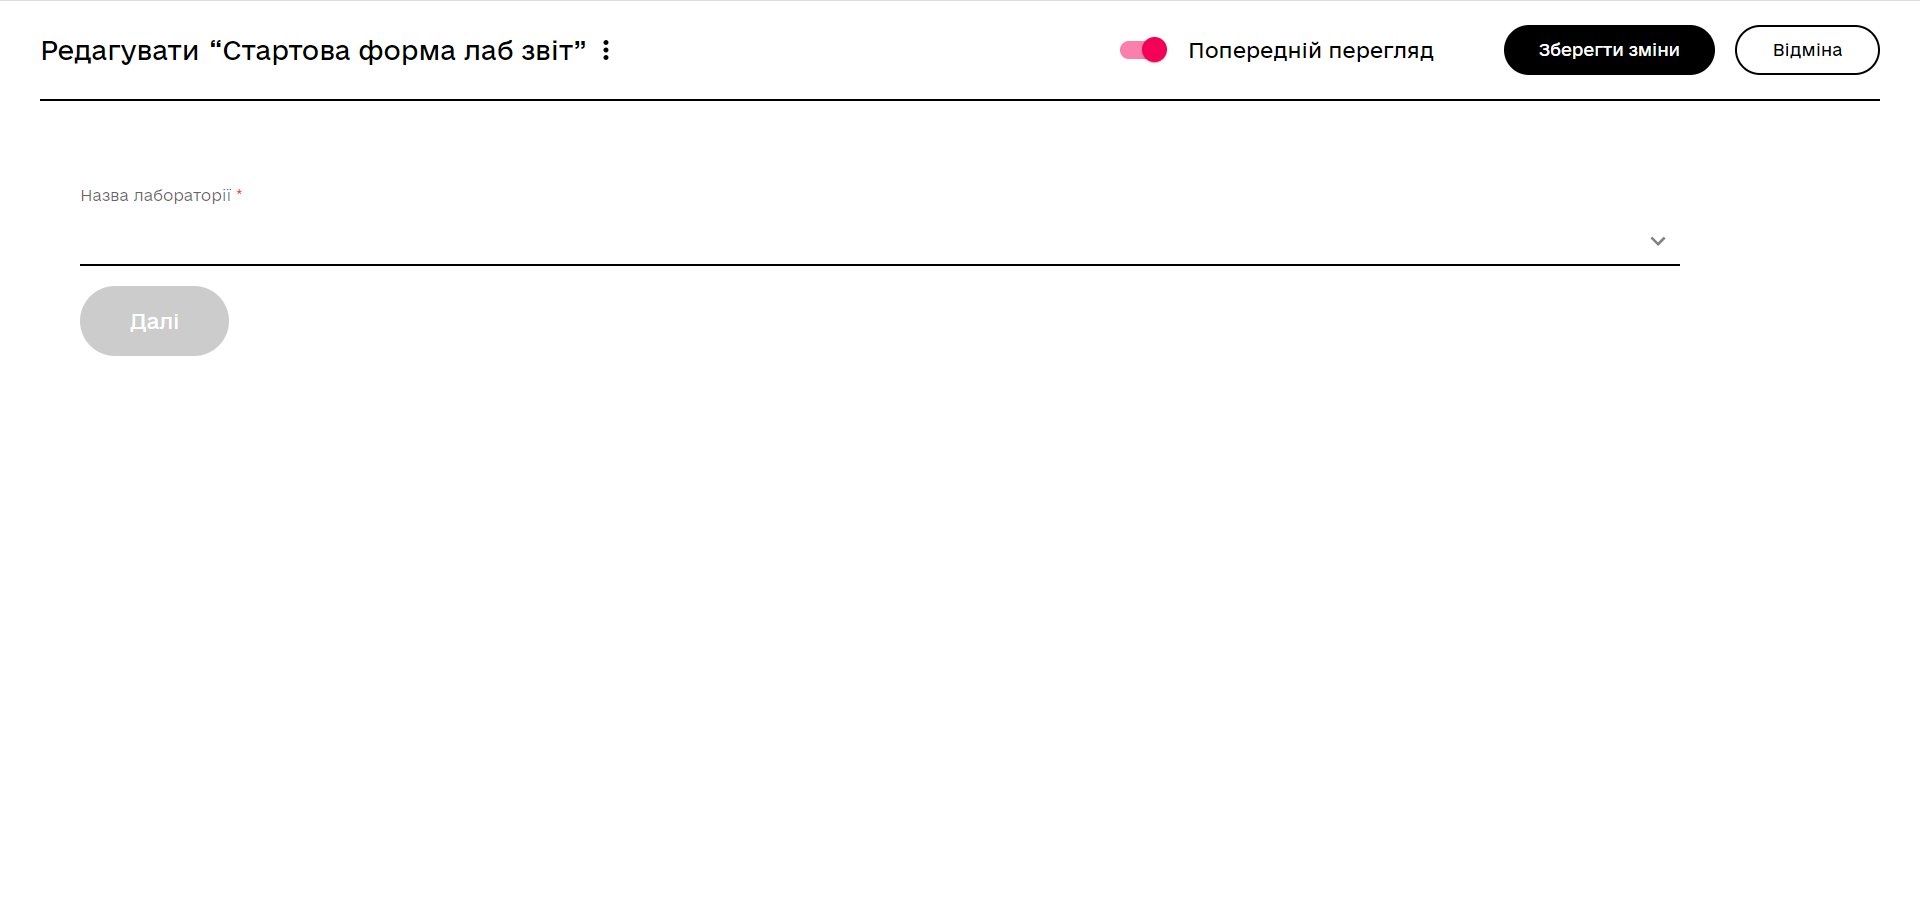
6.1. Modeling the starting form
Modeling the starting form involves creation of a form for searching a laboratory by its name.
-
In the
Form business namefield, enter theStart form lab reportvalue. -
In the
Form service namefield, enter theadd-startform-zvitvalue (which is used at the previous step as the value of theForm Keyparameter).
|
The configured form can be downloaded from the following link: |
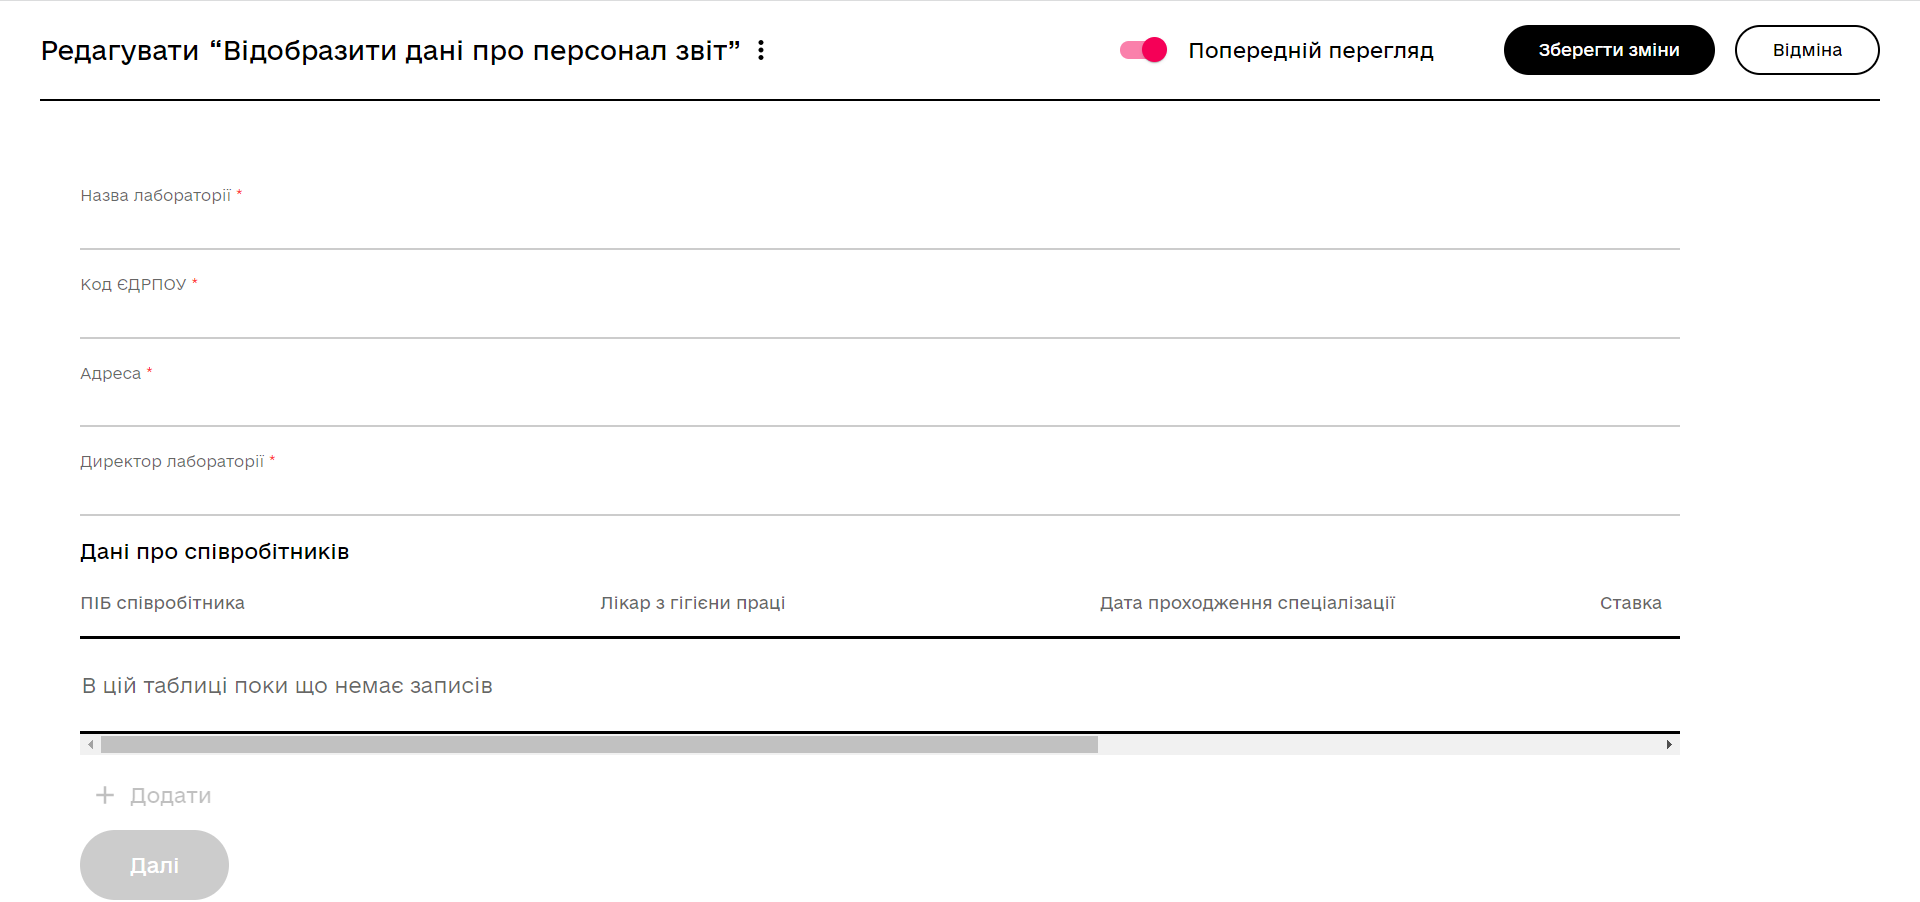
6.2. Modeling the personnel data display form
Modeling the personnel data display form involves creation of a form for generating the data of the called laboratory.
-
In the
Business name of the formfield, enter theDisplay personnel data reportvalue. -
In the
Form service namefield, enter theread-personnel-data-zvitvalue (which is used at the previous step as the value of theForm Keyparameter).
|
The configured form can be downloaded from the following link: |
7. An example of using the business process by a user
You can learn more about the process of creating excerpts by users based on the result of the modeled business process by the following links: