Emulating external integrations
- 1. General overview
- 2. Action plan for using external integration emulators
- 3. Activation of emulators for external integrations
- 4. Defining templates of emulators in the policy
- 5. Creating a route for the service and using WireMock
- 6. API testing using Postman
- 7. Usage of integration connectors in business processes
| 🌐 This document is available in both English and Ukrainian. Use the language toggle in the top right corner to switch between versions. |
1. General overview
You can configure mock integrations with external systems via SOAP or REST in the Control Plane administrative panel WireMock.
- Key features:
-
-
🔄 Support of SOAP and REST:Mock integrations can be created for both protocols — SOAP and REST, which provides greater flexibility when working with different external systems.
-
-
🔧 Management via Control Plane: аActivation and management of mocks is done through the Control Plane administrative panel within the dev registry templates.
-
🛠️ WireMock — powerful testing tool: WireMock is an HTTP server simulator that allows creating mock HTTP interactions. This is a convenient tool for simulating the work of external APIs and services.
-
📁 Customization of mocks via mock-integrations: You can define the structure of mock integrations at the registry policy level using the mock-integrations directory mock-integrations.
- Use cases:
-
🧪 Testing: Create unit and integration tests using WireMock to emulate external APIs and services.
-
💻 Development: If a real service is not yet ready or temporarily unavailable, WireMock will help simulate its behavior, allowing development to continue uninterrupted.
-
🔍 Replicating errors: Use WireMock to model different states and HTTP service errors to gain deeper understanding and help resolve issues.
This functionality is intended to improve development and testing quality, providing more control and flexibility when working with external systems.
2. Action plan for using external integration emulators
-
Deploy registry from a development template
-dev. The platform provides several available templates. Choose, for example,-dev-recommended. -
Activate the emulators using when configuring integration with other systems in Control Plane.
-
Configure emulator templates in the policy of your registry.
-
Model interaction with external systems in business processes through integration connectors.
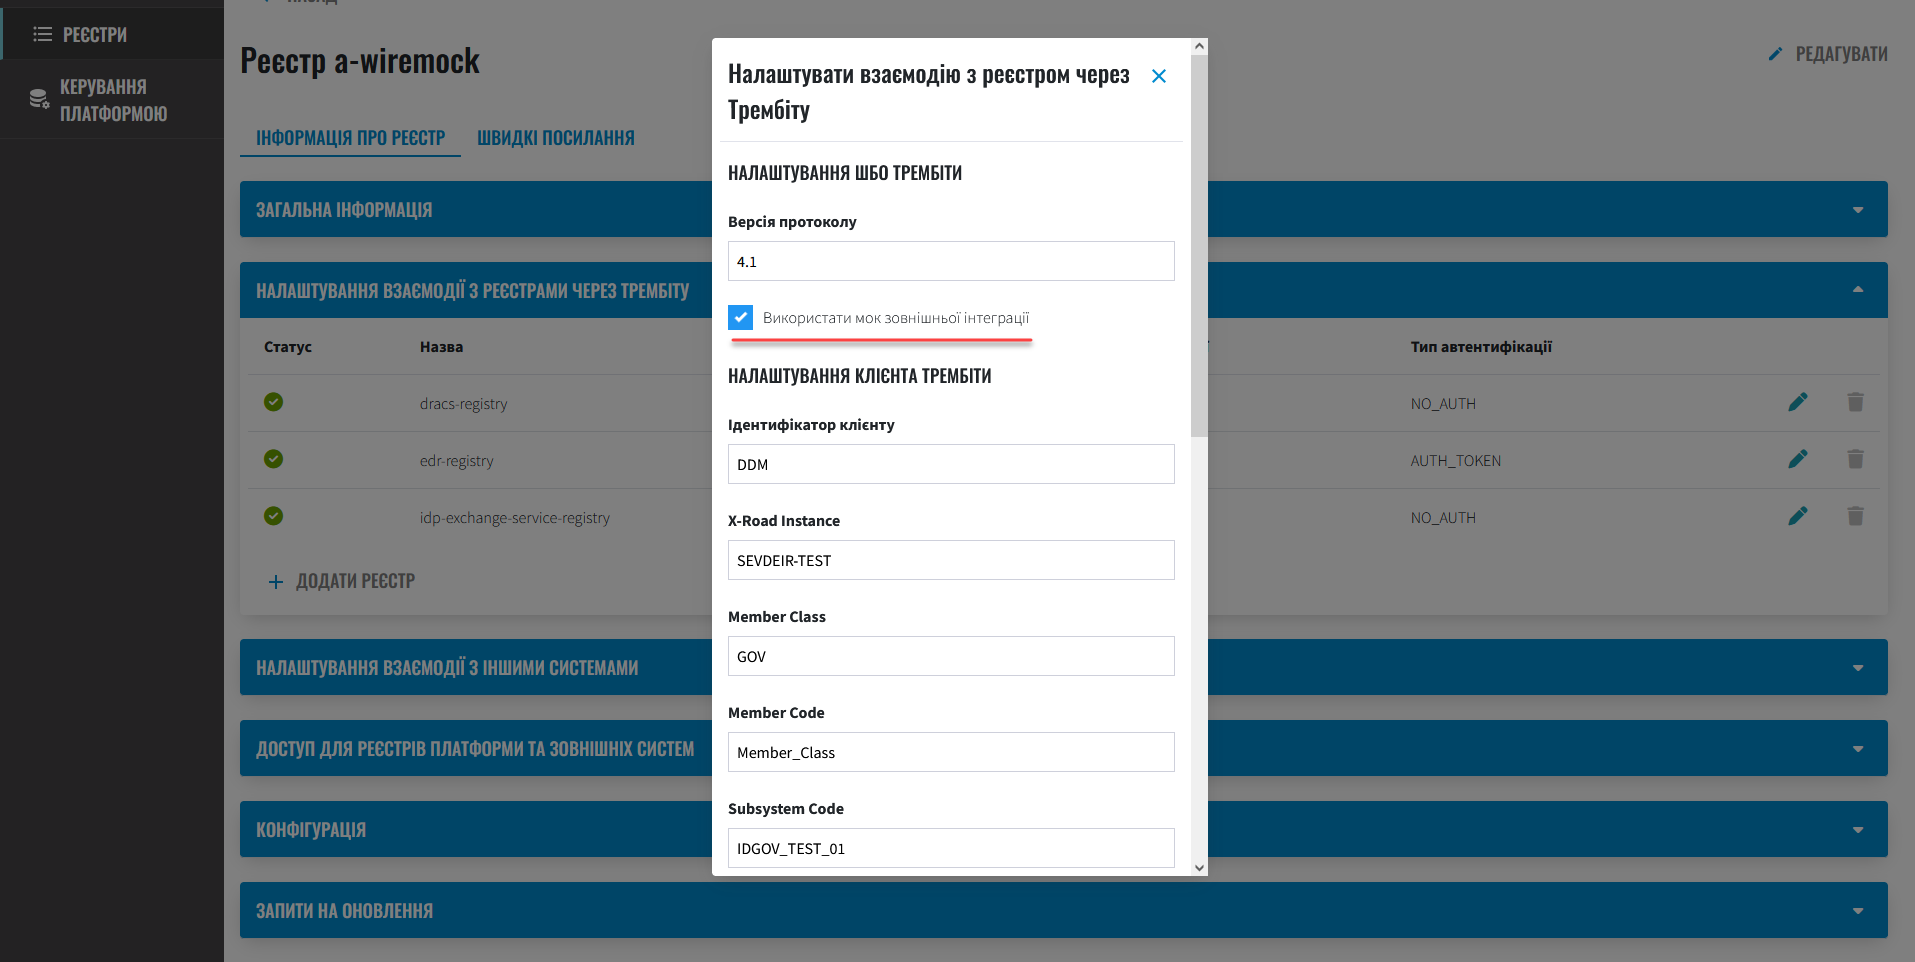
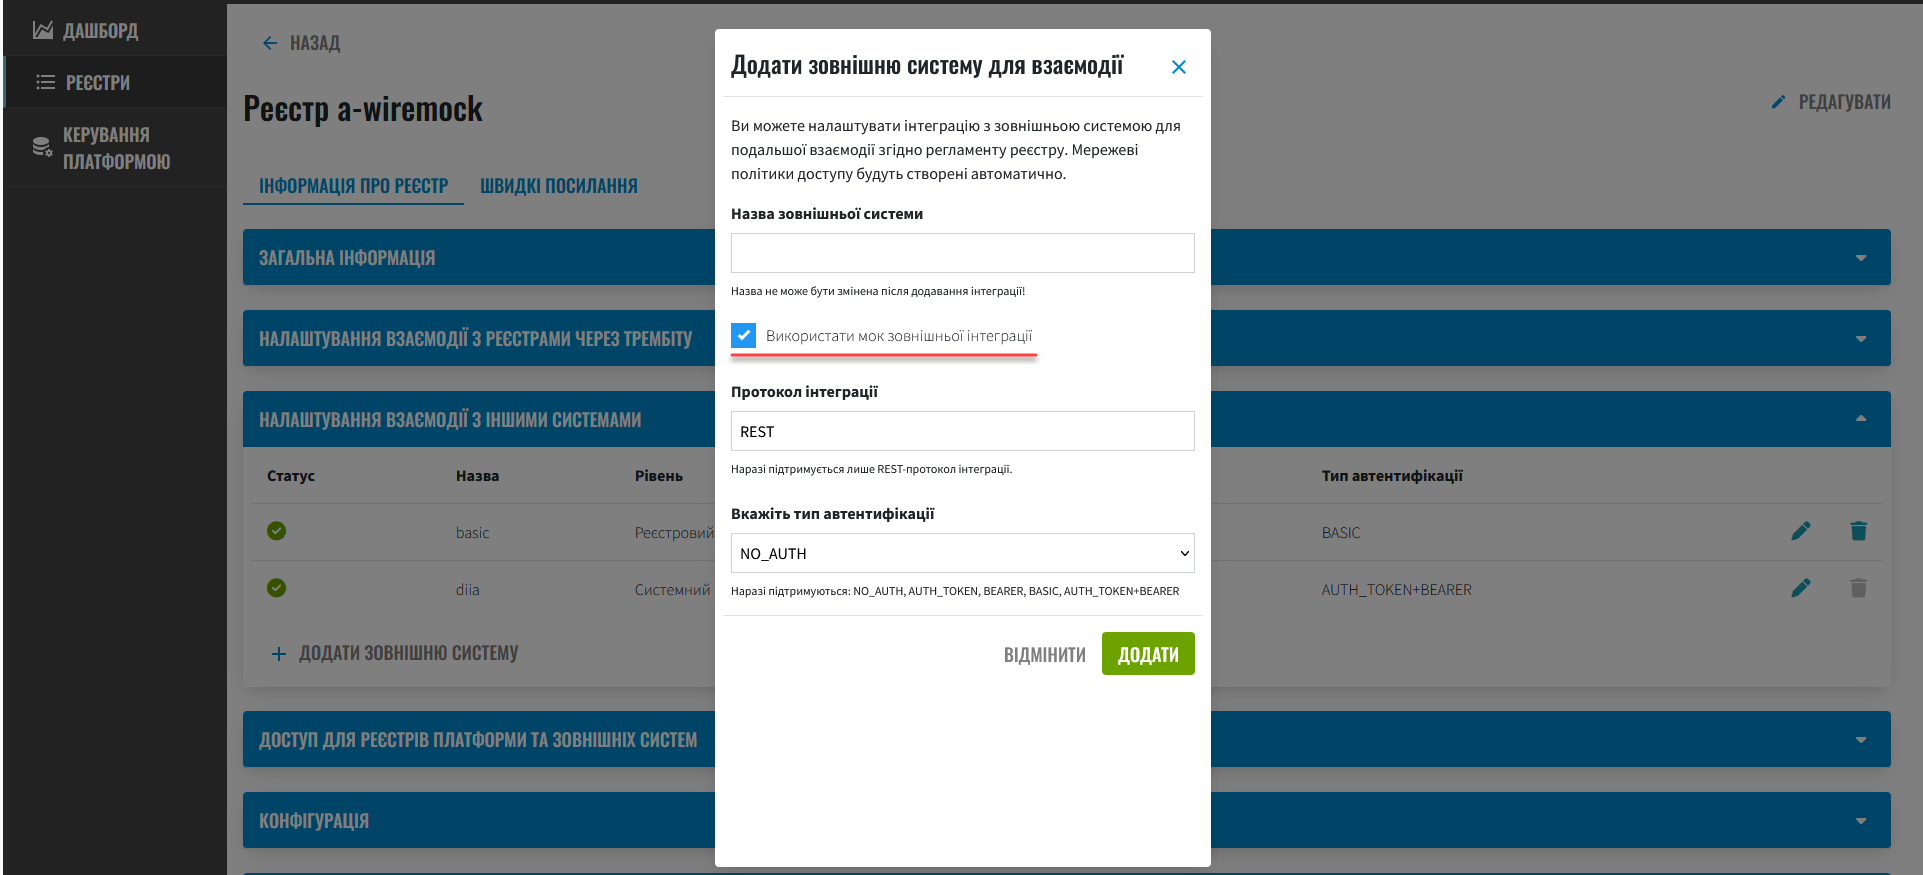
3. Activation of emulators for external integrations
You can enable the use of emulators when configuring external integrations in the Control Plane administrative panel interface, specifically during:
-
Configuring interaction with registries via secure exchange gateway "Trembita" within SOAP protocol
| This functionality is specific to the Ukrainian implementation and may not apply or function as described in other contexts or regions. Please consult the local guidelines or documentation if you are implementing this outside Ukraine. |
Activate the toggle switch Use an external integration mock for the corresponding type of interaction.
4. Defining templates of emulators in the policy
Configuration of external integration emulator templates is defined at the Gerrit repository policy level of your registry, in the mock-integrations directory. The templates should follow the conventions outlined by WireMock in JSON format.
4.1. REST
WireMock templates can be divided into two main parts
-
Request Matching — defines which HTTP requests should be intercepted. You can specify the URL, method (
GET,POSTetc.), headers, request body, and more.
-
Response Definition — defines how the response that is returned for a matched request should look like. You can specify the status code, headers, response body, and more.
{
  "request": {
    "method": "GET",
    "urlPathPattern": "/some/endpoint"
  },
  "response": {
    "status": 200,
    "headers": {
      "Content-Type": "application/json"
    },
    "jsonBody": {"key": "value"}
  }
}
This template specifies that when WireMock receives a GET request to the URL /some/endpoint, it should return a response with a 200`status code, a header of `Content-Type set to application/json, and a response body in the format {"key":"value"}.
4.2. SOAP
WireMock can also be used to mock SOAP web services. SOAP (Simple Object Access Protocol) is a protocol for exchanging messages between applications over HTTP and, unlike REST, uses the XML format to structure data.
When mocking a SOAP service using WireMock, you would typically want to create mocks for the SOAP requests and responses they receive. Here is an example of what a WireMock configuration file could look like for mocking a SOAP web service:
{
  "request": {
    "method": "POST",
    "url": "/soap-endpoint",
    "headers": {
      "Content-Type": "text/xml; charset=utf-8"
    },
    "bodyPatterns": [
      {
        "matchesXPath": "//your-xpath-expression"
      }
    ]
  },
  "response": {
    "status": 200,
    "headers": {
      "Content-Type": "text/xml; charset=utf-8"
    },
    "body": "<your-soap-response-xml>"
  }
}
In this example, WireMock is configured such that when it receives a POST request to the URL /soap-endpoint with the appropriate headers and a body that matches the given XPath expression, it will return a response with a 200 status code and an XML payload as the response body.
It is important to prepare the correct XML payload for the SOAP response body and, if necessary, use XPath to match elements within the SOAP request payload.
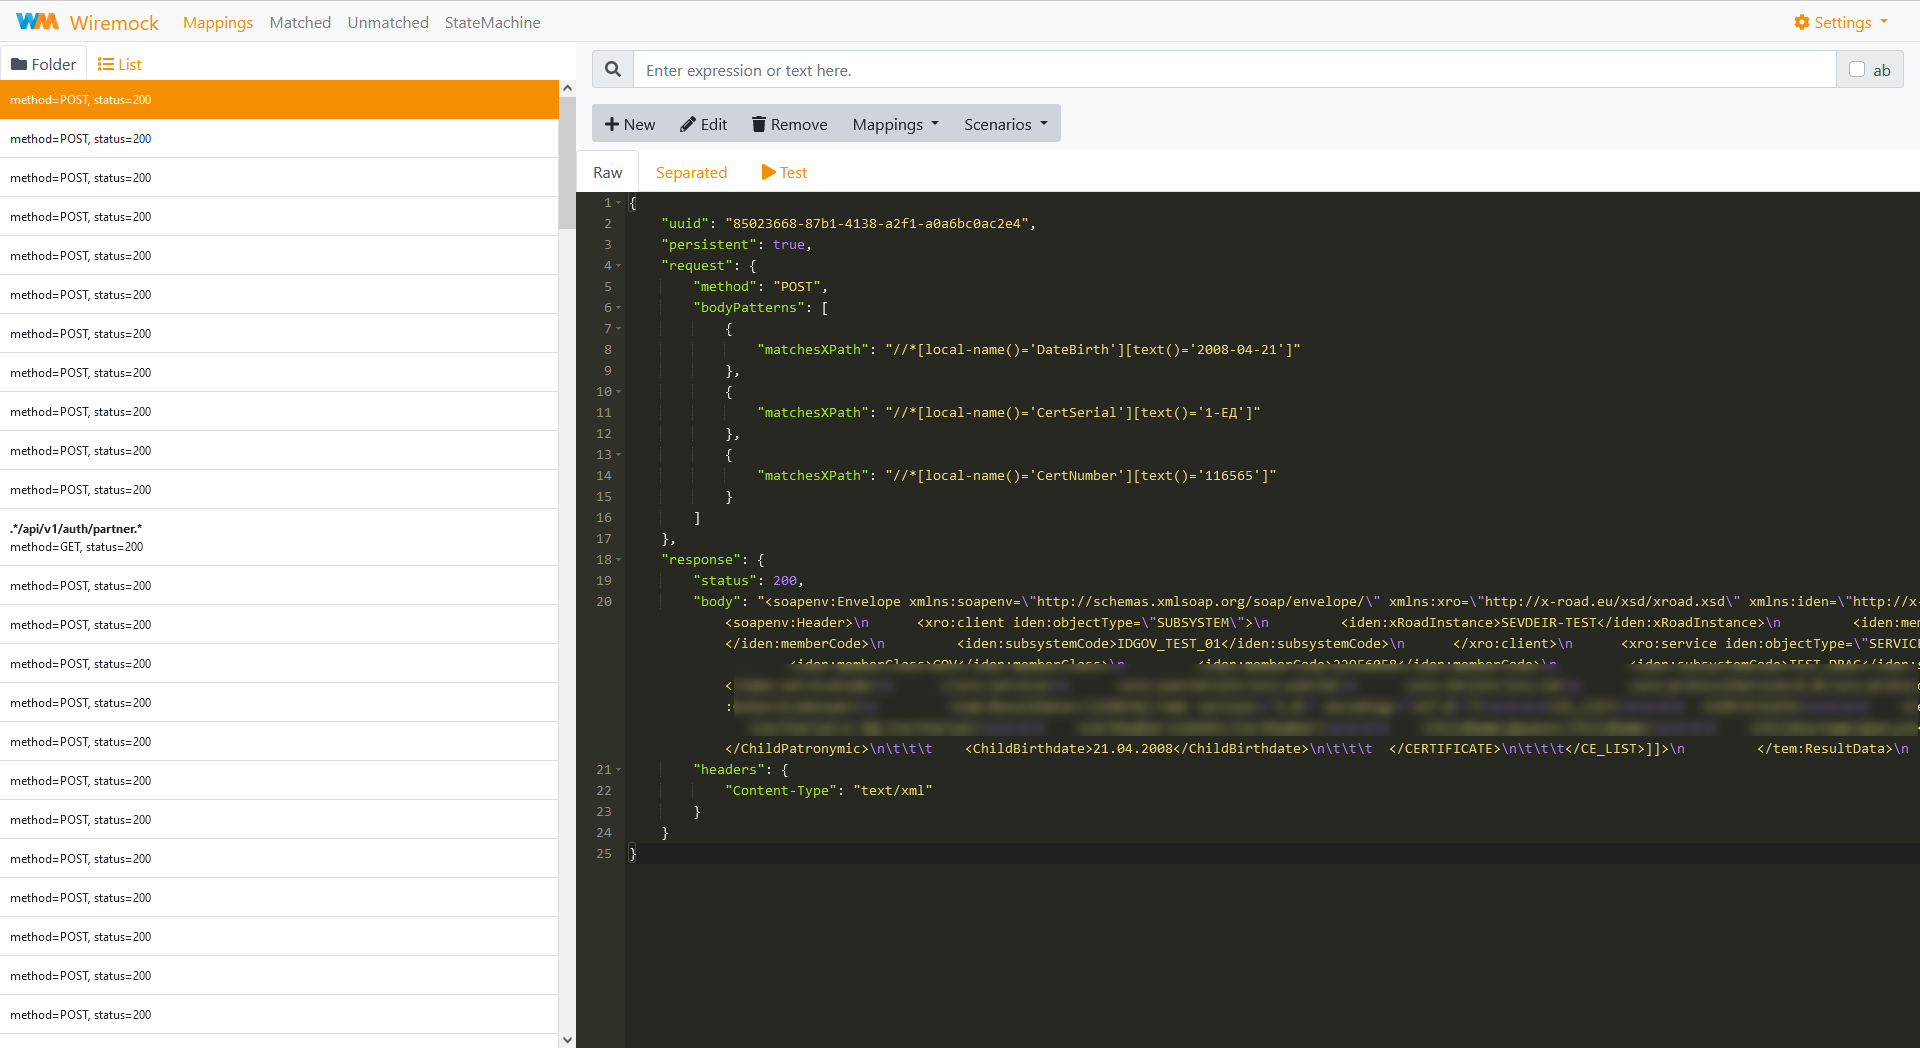
Imitation of SOAP service behavior for requests to SearchSubjects endpoint.
| This functionality is specific to the Ukrainian implementation and may not apply or function as described in other contexts or regions. Please consult the local guidelines or documentation if you are implementing this outside Ukraine. |
{
  "mappings": [
    {
      "priority": 100,
      "request": {
        "method": "POST",
        "bodyPatterns": [
          {
            "matchesXPath": "//*[local-name()='serviceCode'][text()='SearchSubjects']"
          }
        ]
      },
      "response": {
        "status": 200,
        "body": "<soap11env:Envelope xmlns:soap11env=\"http://schemas.xmlsoap.org/soap/envelope/\" xmlns:tns=\"http://nais.gov.ua/api/sevdeir/EDR\" xmlns:xroad=\"http://x-road.eu/xsd/xroad.xsd\" xmlns:id=\"http://x-road.eu/xsd/identifiers\">\n   <soap11env:Header>\n      <tns:AuthorizationToken>token</tns:AuthorizationToken>\n      <xroad:userId>MDTUDDM</xroad:userId>\n      <xroad:client id:objectType=\"SUBSYSTEM\">\n         <id:xRoadInstance>SEVDEIR-TEST</id:xRoadInstance>\n         <id:memberClass>GOV</id:memberClass>\n         <id:memberCode>43395033</id:memberCode>\n         <id:subsystemCode>IDGOV_TEST_01</id:subsystemCode>\n      </xroad:client>\n      <xroad:service id:objectType=\"SERVICE\">\n         <id:xRoadInstance>SEVDEIR-TEST</id:xRoadInstance>\n         <id:memberClass>GOV</id:memberClass>\n         <id:memberCode>00015622</id:memberCode>\n         <id:subsystemCode>2_MJU_EDR_prod</id:subsystemCode>\n         <id:serviceCode>SearchSubjects</id:serviceCode>\n      </xroad:service>\n      <xroad:protocolVersion>4.0</xroad:protocolVersion>\n      <xroad:id>MDTUDDM</xroad:id>\n      <xroad:requestHash algorithmId=\"http://www.w3.org/2001/04/xmldsig-more#gost34311\">kfkfkjkfjkjkfjkfjkjokojkkjlkjkjlkjdlkjljkdlk=</xroad:requestHash>\n   </soap11env:Header>\n   <soap11env:Body>\n      <tns:SearchSubjectsResponse>\n         <tns:SubjectList/>\n      </tns:SearchSubjectsResponse>\n   </soap11env:Body>\n</soap11env:Envelope>",
        "headers": {
          "Content-Type": "text/xml"
        }
      }
    }
]
}
This template is created using WireMock and is used to simulate a web service that handles SOAP requests.
- This works as follows:
-
-
request— specifies the criteria that a SOAP request must meet in order to be intercepted. In our example template, the pattern is looking forPOSTrequests whose body matches the followingXPathexpression:"//*[local-name()='serviceCode'][text()='SearchSubjects']"
This means that the request will be intercepted if it contains an element with the local name
'serviceCode'and the text'SearchSubjects'. -
response— defines the response that WireMock will return when it finds an incoming request that matches the template. In this case, it returns anHTTPresponse with a status code of200, a headerContent-Type: text/xmland a specific XML payload which is the response to the SOAP request. -
SOAP Envelope is the top-level element of a SOAP (Simple Object Access Protocol) message and identifies that the message is a SOAP message. It contains information that needs to be conveyed between client and server applications.
SOAP message must contain an Envelope with the following structure:
Structure of a basic SOAP message<soap11env:Envelope xmlns:soap11env="http://schemas.xmlsoap.org/soap/envelope/" xmlns:tns="http://nais.gov.ua/api/sevdeir/EDR" xmlns:xroad="http://x-road.eu/xsd/xroad.xsd" xmlns:id="http://x-road.eu/xsd/identifiers"> <soap11env:Header> <!-- Header --> </soap11env:Header> <soap11env:Body> <!-- Body --> </soap11env:Body> </soap11env:Envelope>
-
-
Envelope— this is the root element of the SOAP message, which wraps all the information being transmitted.
-
Header— an optional element that contains additional information (metadata) that may be required to process the message. In our case, the header contains elements for authorization, user identification, client, service, etc.
-
Body— contains the actual data being transmitted. This is the only mandatory element of the SOAP Envelope. In our case, the body contains a response with theSearchSubjectsResponseelement.It is also important to note the attributes with namespace declarations (xmlns), which define the namespaces for different parts of the message and are used to avoid conflicts between elements with the same name but from different sources.
5. Creating a route for the service and using WireMock
Following the steps mentioned above, a sub-service wiremock will be created. Now, you can interact with the WireMock API collection in two ways:
-
through a route to the WireMock interface in OpenShift (see description below in this section).
To create a new route for this service manually, follow these steps:
-
Sign in to the OpenShift console, go to the Projects section and find your registry project.
-
Go to Networking > Routes and create a new route by clicking the
Create Routebutton. -
Select Configure via > Form view in a new window.
-
In the Name field, provide a unique name for the route in your registry project. For example,
test-wiremock-route. -
In the Hostname field, provide the hostname where the route will be deployed. For example,
test-wiremock-route.apps.1-9-6-1.mdtu-ddm.projects.epam.com.This is the public hostname for the route. You can leave the field empty-- and the system will generate a hostnameautomatically. -
In the Path field, provide the path that the router uses to route traffic to the service. For example,
/. -
In the Service field, select the sub-service from the available list —
wiremock. -
In the Target port field, specify the target port where the traffic should be allowed. Select the option
9021→9021 (TCP). -
Define security settings for the connection. Routes can be secured using several types of TLS termination.
What TLS termination is?
TLS termination in OpenShift refers to the process of decrypting TLS-encrypted traffic at a certain level in the structure of your service and is used to secure communication between clients and servers.
In OpenShift, the concept of "routes" is used to expose services to the external network. A route allows you to define how external requests should be routed to services inside the cluster.
When creating a route in OpenShift, you can specify exactly where TLS termination should occur:
-
Edge Termination: TLS termination occurs at the route level. This means that OpenShift decrypts the traffic before it reaches your application. After decryption, the traffic can be passed to the application as either unencrypted or re-encrypted.
-
Passthrough Termination: OpenShift does not interfere with encryption, and TLS traffic passes through the route unchanged. TLS termination occurs at the application or service level.
-
Re-encrypt Termination: this is a combination of
EdgeandPassthrough. TLS termination occurs at the route, and then the traffic is encrypted again before being passed to the application. This can be useful if you want to use different certificates for external and internal communication.
-
-
In the Insecure traffic field, define the policy for HTTP traffic. The available options are:
-
None -
Allow -
Redirect
-
-
Click
Createand save the changes. As a result, the route for emulating external interaction will be added to the list of available routes in your registry project.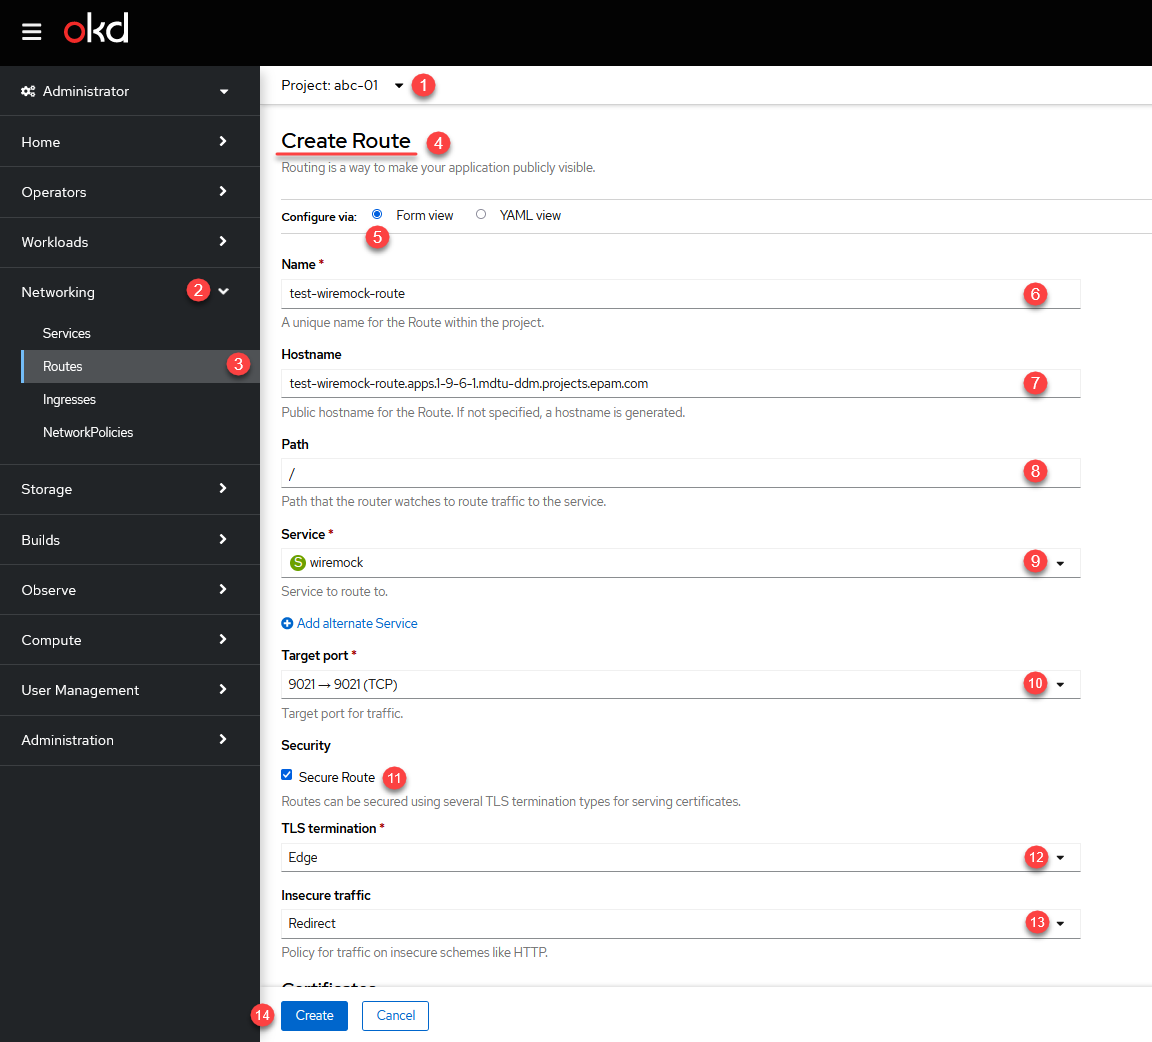
-
Follow the link to the corresponding service
wiremock.
Be sure to add the endpoint
/__admin/webappto the end of the service URL to avoid `403 Forbidden`error.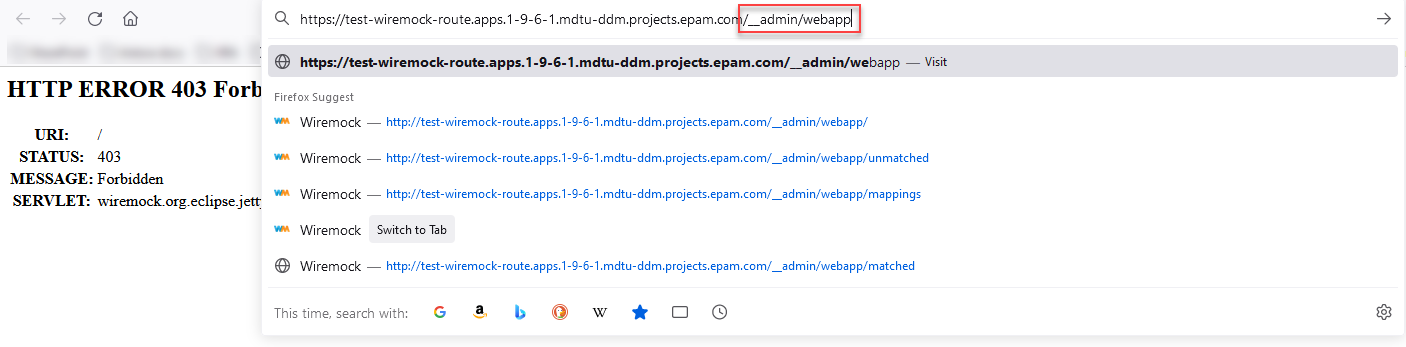
Now you can see all the published mocks in a convenient interface, according to the structure of your registry. You can use the WireMock interface to work with the collection of mocks
Explore the capabilities of WireMock at in the official product documentation.
6. API testing using Postman
You can use the collection of mocks by connecting to the sub-service wiremock and using the WireMock API for testing integration scenarios.
|
You may need Postman - a tool for developing and testing APIs. If necessary, you can use any alternative option. Also, install OpenShift CLI - a command-line utility that provides access to managing and interacting with the OpenShift cluster. |
-
Sign in to the OpenShift- console
-
In the top right corner of the interface, click on the user —
<your name>, and copy the login command for logging in throughoc cli—Copy login command. -
Click on
Display Tokenand copy the command in the Log in with this token.. The command may look like this:oc login --token=sha256~kjshdfhfdj_jnksdjnfksdnf-KMCZ0vMR2Y --server=https://api.1-9-6-1.mdtu-ddm.projects.epam.com:6443
-
Open the terminal or console on your operating system and paste the copied command for logging in.
This way, you will be able to interact as an administrator with OpenShift through
oc cli. -
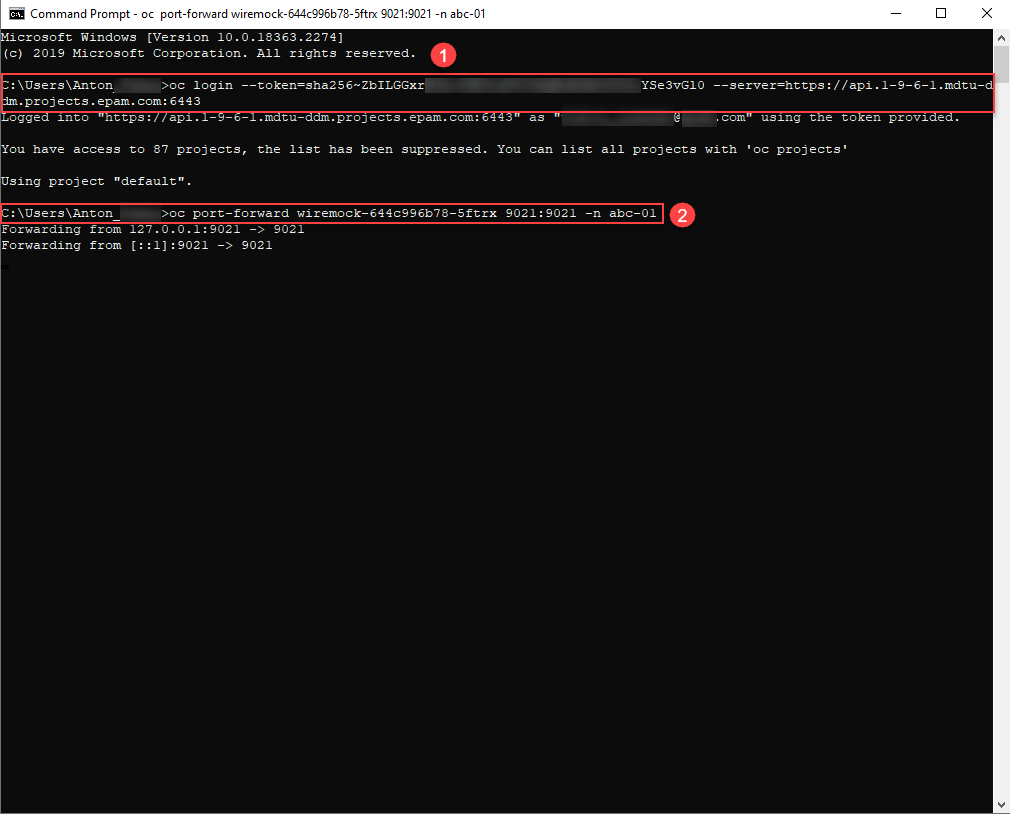
Configure port forwarding from the sub-service
wiremockto your local machine. To do this, run the following command in the terminal:Example 1. Port forwarding for connecting to the sub-service wiremockoc port-forward wiremock-644c996b78-5ftrx 9021:9021 -n abc-01
-
wiremock-644c996b78-5ftrx— the name of the pod with the `wiremock`service in your registry project. -
9021:9021— ports for forwarding.-
First port (
9021before a colon) — this is the port on your local machine. By default, this is port9021. You can choose any free port. -
Second port (
9021after a colon) — this is the port on the target pod (wiremock-644c996b78-5ftrx) in the namespaceabc-01.
How to check the list of open ports on the local machine?
You can check the list of open ports on your machine using the following commands (for Windows):
netstat -ano
This command will display a list of all active TCP connections, their ports, and the PID (Process ID) of the processes that use these connections.
If you want to check a specific port, you can add it to the
netstatcommand with thefindstrkey. For example, to check if the port8080is available, you can run the following command:netstat -ano | findstr 8080
If the command returns no output, it means that the port 8080 is available and not being used.
-
-
abc-01— name of your registry.
-
-
Open the Postman application and create a new collection. You can name it Wiremock as an example.
-
Create a new GET request and send it to the endpoint
http://localhost:9021/__admin/mappings. This way, you will get a list of all available mocks in the wiremock service, provided by the structure of your registry.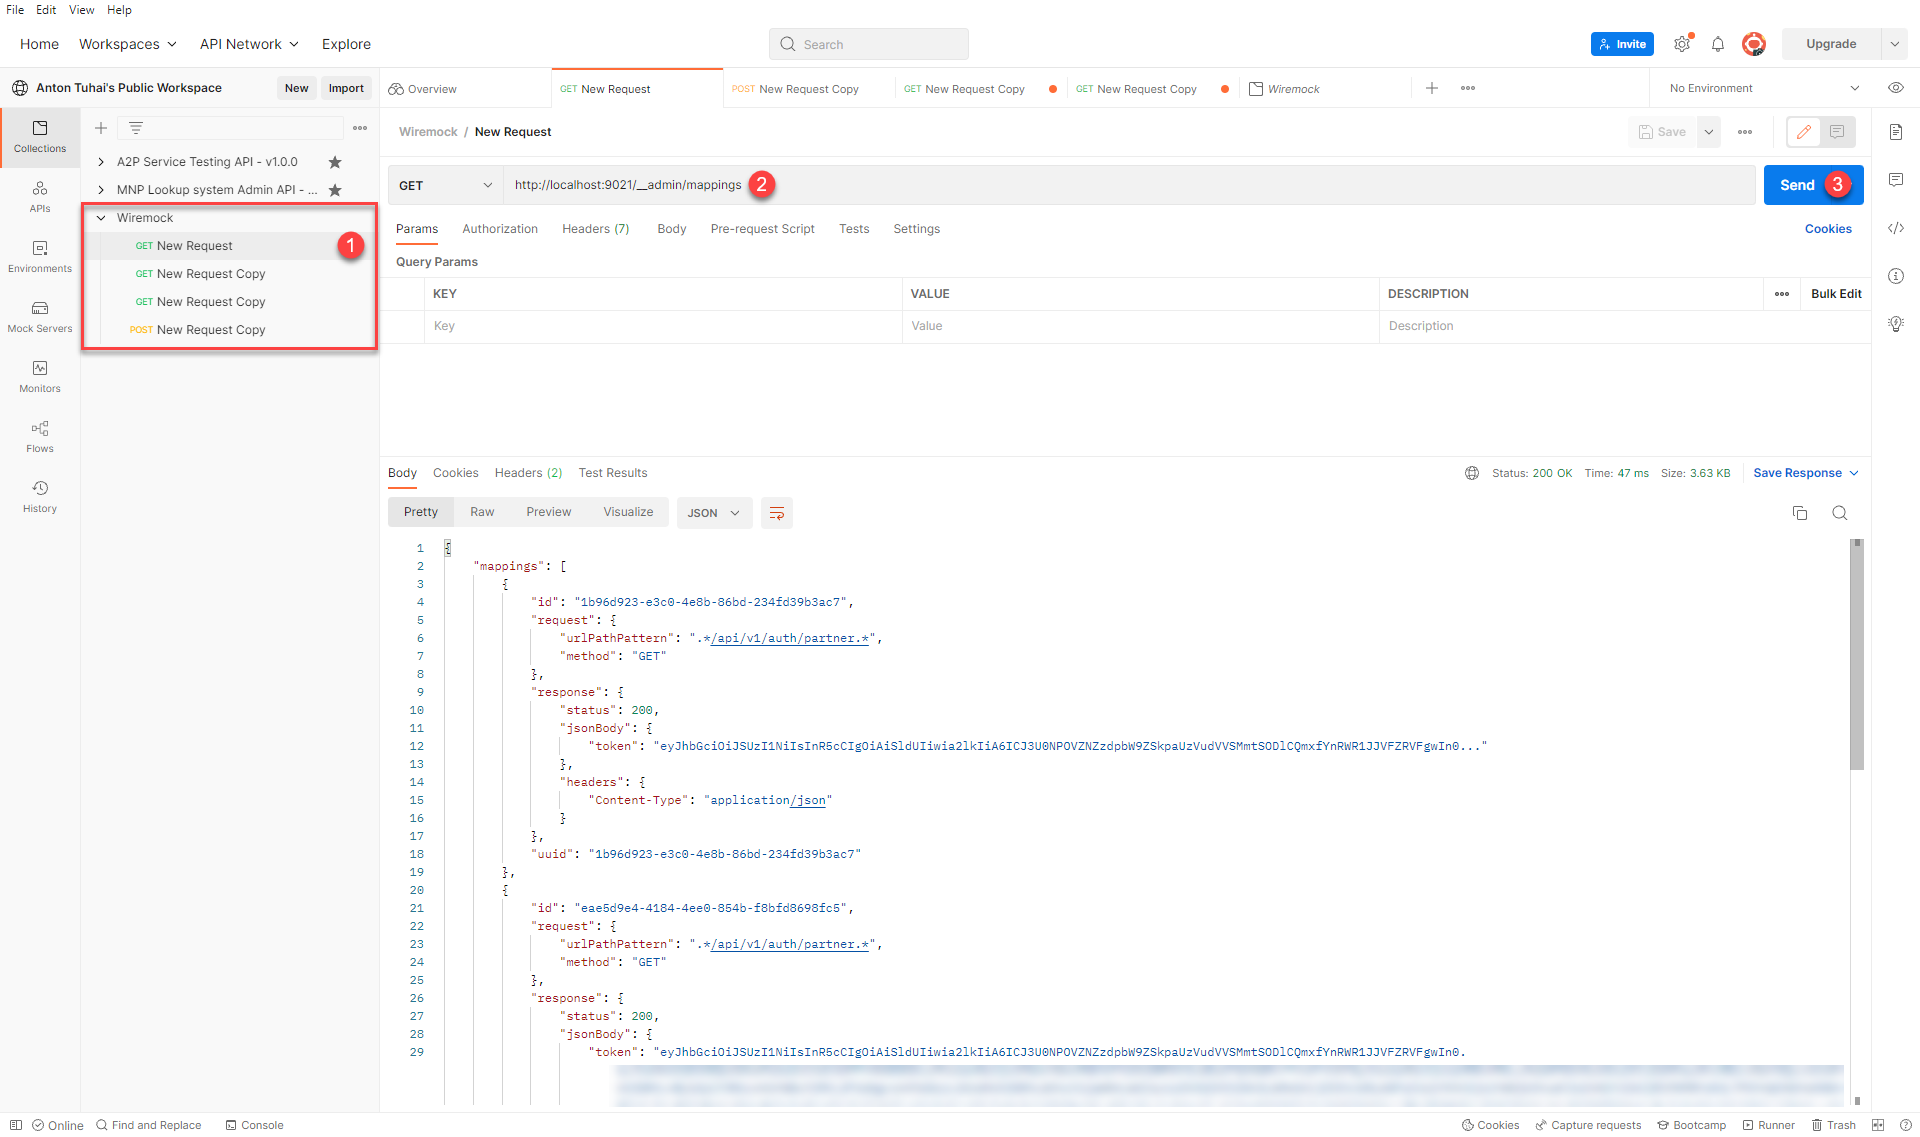
-
Create new requests to test the rules and interaction scenarios with external services and systems specified in the mocks.
7. Usage of integration connectors in business processes
After activating the mocks in the Control Plane and configuring the mock-integrations templates in the registry, you can model integration scenarios in business processes using the corresponding SOAP and REST connectors.
|
You can find more detailed information about integration connectors in the following pages: |