Granting organization access to business process tasks at the level of user attributes
- 1. Abstract
- 2. Business process modeling and configuration
- 2.1. Creating a pool for the first school business process
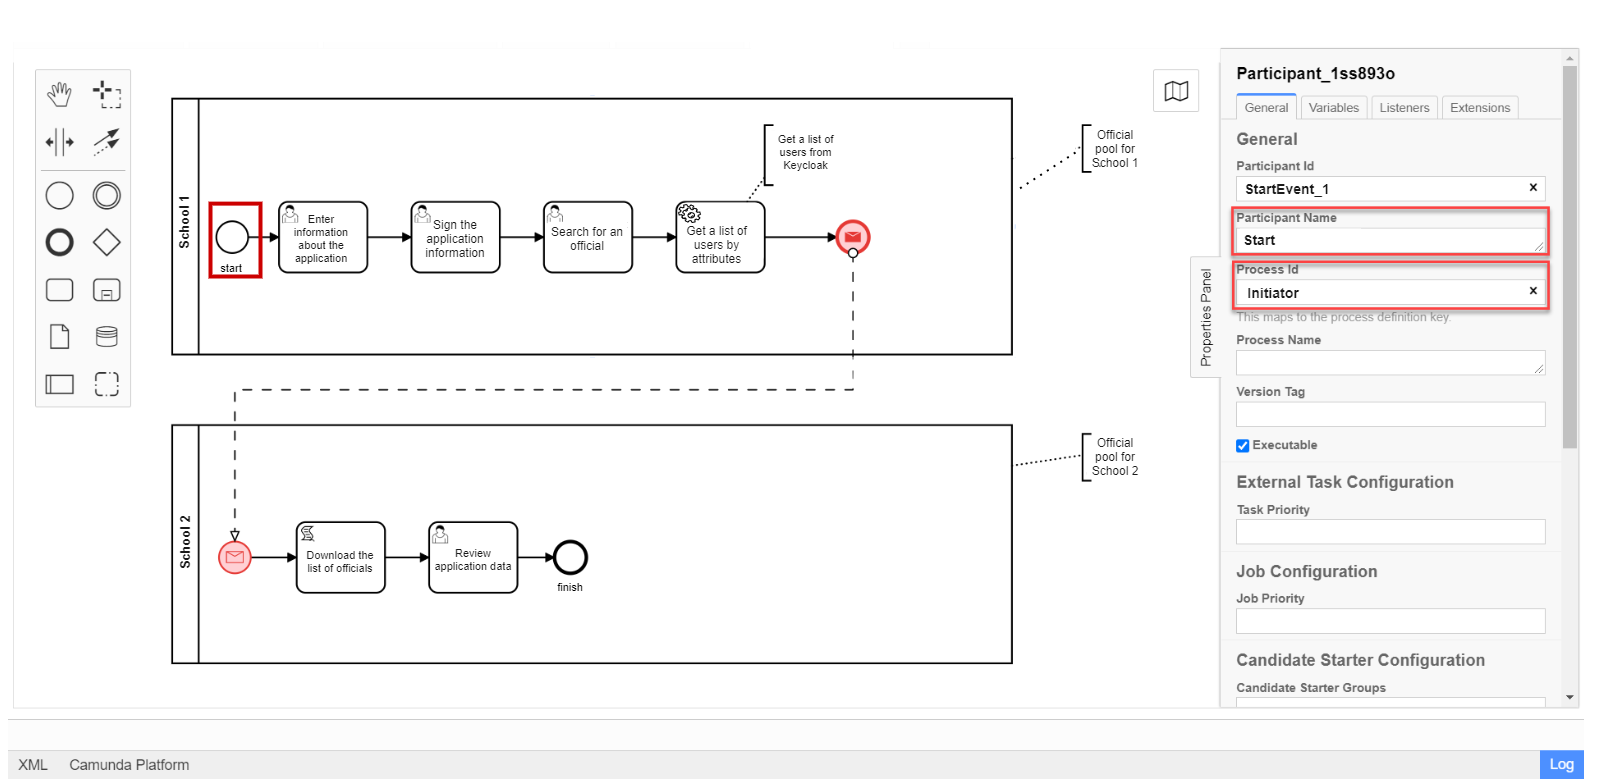
- 2.1.1. Modeling of the start event
- 2.1.2. Modeling of the user task for data entering
- 2.1.3. Modeling of the user task to sign the data using QES
- 2.1.4. Modeling of a user task for searching an officer
- 2.1.5. Modeling a service task for getting a list of users by their attributes
- 2.1.6. Modeling the "Message" end event
- 2.2. Creating a pool for the second school business process
- 2.1. Creating a pool for the first school business process
- 3. Access settings in Keycloak
- 4. Implementation at API level
| 🌐 This document is available in both English and Ukrainian. Use the language toggle in the top right corner to switch between versions. |
1. Abstract
In order to support the functionality of organization access granting to business processes at the level of user attributes, a standard extension to business processes has been developed — the ${getUsersByAttributesFromKeycloak} delegate. For that, the Get users by attributes from keycloak template with the same name is implemented as a JSON file getUsersByAttributesFromKeycloak.json.
The delegate is required in order to receive a list of users (officers) by certain attributes from the Keycloak identity and access management service when performing a business process.
- You can search in Keycloak using the following attributes:
-
-
edrpou: The identification number of an entity in the Unified state register of enterprises and organizations of Ukraine (EDRPOU). -
drfo: The identification number of a natural person in the State Register of Individuals – Taxpayers (DRFO).
-
Each officer of a certain organization has such attributes in the Keycloak service. As a result of the query, a list of usernames is returned to the business process.
This is NOT the full name of a user, but a username. For example, username1, username2 etc.
|
This list of names can be used later on in the Candidate users field when performing a user task in a business process.
Candidate users are the users authorized to perform the task. This parameter is required to control user access to specific tasks of a business process.
The list of Keycloak users is saved to the result variable in a service task of a business process. This variable is further processed by the groovy script when executing the scripting task. As a result, the list becomes a string that can be used in Candidate users.
So, we get the list object from the Keycloak service using the edrpou and drfo attributes and use the script to convert it into a string, which values are comma separated and used in the Candidate users parameter for granting access to a specific task of a business process.
|
2. Business process modeling and configuration
Let’s consider setting up a delegate to search for user attributes in the Keycloak service as part of the process when transferring a student from one school to another.
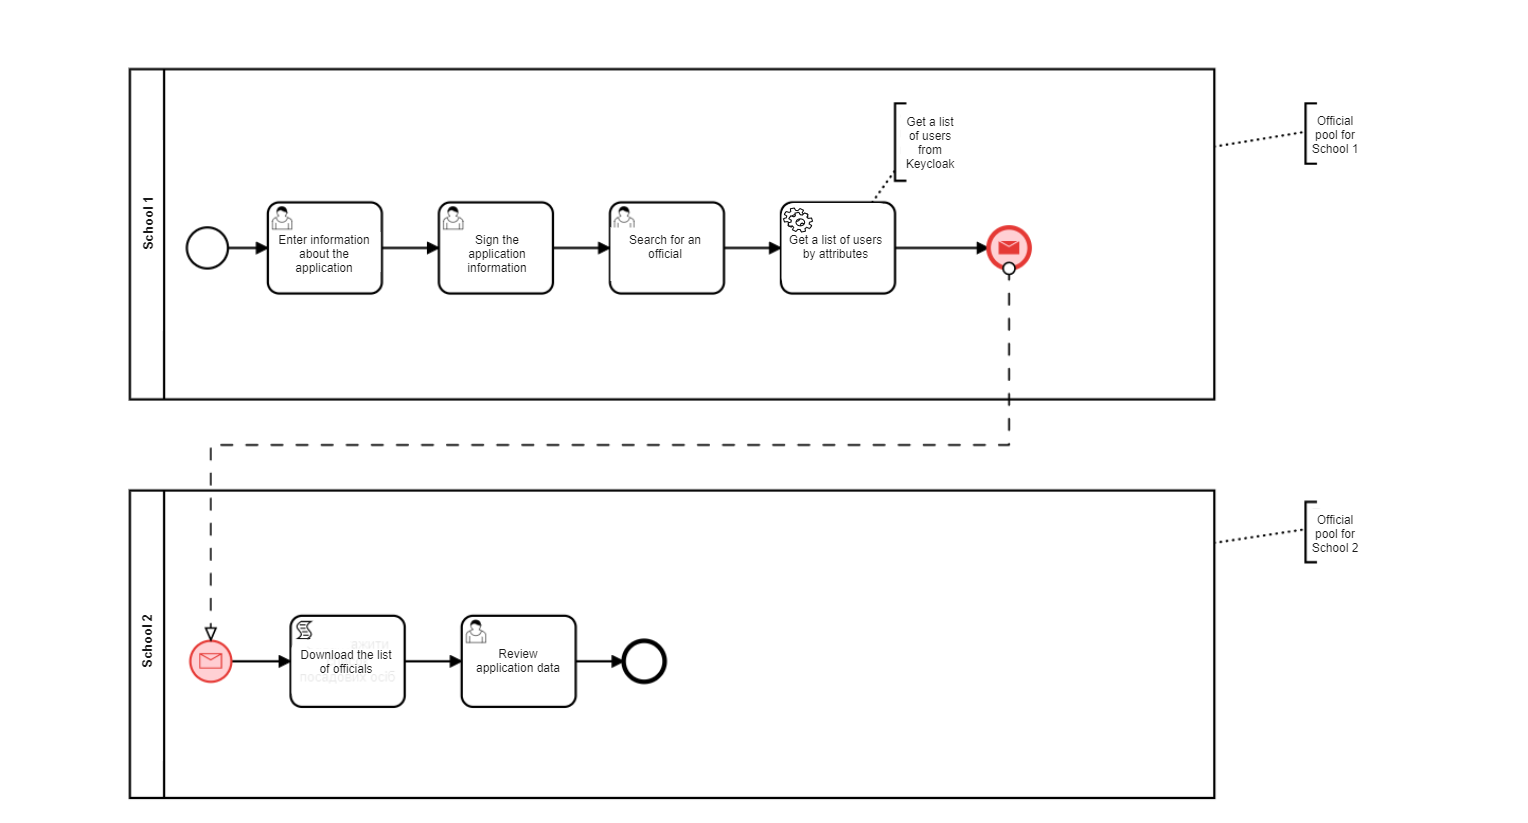
We have a complex business process of transferring a student from one school to another. The student must first be excluded from the first school, and then enrolled at the second.
From the point of the security architecture, each organization (herein educational institution) in the Keycloak service has its own EDRPOU code. Therefore, two business processes in our example are different organizations, each one having its own employees and corresponding level of access within the organization.
We have to automatically launch the business process of the second school after the first process finishes. The end of the business process in the first school (School 1) launches the second process (School 2) by the Message event.
In the business process of the second school, the officer must perform the task (User Task) of transferring the student, that is, it is necessary to appoint a performer of the task in the new organization (school). To do this, you need first to get a list of potential users in the relevant organization (performers) from the Keycloak service, and then use this list to grant task access to users in the second business process.
That means that each officer in the relevant organization can see the task in the citizen portal and appoint himself/herself as the performer.
2.1. Creating a pool for the first school business process
First of all, model the pool for the business process of the first school. To do this, follow the steps below:
| Modeling of the business process diagram has to be made within the Create Pool/Participant element. |
-
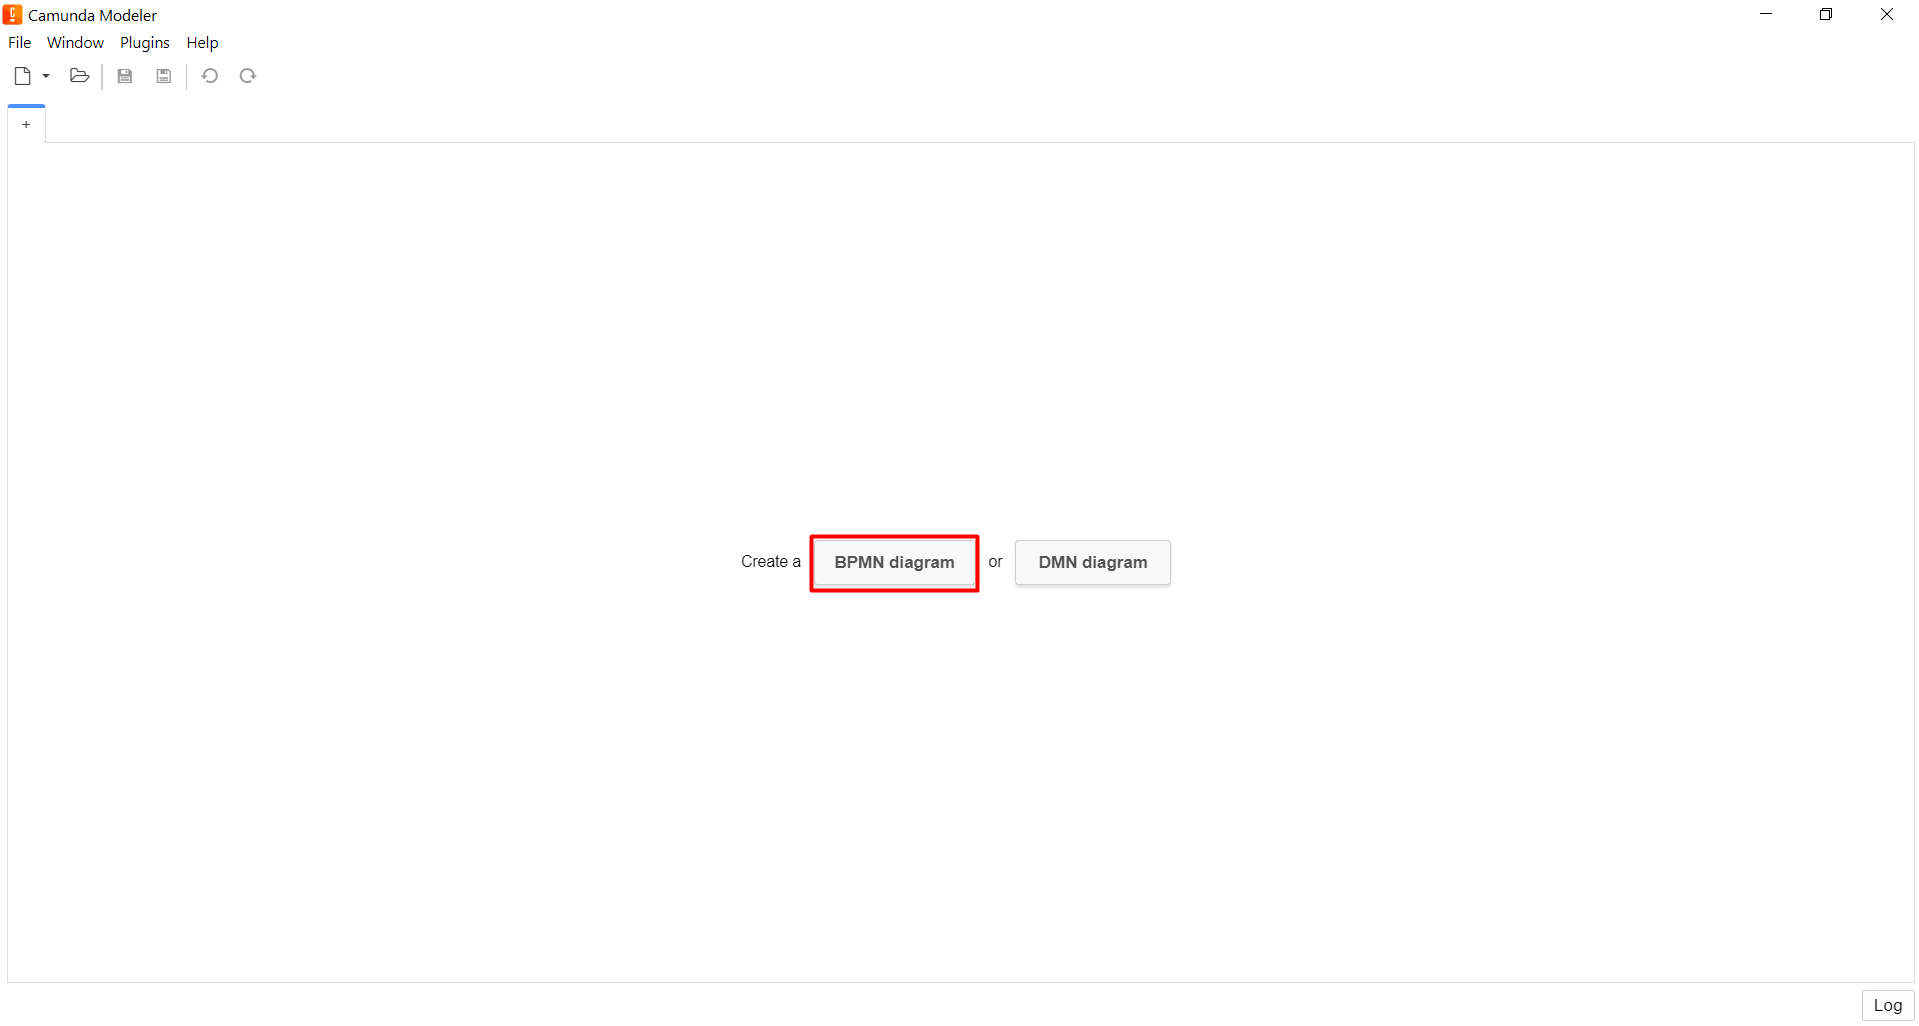
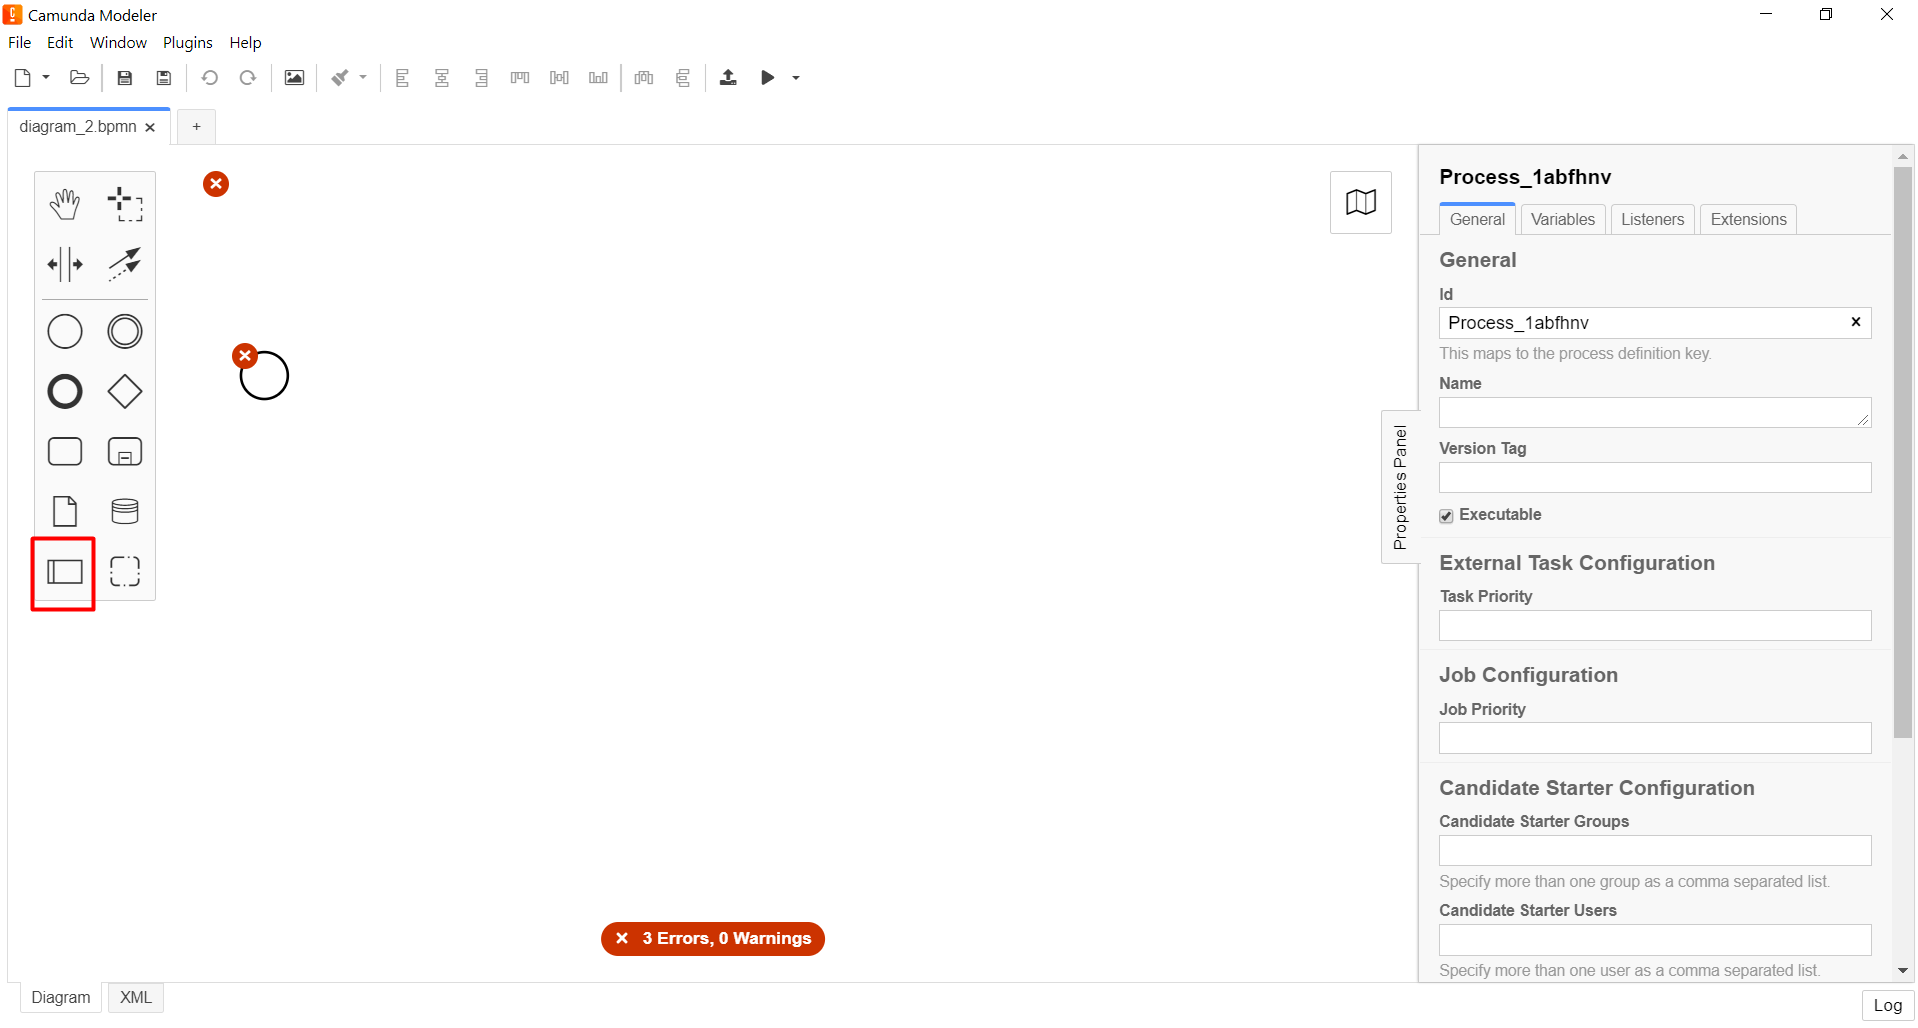
Open the Camunda Modeler application and create a new BPMN diagram. To do this, click File → New File → BPMN Diagram in the upper left-hand side corner.
-
In the toolbar on the left-hand side, find the Create pool/Participant item and drag it to the modeling panel.
-
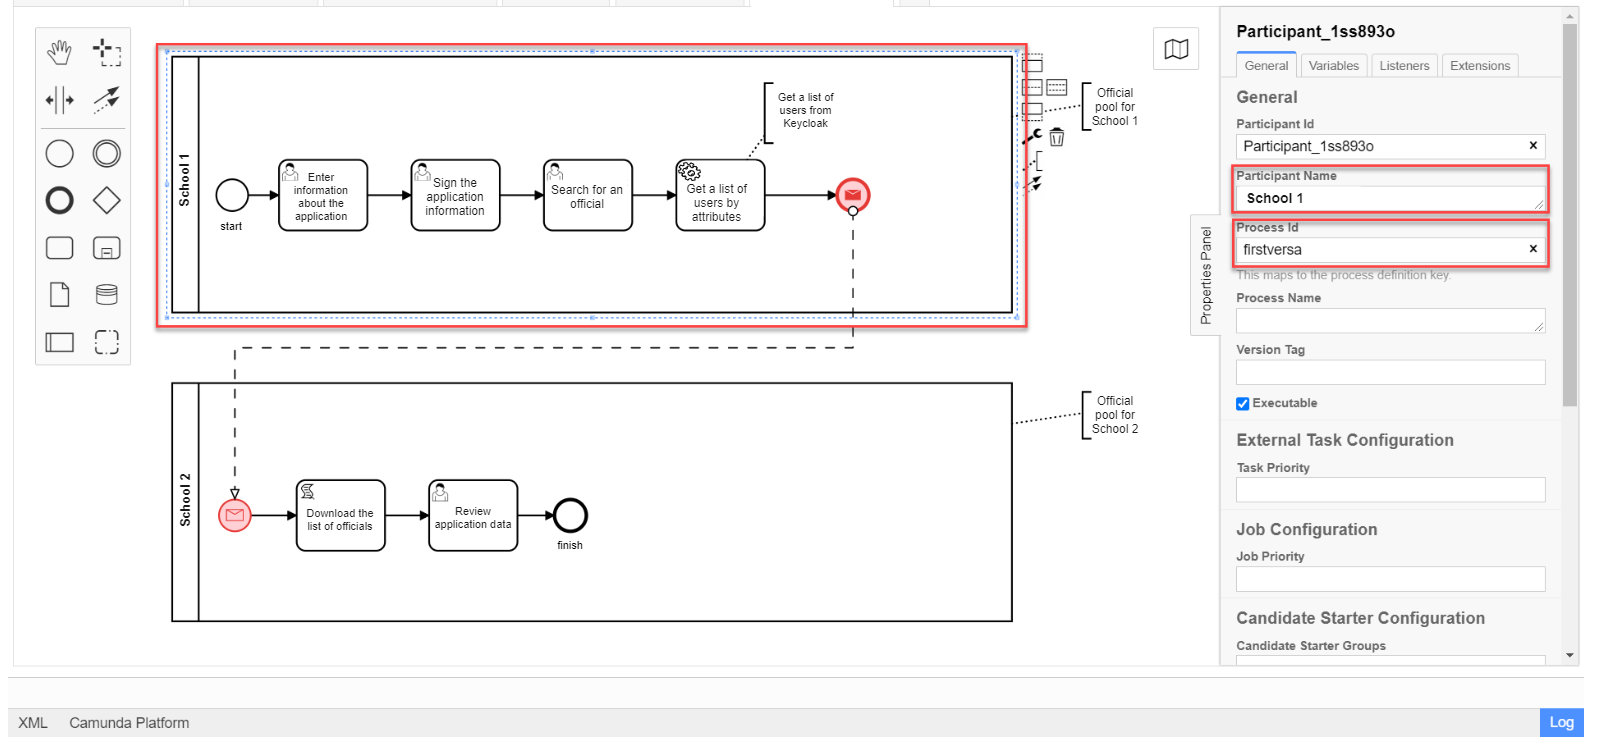
Enter the corresponding values into the following fields:
-
In the
Participant Namefield, enter the name of the pool to be displayed in the modeler —School 1. -
In the
Process idfield, enter the business process ID —firstversa. -
In the
Process Namefield, enter the process business name, optional.
-
2.1.1. Modeling of the start event
Create a start event. To do this, follow the following steps:
-
On the toolbar on the left-hand side, find the CreateStartEvent element (circle) and drag it to the modeling panel.
-
In the settings panel on the right-hand side, enter the corresponding values for the following parameters:
-
In the
Namefield, enter the name of the start event —Start; -
In the
Initiatorfield, enterinitiator.initiatoris a special variable set for the user who initiated the process.
-
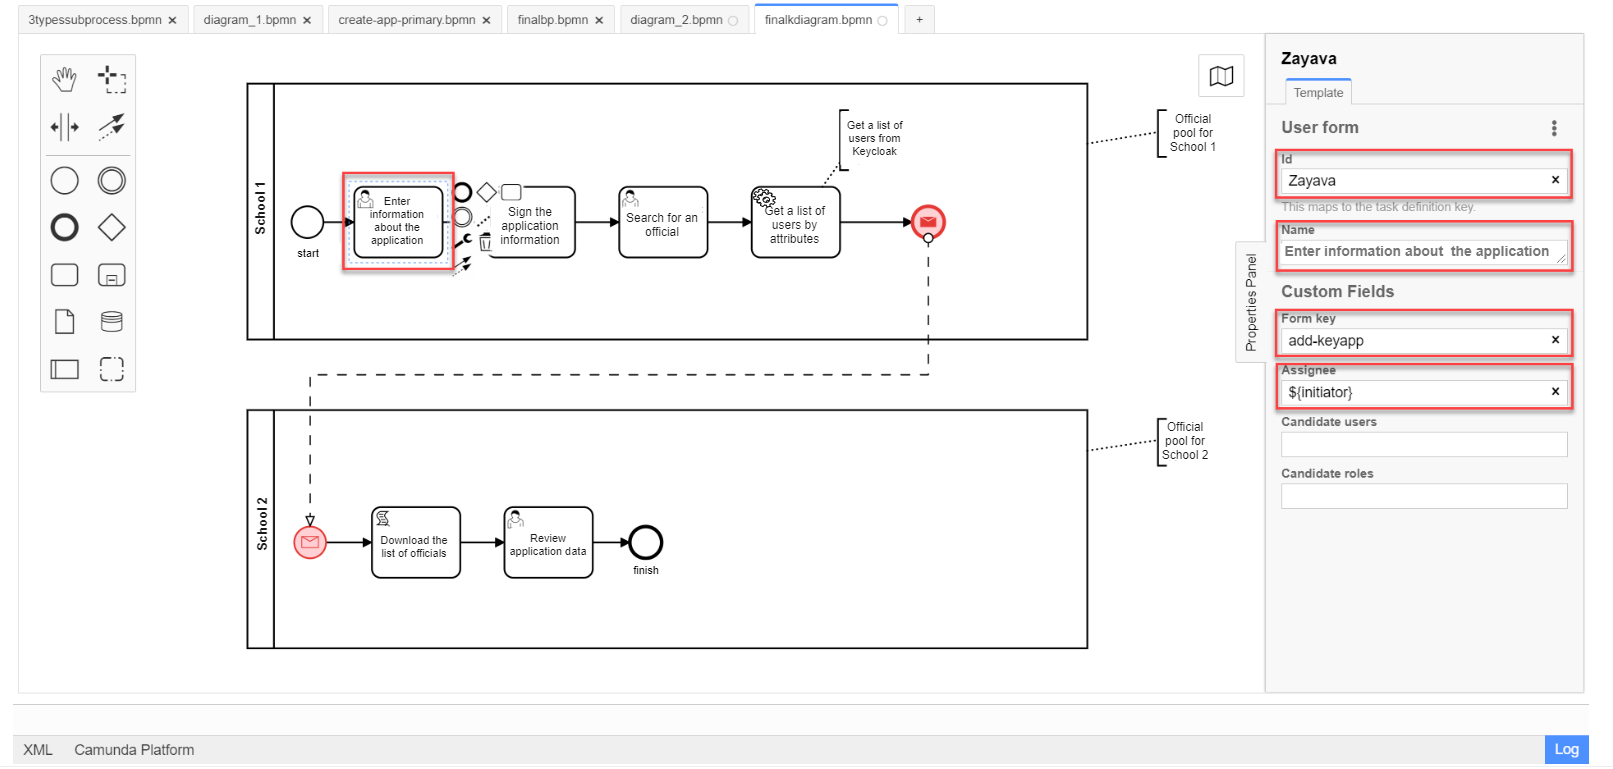
2.1.2. Modeling of the user task for data entering
Next, create a user task for entering data by a user. To do this, follow these steps:
-
Create a new task, enter its type by clicking the wrench icon and selecting User Task from the menu.
-
In the settings panel on the right-hand side, click
Open Catalog, select the User Form template and clickApplyto confirm. -
In the settings panel, configure the following parameters:
-
In the
Idfield, enter the task identifier —Zayava.Task ID is assigned automatically by default. Enter the value manually, if necessary. -
In the
Namefield, enter the name of the task —Enter application data. -
In the
Form keyfield, enter the form key that corresponds to the service name of the data entry form —add-keyapp. -
In the
Assigneefield, enter the variable used to store the user who launched the process instance —${initiator}.On the UI, after launching the business process, the officer can see a form for entering application data. The data are passed to the business process via the Form keyparameter and will be used in the next task of the process.
-
2.1.3. Modeling of the user task to sign the data using QES
Model a user task (User form) for signing the application data using QES and link it to the business process form using the Form key parameter.
-
In the
Idfield, enter the task identifier —Sign. It is a task definition key. -
In the
Namefield, enter the task name. For example,Sign the application data. -
In the
Form keyfield, enter the business process form key —add-zayavasign. -
In the
Assigneefield, enter the variable used to store the user who launched the process instance —${initiator}.On the UI, after data entered by the user, a new form appears for data signing using QES. The data are passed to the business process via the Form keyparameter and will be used in the next task of the process.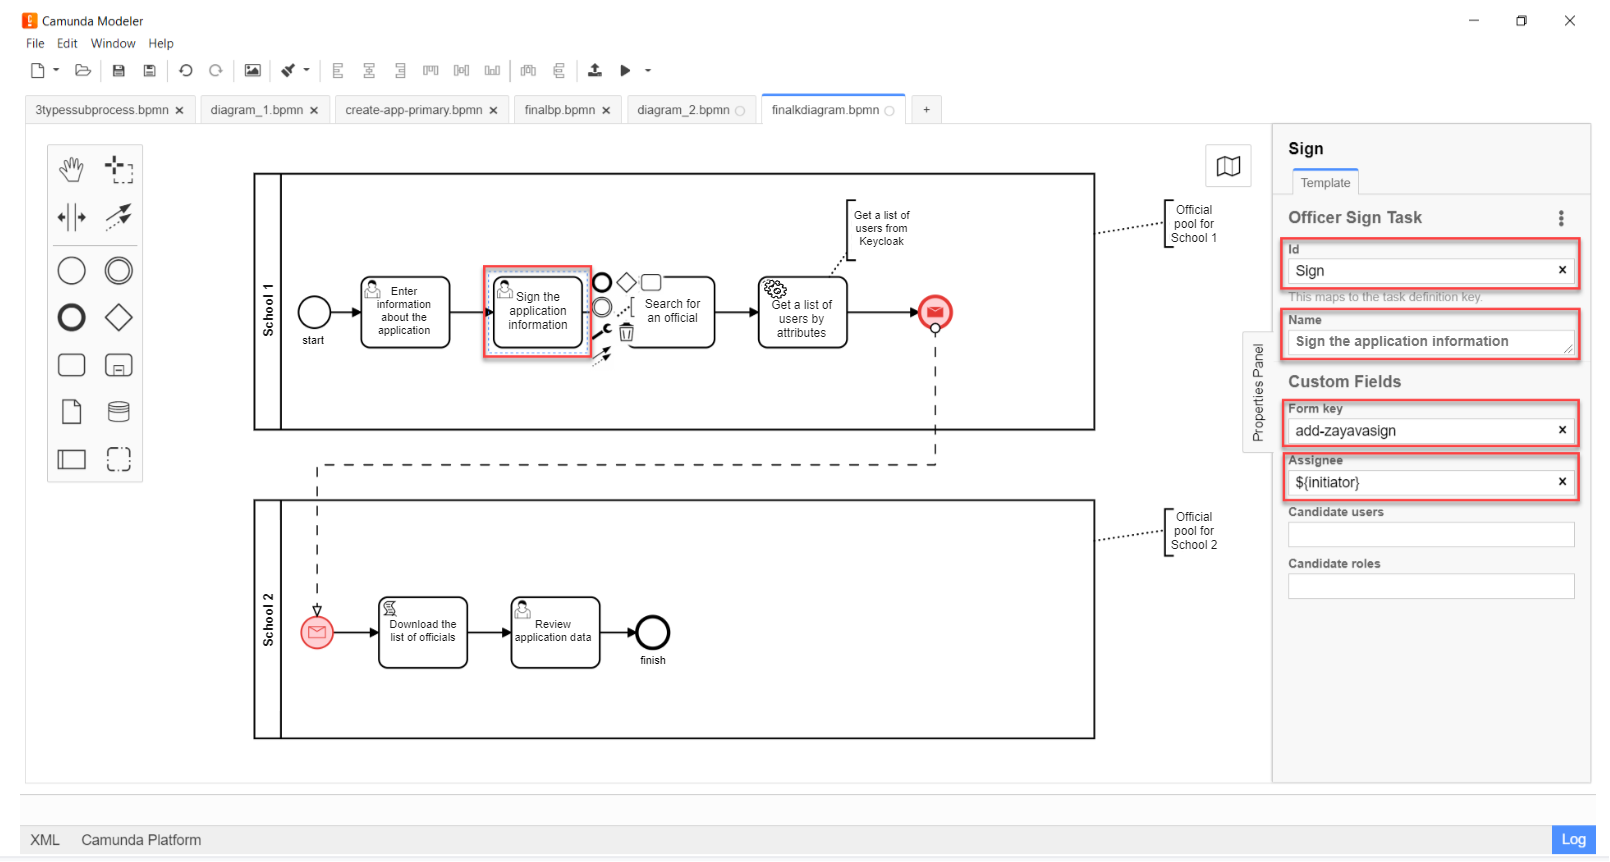
2.1.4. Modeling of a user task for searching an officer
Model a user task (User form) to search for officers or for a specific officer by attributes and associate it with the business process form using the Form key parameter.
-
In the
Idfield, enter the task identifier —Search. It is a task definition key. -
In the
Namefield, enter the name of the task. For example,Search for an officer. -
In the
Form keyfield, enter the business process form key —add-zayavasearch. -
In the
Assigneefield, enter the variable used to store the user who launched the process instance —${initiator}.On the UI, after the user signs the data, a new form appears for searching officers / an officer by attributes. That means, the user must enter the values of the edrpouanddrfoattributes into the corresponding fields of the form. The data are passed to the business process via the `Form key' parameter and will be used in the next task of the process.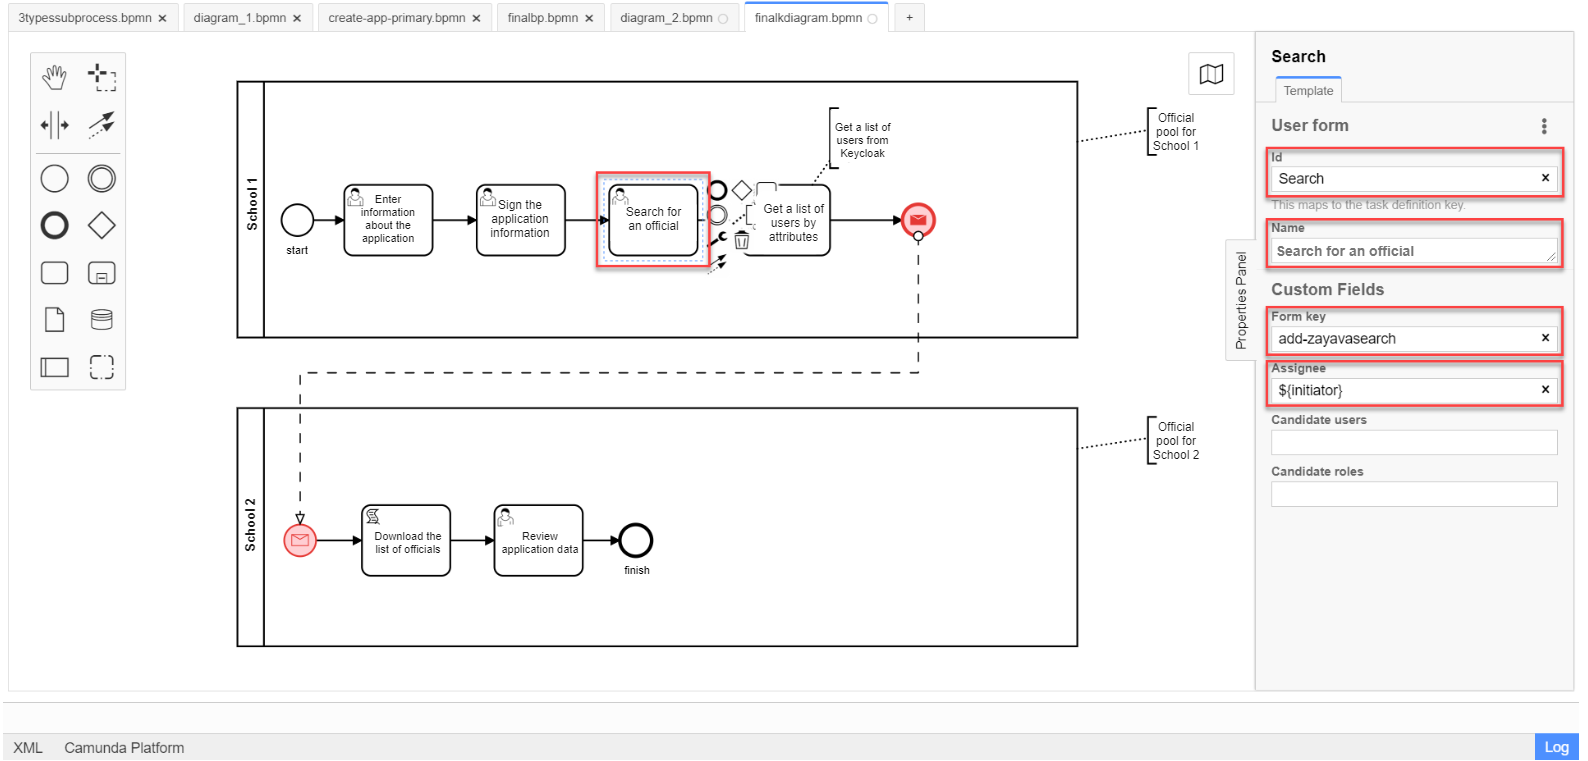
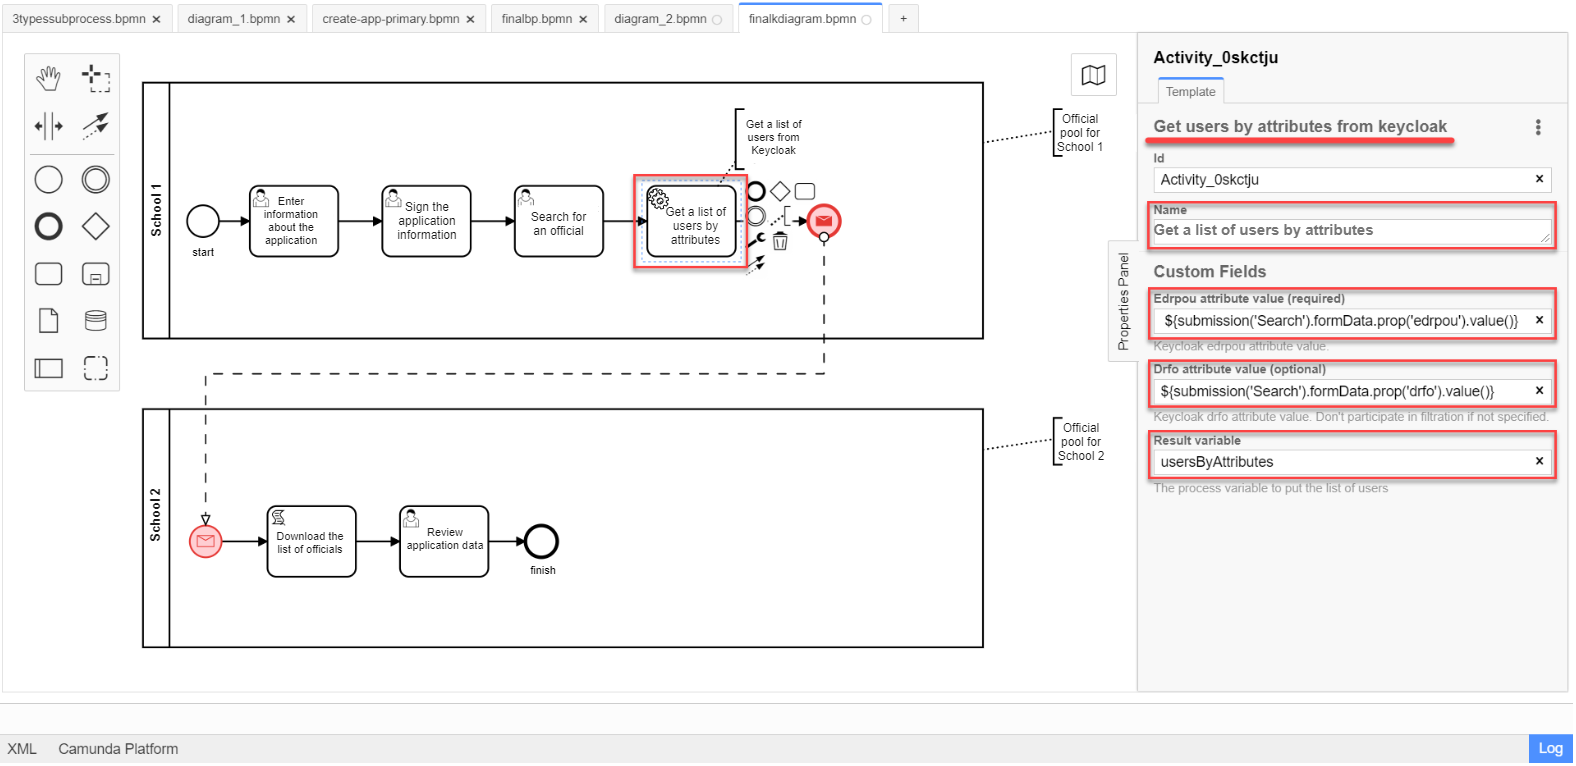
2.1.5. Modeling a service task for getting a list of users by their attributes
Later on, the data is used in the service task "Get a list of users by attributes".
In the task, you need to use a delegate to get a list of users by their attributes (Get users by attributes from keycloak).
As a result, you get a list of users by their attributes.
-
Model a new task.
-
Define its type by clicking the wrench icon and selecting Service Task from the menu.
-
Go to the settings panel on the right-hand side and apply the Get users by attributes from keycloak delegate. To do this, select the corresponding template from the catalog (`Open Catalog').
-
Make further settings:
-
Enter the task name in the
Namefield. For example,Get a list of users by attributes. -
In the
Edrpou attribute valuefield, enter the value of theedrpouattribute —${submission('Search').formData.prop('edrpou').value()}.The value of the
edrpouattribute is required. It can be submitted both directly (by entering the EDRPOU code, for example,11111111), and using thesubmission()function, specifying the ID of the last user task (hereinSearch). -
In the
Drfo attribute valuefield, enter the value of thedrfoattribute —${submission('Search').formData.prop('drfo').value()}.The value of the
drfoattribute is optional. You can pass it both directly (by entering the DRFO code, for example,2222222222), and using thesubmission()function, by entering the ID of the last user task (hereinSearch). -
In the
Result variablefield, enter the name of the variable where you want to save the response —usersByAttributes.As a result of the inquiry, you receive a list of users from Keycloak by their attributes. This list is stored in the
usersByAttributesvariable.-
If the user passes only the value of the
edrpouparameter, the service returns a list of all officers in the corresponding organization. -
If the user passes the values of the
edrpouanddrfoparameters, the service returns a list with a name of a particular officier in the corresponding organization.
-
-
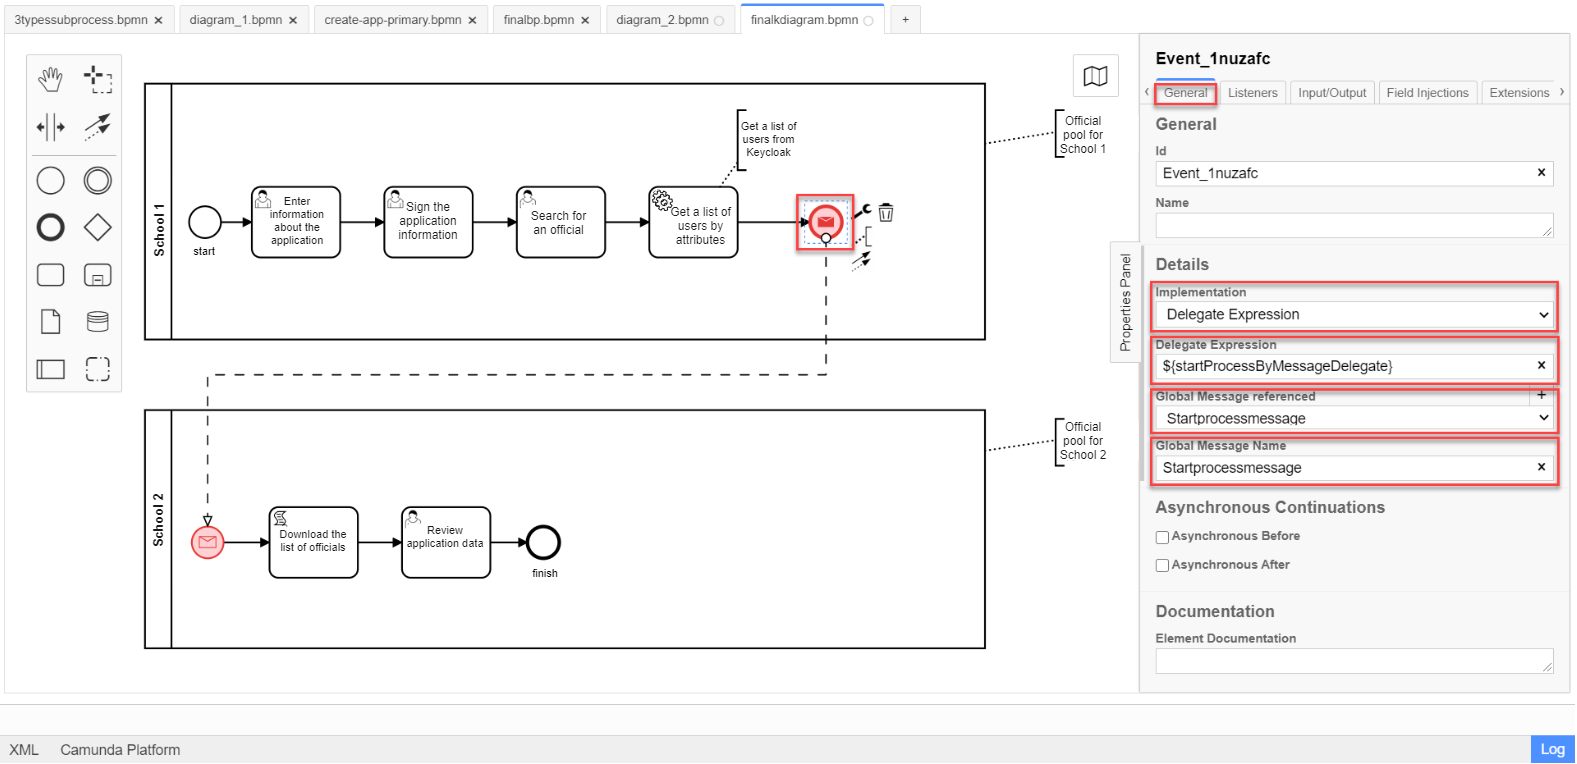
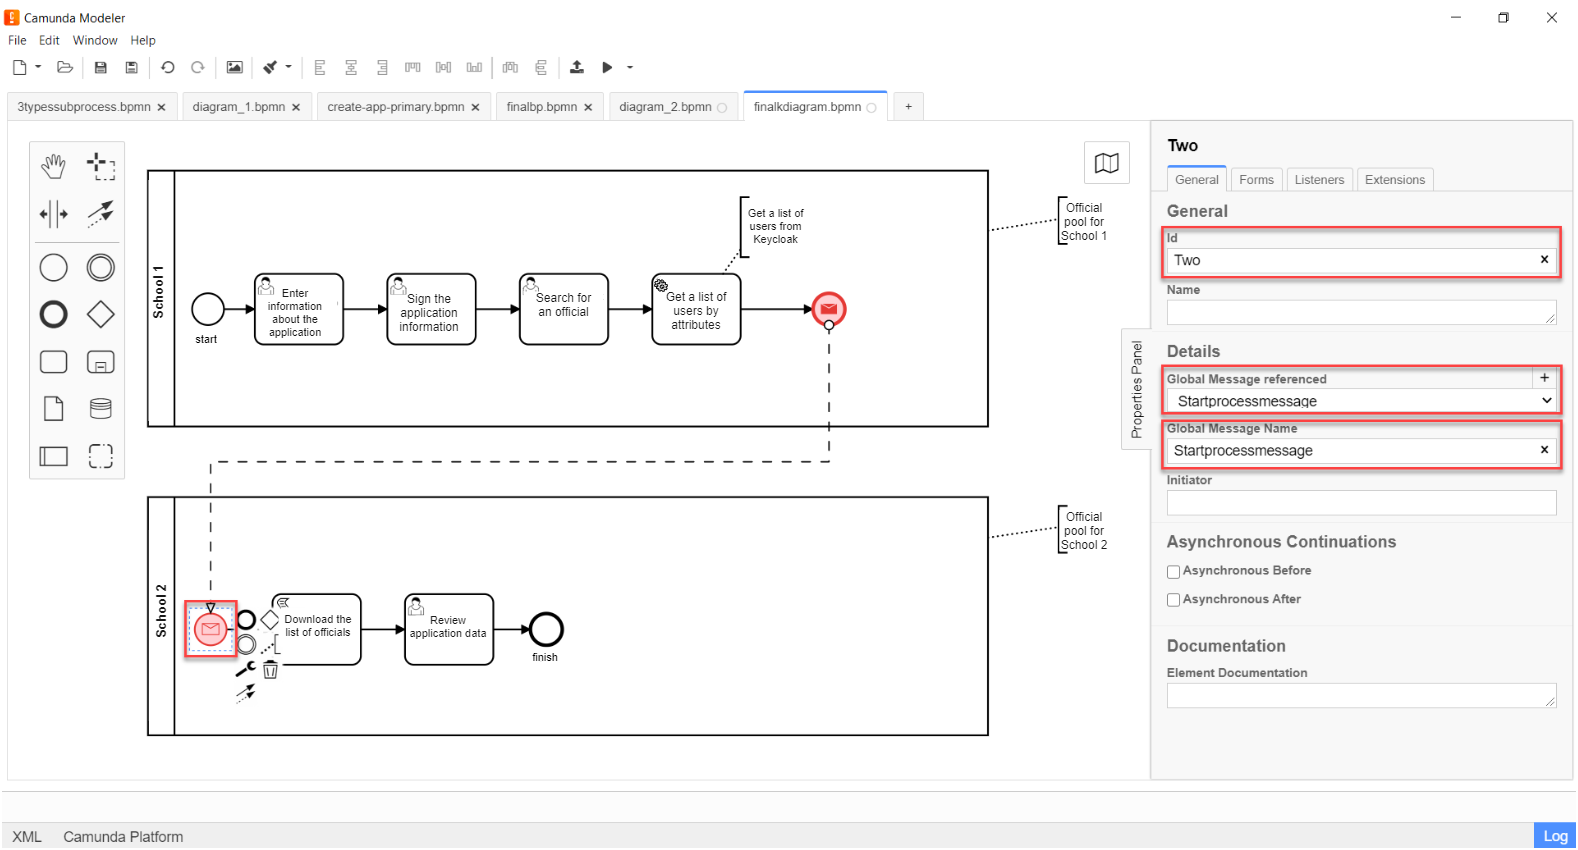
2.1.6. Modeling the "Message" end event
At this stage, it is necessary to pass the received list of users to another business process. For this, the "Message" end event is used. That means that the termination of one process initiates another process by passing certain data in a message.
We need to create a local variable, and pass the list of users and QES to another process in it.
-
Model the end message event.
To find out more about the "Message" event, read this information. -
Go to the settings panel on the right-hand side and configure the options:
-
In the
Generaltab, configure the following settings:-
In the
Implementationfield, select theDelegate Expressiontype. -
In the
Delegate Expressionfield, enter the delegate to pass the message —${startProcessByMessageDelegate}. -
In the
Global Message Namefield, enter the global name for establishing communication between message events —Startprocessmessage. -
In the
Global Message referencedfield, selectStartprocessmessage. The value is filled in automatically, according to theGlobal Message Nameparameter.
The values of the Global Message NameandGlobal Message referencedparameters must match the corresponding values of the message-receiving event. -
-
In the
Input/Outputtab, configure a local variable as an input parameter:-
In the
Local Variable Namefield, enter the name of the local variable —messagePayload. -
In the `Variable Assignment Type' field, enter the type of parameter passing using a variable — `Map' (key-value).
-
Add entries for two parameters by clicking the plus sign (
+):-
For the first entry, enter the
usersparameter and its value${usersByAttributes}in theKeyfield.The user must pass a name of the variable where the array of users, obtained in the previous service task, is stored. -
For the second entry, enter the
taskparameter and its${submission('Sign').formData}value in theKeyfield.The user must pass QES used in the last user task for data signing (herein, Sign) using thesubmission()function.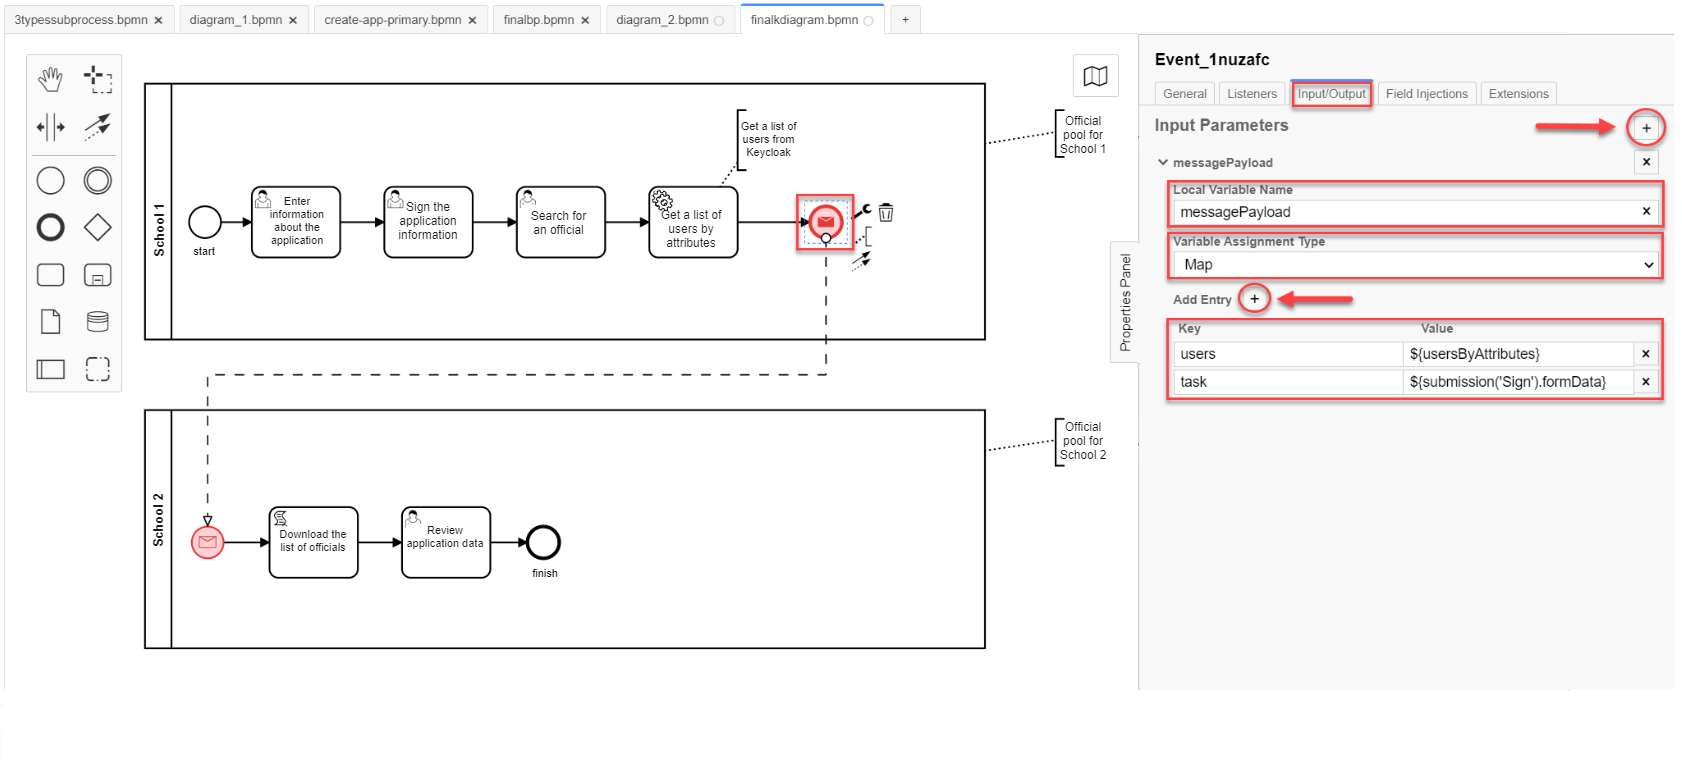
-
-
-
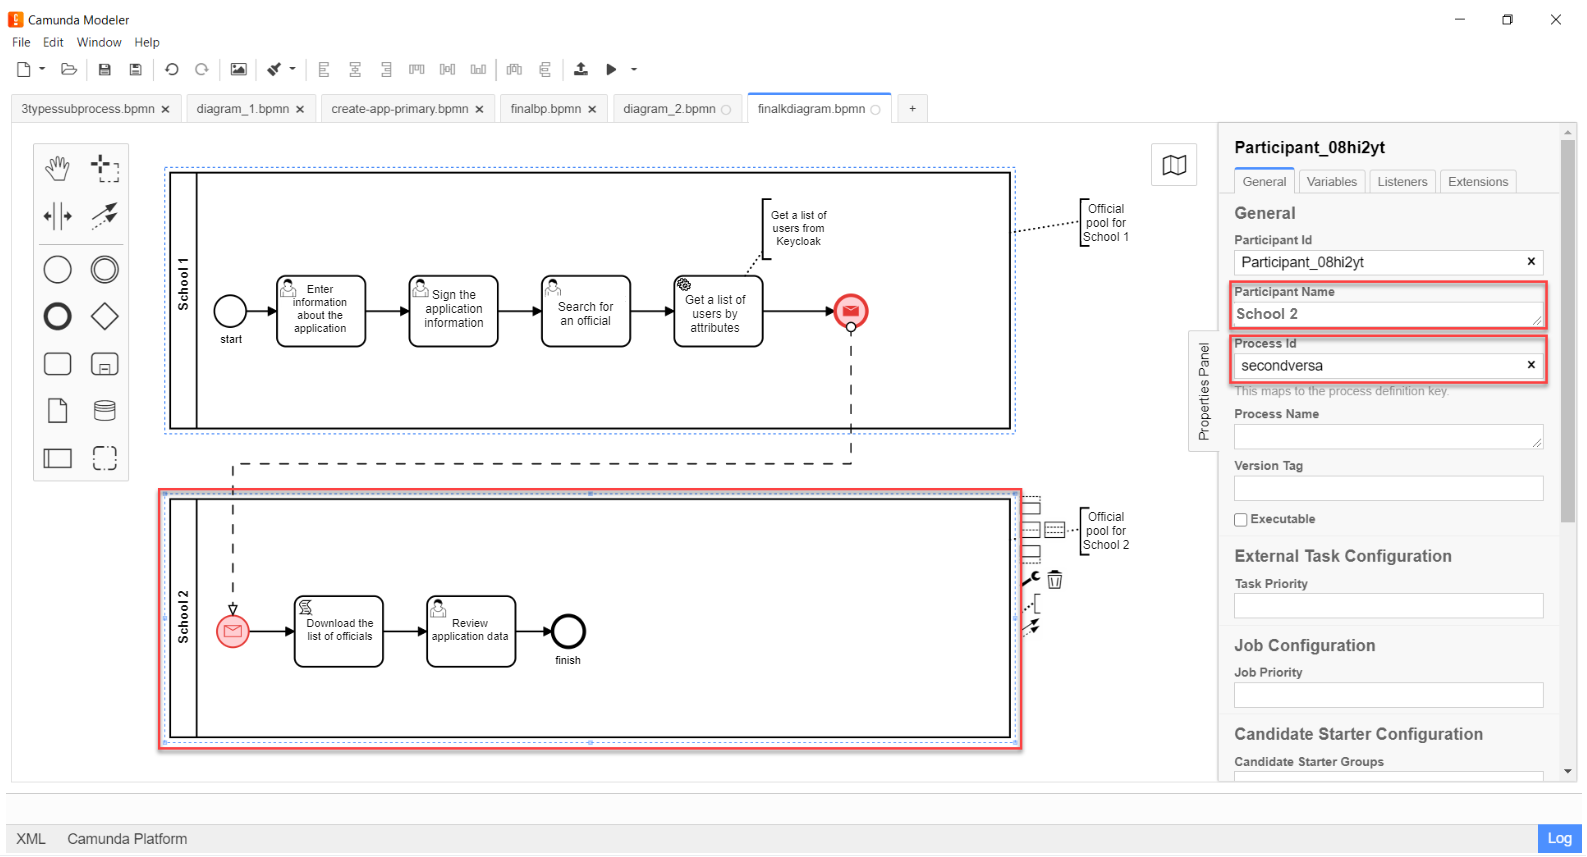
2.2. Creating a pool for the second school business process
Model the pool for the business process of the second school_. To do this, follow the steps below:
| Modeling of the business process diagram has to be made within the Create Pool/Participant element. |
-
Open the Camunda Modeler application and create a new BPMN diagram. To do this, click File > New File > BPMN Diagram in the upper left-hand side corner.
-
In the toolbar on the left-hand side, find the Create pool/Participant item and drag it to the modeling panel.
-
Enter the corresponding values into the following fields:
-
In the
Participant Namefield, enter the name of the pool to be displayed in the modeler —School 2. -
In the
Process idfield, enter the business process ID —secondversa. -
In the
Process Namefield, enter the process business name, optional.
-
2.2.1. Modeling of the message start event
At this stage, it is necessary to get a list of users from the business process of the first school. This is done using the initial "Message" event.
-
Model the start message event.
To find out more about the "Message" event, read this information. -
Go to the settings panel on the right-hand side and configure the parameters:
-
In the
Idfield, enter the event identifier —Two. -
In the
Global Message Namefield, enter the global name for establishing communication between message events —Startprocessmessage. -
In the
Global Message referencedfield, selectStartprocessmessage. The value is filled in automatically, according to theGlobal Message Nameparameter.
The values of the Global Message NameandGlobal Message referencedparameters must match the corresponding values of the message sending event.+
-
2.2.2. Modeling the scripting task for downloading a list of officers
At this stage, it is necessary to create a script based on the data from the business process of the first school. This script converts the list of users received from the Keycloak service into a string of comma-separated values. These values can be used later on for granting access to the student transfer task in the business process of the second school.
-
Create a new task, define its type by clicking the wrench icon and selecting Script Task from the menu.
-
In the settings panel on the right-hand side, fill in the following fields:
-
In the
Namefield, enter the task name —Download the list of officers. -
In the
Script Formatfield, specify the script format —groovy. -
In the
Script Typefield, enter the script type —Inline Script. -
Enter the groovy script directly into the
Scriptfield:
Example 1. Example. The groovy script to convert an object containing a list of users into a comma-separated string of valuesdef users = message_payload('Two').data['users'] def usersstring = '' users.each { usersstring=usersstring+it+',' } set_variable('users',users) -
-
The result of script execution is written to the
usersvariable.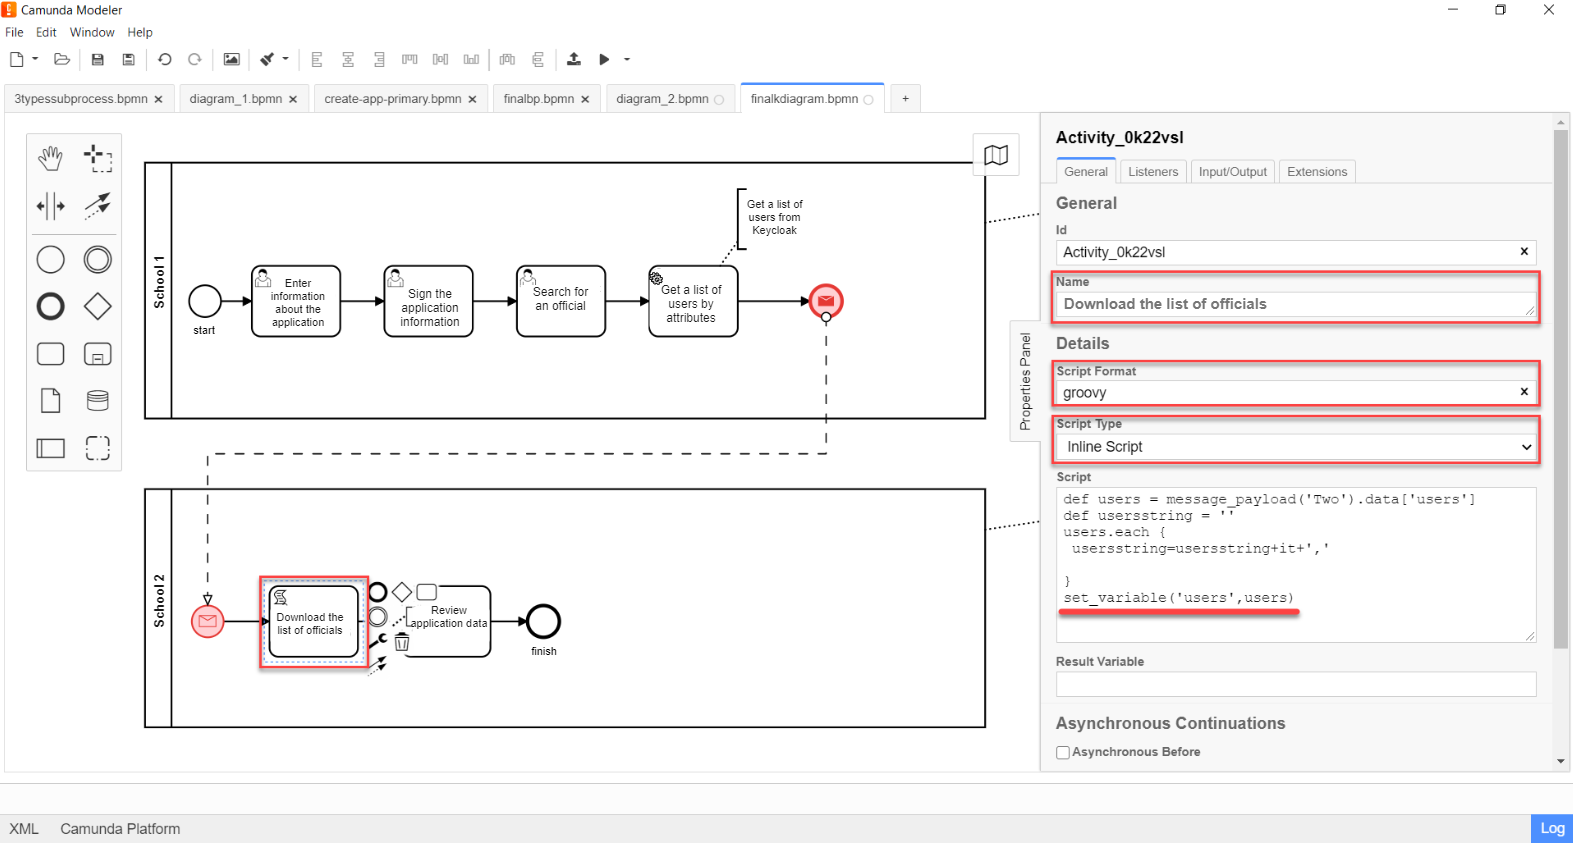
2.2.3. Modeling a user task to view application data
Model a user task (User form) for viewing application data and connect it to the business process form using the Form key parameter.
-
In the
Namefield, enter the name of the task. For example,View application data. -
In the
Form keyfield, enter the business process form key —add-zayavaview. -
In the
Candidate usersfield, use the variable that stores the received list of users from Keycloak as a comma-separated string of values —${users}.The list of usernames can be passed both directly (for example,
username1, username2, username3, …) and using a variable (herein,${users}) where this list is stored.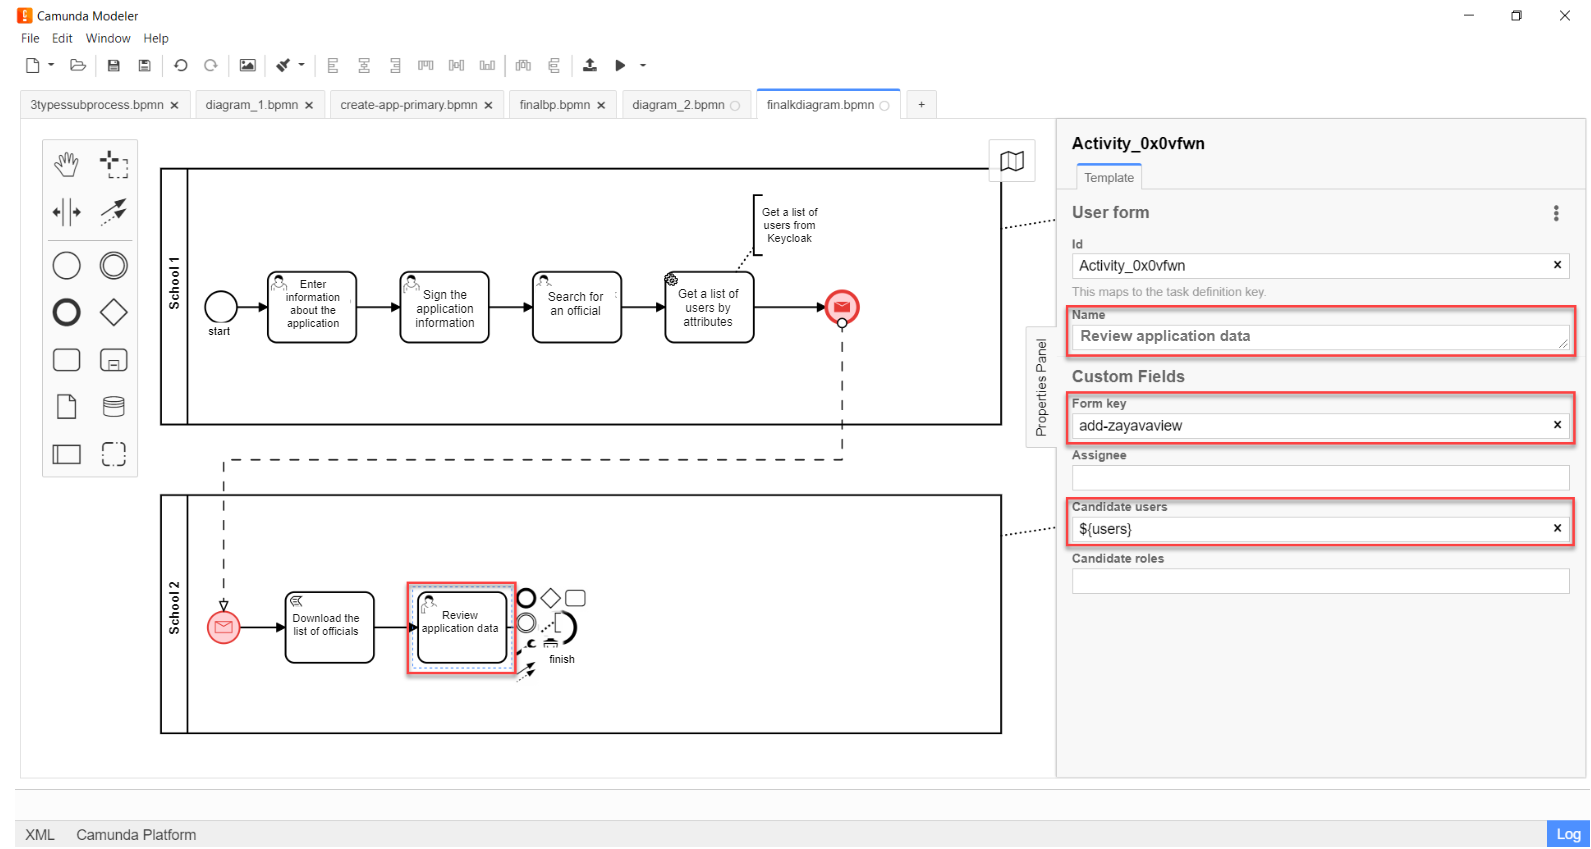
In this case, each officer in the corresponding organization (School 2) has access to review this task in the personal portal, and will also be able to appoint himself/herself as a performer.
| An officer may NOT have access to a business process, but only to a specific task. That means that such a user is not able to start a business process, but is able to perform a certain task within such a process. |
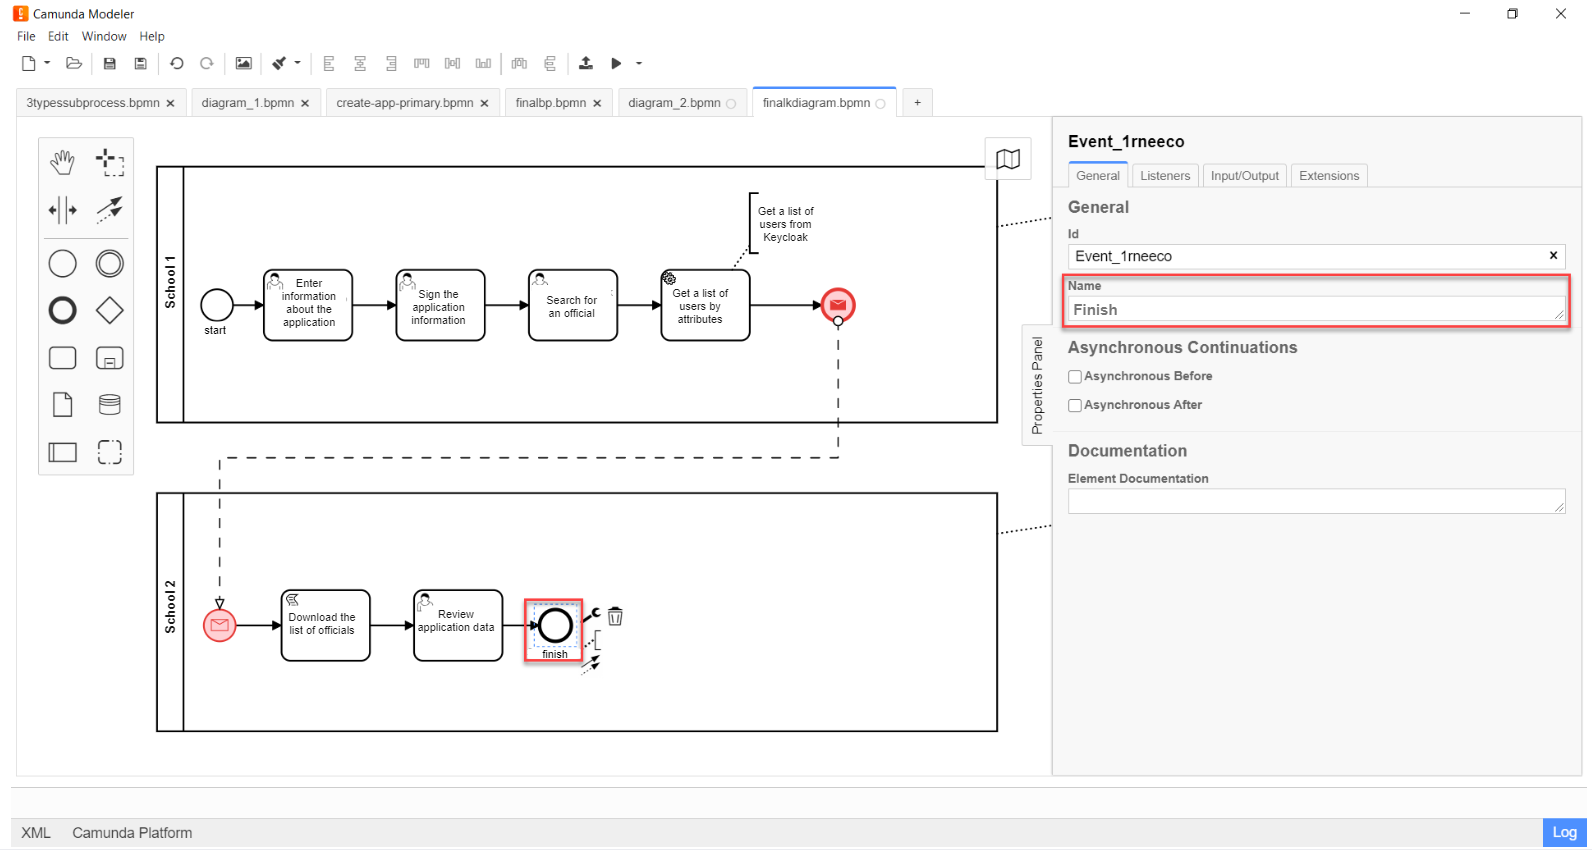
2.2.4. Simulation of the process end event
Model the process end event:
In the Name field, enter the name of the event — End.
3. Access settings in Keycloak
Let’s see what users and their attributes look like from the perspective of the Keycloak service.
All users of the Platform and registry, as well as their attributes, are stored in specific Keycloak realms[1], according to their roles.
There are four main realms:
-
-admin -
-officer-portal -
-citizen-portal -
-external-system.
| To find out more about creating users and granting them access rights, see this link. |
You have to get the list of users by their attributes from the -officer-portal realm, because access to a task is granted to users having the "Officer" role.
|
-
Enter the
-officer-portalrealm.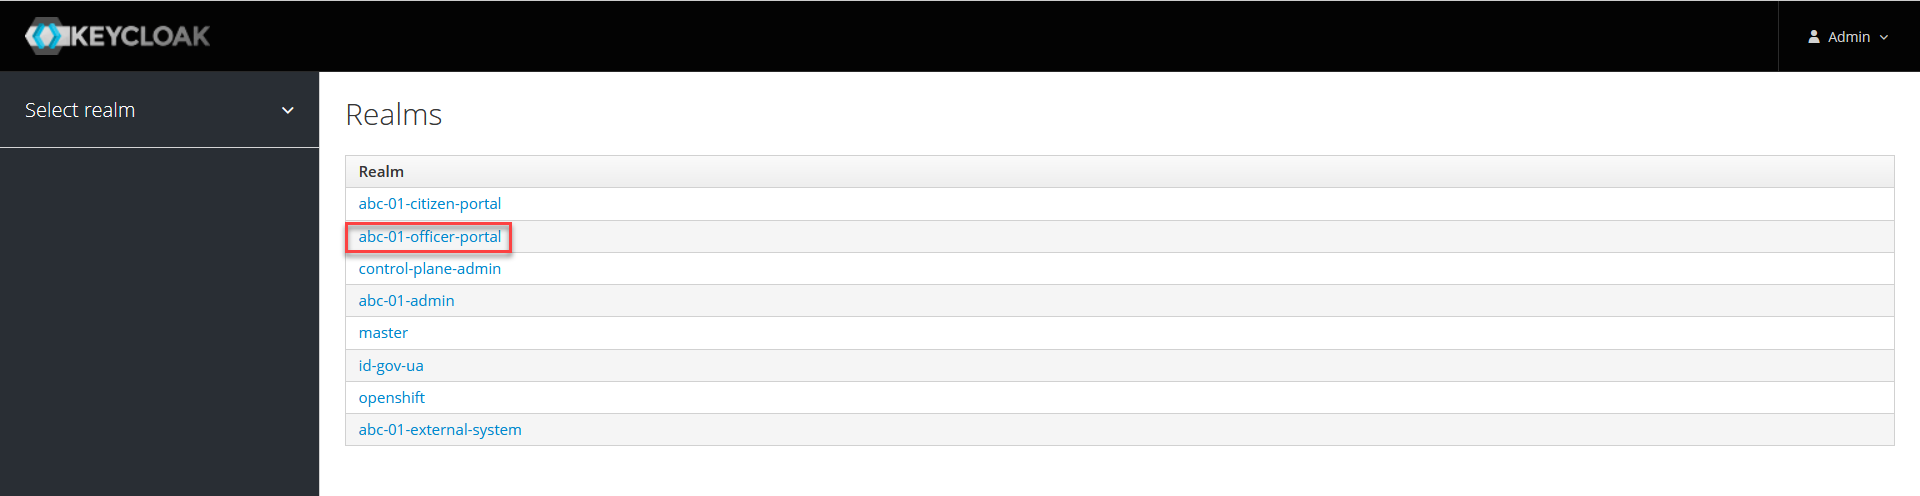
-
In the sidebar on the left-hand side, go to the Users section. Click
View all usersto display the list of all users in this realm.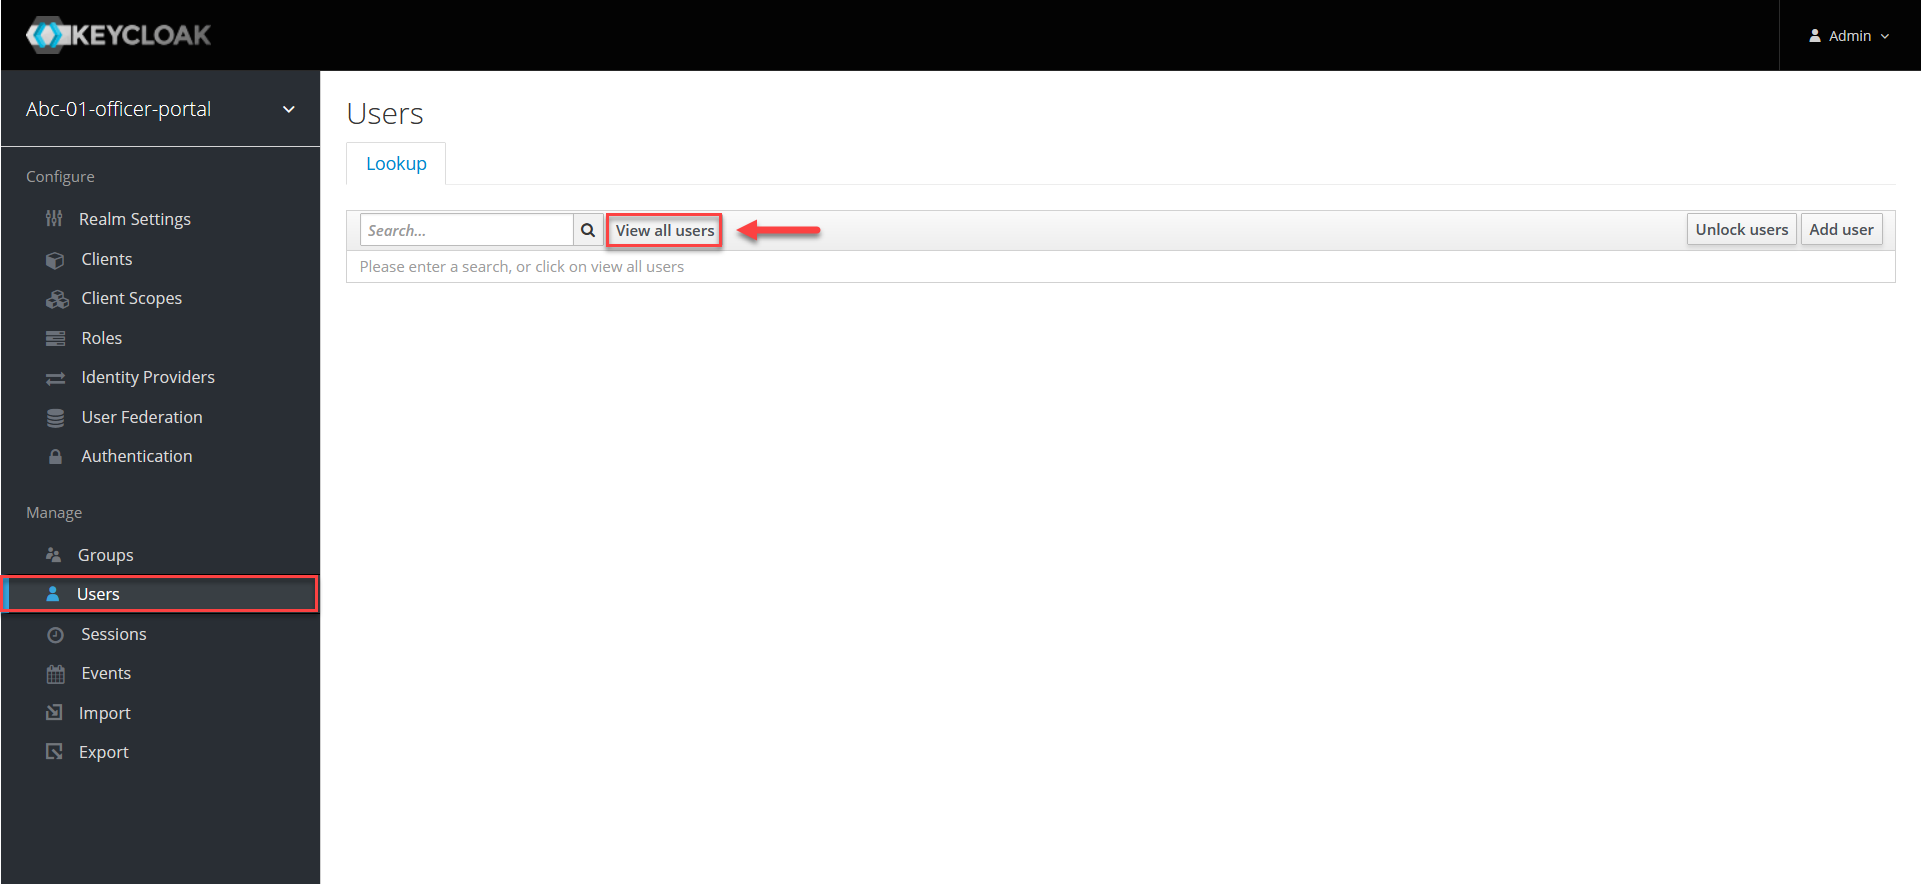
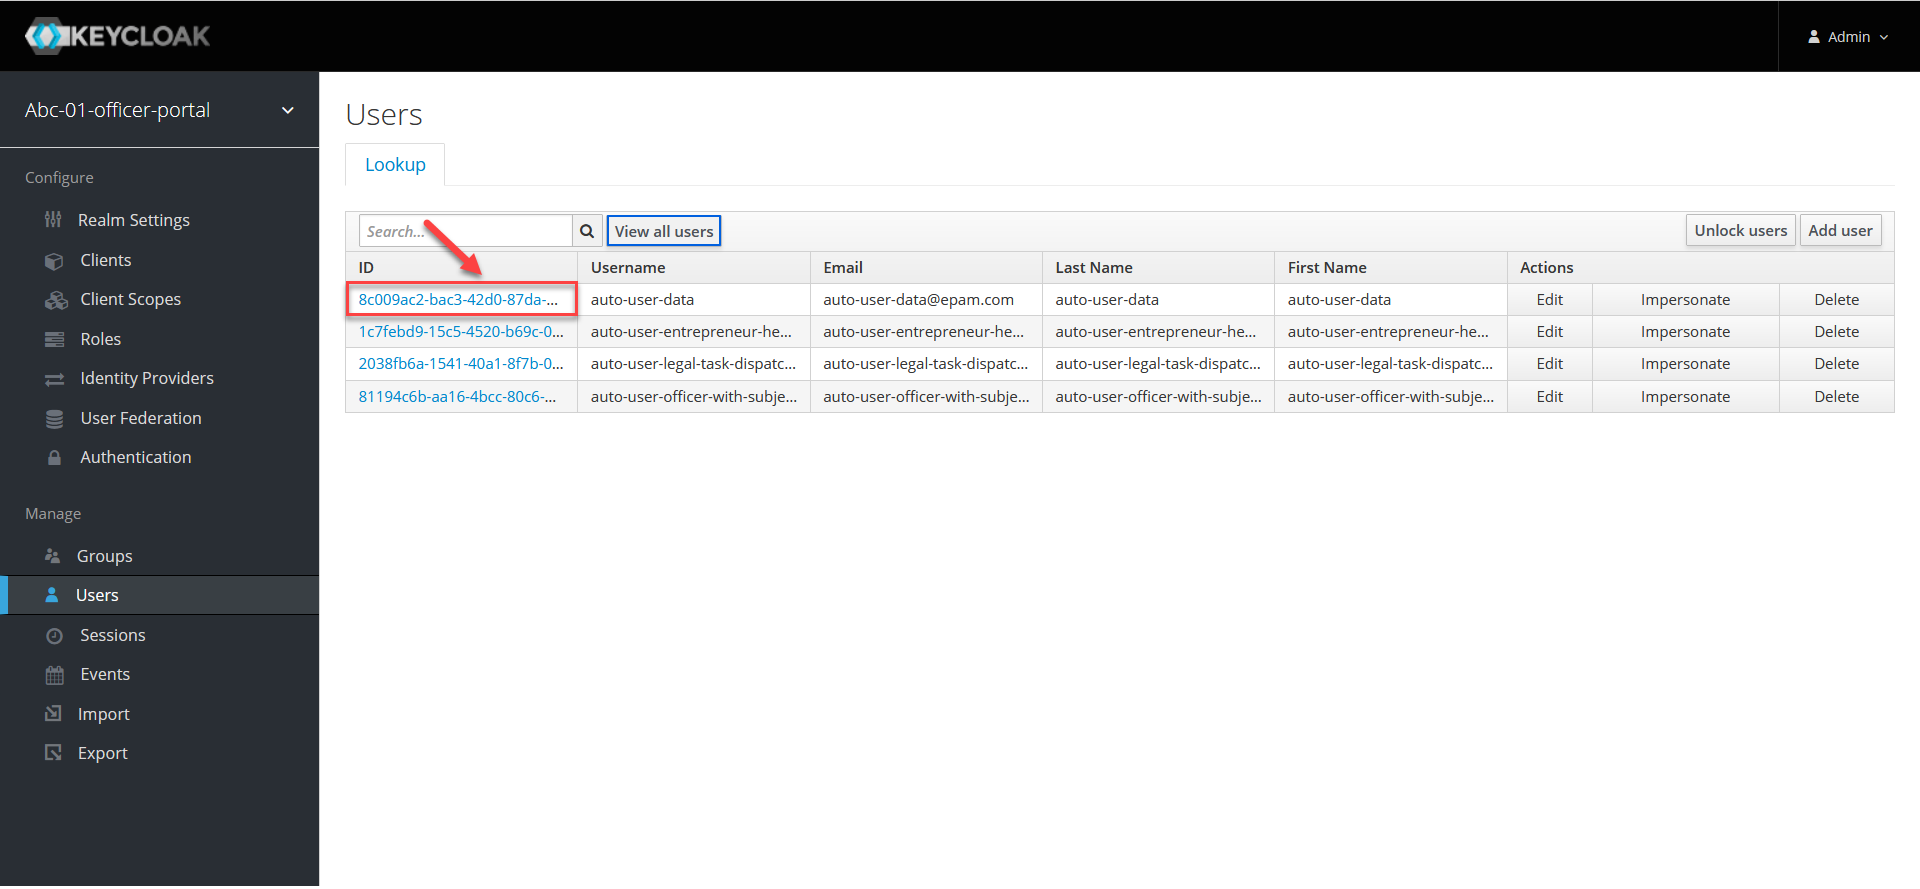
-
Go to the settings of a particular user. To do this, click the user ID.
-
In the Details tab, find the username returned in a list to the business process. It corresponds to the
Usernameparameter.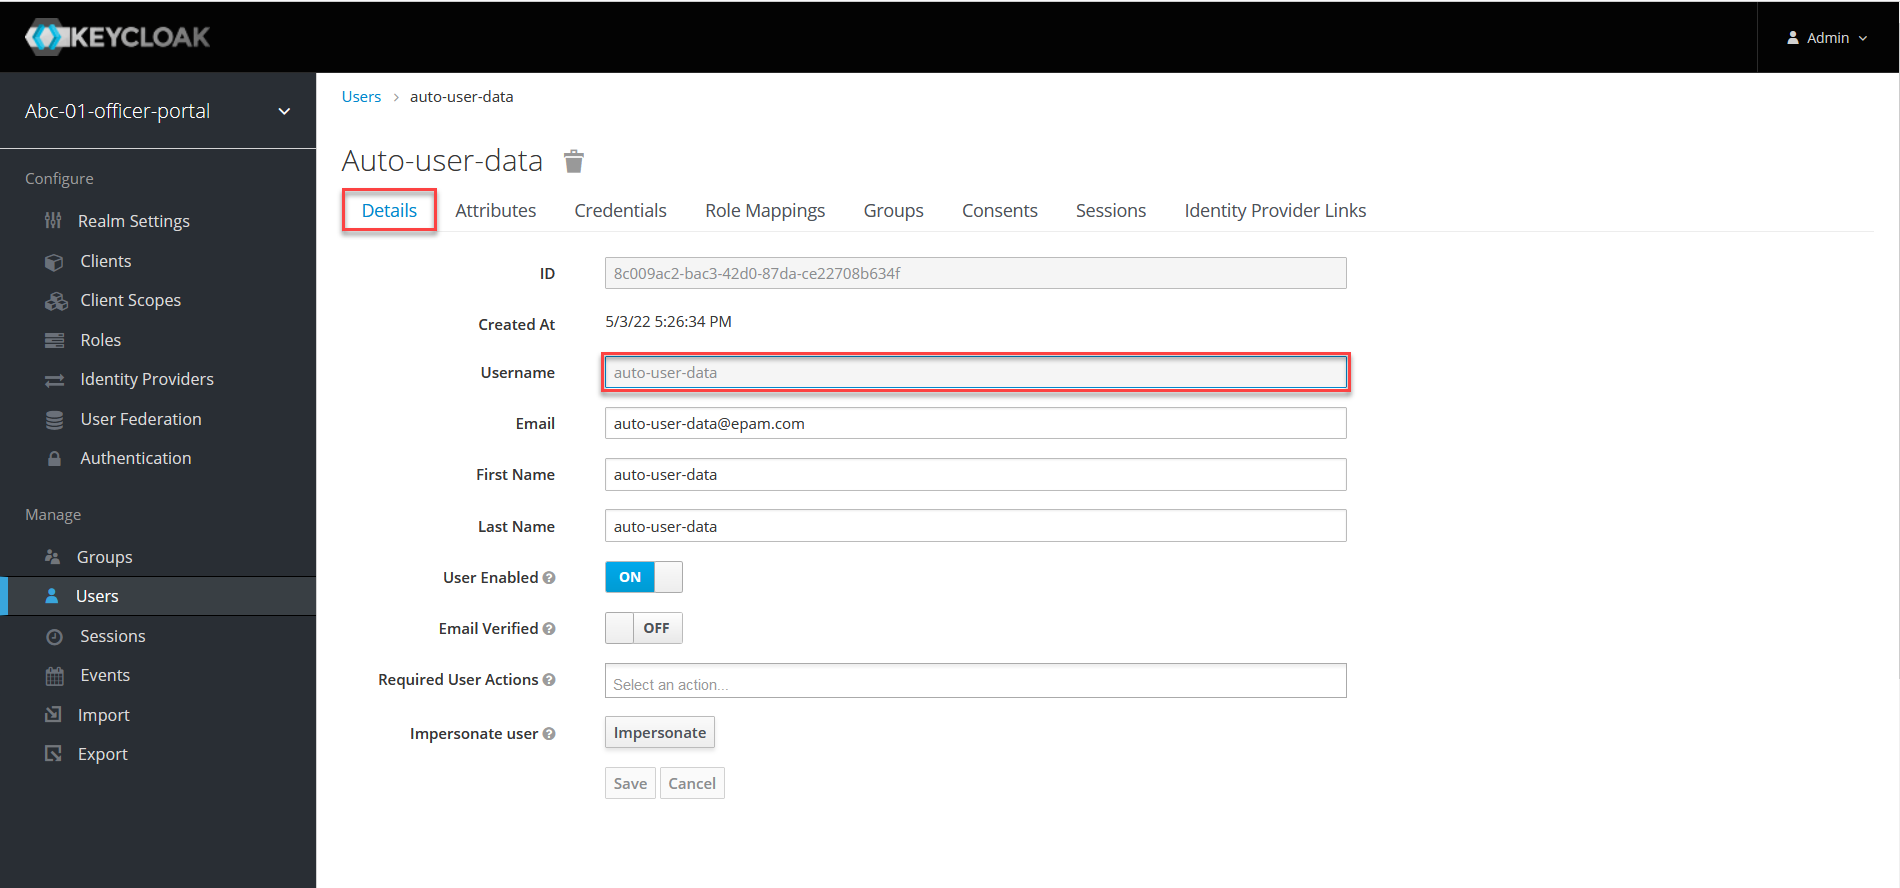
-
Open the Attributes tab.
User attributes are defined as pairs of keys and their values in the
KeyandValuefields.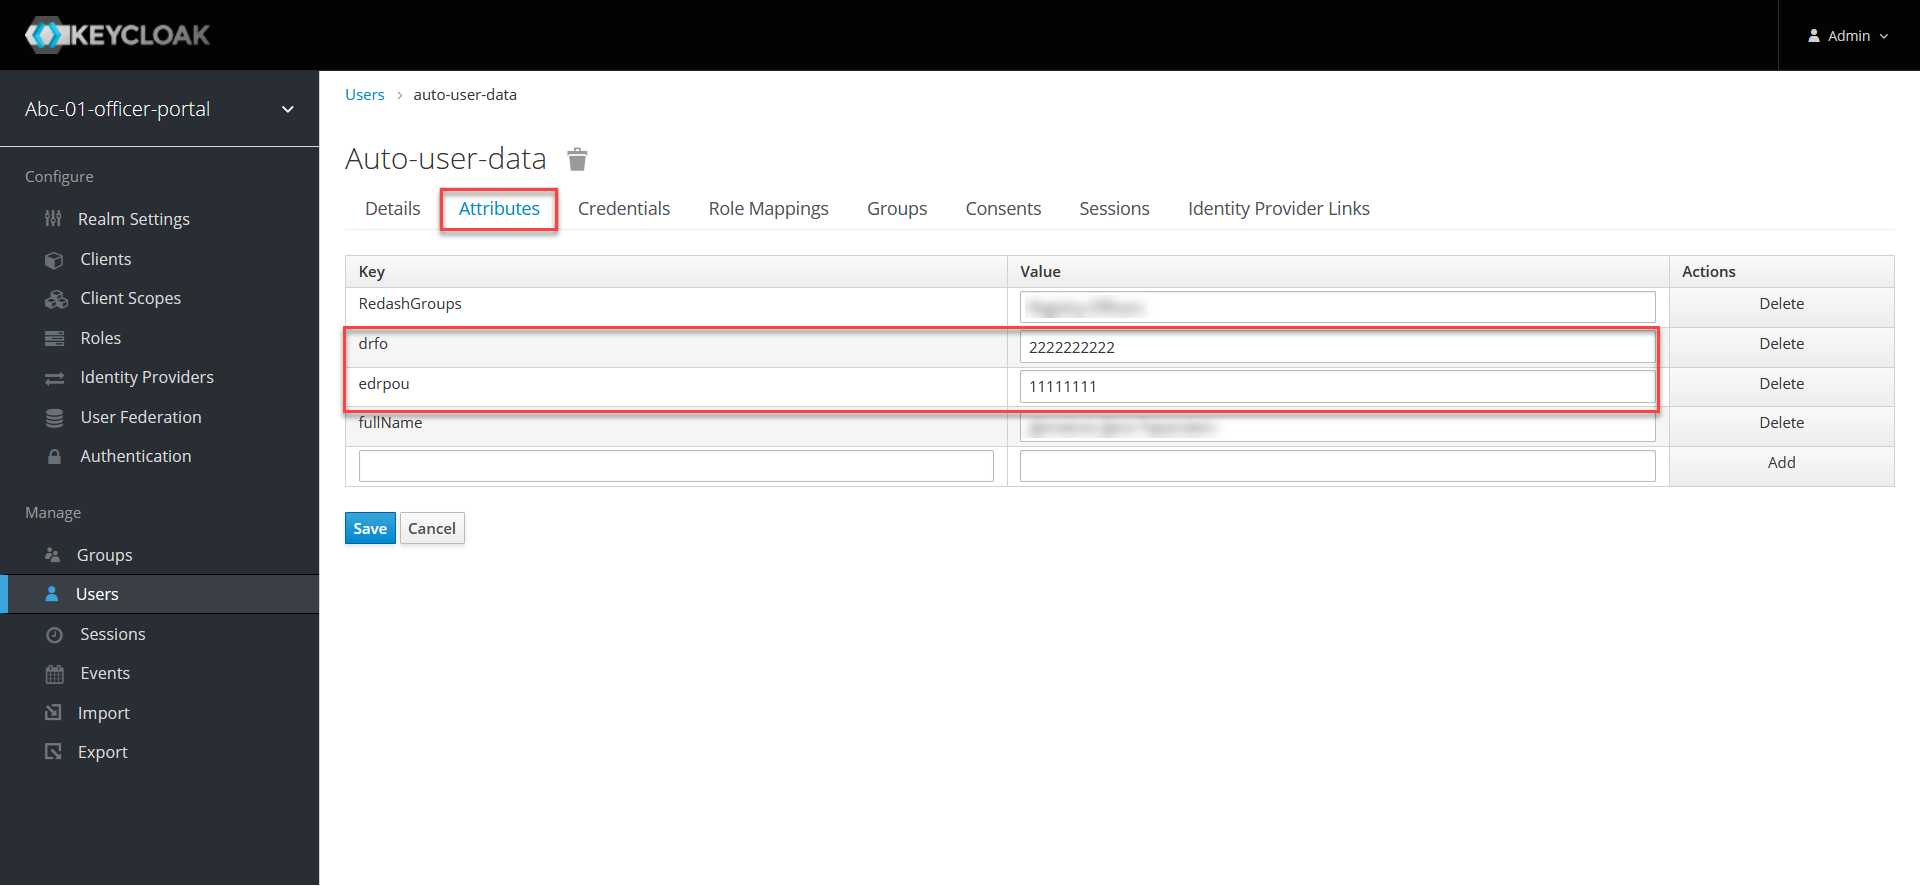
So we can see that the user with the auto-user-data name has the edrpou and drfo attributes configured. The parameters have the values of the EDRPOU and DRFO codes — 11111111 and 2222222222, respectively. The edrpou attribute defines that this user belongs to the organization with the 11111111 code. The drfo attribute defines the identification number of this user.
Keycloak does not have a clear distribution into organizations. Such distribution is set by the edrpou attribute. That means, if a certain organization has the EDRPOU code 11111111, then every user with the attribute "edrpou":"11111111" belongs to that organization.
|
4. Implementation at API level
For the functioning of the ${getUsersByAttributesFromKeycloak} delegate, an additional endpoint has been developed at the Java API level to receive a list of users from the Keycloak service by edrpou and drfo attributes.
- Resource:
-
POST /realms/{realm}/users/search-
POST: HTTP method. -
{realm}: The realm in Keycloak. For example,-officer-portal. -
/users/search: The resource/endpoint.
-
- Request body:
-
{
   "attributes":{
      "edrpou":"edrpou",
      "drfo":"drfo"
   }
}
The API returns an object with a list of users based on the specified attributes.
{
   "id":"userId",
   "username":"username",
   "firstName":"firstName",
   "lastName":"lastName"
...
}