Selecting and acting on one or multiple rows in a table
- 1. Data structure modeling
- 2. Reference business process
- 2.1. Creating pools for processes
- 2.2. Selecting all licensing authorities from the database using search condition
- 2.3. Data preparation script for displaying in tabular form
- 2.4. Performing an action on data in a single row of a table
- 2.5. Modeling an XOR gateway and adding logic through condition expressions
- 2.6. Call Activity for the license cancellation subprocess
- 2.7. User task for license cancellation
- 2.8. Data preparation for recording (transient var)
- 2.9. Data signing with the qualified digital signature and system signature
- 2.10. Saving the updated data of the selected row in the table on the form to the database.
- 2.11. Completing the process and returning the user to the initial form.
- 3. Modeling UI Forms for business processes
- 4. Usage in user portals
| 🌐 This document is available in both English and Ukrainian. Use the language toggle in the top right corner to switch between versions. |
1. Data structure modeling
Create a data model for the registry based on the example below.
Where can I find reference data modeling examples?The Platform administrator can deploy for you a demo-registry — a reference registry containing reference and other example files for creating a digital registry regulations. It includes various elements for developing data models, business processes, UI forms, analytical reporting, extracts, notifications, external integrations, and more. Detailed instructions on deploying the demo-registry and obtaining reference modeling examples can be found on page Deploying demo registry with reference examples. Examples of .xml schemas and associated CSV files for creating a data model can be found in the demo registry’s regulations by searching with keywords. The schema for creating tables and search criteria will be available under the name licenseTable.xml. The reference CSV file with data for importing into the database will be available under the name licences.csv. The file to populate the |
-
Create a new data type, table, and search conditions.
This data model creates a new user-defined data type and table, as well as it defines the search condition.
Basic data model for our example
  <changeSet author="registry owner" id="enum license_status">
    <comment>CREATE TYPE license_status</comment>
    <ext:createType name="license_status">
      <ext:asEnum>
        <ext:label translation="діюча">active</ext:label>
        <ext:label translation="анульована">canceled</ext:label>
      </ext:asEnum>
    </ext:createType>
  </changeSet>

  <changeSet author="registry owner" id="table licenses">
    <comment>CREATE TABLE licenses</comment>
    <ext:createTable tableName="licenses" ext:historyFlag="true">
      <column name="license_id" type="UUID">
        <constraints nullable="false" primaryKey="true" primaryKeyName="pk_licenses"/>
      </column>
      <column name="number" type="TEXT">
        <constraints nullable="false"/>
      </column>
      <column name="date_received" type="DATE">
        <constraints nullable="false"/>
      </column>
      <column name="date_terminated" type="DATE">
        <constraints nullable="false"/>
      </column>
      <column name="full_name" type="TEXT">
        <constraints nullable="false"/>
      </column>
      <column name="licensing_status" type="license_status">
        <constraints nullable="false"/>
      </column>
    </ext:createTable>
  </changeSet>

  <changeSet author="registry owner" id="searchCondition search_licenses_by_status">
    <comment>CREATE search condition search_licenses_by_status</comment>
    <ext:createSearchCondition name="search_licenses_by_status">
      <ext:table name="licenses" alias="l">
        <ext:column name="license_id"/>
        <ext:column name="number"/>
        <ext:column name="date_received"/>
        <ext:column name="date_terminated"/>
        <ext:column name="full_name"/>
        <ext:column name="licensing_status" searchType="equal"/>
      </ext:table>
    </ext:createSearchCondition>
  </changeSet>
A custom data type called
license_statusis being created with two possible values: “active” and “canceled”.A new table called
licensesis being created with the following columns:-
license_id: unique identifier for the license (UUID). -
number: license number (text format). -
date_received: date when the license was received (date format). -
date_terminated: date when the license was terminated (date format). -
full_name: full name of the license owner (text format). -
licensing_status: license status (of typelicense_status).A search condition named
search_licenses_by_statusis being created, which allows searching for licenses in thelicensestable based on their status. This search condition assumes that the value of thelicensing_statuscolumn should be equal to the specified search value (searchType="equal").
-
-
Prepare a CSV reference file with data for importing into the database.
This CSV reference file contains data about licenses that can be loaded into the database (table "licenses"). The file contains the following columns:
-
number: license number. -
licensing_status: license status (active or canceled). -
date_received: date when the license was received. -
date_terminated: date when the license was terminated. -
full_name: full name of the license owner (organization or individual).These data can be imported into the
licensestable of the database.
-
-
Import the data from the CSV reference file using the data loading function call to the database:
CALL p_load_table_from_csv(). To do this, create a separate file named populateLicences.xml with the following structure:<property name="dataLoadPath" value="/tmp/data-load/"/> <changeSet author="registry owner" id="load licenses"> <sql dbms="postgresql" endDelimiter=";" splitStatements="true" stripComments="true"> CALL p_load_table_from_csv('licenses','${dataLoadPath}licenses.csv', array['number', 'licensing_status', 'date_received', 'date_terminated', 'full_name']); </sql> </changeSet>This function uses the built-in Liquibase mechanism to import data from a CSV file into a database table. The following components are used:
-
<property>: sets the value of thedataLoadPathvariable, which specifies the path to the directory containing CSV files for data loading. -
<changeSet>: describes the changes to apply to the database. In this case, it’s a call to thep_load_table_from_csv()function to import data from the CSV file into thelicensestable. -
<sql>: describes the SQL query that invokes thep_load_table_from_csvfunction. The query includes the name of thelicensestable, the path to the CSV file (using the${dataLoadPath}variable), and an array of columns to import from the file.
-
| For more information on creating a data model and loading data into the registry, please refer to Creating a physical data model and Initial loading of registry data. |
2. Reference business process
2.1. Creating pools for processes
This is a complex business process consisting of a main process and subprocesses that it invokes.
The BPMN diagram includes the main process and two subprocesses initiated by the main process through a Call Activity. These subprocesses are similar and differ only in the names of tasks and their execution order.
In our example, we will examine the main process and briefly discuss one of the subprocesses — license cancellation.
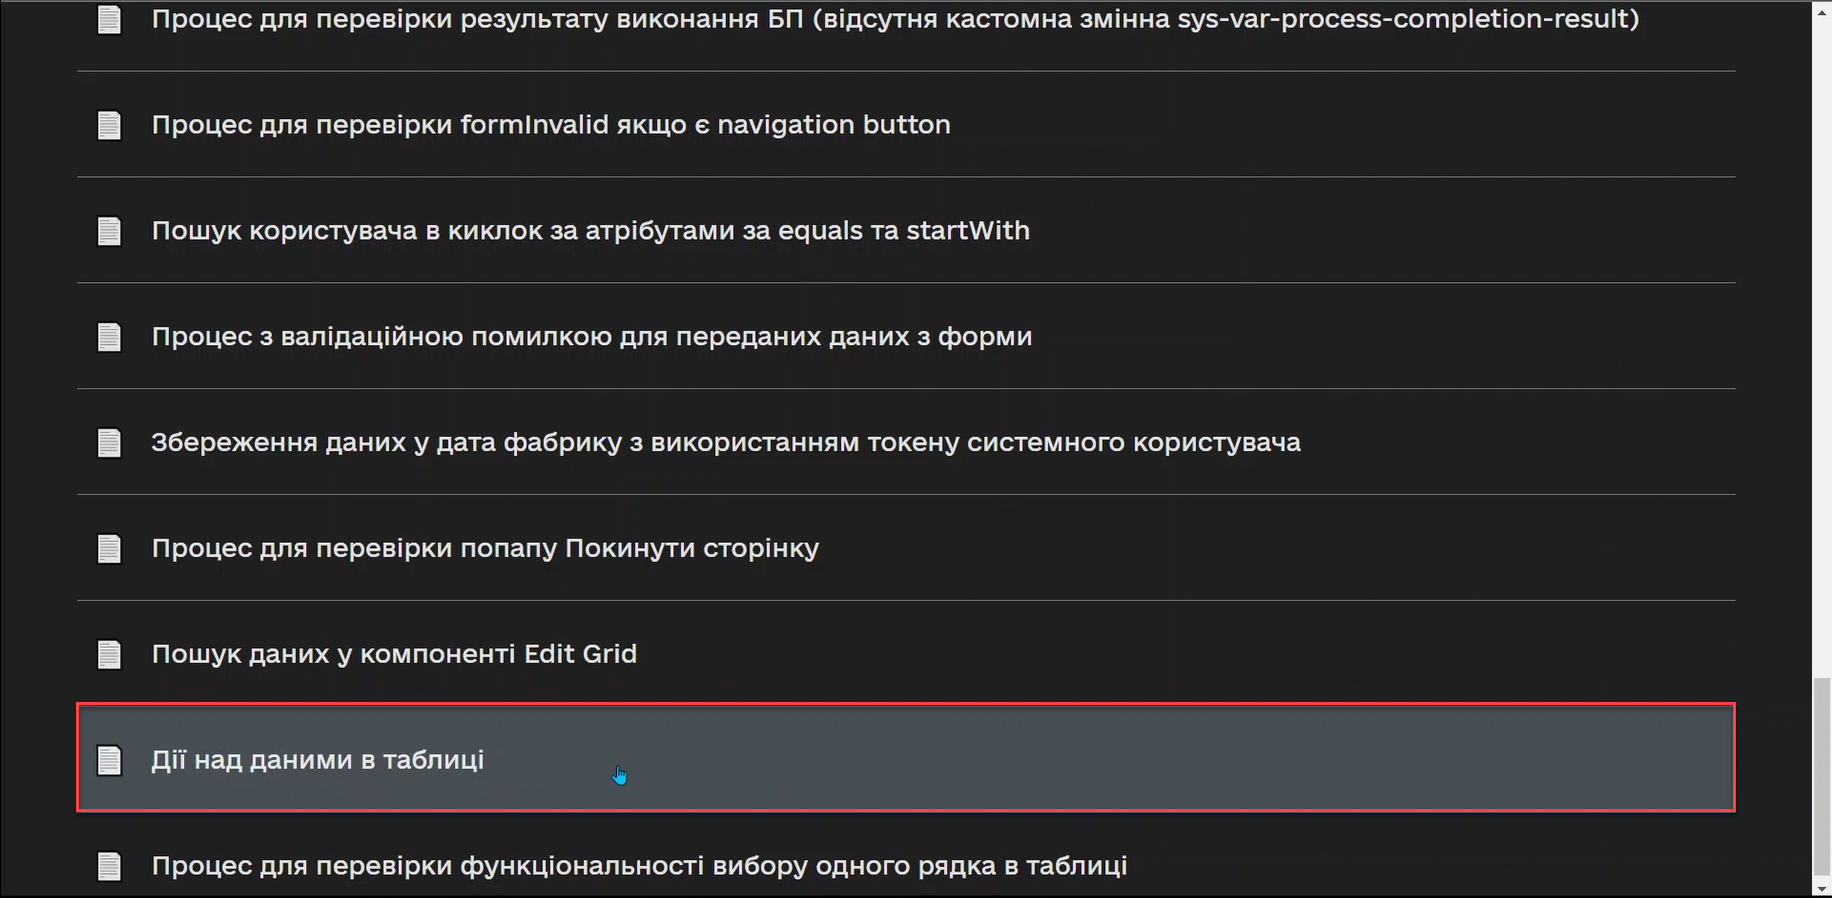
Where can I find an example of a reference business process?The Platform administrator can deploy for you a demo-registry — a reference registry containing reference and other example files for creating a digital registry regulations. It includes various elements for developing data models, business processes, UI forms, analytical reporting, extracts, notifications, external integrations, and more. Detailed instructions on deploying the demo-registry and obtaining reference modeling examples can be found on page Deploying demo registry with reference examples. An example of a BPMN process diagram will be available in the demo-registry’s regulations by searching for the keywords — edit-grid-rows-action. The names of the forms can be found inside the corresponding User Tasks of the business process in the |
2.2. Selecting all licensing authorities from the database using search condition
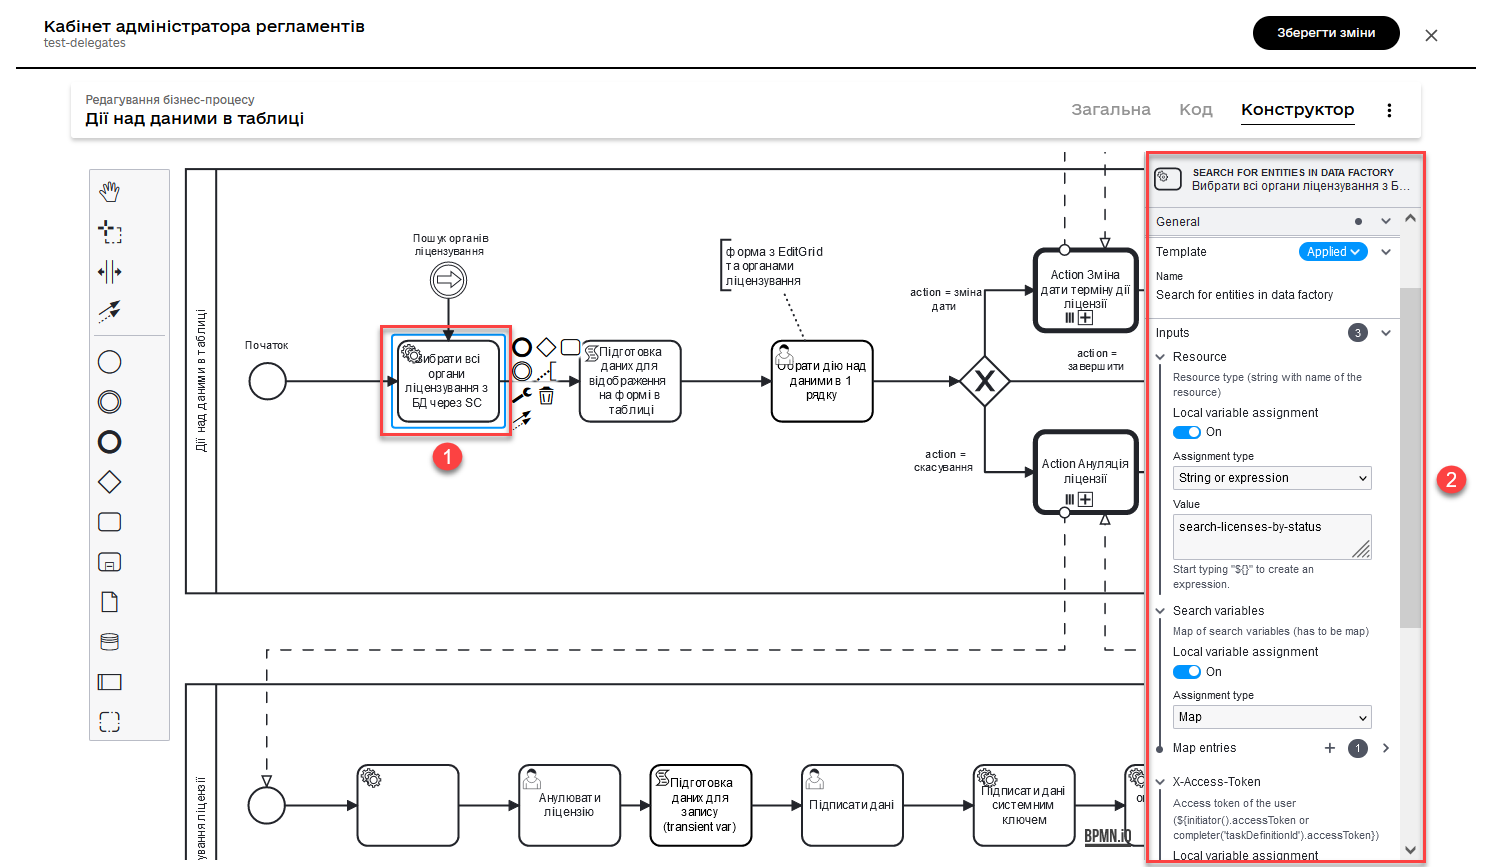
Model a Service Task and utilize the delegate Search entities in data factory.
Based on the created data model, this task is responsible for searching and selecting licenses from the licenses table. The licenses table contains the following columns:
-
license_id: unique identifier of the license (UUID). -
number: license number (TEXT). -
date_received: date of license issuance (DATE). -
date_terminated: date of license termination (DATE). -
full_name: full name of the licensing authority (TEXT). -
licensing_status: license status (data type:license_status).
The license_status data type is an enumeration with two possible values:
-
active: the license is valid. -
canceled: the license is canceled.
The current task uses the search condition search_licenses_by_status to filter licenses in the licenses table based on their licensing status. In this case, the task searches for licenses with the status active.
Thus, the service task performs a search for active licenses in the licenses table based on the defined search conditions, passing the system access token for query authorization to the database.
- The parameters used for configuration and obtaining search results are as follows:
-
-
In the Inputs section, set the input parameter
resourceassearch-licenses-by-statusto determine the resource/API endpoint to be used for the search.Here, the endpoint search-licenses-by-statusis generated based on the search criterionsearch_licenses_by_statusdefined in the data model. -
In the Inputs > Search variables section, provide the search parameters to be applied as key-value pairs (
Map):-
Key: licensingStatus -
Value: activeIn this case, we are searching for licenses with the status
active.
-
-
In the Inputs > X-Access-Token section, pass the system access token for query authorization to the database:
${system_user().accessToken} -
In the Outputs > Result variable section, set the output parameter as the variable
licensesResponse, which will store the response from the database for further use.
-
2.3. Data preparation script for displaying in tabular form
Model the service task and use the following Groovy script.
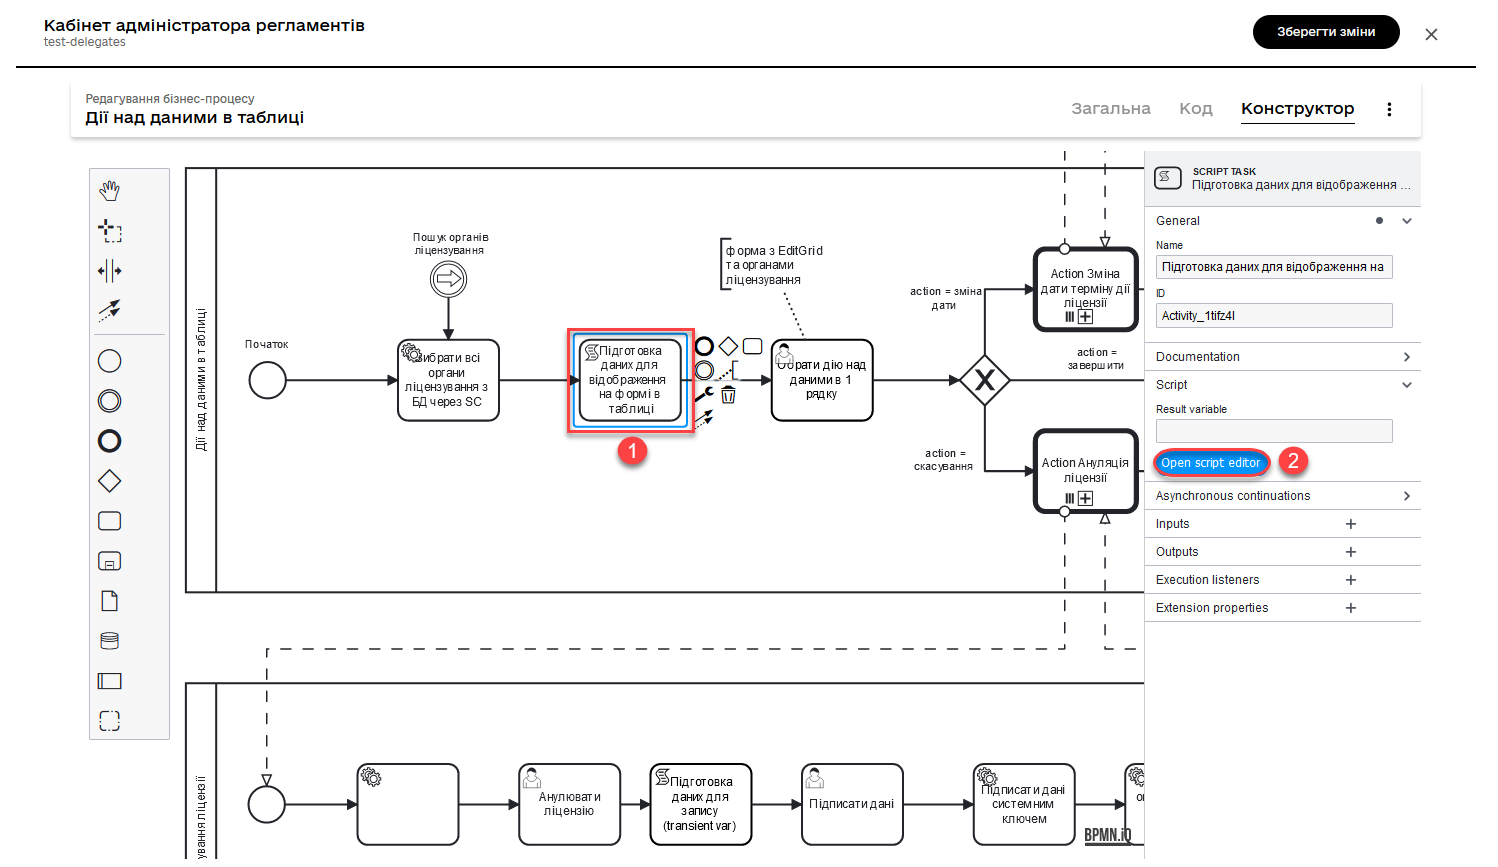
def licenses = licensesResponse.responseBody.elements()

        def payload = S([:], 'application/json')
        payload.prop('licenses', licenses)
        set_transient_variable('payload', payload)
This script performs the following actions:
-
Extracts the list of licenses from the response
licensesResponse.responseBody.elements(). The variablelicensescontains the list of active licenses obtained from the previous service task. -
Creates a new JSON object
payloadwith an empty dictionary. -
Adds the list of licenses obtained in the first step to the JSON object
payload, under the keylicenses. -
Stores the JSON object
payloadin a transient variable (a temporary variable that exists only during the process execution) namedpayload.
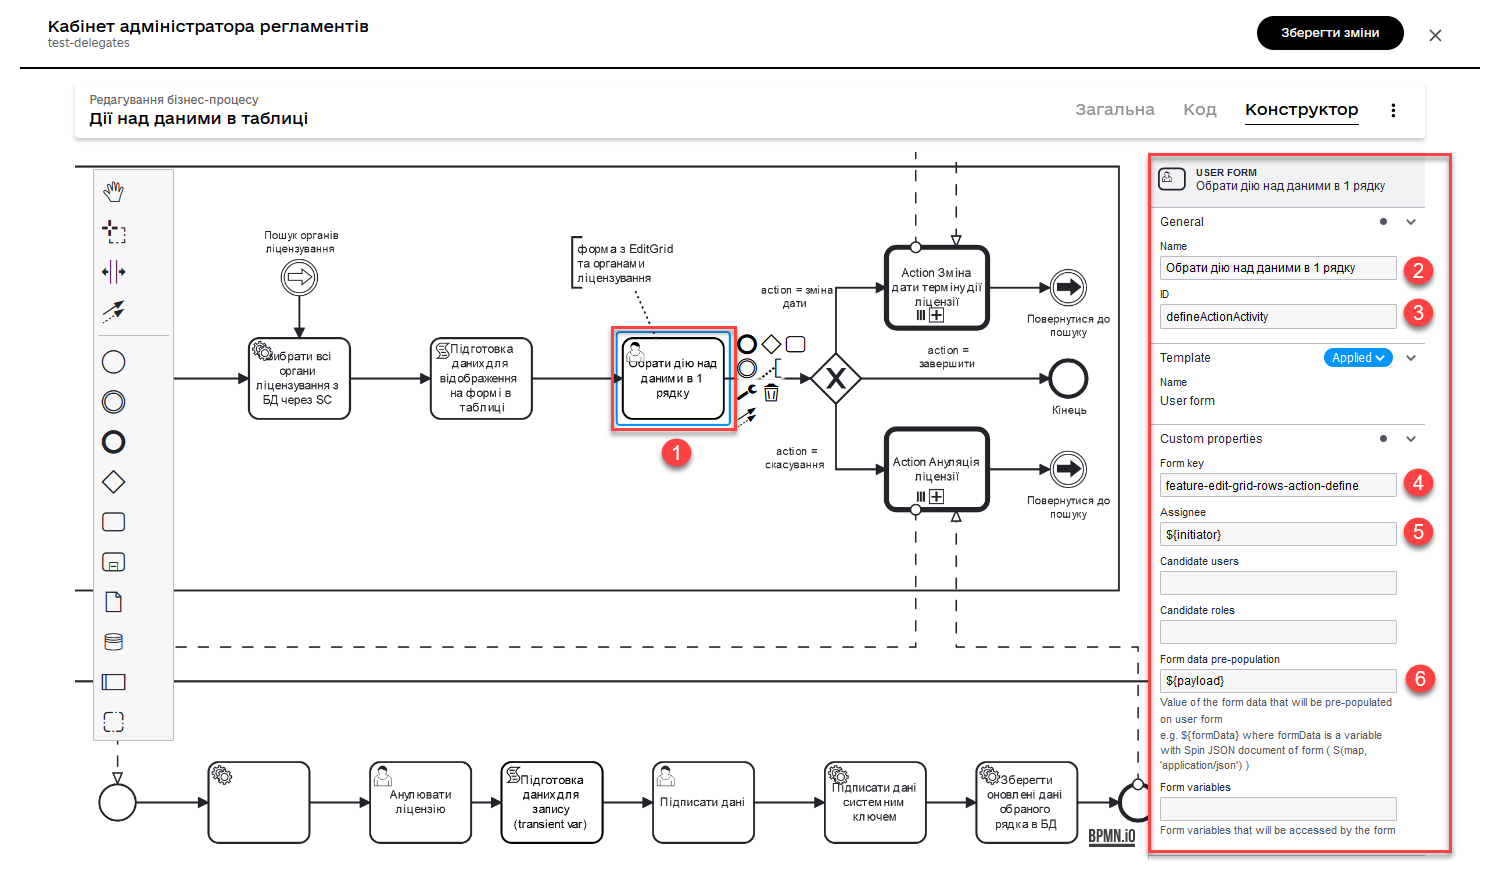
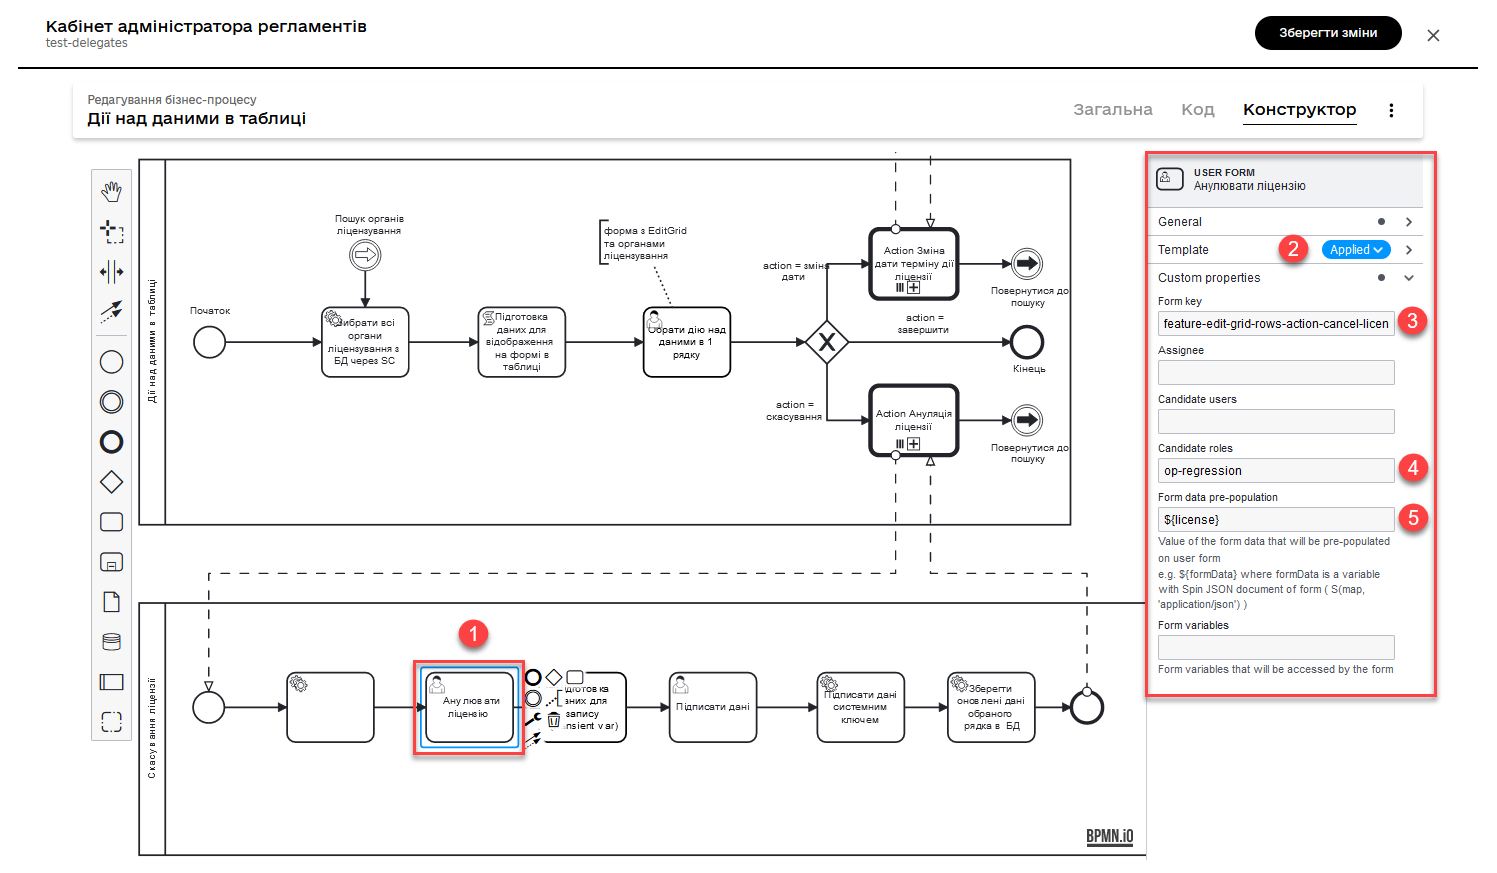
2.4. Performing an action on data in a single row of a table
Model a User Task and associate it with the corresponding UI form using the Form key key.
The main goal of this form is to allow the user to select an action to perform on the data in a specific row of a table using the Edit Grid component (such as changing the date or canceling a license).
- Perform the following configurations:
-
-
In the Name field, enter the name of the User Task.
-
Apply the delegate template —
User Form. -
In the
IDfield, enter the task identifier —defineActionActivity. -
In the
Form keyfield, define the key to connect with the corresponding modeled form of the business process —feature-edit-grid-rows-action-define. -
In the Assignee field, specify the variable for the person assigned to the current task —
${initiator}. -
In the
Form data pre-populationfield, pass the data to the UI form as the variable${payload}.
-
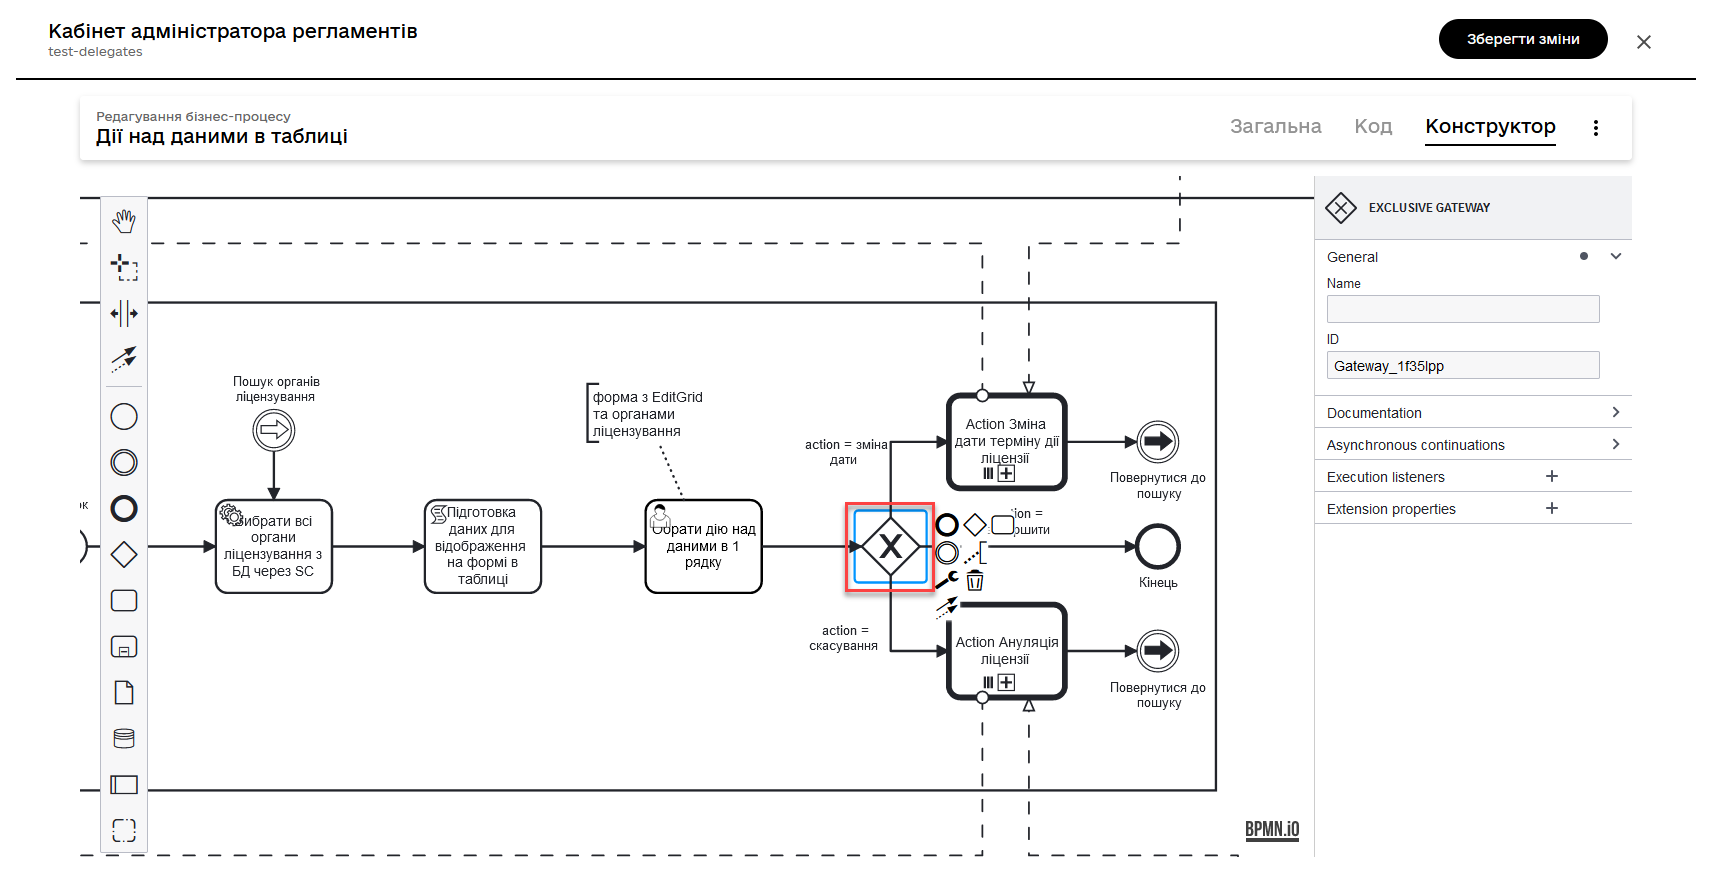
2.5. Modeling an XOR gateway and adding logic through condition expressions
Model an XOR Gateway that determines which subprocess to call based on the action codes selected on the previous form.
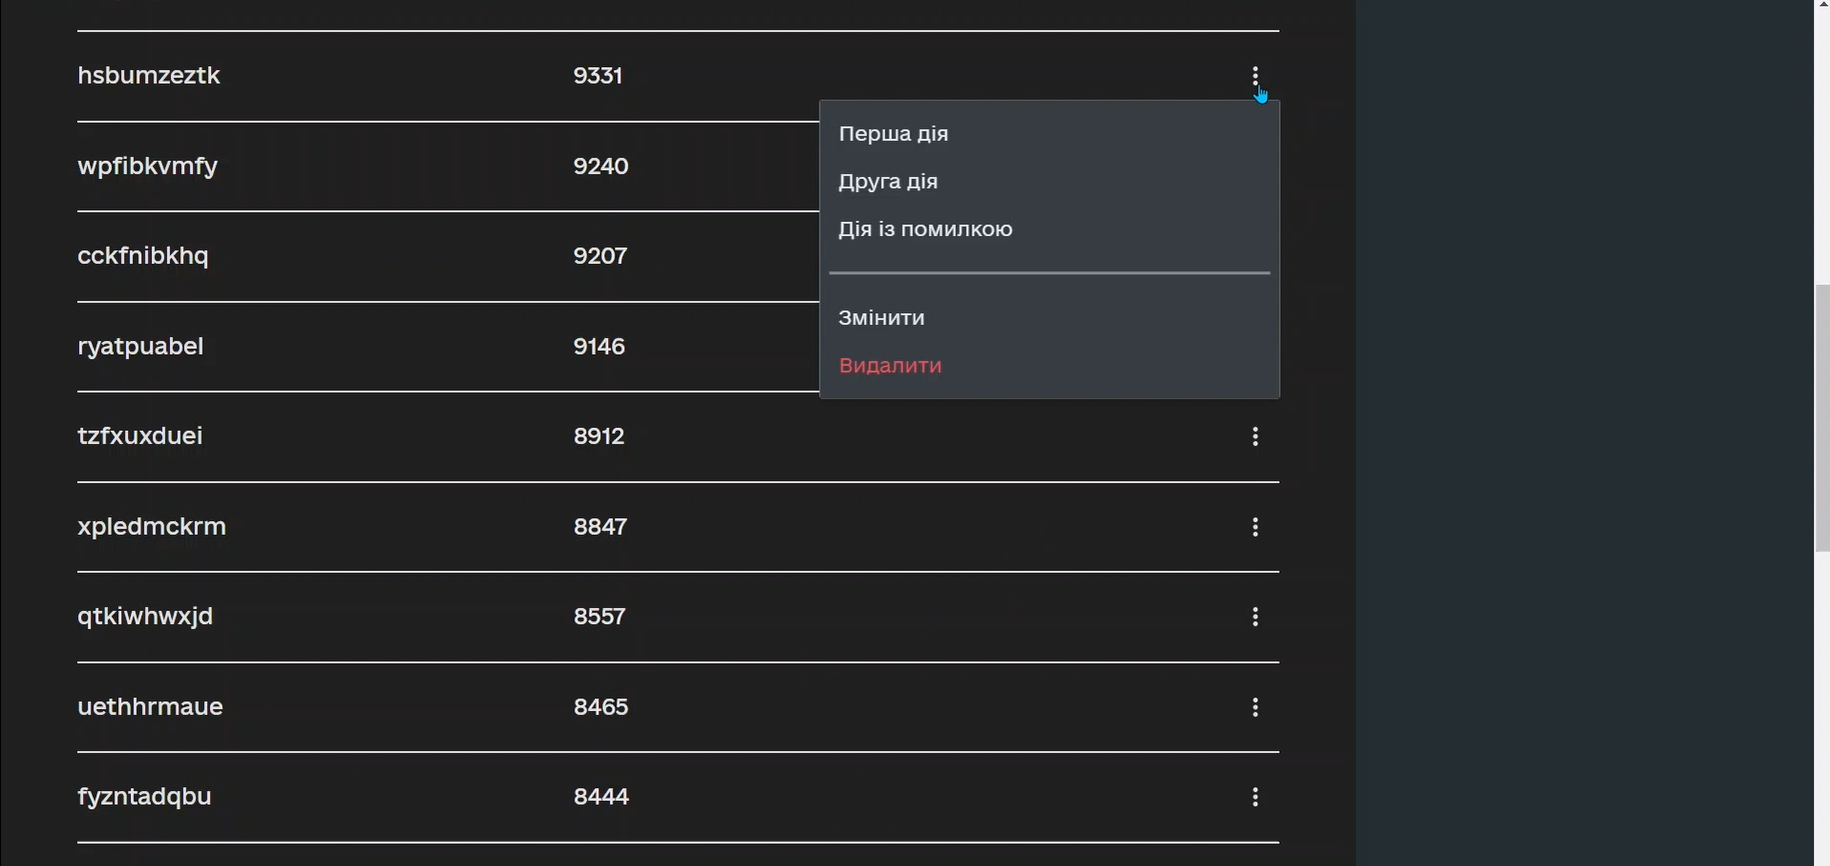
Action codes are buttons in the context menu (three dots), modeled on the UI form using the Edit Grid element.
|
|
If the multiple rows (records) checkbox is selected on the If you select the context menu (three dots) next to a specific row, the corresponding subprocess will only be triggered for the data in that row. The specific subprocess to be launched is controlled by the action code logic, modeled on the Edit Grid component. In other words, the context menu (three dots) allows you to choose the execution logic for an individual row of the table. |
Depending on the action defined in the action codes (in our example, we only update data for one row on the form, so we only use action codes through the context menu), the main process initiates one of the following subprocesses through the Call Activity:
-
The
Change license expiry date processif the entered action code satisfies the following condition:${submission('defineActionActivity').formData.hasProp('_action_code') && submission('defineActionActivity').formData.prop('_action_code').value().equals('_action_update')}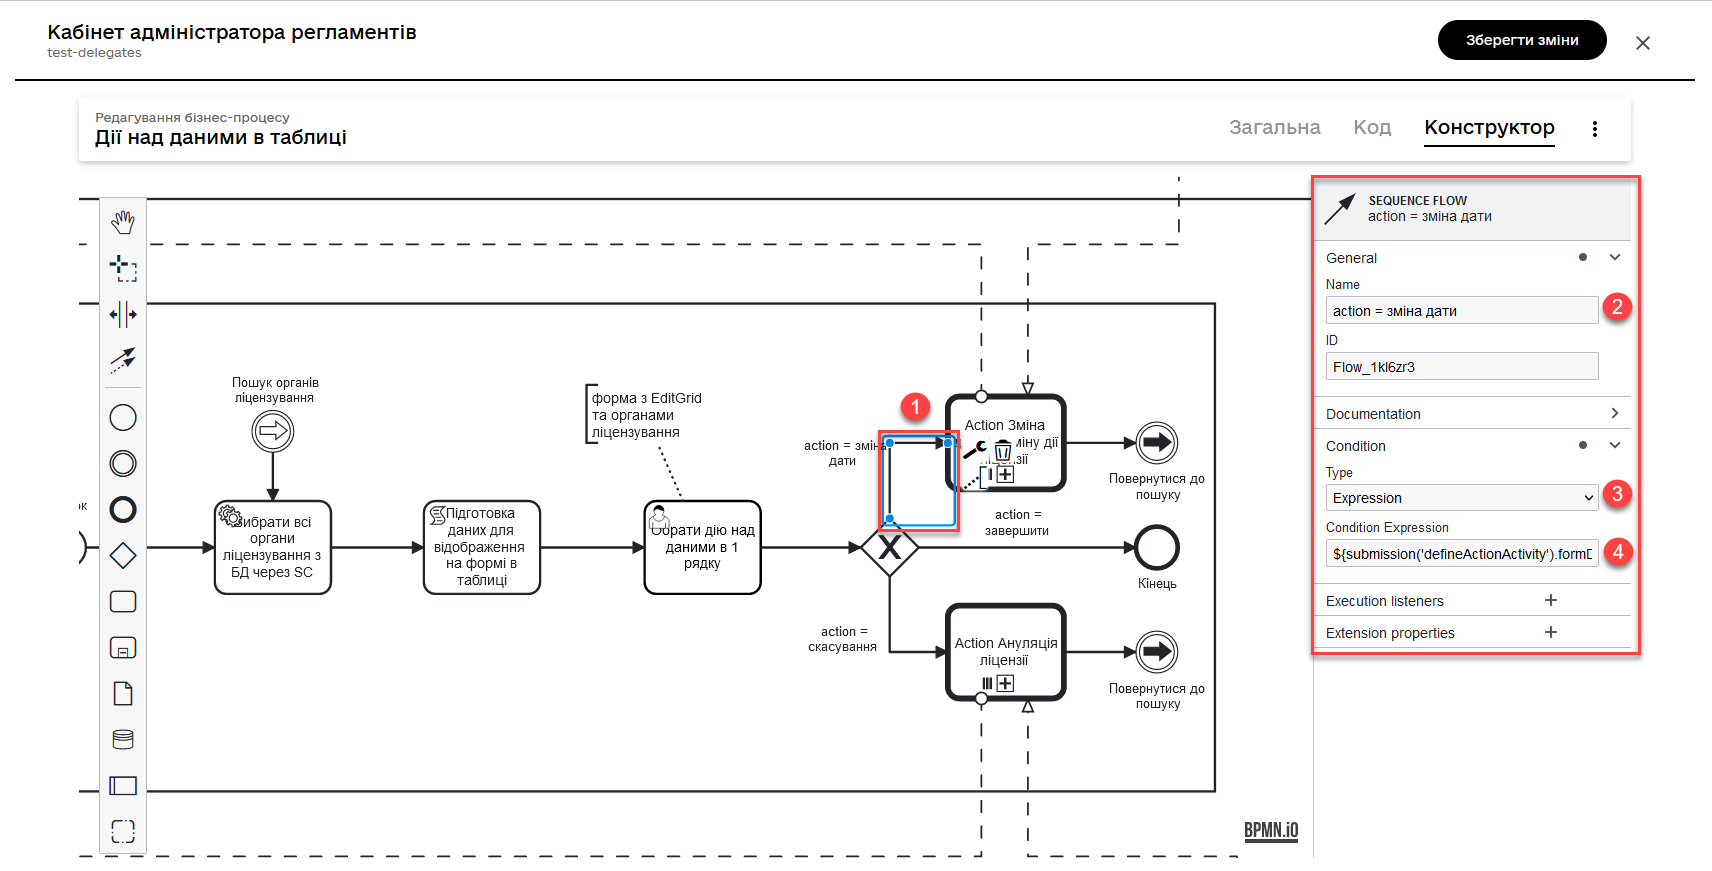
-
License Cancellationprocess if the entered action code satisfies the following condition:${submission('defineActionActivity').formData.hasProp('_action_code') && submission('defineActionActivity').formData.prop('_action_code').value().equals('_action_cancel')}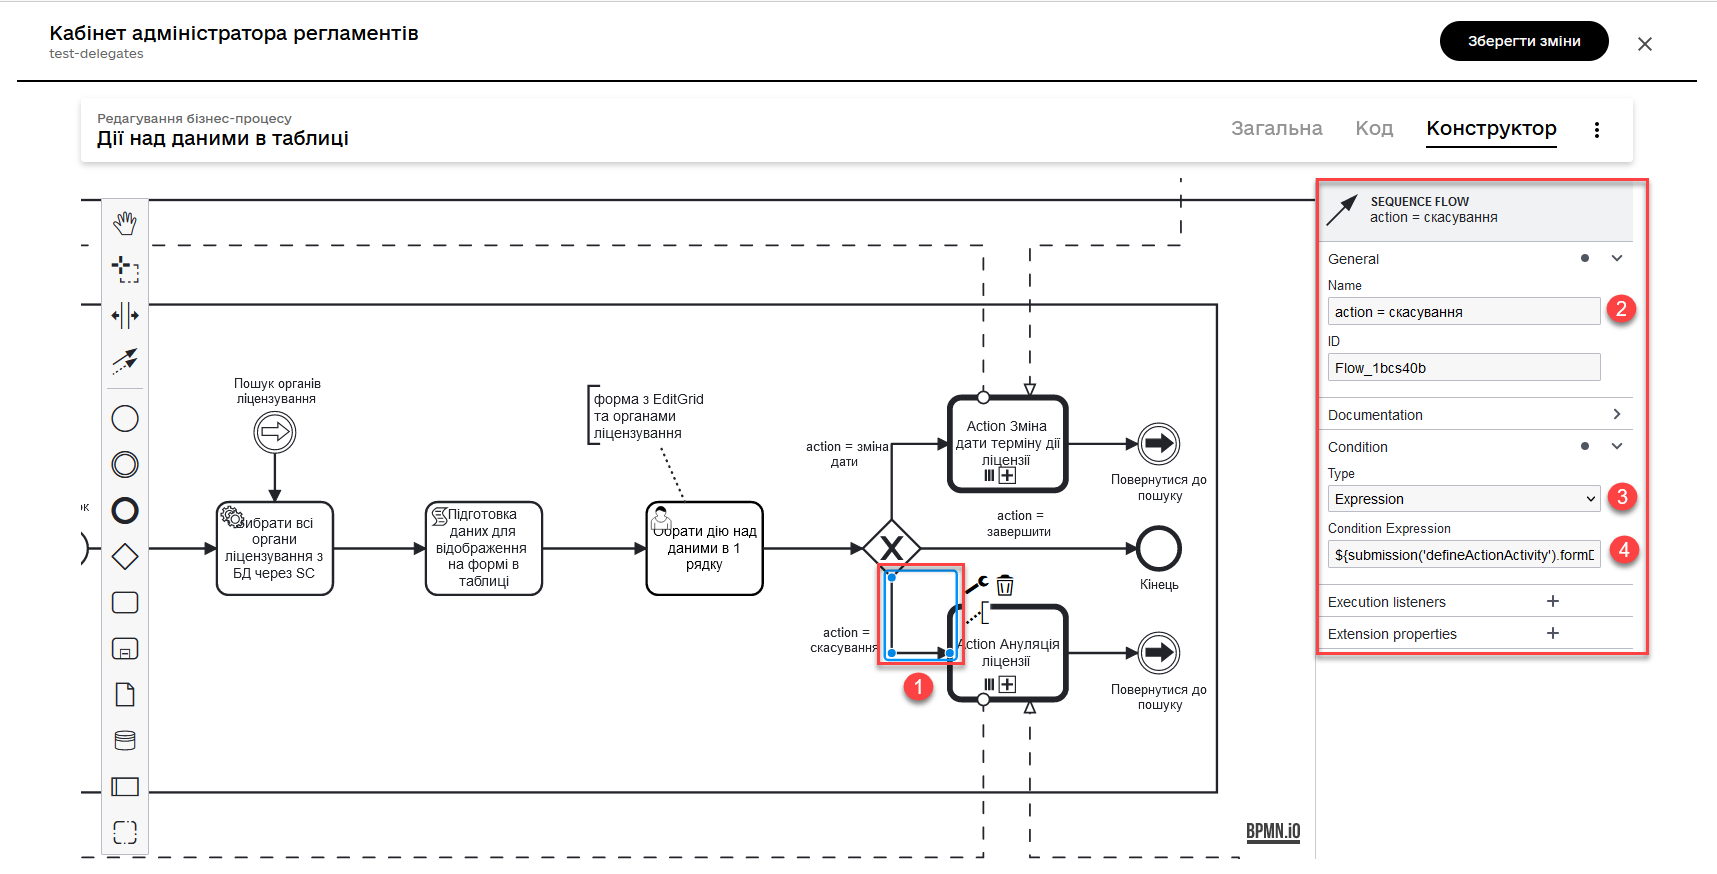
After calling the corresponding subprocess using the Call Activity, the main process continues to the final event. Next, we will discuss the flow with the cancellation subprocess call.
2.6. Call Activity for the license cancellation subprocess
This Call Activity executes a process named license-cancellation for each item in the data collection specified in multiInstanceLoopCharacteristics. This means that if you select the checkbox on one or more records in the Edit Grid form, using the Multi-instance feature, the subprocess will be triggered for each of those records.
|
Note that when the checkbox for multiple rows in the table is selected, the data from the form should be sent to the process based on the action codes modeled on the UI form using the Button component. For more details, see Modeling UI Forms for business processes. |
|
For more details on Call Activity and its application features, you can review the following pages: |
- Perform the following configurations:
-
-
In the Multi-instance >
Collectionsection, enter the value:${submission('defineActionActivity').formData.prop('licenses').elements()} -
For Multi-instance >
Element variable, specify the variablelicense.This means that the Call Activity will be performed for each element in the data collection returned by the function ${submission('defineActionActivity').formData.prop('licenses').elements()}. Each element of this collection will be stored in the defined variable license.
The use of the Multi-instance feature is also demonstrated in the example Notifying users via email.
-
In the
Called elementfield, specify the identifier (Process ID) of the subprocess to be called and executed. In our case, it islicense-cancellation. -
For the
Asynchronous continuationfield, specify the valueBefore. This means that this activity will be performed asynchronously. Asynchronous continuation starts before the execution of the Call Activity itself, meaning "asynchronously before."What is Asynchronous continuation?
Asynchronous continuation in Call Activity in Camunda BPM is a mechanism that allows executing an activity asynchronously in relation to the main process flow. This means that the activity (in this case, Call Activity) can be executed later without delaying the execution of subsequent elements in the main flow.
Asynchronous continuation is often used when it is necessary to initiate a long-running or resource-intensive operation without blocking the further execution of the process. This can be useful, for example, when the Call Activity invokes an external process that may take some time.
After the completion of the asynchronous operation, the process workflow continues from the next point after the Call Activity. Asynchronous continuation also enables process management systems (such as Camunda BPM) to more efficiently manage resources by distributing the load among different process instances.
In the context of Camunda BPM,
asynchronous continuation: beforemeans that the asynchronous invocation takes place before the start of the Call Activity, rather than after its completion.This use of asynchronous continuation can be useful when you need to initiate a long-running or resource-intensive activity (such as a Call Activity), but you don’t want to block the execution of the main process flow until this activity is completed.
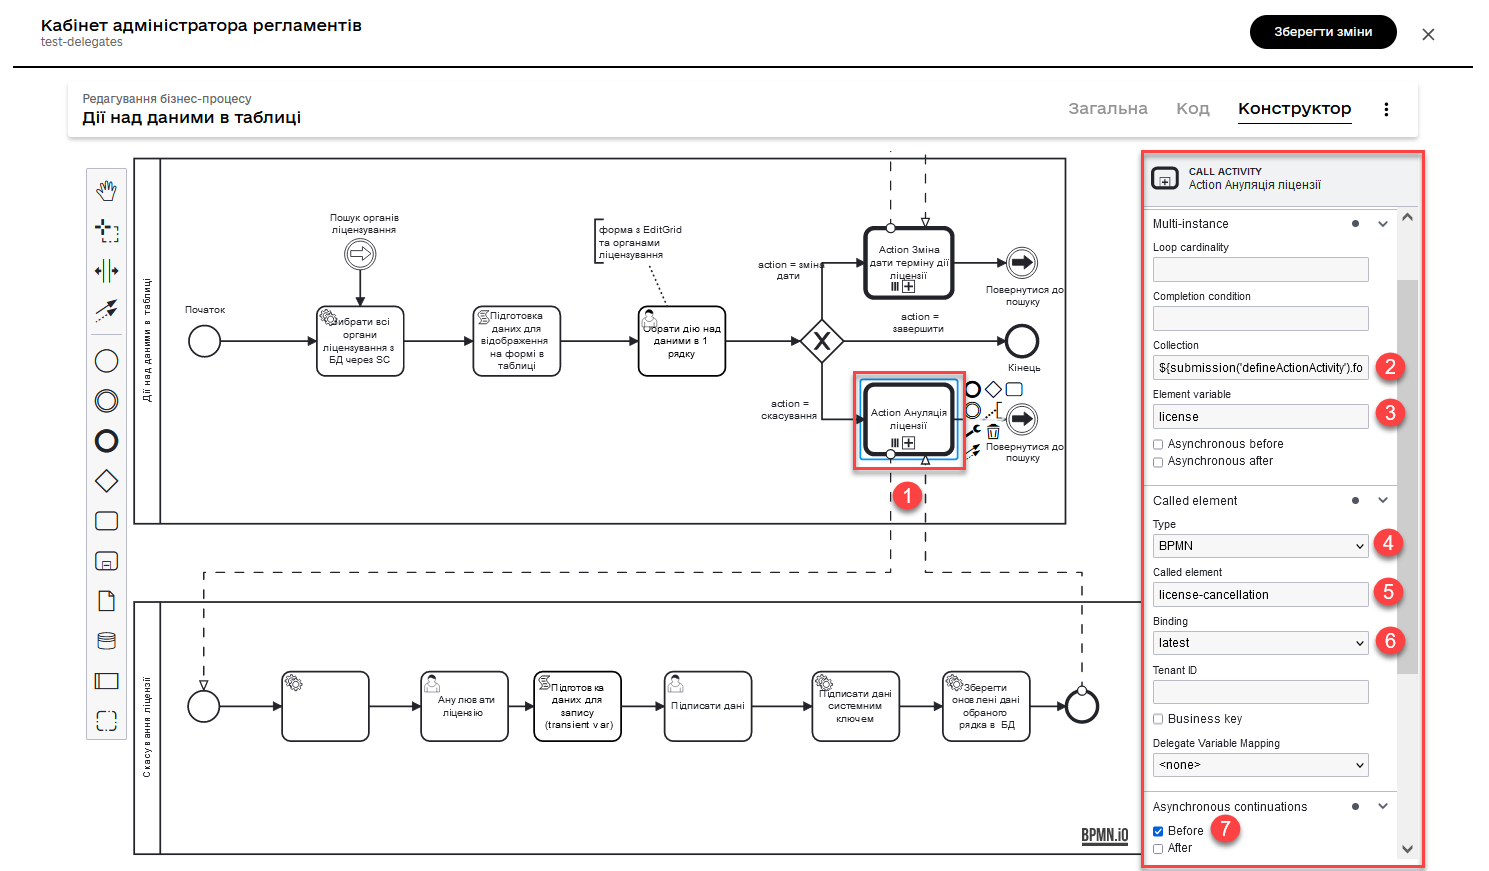
-
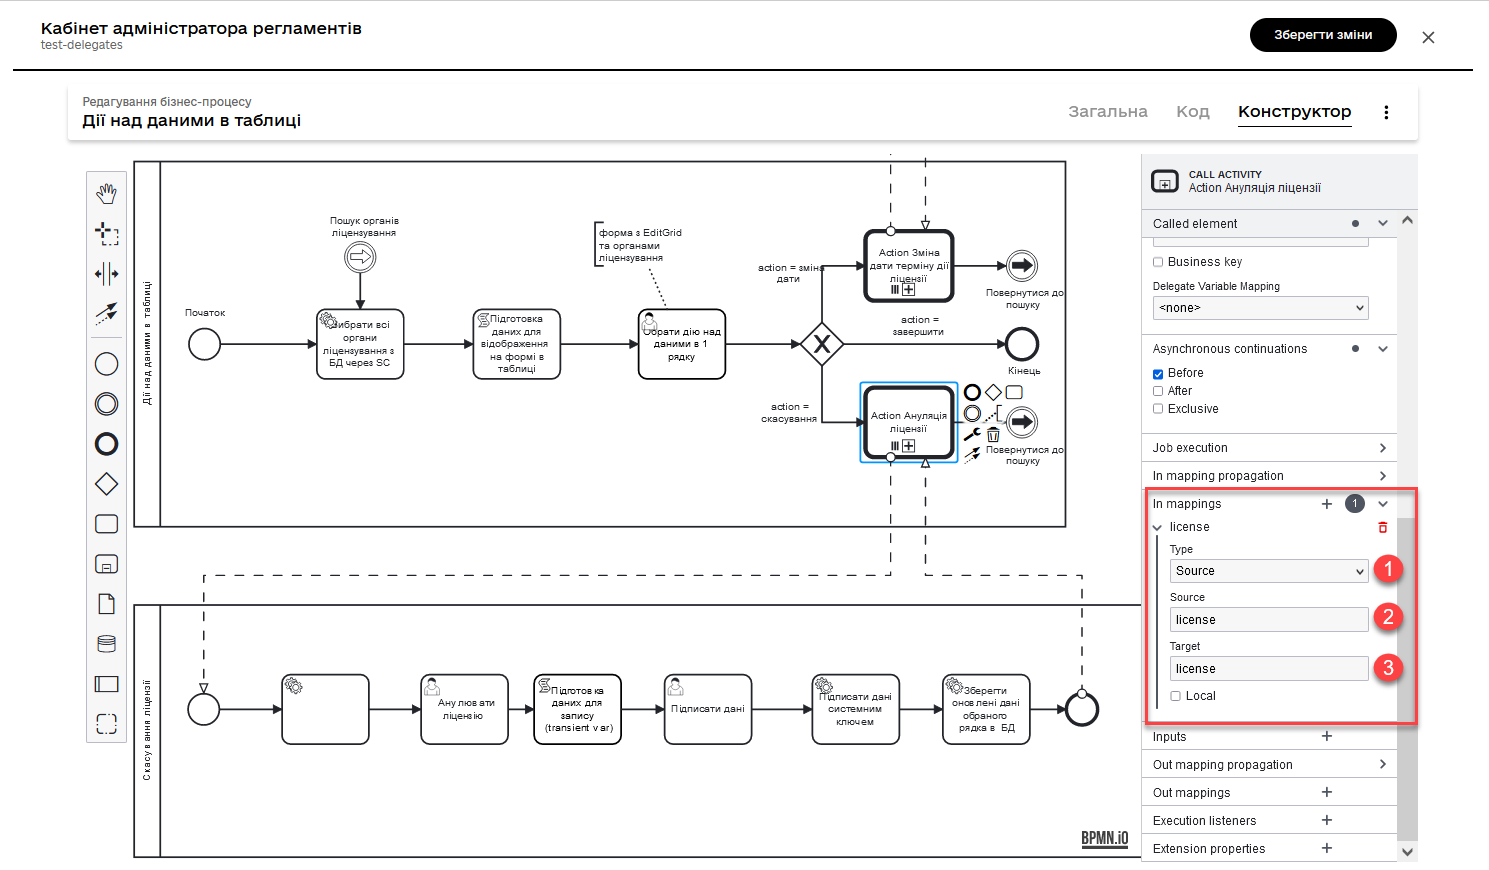
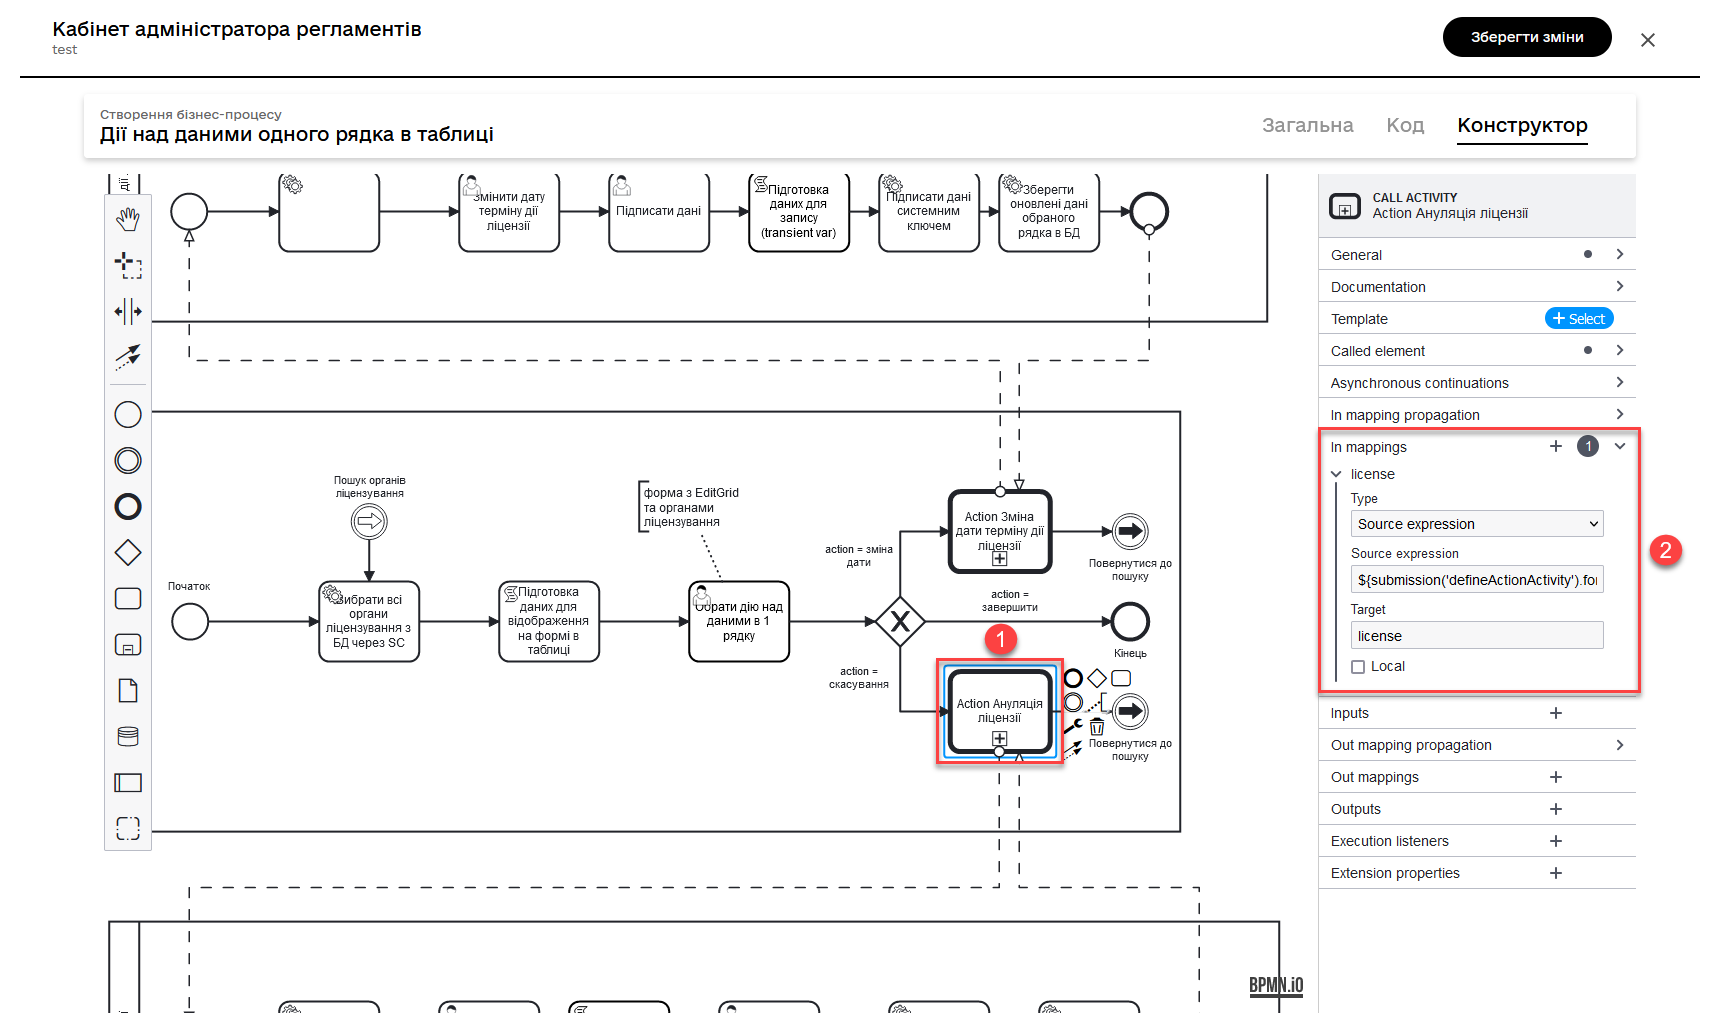
In the In mappings field, specify:
-
Source: Type -
source: license -
target: license
This means that the data from the variable license in the main process will be passed to the license-cancellation subprocess and stored in a variable with the same name.
-
-
|
If you choose an action on a single row of the table using the context menu (three dots)
The basic configurations of the Call Activity in this case will look almost identical to the Multi-instance option:
|
2.7. User task for license cancellation
Model a User Task that allows the user to cancel a license.
-
Use the
User Formdelegate template to create the user form. -
Specify the form ID to be shown to the user, in this case -
edit-grid-rows-action-cancel-license. -
The task can be assigned to a user (
Assignee), but in this case, the field can be left empty, which means any user can claim and execute it. -
In the Candidate roles field, specify the role. This field indicates that users with a specific role/roles, in our case —
op-regression, can view and execute this task. -
In the Form data pre-population field, pass the license data as the variable
${license}, which will be displayed on the form for pre-filling the data.
2.8. Data preparation for recording (transient var)
Model a Script Task and apply a script that can retrieve data from the previous task (form) and prepare it for recording in the database (in our case, updating an entity).
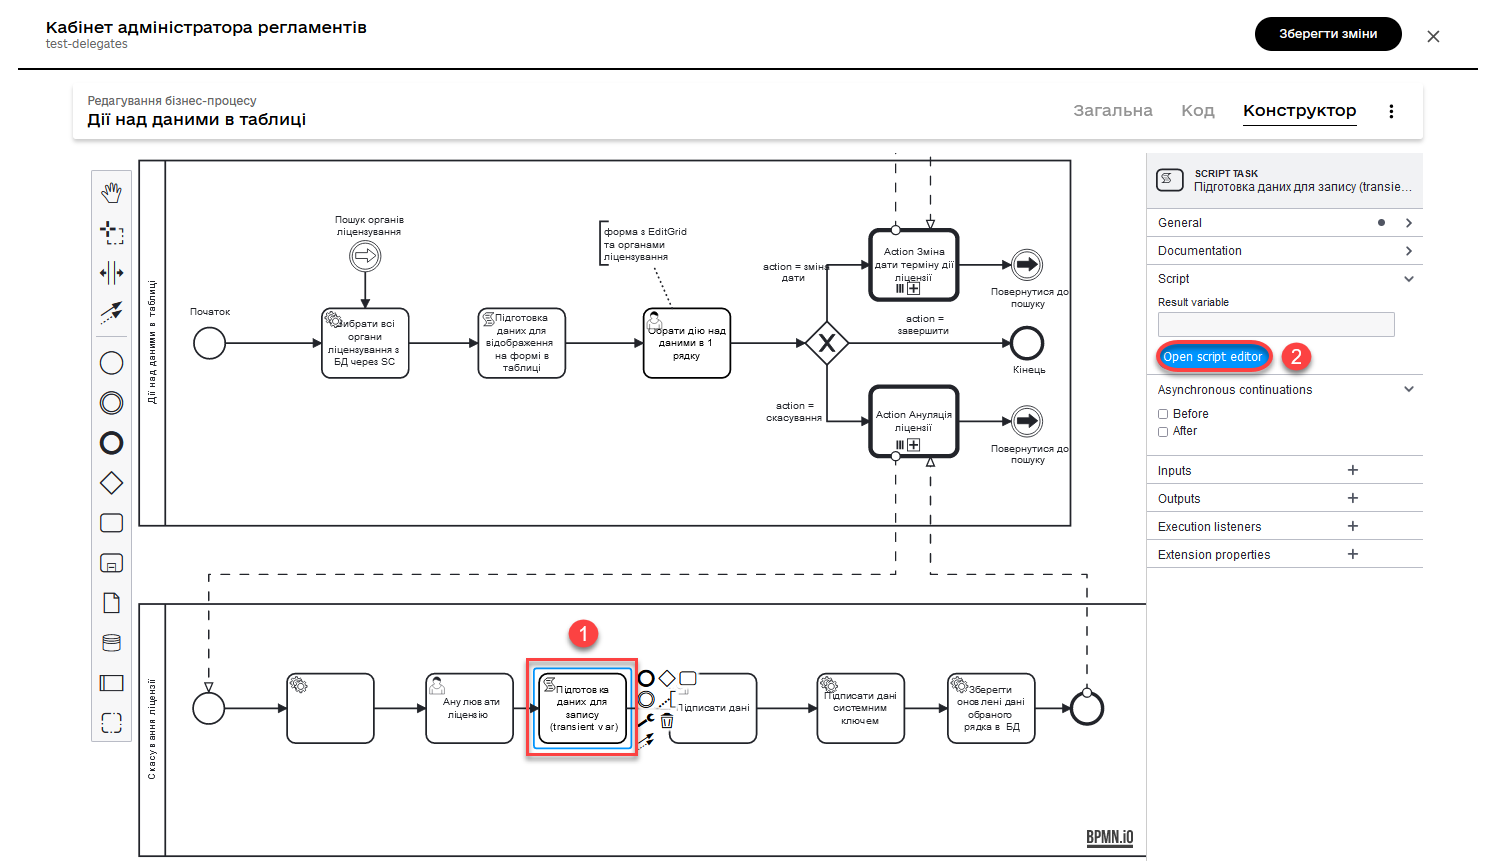
Groovy script to retrieve data from the cancelLicenseActivity form and prepare it for recording
def canceledLicense = submission('cancelLicenseActivity').formData
        canceledLicense.prop('licensingStatus', 'canceled')
        set_transient_variable('canceledLicense', canceledLicense)
This script performs the following actions:
-
Retrieves the form data that was submitted by the user in the
cancelLicenseActivitytask. The result of this expression is stored in the variablecanceledLicense.submission('cancelLicenseActivity').formData -
Sets the
licensingStatusproperty of thecanceledLicenseobject to the valuecanceled. This means that the license is marked as "canceled".canceledLicense.prop('licensingStatus', 'canceled') -
Creates a transient variable named '
canceledLicense' with the value set to thecanceledLicenseobject. Transient variables are only stored during the current execution of the process and are not persisted to the database.set_transient_variable('canceledLicense', canceledLicense)
2.9. Data signing with the qualified digital signature and system signature
Next, model the corresponding tasks for data signing with a digital signature and system key. Use the Officer sign task and System signature by DSO service delegates, respectively.
| You can refer to the Modeling Examples for such tasks at Self-registering officers with manual moderation. |
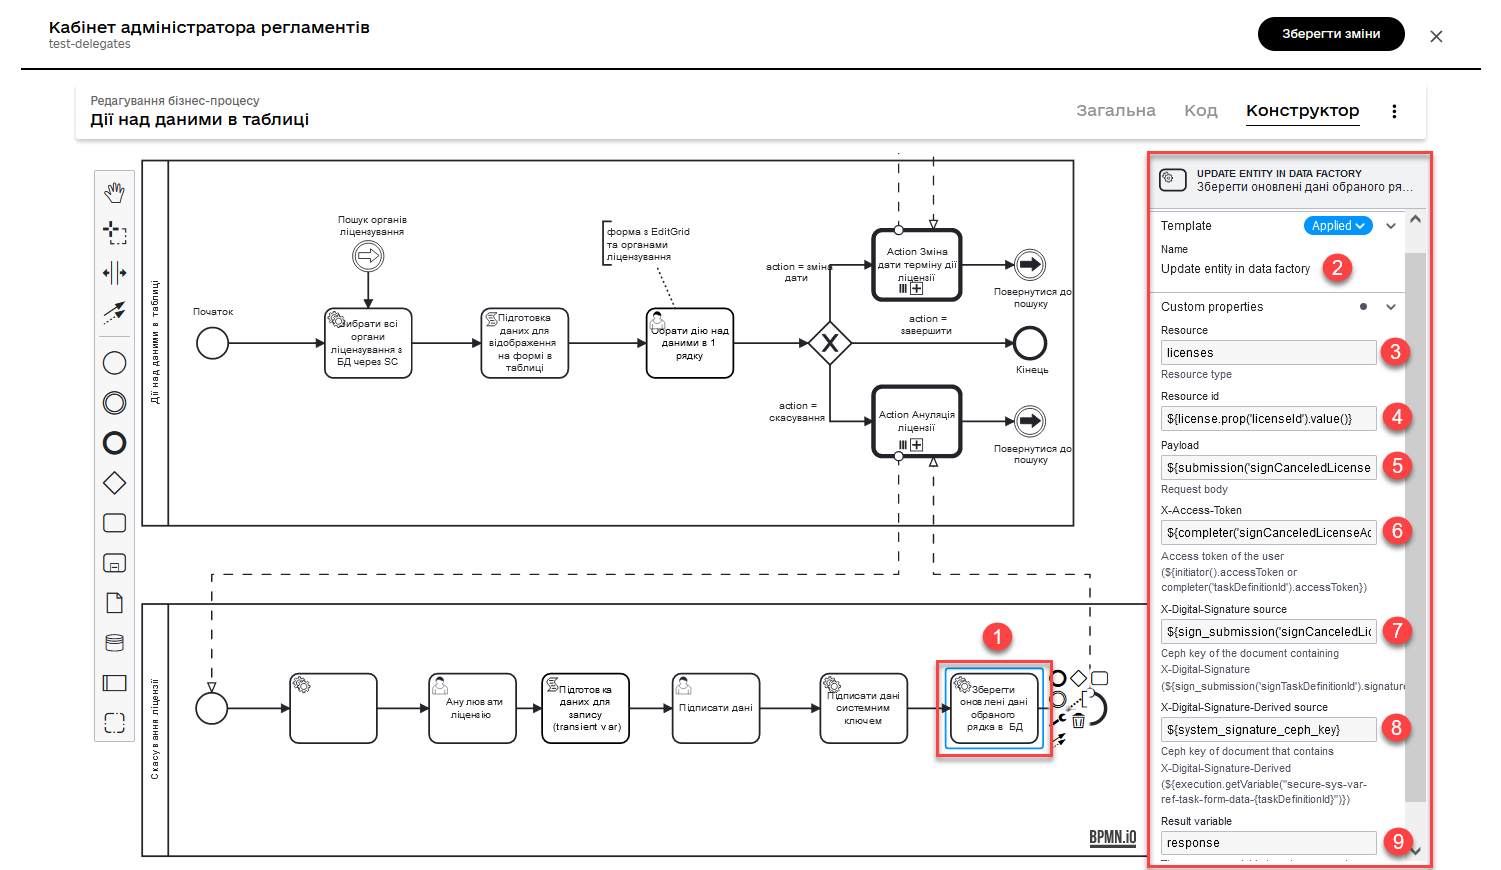
2.10. Saving the updated data of the selected row in the table on the form to the database.
Model a service task that will perform the operation of updating data for the selected record in the database.
-
Use the Update entity in data factory delegate, which is a Java class that contains the logic to perform this task.
Alternatively, you can apply the general Connect to data factory connector, using the
PUTmethod.For more information, refer to Connect to data factory.
-
Specify the
resourcethat indicates the resource, i.e., the table that needs to be updated, in this case -licenses. -
Specify the
Resource idthat defines the identifier of the license that needs to be updated. For example:${license.prop('licenseId').value()} -
In the
Payloadfield, pass the data that needs to be updated for the specified license. This data is taken from the temporary variablecanceledLicense, which was set in the previous steps of the process. This can be done using thesubmission()function. For example:${submission('signCanceledLicenseActivity').formData} -
Pass the access token to the resource —
X-Access-Token, obtained from thesignCanceledLicenseActivitytask. This can be done using thecompleter()function. For example:${completer('signCanceledLicenseActivity').accessToken} -
Pass the keys for the digital signature of the CEP data and the system key in the
X-Digital-Signature sourceandX_Digital-Signature-Derived sourcefields, respectively. For example:Qualified digital signature${sign_submission('signCanceledLicenseActivity').signatureDocumentId}System signature${system_signature_ceph_key} -
Save the result of the request in the output parameter
response.
2.11. Completing the process and returning the user to the initial form.
After updating the entity in the Data Factory, the sub-process that invoked it is completed, and the result is returned back to the Call Activity, and the user is returned to the beginning of the main process. User redirection is possible thanks to the modeled Link events.

| For more information about the "Link" event, you can refer to Link event. |
3. Modeling UI Forms for business processes
Let’s consider an example of modeling a user form for viewing and performing actions on specific rows of a table using the Edit Grid component.
We will also model two buttons using the Button component to perform additional logic.
|
If the multi-row checkbox is selected on the If you select the context menu "Three dots" next to a specific row, the corresponding subprocess will only be launched for the data of that row. The specific subprocess to be launched is determined by the action codes logic modeled on the Edit Grid component on the form. Therefore, the context menu "Three dots" allows selecting the logic for performing an action on a single table row. |
-
Go to the form builder in the Administrator of Regulations Portal, create a new form, and model the Edit Grid component, which consists of 5 text fields (Text Field) for the table.
-
Go to the settings of the Edit Grid component.
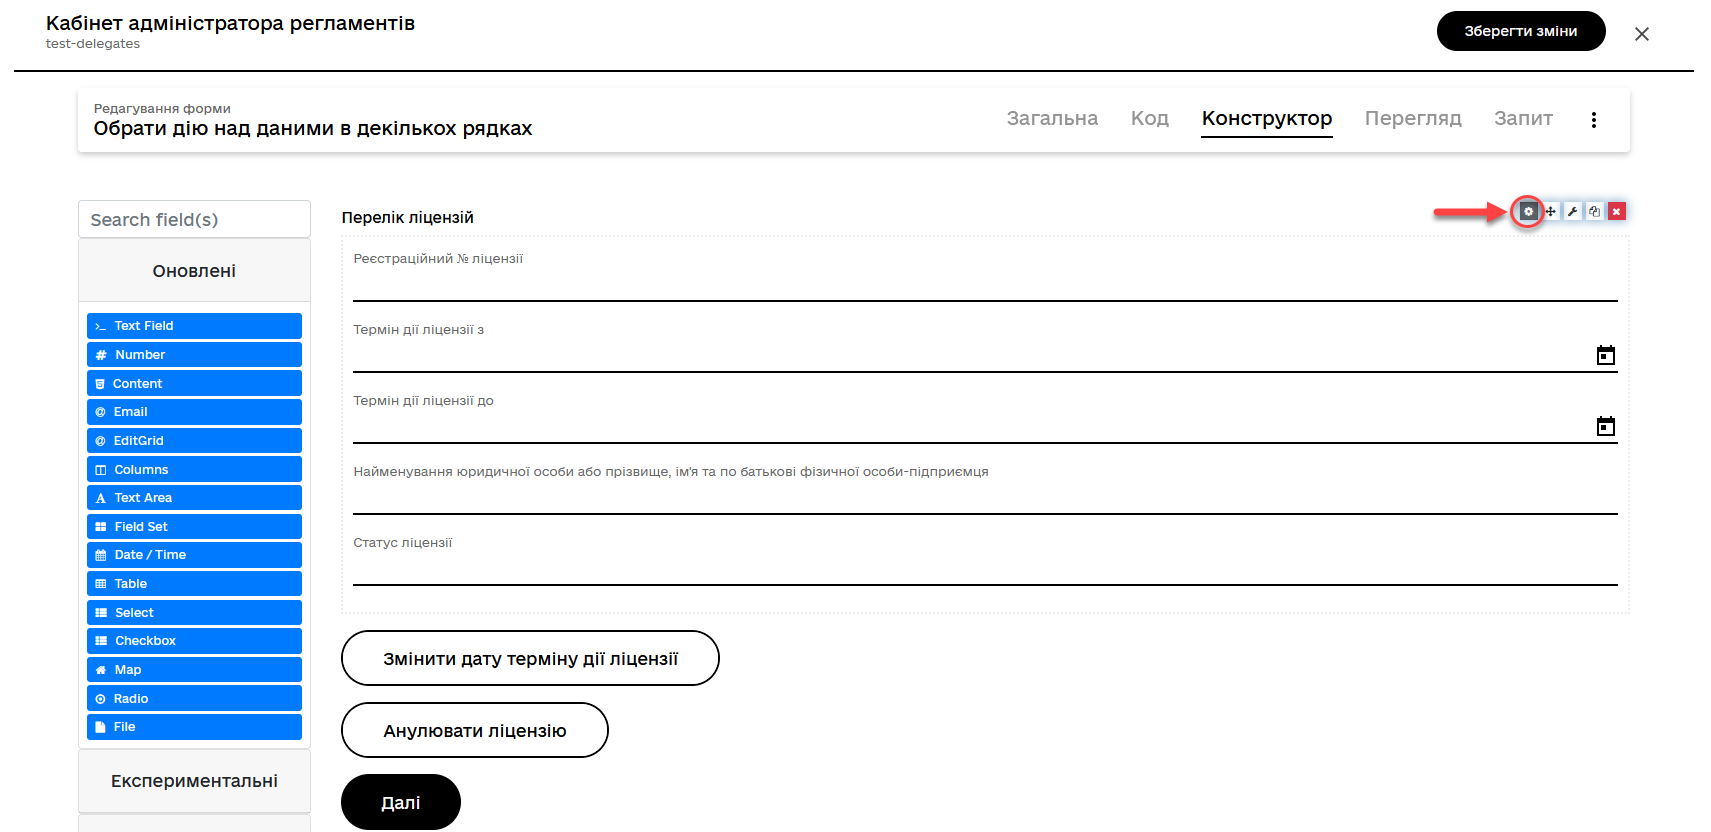
-
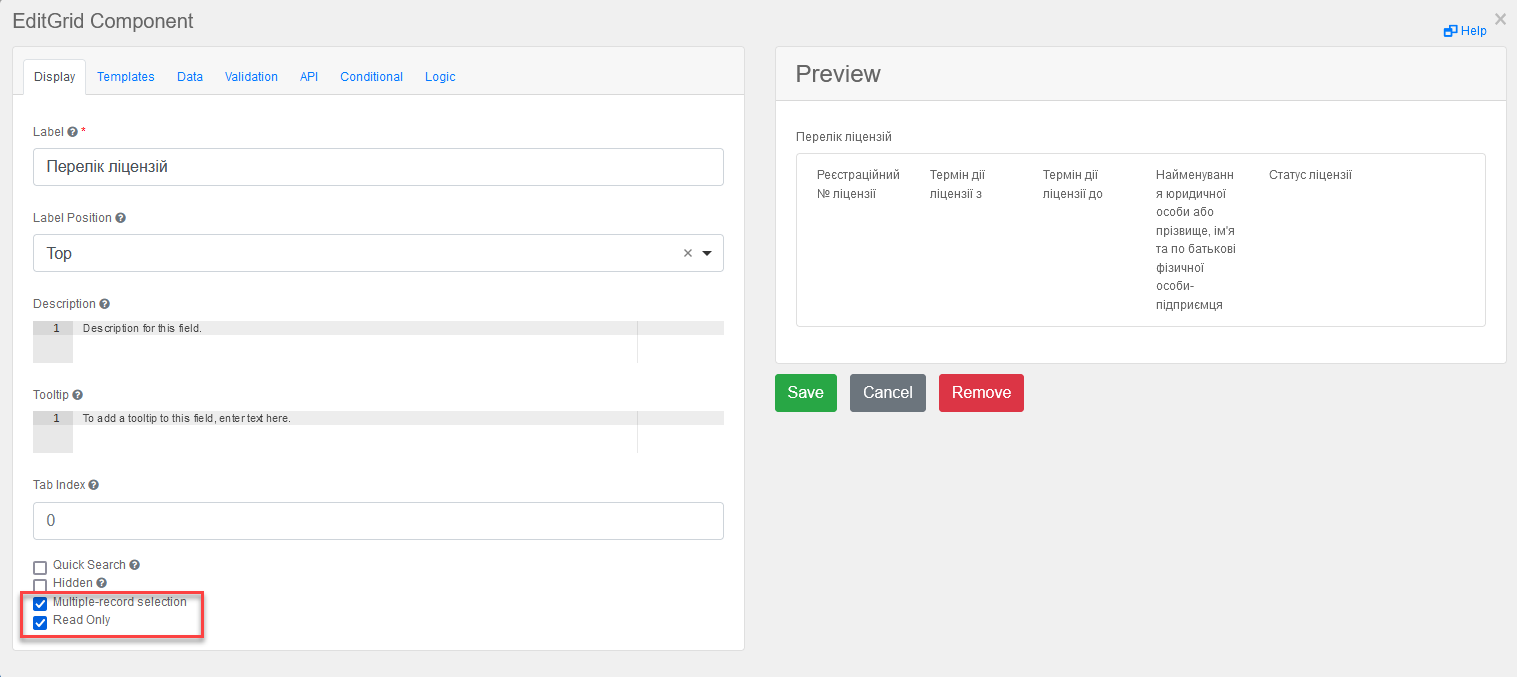
Enter a name (
Label) for this component, which will be displayed on the form, and activate the optionsMultiple-record selectionandRead Only.-
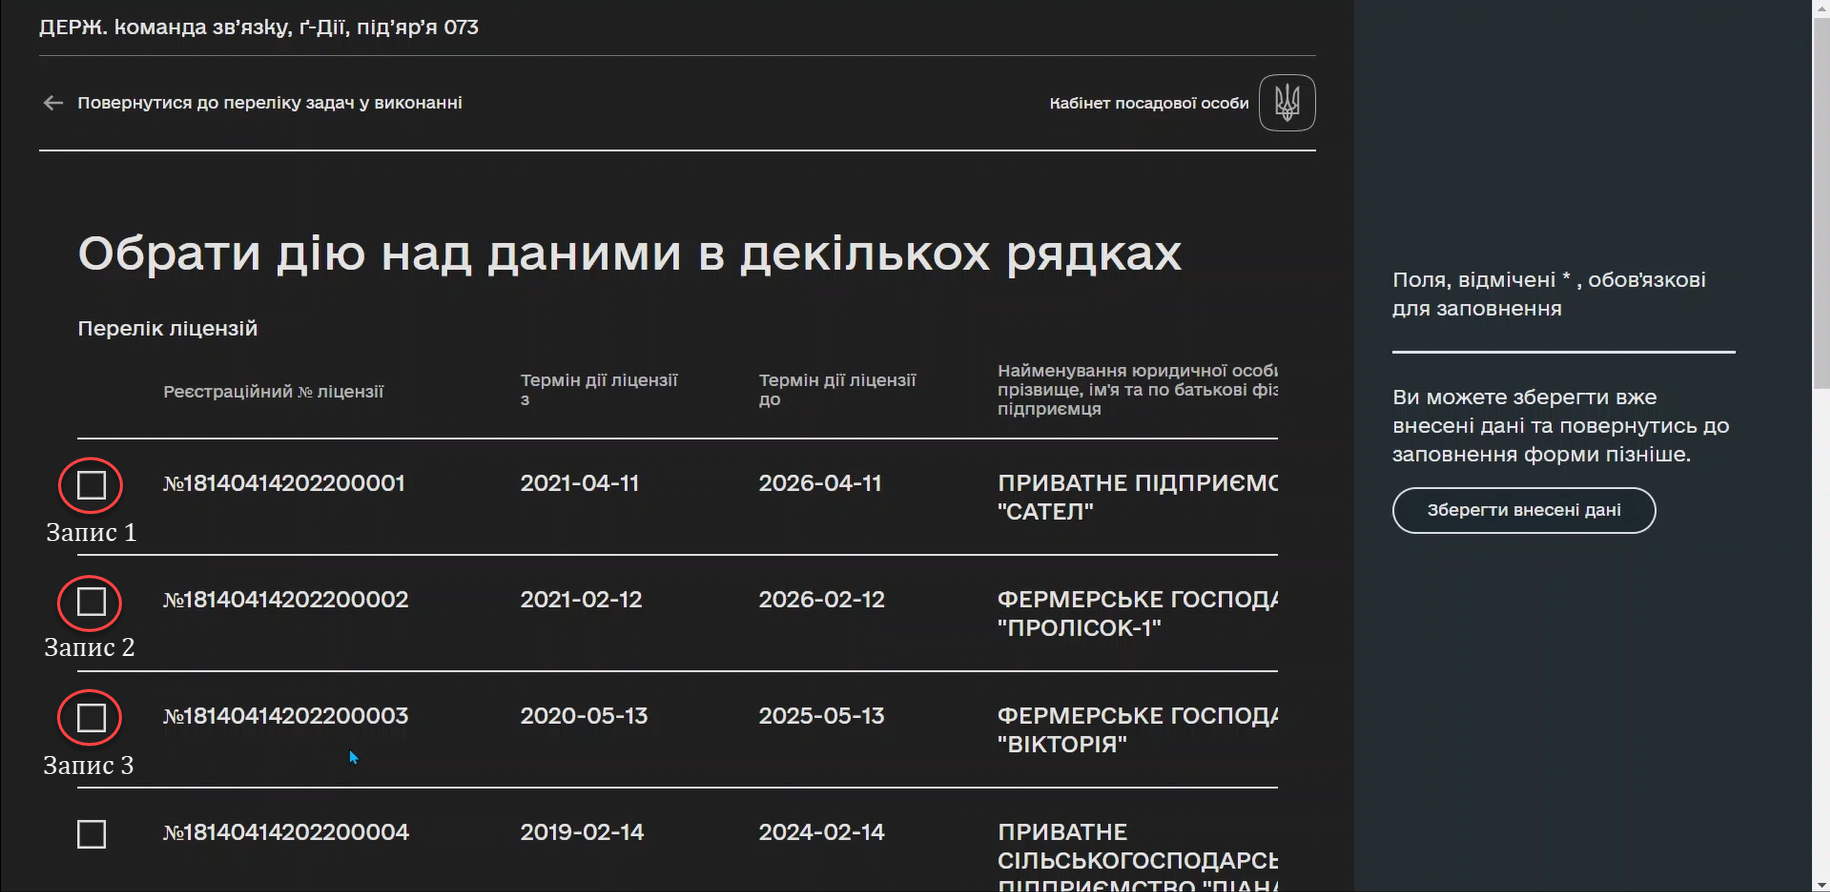
Multiple-record selectionallows users to select multiple records in the table simultaneously. -
Read Onlydisplays data through a separate control element in the context menu (three vertical dots), which allows viewing data without the ability to edit.
-
-
Switch to the API tab and enter a service name for the component to be used in API requests. In our case, it is
licenses, which corresponds to the table name in the database.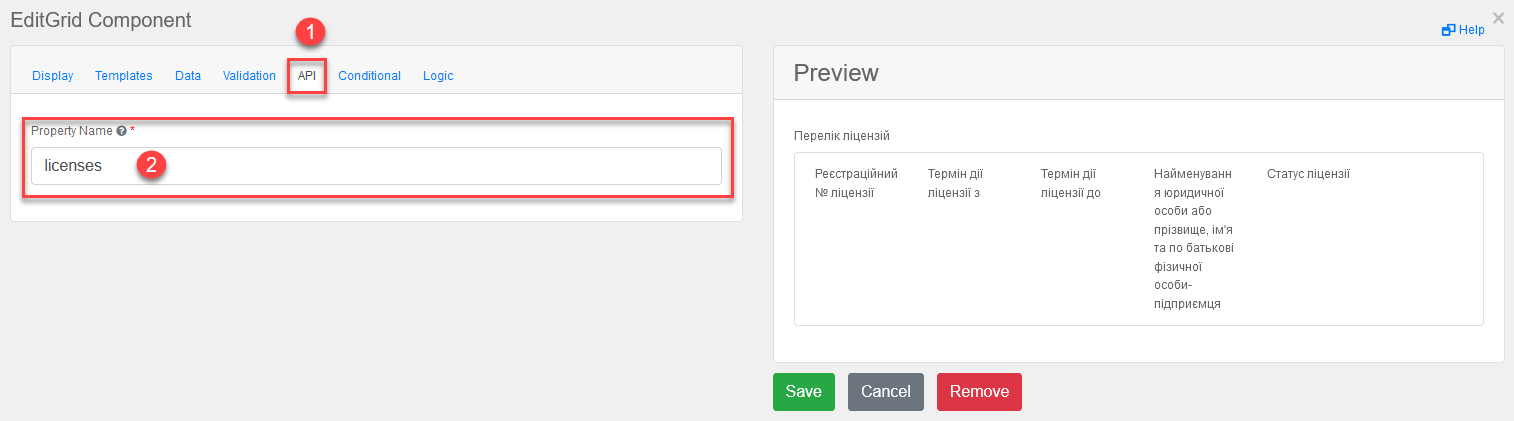
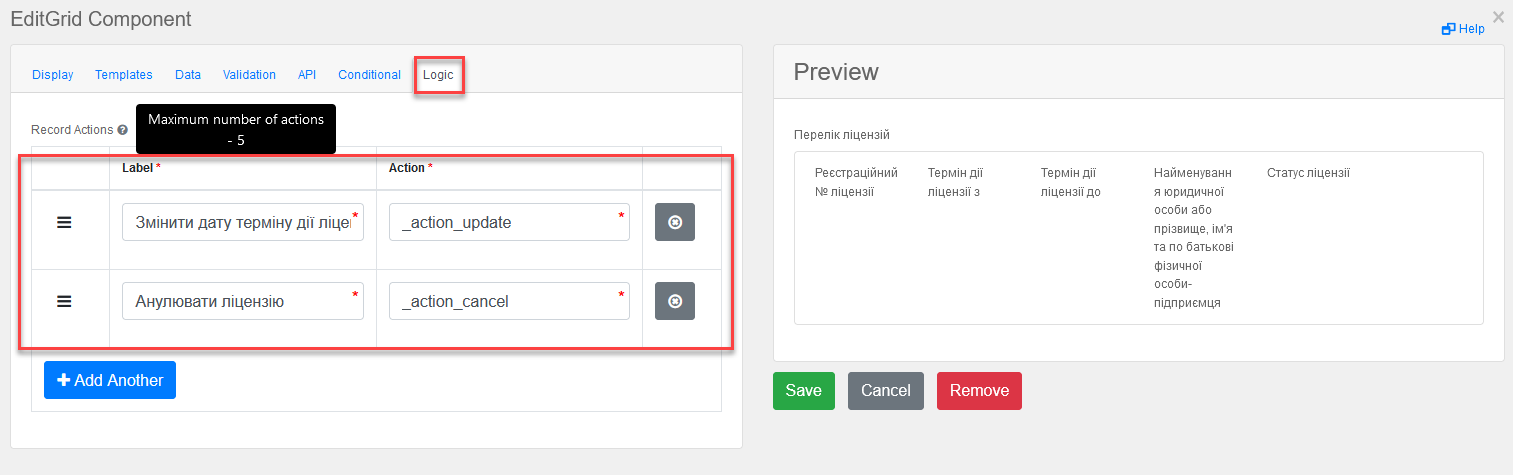
-
Switch to the Logic tab and add action codes for the options in the context menu "Three dots" that will be available for performing an action on a specific row on the form during the execution of the business process.
The regulation developer should avoid modeling actions using the
action_codein the context menu "Three dots" of a table row when EditGrid is in edit mode. Failure to do so may result in unsaved edited data, and the user will automatically move to the next business process based on the action_code.Instead, the user should be directed to a signing form after editing the data to ensure that all changes are saved.
-
Model the Button component for two additional buttons to be able to perform actions on multiple rows of the table simultaneously when the Multiple-record selection option is activated in Edit Grid.
-
Add a button to update the license action period (for one or more records in the table, provided the
Multiple-record selectioncheckbox is used in Edit Grid).

-
Add a button to cancel the license (for one or more records in the table, provided the
Multiple-record selectioncheckbox is used in Edit Grid).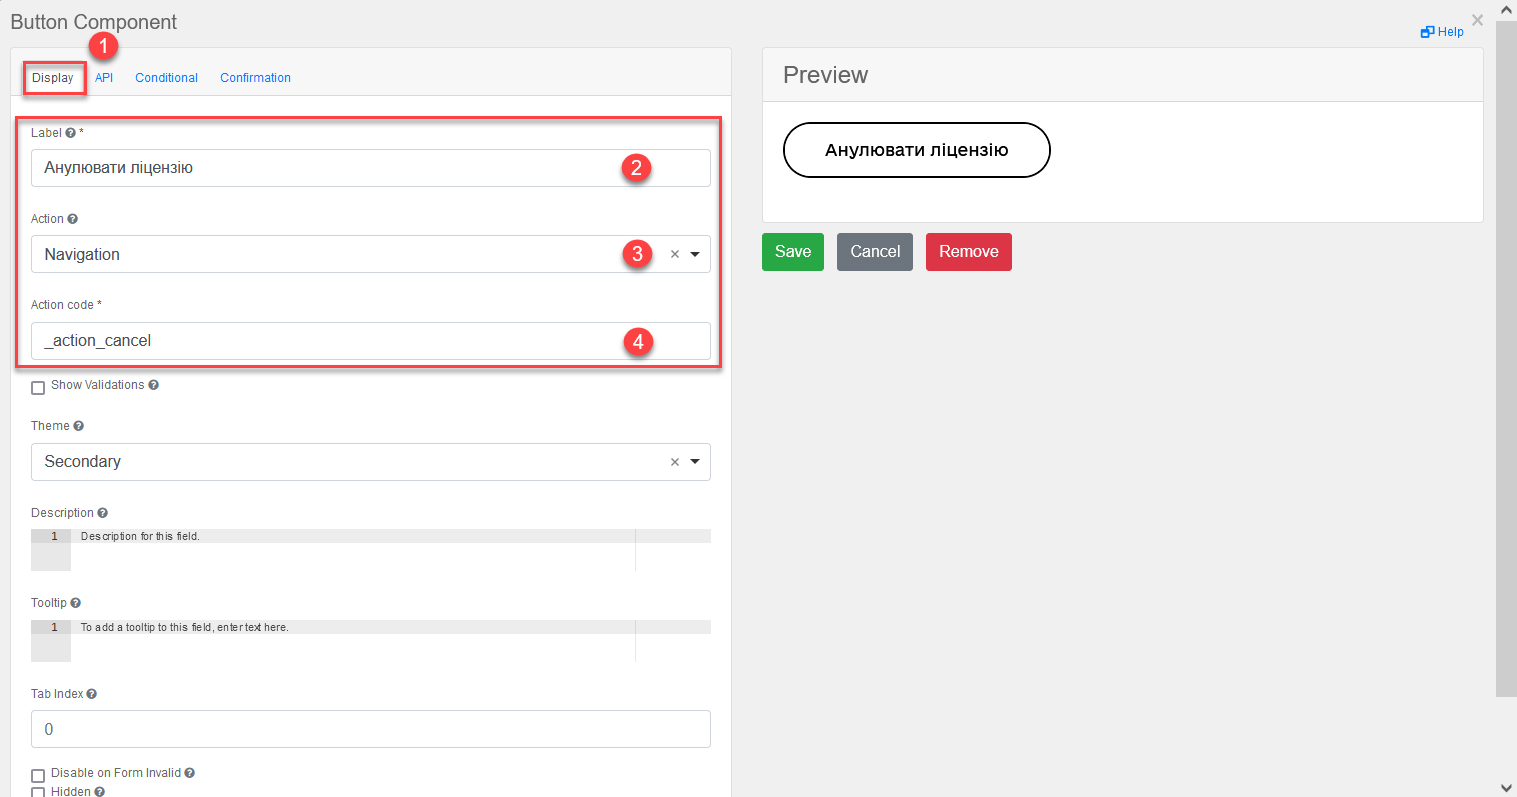

-
-
Save the changes and apply the configuration to the master branch.
| Read about the capabilities of the Edit Grid component at Edit Grid component. |
4. Usage in user portals
The modeled business process can be found in the list of available services in the Officer Portal under the authorized person in the demo registry.
|
The Officer portal is available via the pattern link: https://officer-portal-<registry-name>-main.<dns-wildcard> where For example, for the |