Updating registry digital signature keys and certificates
| 🌐 This document is available in both English and Ukrainian. Use the language toggle in the top right corner to switch between versions. |
When you deploy a registry instance, you must configure the digital signature key. After that, you can update key information as part of the registry editing. The configuration mechanism on the part of the administrator is the same both when initially adding and updating the key data.
To replace the digital key of the registry, follow the steps hereunder.
1. Editing key data
-
Log in to Control Plane, the administrative control panel of the registries, using the previously received login and password.
-
Go to the
Registriessection and select the corresponding registry in which you want to change the system key.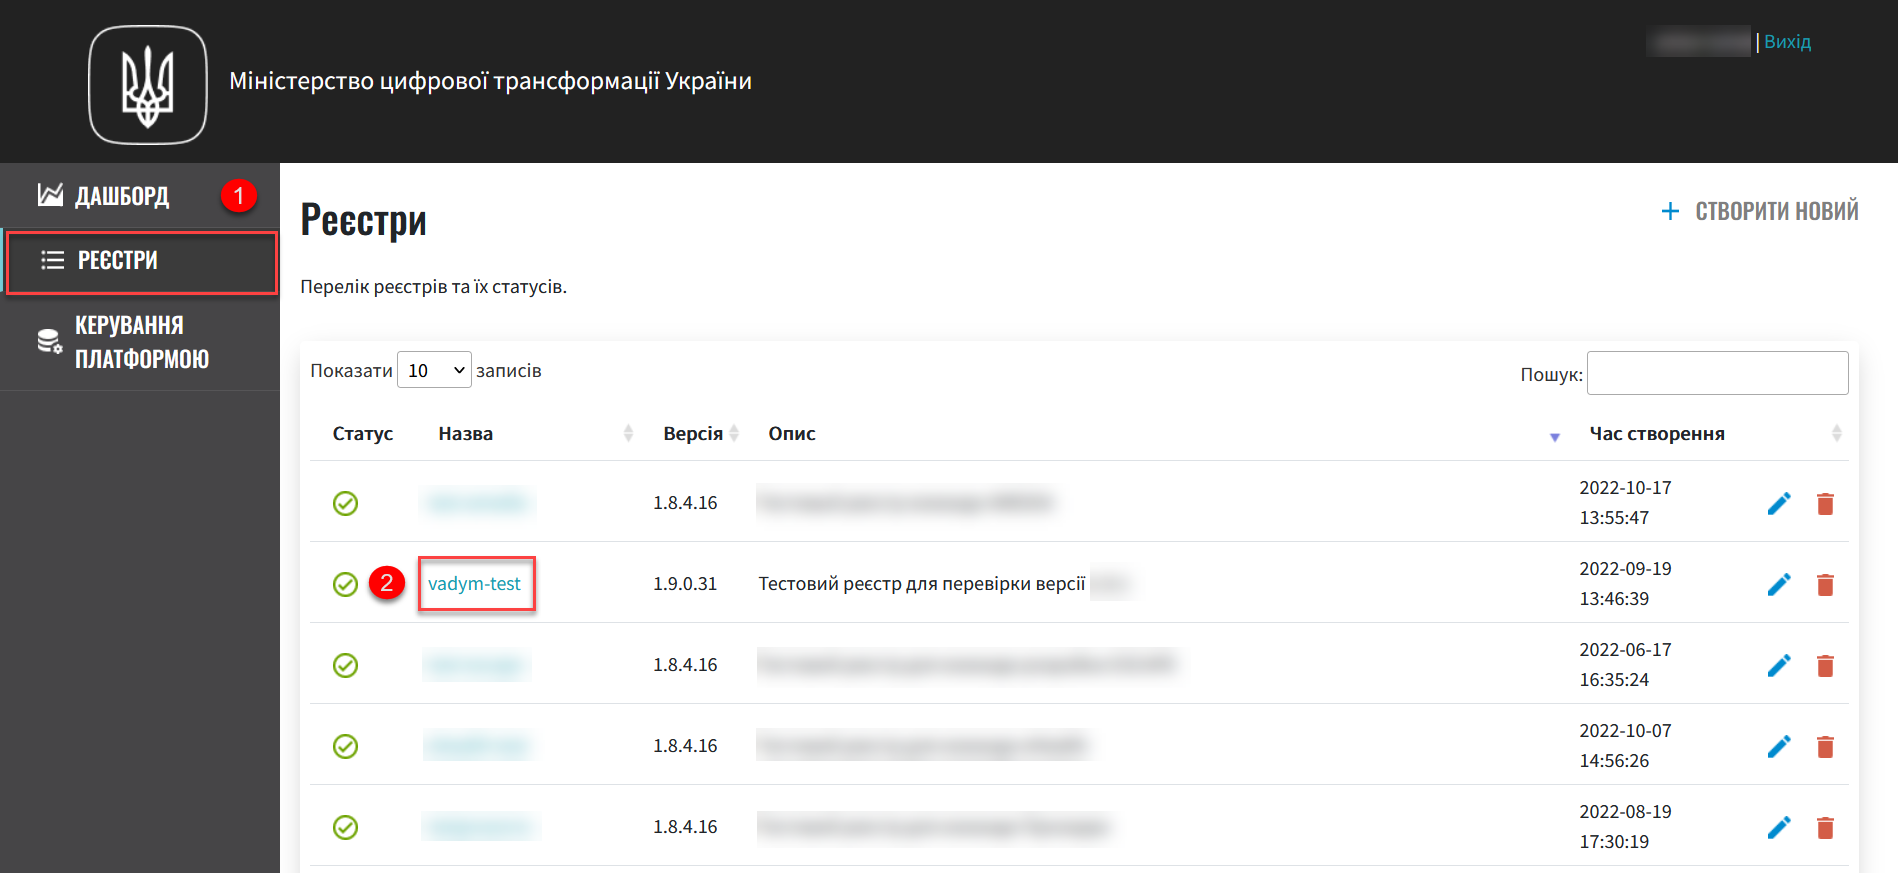
-
Click the
Editbutton in the upper right corner.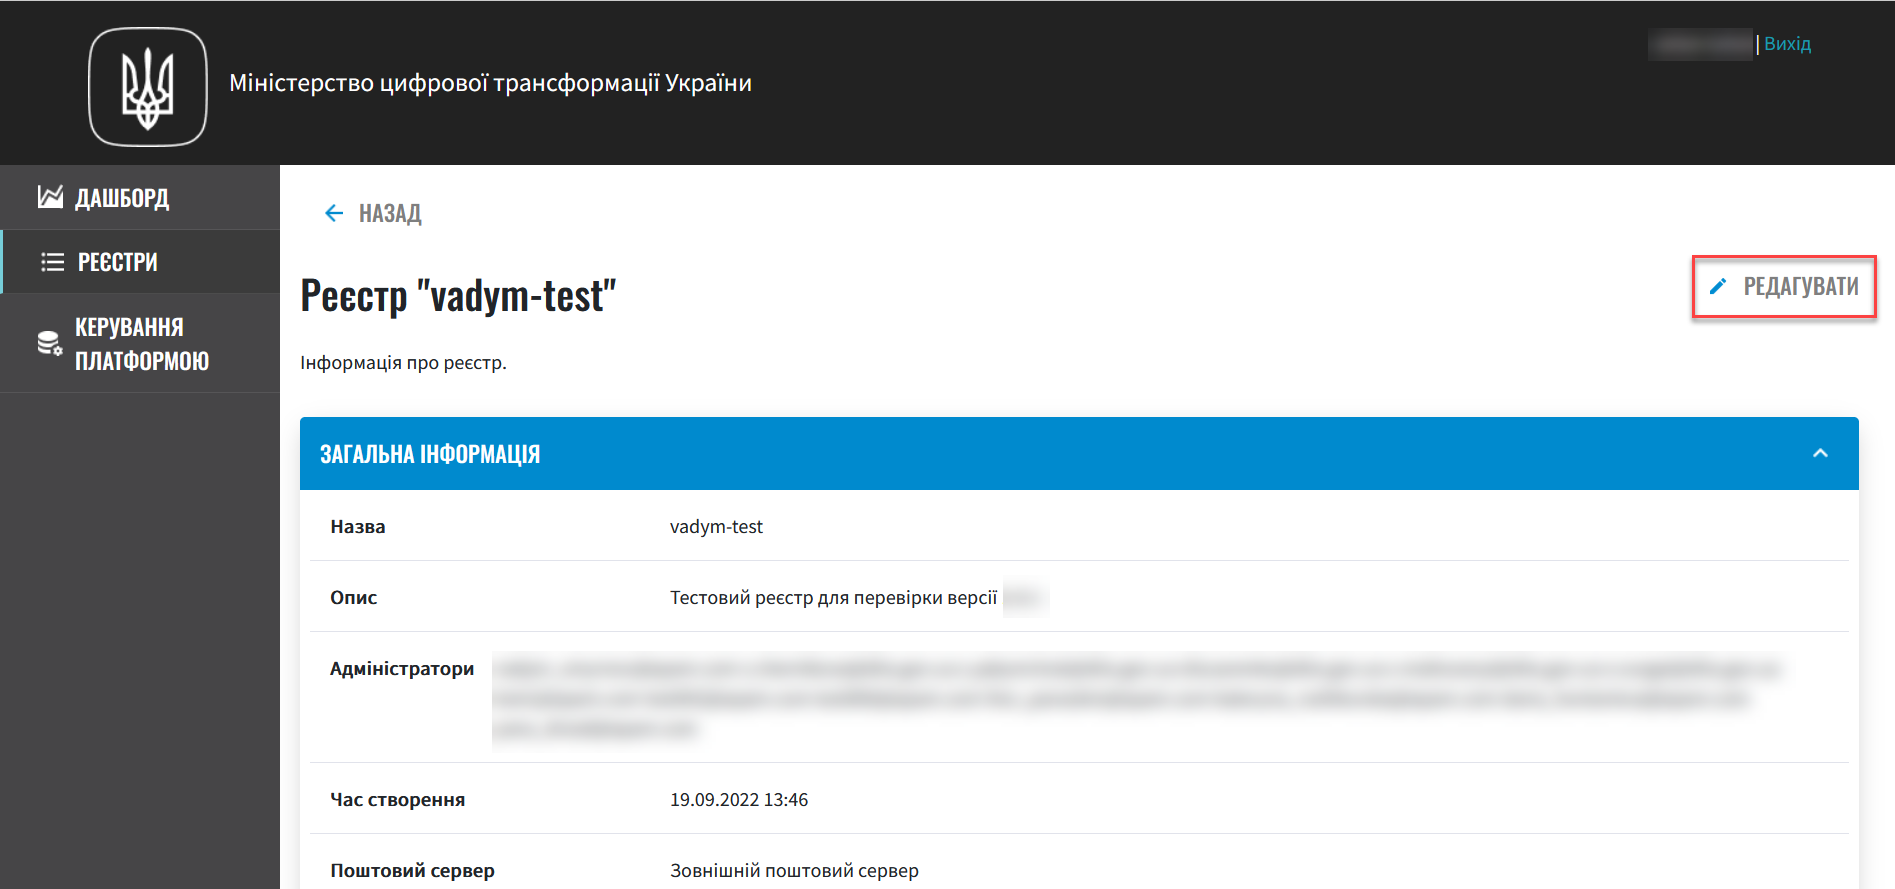
-
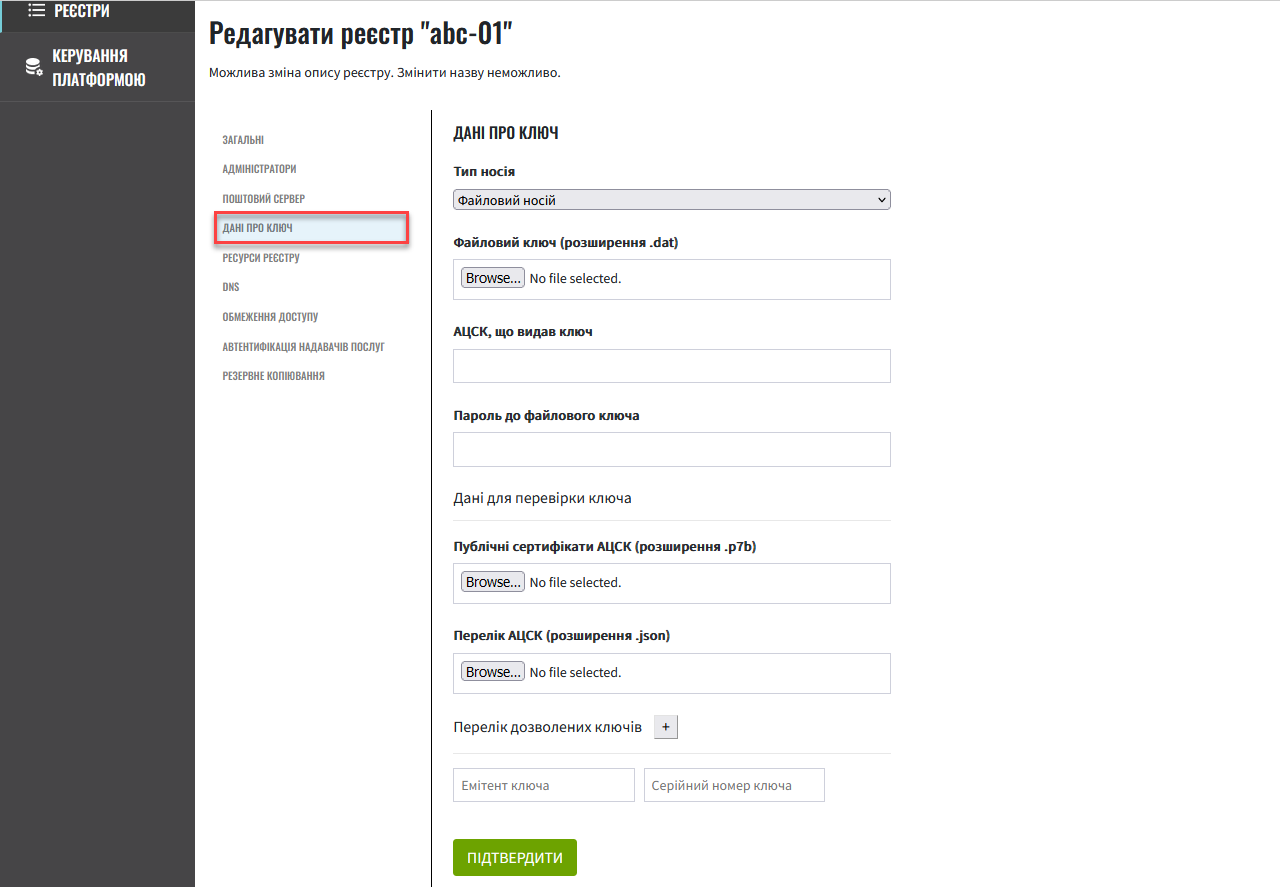
Go to the Key data section and make further settings.
2. Setting keys
You can configure two types of keys:
-
file key: stored in the user storage in the*.datformat. -
hardware key: stored in the network cryptomodule and controlled by the corresponding software.
2.1. Setting the file keys
-
Select
Storage type—File-based key storage(default).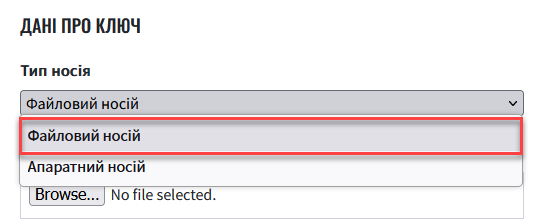
-
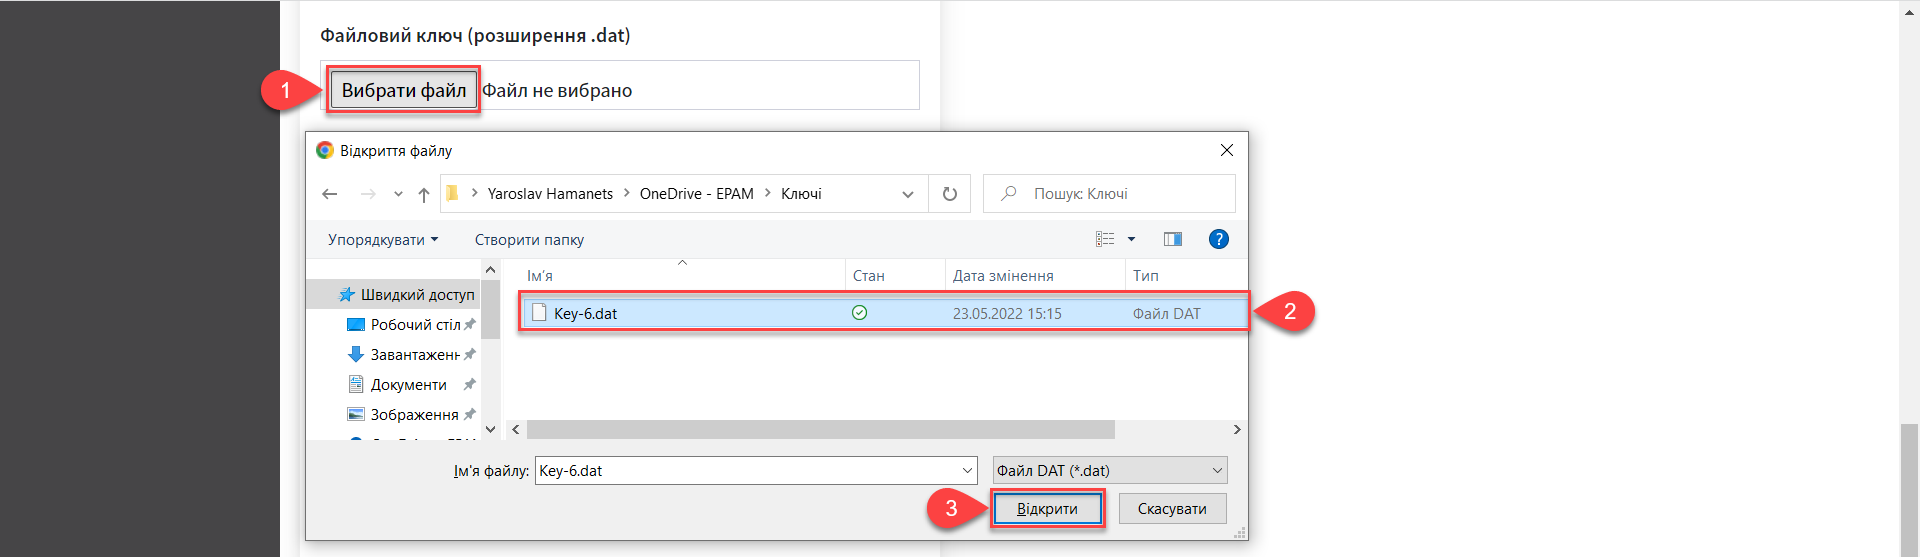
Press the Select file button to add the new system key. In the new window, navigate to the folder where the key file in the
*.datformat is stored, select it, and click Open.Accredited key certification centers (AKCC) are state-accredited organizations that provide digital signature services, secure key information carriers, or use the applicant’s carriers like USB flash drives. They play a vital role in maintaining the security and integrity of digital transactions and communications, ensuring the authenticity of digital signatures, and thus enabling secure and trustworthy electronic interactions.
-
The following step is to enter the name of the Accredited key certification center (AKCC) in the
AKCC that issued the keyfield. The name of the AKCC that issued the key can be found in the certificate of the key. -
Enter the password of the selected system key into the corresponding field.

-
Enter the list of certificates from the appropriate key certification centers (.p7b). You can get your .p7b file on the site of your regional competent authority.
When deploying and working with the test registry, use the certificates of the test AKCC, otherwise the registry deployment pipeline will not work, and you will receive the
digital-signature-opscryptoservice initialization error. This happens because the certificate files for the production environment simply do not contain data about the test AKCC.This functionality is specific to the Ukrainian implementation and may not apply or function as described in other contexts or regions. Please consult the local guidelines or documentation if you are implementing this outside Ukraine. For the prod environment, use the appropriate prod certificates.
-
AKCC certificates for the test environment: https://iit.com.ua/download/productfiles/CACertificates.Test.All.p7b.
-
AKCC certificates for the prod environment: https://iit.com.ua/download/productfiles/CACertificates.p7b.
Add the certificate file by clicking the Select File button in the
AKCC public certificates (.p7b extension)field. In the new window, navigate to the folder where the certificate file is stored, select it, and click Open.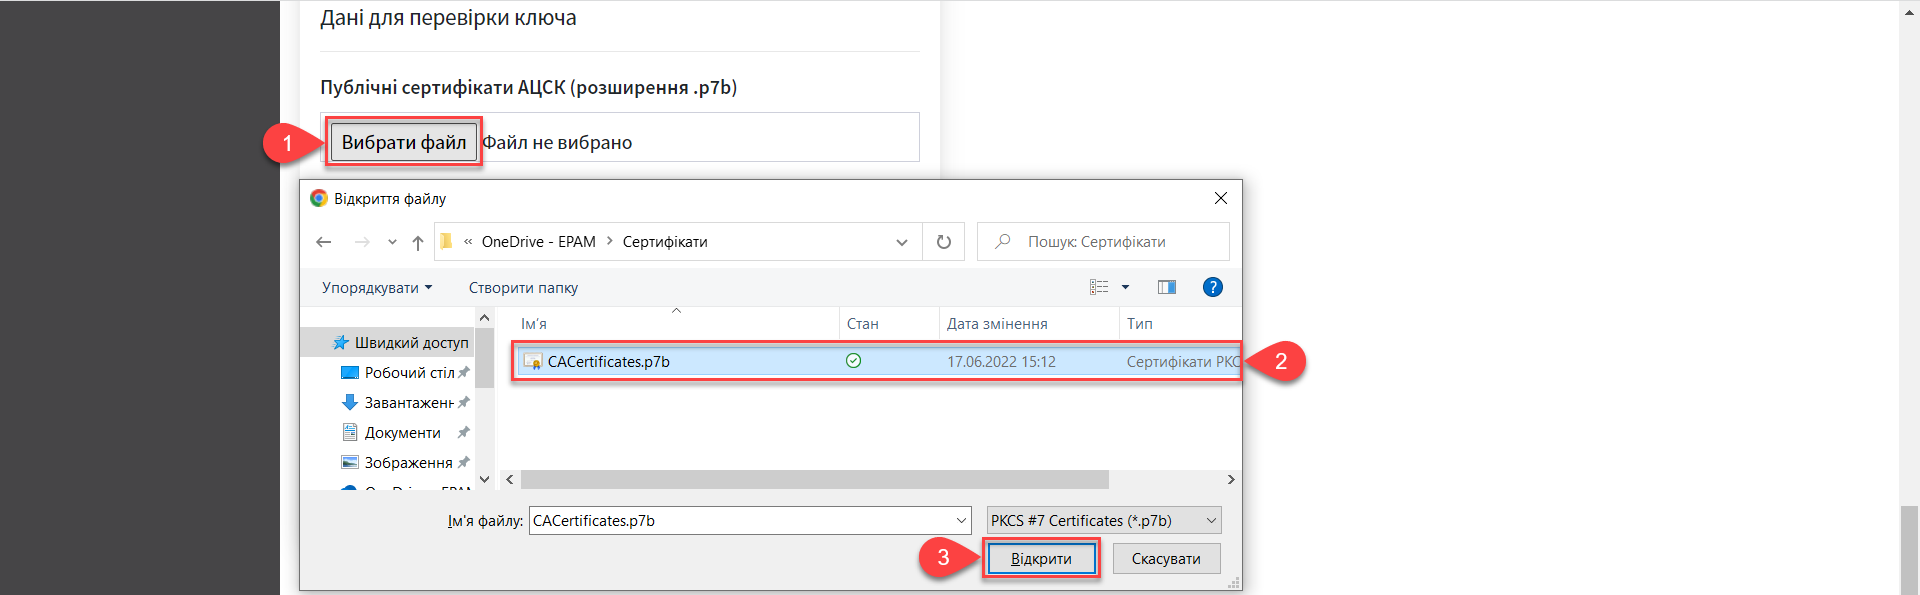
-
-
Add the parameters to interact with the compatible key certification centers (.json).
When deploying and working with the test registry, use the certificates of the test AKCC, otherwise the registry deployment pipeline will not work, and you will receive the
digital-signature-opscryptoservice initialization error. This happens because the certificate files for the production environment simply do not contain data about the test AKCC.This functionality is specific to the Ukrainian implementation and may not apply or function as described in other contexts or regions. Please consult the local guidelines or documentation if you are implementing this outside Ukraine. For the prod environment, use the appropriate prod certificates.
-
AKCC certificates for the test environment: https://iit.com.ua/download/productfiles/CAs.Test.All.json.
-
AKCC certificates for the prod environment: https://iit.com.ua/download/productfiles/CAs.json.
Add the certificate file by clicking the Select File button in the
AKCC list (extension .json)field. In the new window, navigate to the folder where the file containing parameters is stored, select it, and click Open.
-
-
Next, indicate the
List of allowed keyswhose signature can be considered true.This block specifies a list of keys, including the old ones (for example, when replacing keys), so that everything previously signed with the old key is verified (validated). That is, the list of allowed keys must contain the data history of all keys used in the system for signing. The list of allowed keys contains the following key data:
-
"Key issuer" -
"Key serial number"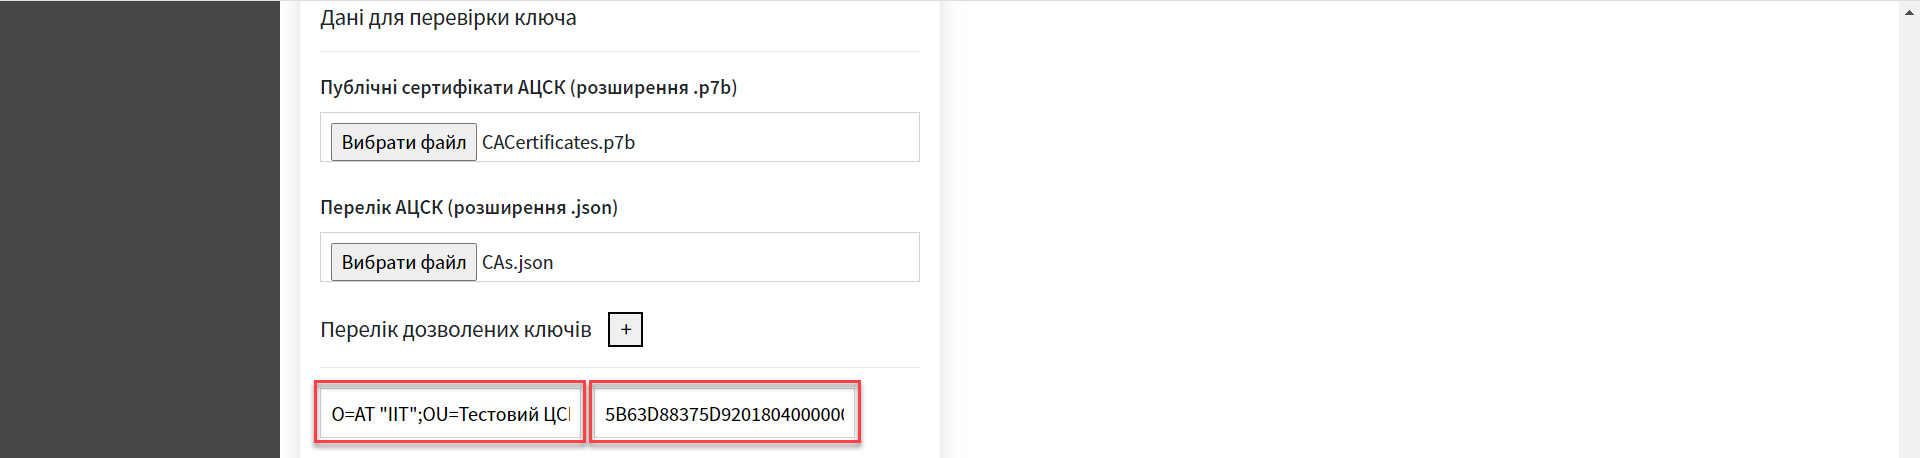
-
-
Finally, check the entered information and click
Confirm.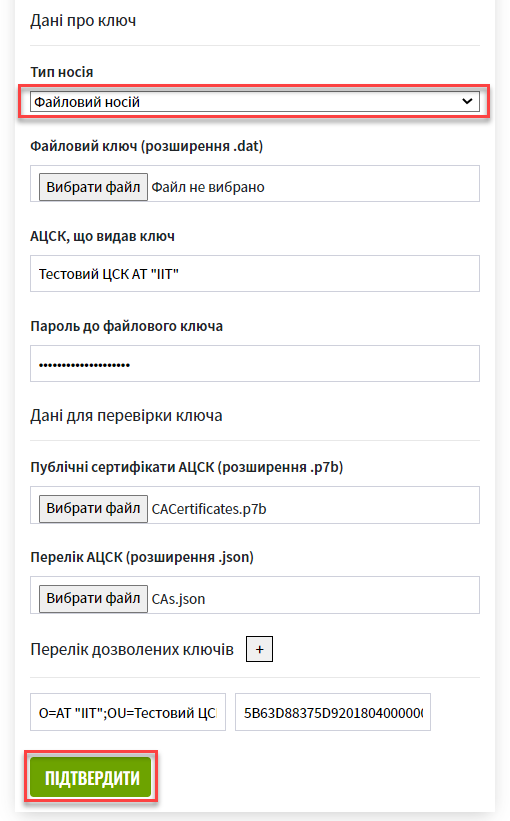
As a result of updating the key data in the Control Plane interface, a new request is created to update the
cluster-mgmtconfiguration, which must be confirmed.
2.2. Setting the hardware key
-
Select
Storage type—Hardware-based key storage.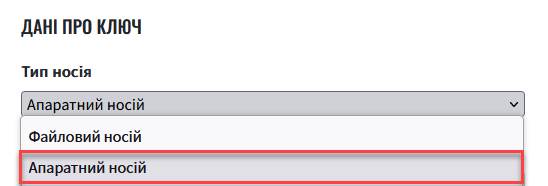
-
By default, the value of the
Key typefield is set to thecryptomod. IIT Hryada-301value. IIT Hryada-301 is a hardware cryptomodule.This functionality is specific to the Ukrainian implementation and may not apply or function as described in other contexts or regions. Please consult the local guidelines or documentation if you are implementing this outside Ukraine. 
-
Enter the hardware key password into the corresponding field.
The key password has the following structure
##User##Password.This functionality is specific to the Ukrainian implementation and may not apply or function as described in other contexts or regions. Please consult the local guidelines or documentation if you are implementing this outside Ukraine. 
-
Then, enter the name of your Accredited key certification center (AKCC) into the
AKCC namefield.For example, the AKCC’s name is in your key’s digital signature certificate.

-
In the next step, enter the
AKCC hostparameter.
You can find the value in the file of interaction parameters provided by your corresponding accredited key certification center (example: https://iit.com.ua/downloads).
This functionality is specific to the Ukrainian implementation and may not apply or function as described in other contexts or regions. Please consult the local guidelines or documentation if you are implementing this outside Ukraine. -
AKCC certificates for the test environment: https://iit.com.ua/download/productfiles/CAs.Test.All.json.
-
AKCC certificates for the prod environment: https://iit.com.ua/download/productfiles/CAs.json.
-
-
Then, enter the
AKCC portparameter.
You can find the value in the file of interaction parameters provided by your corresponding accredited key certification center (example: https://iit.com.ua/downloads).
This functionality is specific to the Ukrainian implementation and may not apply or function as described in other contexts or regions. Please consult the local guidelines or documentation if you are implementing this outside Ukraine. -
AKCC certificates for the test environment: https://iit.com.ua/download/productfiles/CAs.Test.All.json.
-
AKCC certificates for the prod environment: https://iit.com.ua/download/productfiles/CAs.json.
-
-
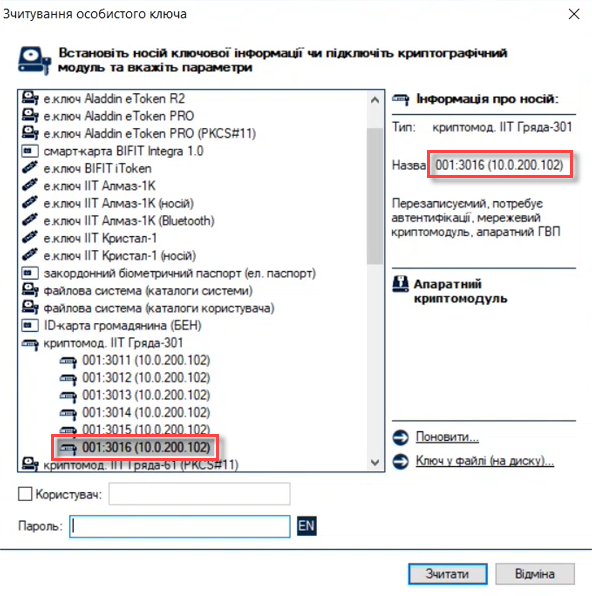
Enter the
Device serial number(the hardware key serial number).
This functionality is specific to the Ukrainian implementation and may not apply or function as described in other contexts or regions. Please consult the local guidelines or documentation if you are implementing this outside Ukraine. The following parameters are specified when creating and configuring a network cryptographic module.
Configuring Ukrainian network cryptographic module IIT Hryada-301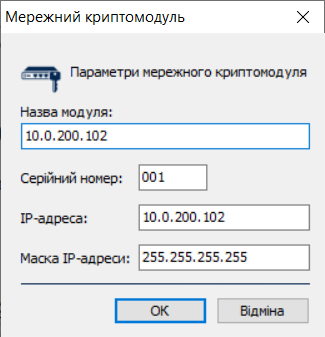
The device serial number is shown in the key name, for example:
001:3016(10.0.200.102), where-
001: serial device number. -
3016: key port. -
10.0.200.102: key host.
-
-
Enter
Key port.
-
Enter
Key host(IP address).
-
Enter
Key mask.
The default value is
255.255.255.255. -
Based on all the previously entered parameters, the
INIfile will be automatically configured. Detailed information on its content and additional parameters is displayed in the correspondingINI configurationeditable field.
-
Next, add the list of certificates from the appropriate key certification centers (.p7b).
You can get your .p7b file on the site of your regional competent authority.
When deploying and working with the test registry, use the certificates of the test AKCC, otherwise the registry deployment pipeline will not work, and you will receive the
digital-signature-opscryptoservice initialization error. This happens because the certificate files for the production environment simply do not contain data about the test AKCC.This functionality is specific to the Ukrainian implementation and may not apply or function as described in other contexts or regions. Please consult the local guidelines or documentation if you are implementing this outside Ukraine. For the prod environment, use the appropriate prod certificates.
-
AKCC certificates for the test environment: https://iit.com.ua/download/productfiles/CACertificates.Test.All.p7b.
-
AKCC certificates for the prod environment: https://iit.com.ua/download/productfiles/CACertificates.p7b.
Add the certificate file by clicking the Select File button in the
AKCC public certificates (.p7b extension)field. In the new window, navigate to the folder where the certificate file is stored, select it, and click Open. -
-
Add the parameters to interact with the compatible key certification centers (.json).
You can get your .json file from your corresponding local provider.
When deploying and working with the test registry, use the certificates of the test AKCC, otherwise the registry deployment pipeline will not work, and you will receive the
digital-signature-opscryptoservice initialization error. This happens because the certificate files for the production environment simply do not contain data about the test AKCC.This functionality is specific to the Ukrainian implementation and may not apply or function as described in other contexts or regions. Please consult the local guidelines or documentation if you are implementing this outside Ukraine. For the prod environment, use the appropriate prod certificates.
-
AKCC certificates for the test environment: https://iit.com.ua/download/productfiles/CAs.Test.All.json.
-
AKCC certificates for the prod environment: https://iit.com.ua/download/productfiles/CAs.json.
Add the certificate file by clicking the Select File button in the
AKCC list (extension .json)field. In a new window, navigate to the folder where the file containing parameters is stored, select it, and click Open. -
-
Enter the
List of allowed keyswhose signature can be considered true.This block specifies a list of keys, including the old ones (for example, when replacing keys), so that everything previously signed with the old key is verified (validated). That is, the list of allowed keys must contain the data history of all keys used in the system for signing. The list of allowed keys contains the following key data:
-
"Key issuer" -
"Key serial number"
-
-
Finally, check the entered information and click
Confirm.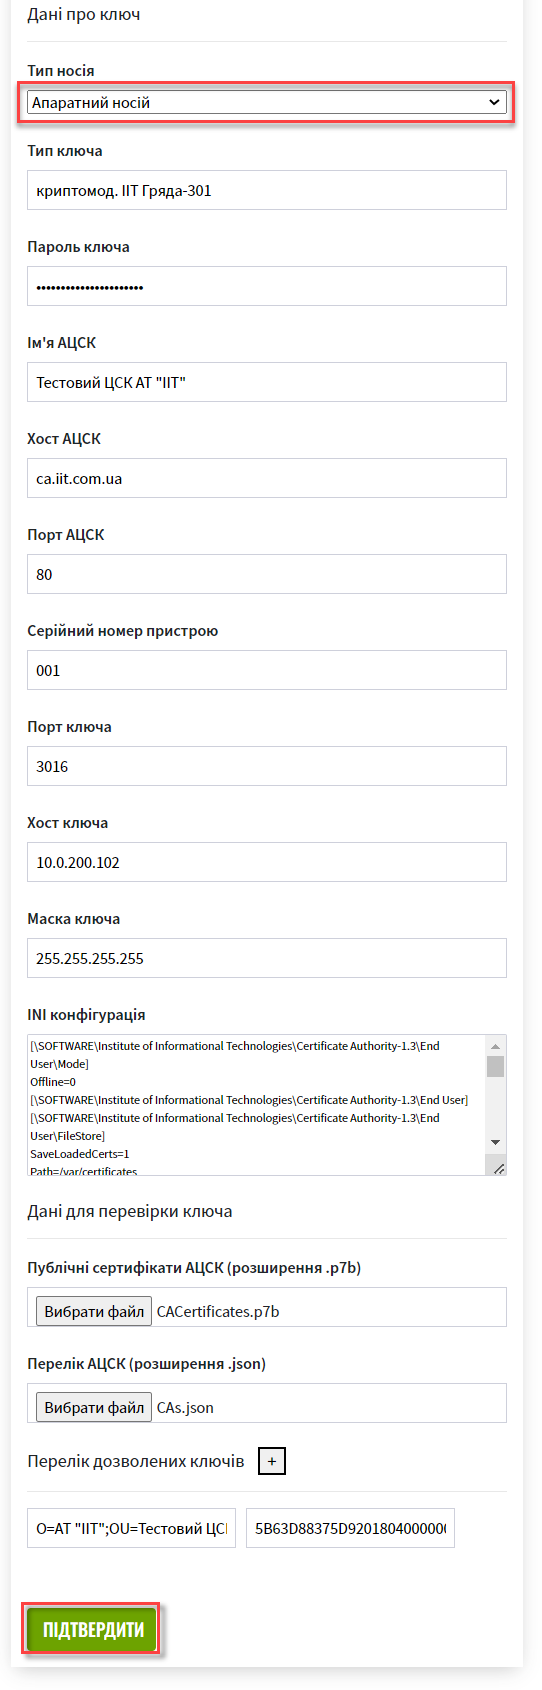
As a result of updating the key data on the Control Plane interface, a new request is created to update the registry configuration that you need to confirm.
3. Confirming changes and applying configuration
Platform keys are updated by changing the configuration of the Digital signature service.
3.1. Digital signature key configuration algorithm
- The general configuration algorithm is as follows for Platform and registry keys:
-
-
The administrator edits the Platform or registry’s digital signature keys in the Control Plane administrative interface.
-
The Control Plane web interface stores changes made by the administrator to the HashiCorp Vault service of the Secret and encryption management subsystem or to the Gerrit service of the Platform and registries deployment and configuration subsystem.
-
The Control Plane web interface displays the path to values and files in the corresponding values.yaml configurations.
-
The pipeline takes the required data from HashiCorp Vault or Gerrit and creates the necessary secrets in OpenShift.
-
Below is the diagram for updating the Platform and registry’s keys and the configuration of the digital signature service.


3.2. Configuration and secret creation parameters
The Control Plane administration panel stores the following data in the vault for the Digital signatures service (DSS):
-
AKCC list
-
KeySecretData -
CASecretData -
AllowedKeysSecretData -
osplm.ini -
Data of the DSS environment variables
The path to the engine for the Platform keys looks as follows:
registry-kv/registry/<назва-реєстру>/key-management/
Parameters and paths are added to the deploy-templates/values.yaml registry configuration.
digital-signature:
  data:
    CACertificates: <path to vault>
    CAs: <path to vault>
    Key-6-dat: <path to vault>
    allowed-keys-yml: <path to vault>
    osplm.ini: ""
  env:
    sign.key.device-type: file
    sign.key.file.issuer: <path to vault>
    sign.key.file.password: <path to vault>
    sign.key.hardware.device: ""
    sign.key.hardware.password: ""
sign.key.hardware.type: ""digital-signature:
data:
CACertificates: <path to vault>
CAs: <path to vault>
Key-6-dat: ""
allowed-keys-yml: <path to vault>
osplm.ini: <path to vault>
env:
sign.key.device-type: hardware
sign.key.file.issuer: ""
sign.key.file.password: ""
sign.key.hardware.device: <path to vault>
sign.key.hardware.password: <path to vault>
sign.key.hardware.type: <path to vault>The MASTER-Build-<registry-name> pipeline creates secrets for digital-signature-env-vars and *digital-signature-data and stores them in OpenShift.
|
- The pipeline creates the following secrets based on values.yaml: configuration
-
Example 3. Secrets for a file key
digital-signature-data:
    CACertificates.p7b
    CAs.json
    Key-6.dat
    allowed-keys.yml
    osplm.ini -- empty
digital-signature-env-vars:
    sign.key.device-type
    sign.key.file.issuer
    sign.key.file.password
    sign.key.hardware.device -- empty
    sign.key.hardware.password -- empty
    sign.key.hardware.type -- empty
Example 4. Secrets for a hardware keydigital-signature-data: CACertificates.p7b CAs.json Key-6.dat -- empty allowed-keys.yml osplm.ini -- generated from a template digital-signature-env-vars: sign.key.device-type sign.key.file.issuer -- empty sign.key.file.password -- empty sign.key.hardware.device sign.key.hardware.password sign.key.hardware.type
3.3. Confirming changes and launching the pipeline
As a result of updating the key data on the Control Plane interface, a new request is created to update the registry configuration, which you have to confirm.
-
In the Control Plane admin panel interface, return to the Platform management section, scroll down to the bottom of the page, and find the Update Requests section.
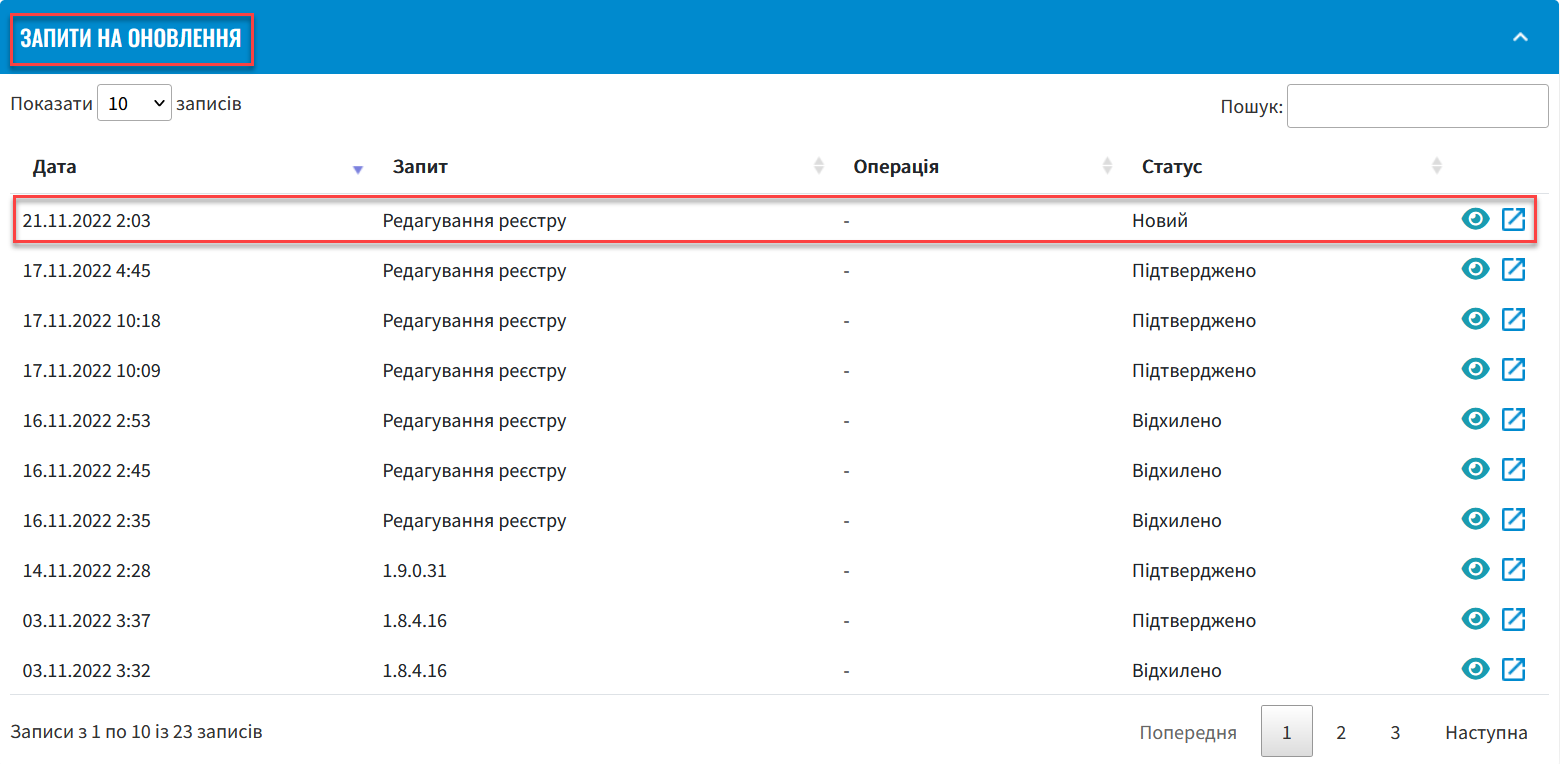
-
Open the generated request by clicking the view icon: 👁.
The suggested changes are made to the deploy-templates/values.yaml file configuration when confirmed. -
In the new window, compare 2 versions of the changes, ensuring the data you entered is correct, and click Confirm.
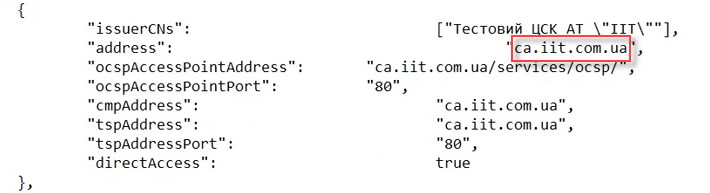
 Figure 2. Applying data about a file key to the values.yaml configuration
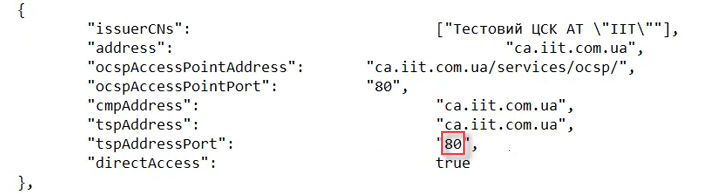
 Figure 3. Applying data about a hardware key to the values.yaml configuration
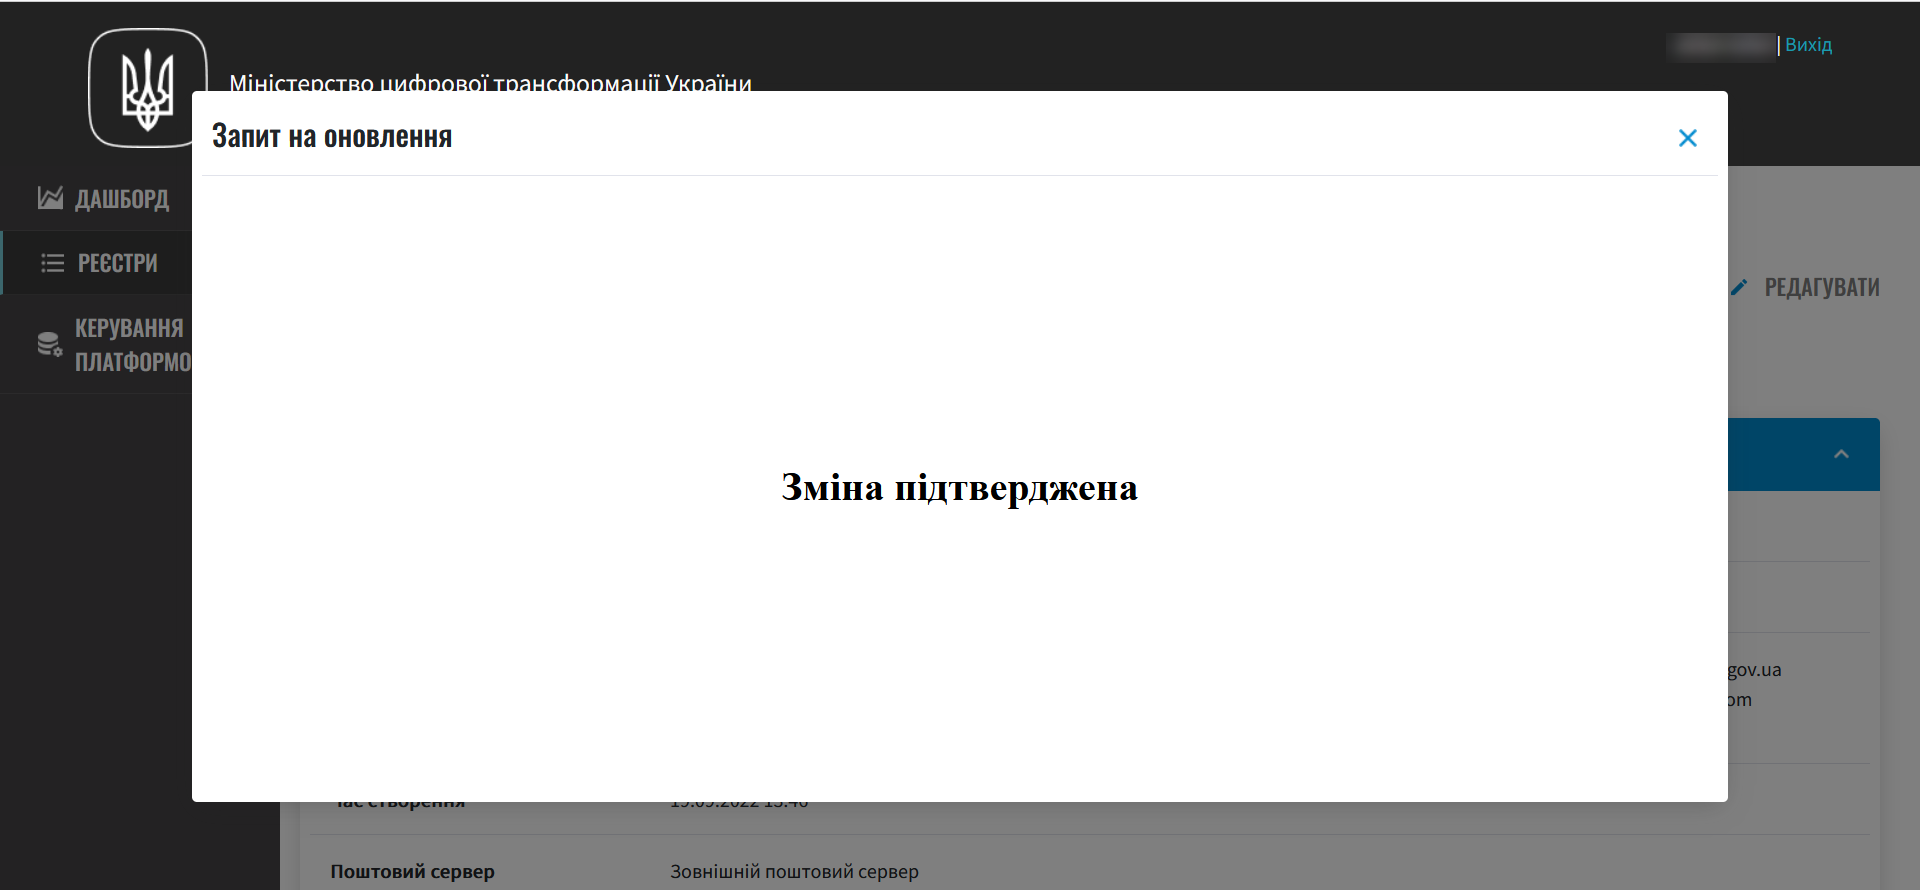
As a result, the request becomes
Confirmedand the changes take effect.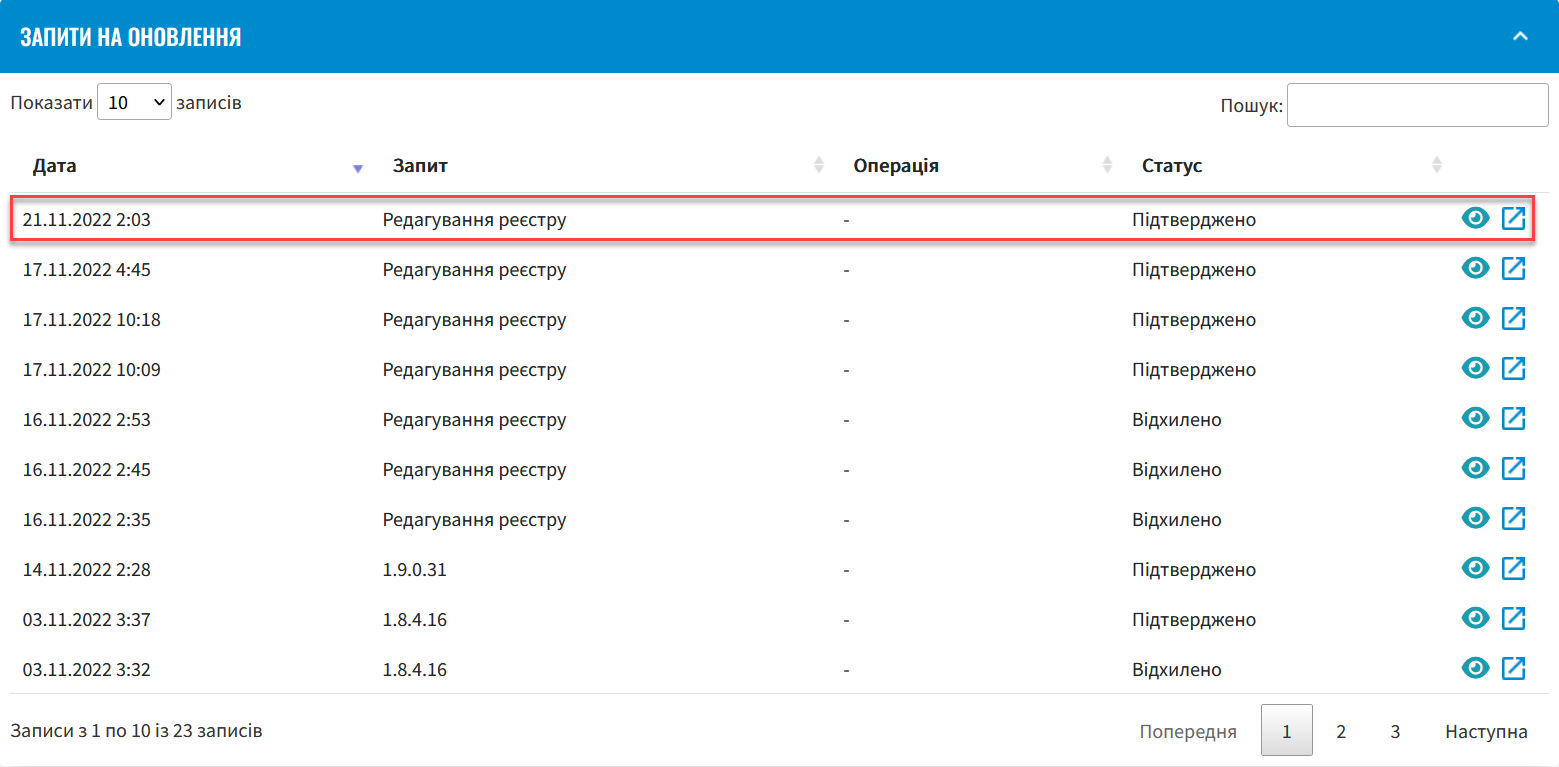
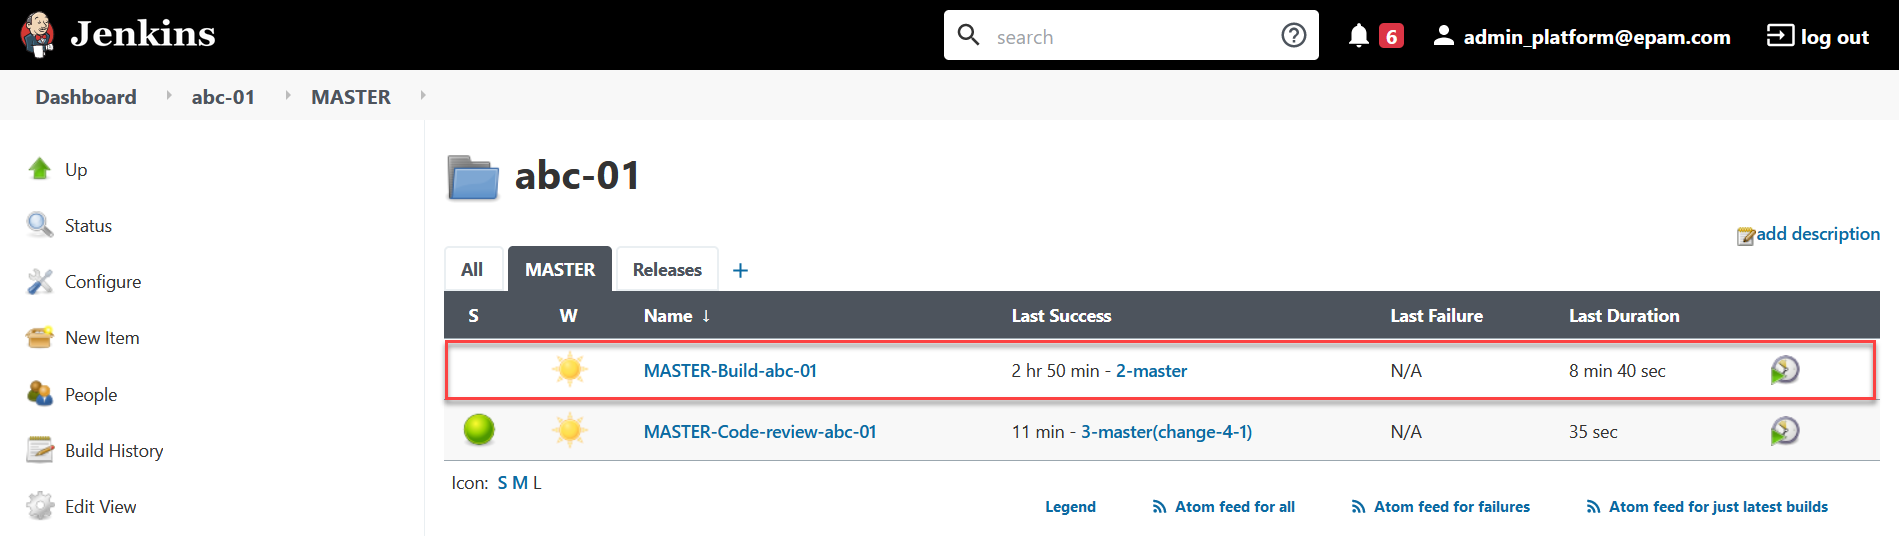
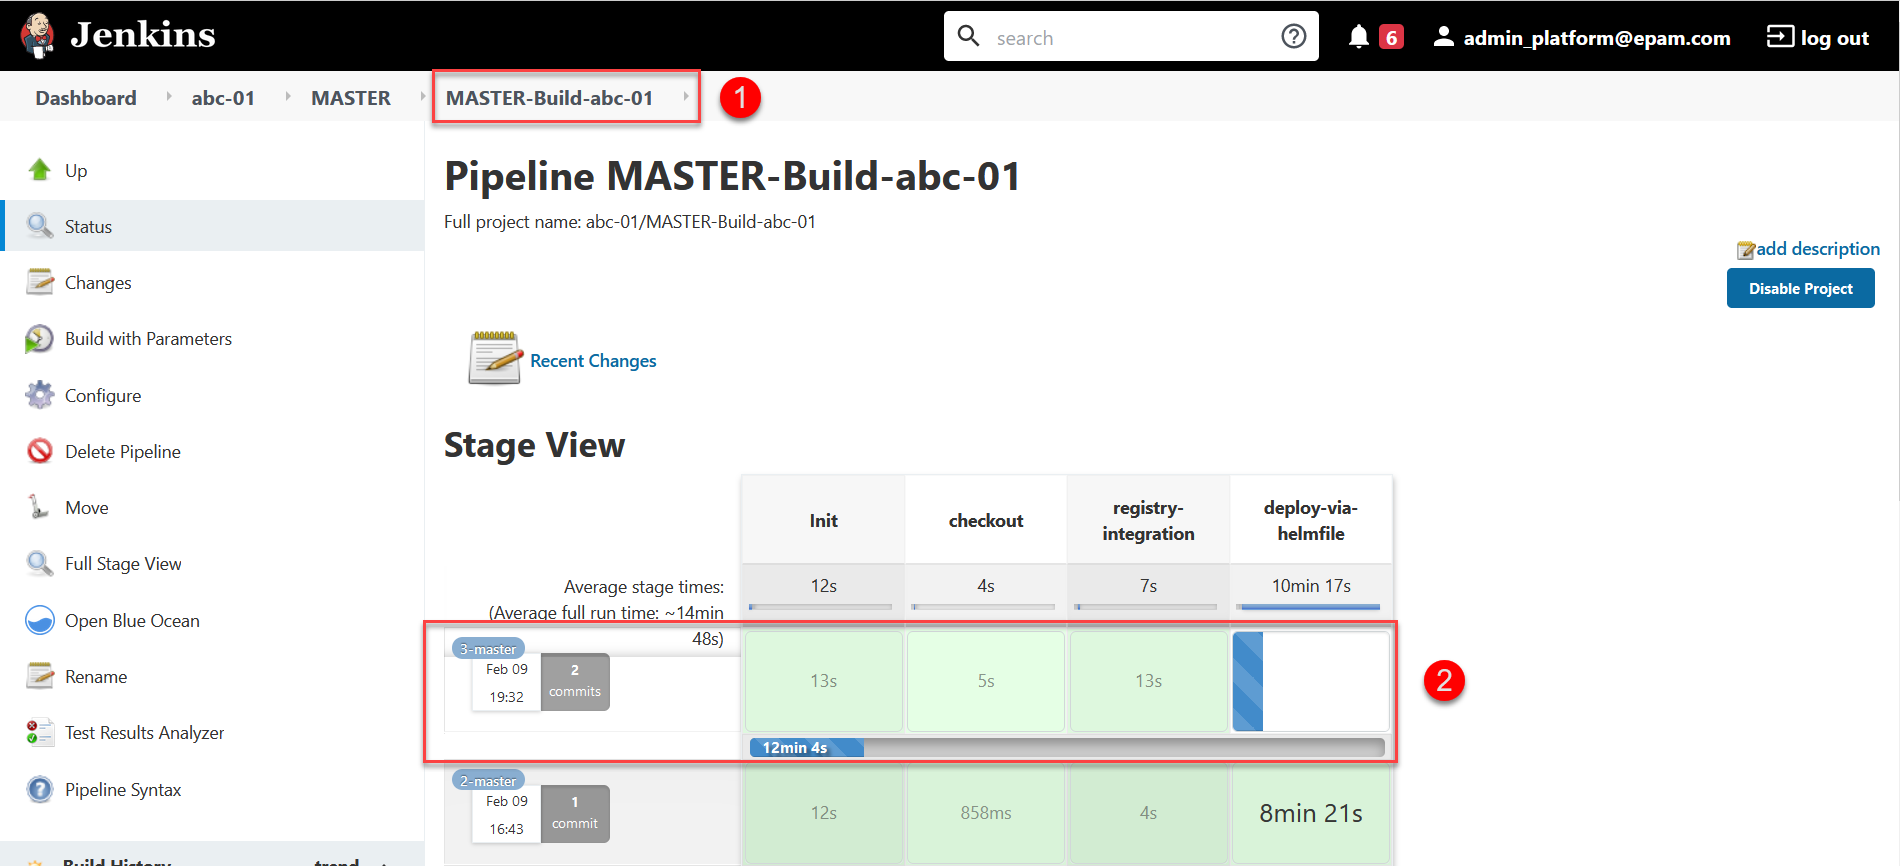
Next, the
MASTER-Build-<registry-name>pipeline automatically starts, which applies the parameters of the specified configuration and creates secrets for the digital signature keys. -
Wait while the code is compiled. This may take about 15 minutes, but this time depends on the configuration of a particular registry.
You can check the current status and the result of the execution using the
CIlink on the interface.