Deploying the Platform in a public AWS cloud environment
- 1. Prerequisites
- 2. Deploying additional resources to install an OKD cluster on AWS
- 3. Preparing to install the OKD cluster on AWS
- 4. Running the OKD4 installer and deploying an empty OKD4 cluster
- 5. Replacing self-signed certificates with trusted certificates
- 6. Preparing and launching the Installer to deploy and update the Platform on the OKD cluster
- 7. Common errors during the Platform deployment
| 🌐 This document is available in both English and Ukrainian. Use the language toggle in the top right corner to switch between versions. |
This guide provides detailed instructions on deploying the Platform in an Amazon Web Services (AWS) environment from scratch, from creating an AWS account to installing and configuring the Platform.
1. Prerequisites
Before installing and configuring the Platform, you must perform the following steps.
1.1. Elements required at the pre-deployment stage
Before you begin, make sure you have the resources that are required for further steps:
- Documentation:
-
-
Updating document with additional steps for the selected Platform release version. It is required only for the Platform update procedure.
- Digital signature certificates (digital-signature-ops certificates):
-
-
Key-6.dat — your organization’s private key;
-
allowed-key.yaml — a list of all issued keys. Initially includes only Key-6.dat. When the key is changed, information about the new key is added here without deleting the old one;
-
CAs.json — a list of all Accredited Key Certification Centers from the ІІТ website;
-
CACertificates.p7b - a public key from the ІІТ website.
-
- Configuration files for the Griada network cryptomodule:
-
-
3 files with appropriate values (see attached examples):
-
-
sign.key.device-type — specify the device type for the key (file);
-
sign.key.file.issuer — specify the Accredited Key Certification Center that issued the key (change the value inside the file to match your issuer);
-
sign.key.file.password — specify the password for the file key (change the value inside the file to match your password).
4 files with empty values (create 4 empty files with the following names):
-
sign.key.hardware.device — key device type (hardware);
-
sign.key.hardware.password — hardware key password;
-
sign.key.hardware.type — key type;
-
osplm.ini — INI configuration.
To learn more about loading and updating the keys and digital signature certificates, see Updating the Platform digital signature keys and certificates.
-
a Docker image of the
openshift-installcontainer (for details, see Starting the openshift-install container); -
a downloaded Installer — a script for Platform deployment (for details, see Preparing and launching the Installer to deploy and update the Platform on the OKD cluster).
1.2. Creating an AWS account
Before installing OpenShift Container Platform on AWS, you need to create an AWS account.
To learn how to do this, refer to the AWS documentation: How do I create and activate a new AWS account?
1.3. Setting up an AWS account
Before installing OpenShift Container Platform, you need to set up your AWS account.
1.3.1. Configuring Route 53
To install OpenShift Container Platform, you need to register a domain name. You can do this using the Amazon Route 53 service or any other domain name registrar.
Also, the AWS account you use must have a dedicated public hosted zone in your Route 53 service.
| For details, refer to the Origin Kubernetes Distribution (OKD) documentation: Configuring Route 53. |
1.3.2. Configuring an external domain
If you registered the domain name through an external registrar, not Route 53, you need to delegate the domain. To do this, perform these steps:
-
Sign in to your AWS account and create a public hosted zone using the Route 53 service as described in Configuring Route 53. Use the same domain name as you registered externally.
-
In the Route 53 console, go to the public hosted zone you created and check the
NStype record (name servers process DNS requests for the domain name). The Value column contains a list of NS server names. Save them as they will be needed later. -
Go to the external domain name registrar where you created the domain name.
-
Open the domain settings and find the settings related to NS servers.
-
Provide the NS servers you copied from the public hosted zone in you AWS account.
1.3.3. AWS account limits
The OpenShift Container Platform cluster uses a number of AWS components, and the default service limits affect your ability to install a cluster.
To see a list of AWS components whose limits may impact your ability to install and run an OpenShift Container Platform cluster, refer to the OKD documentation: AWS account limits.
| You must also increase the CPU limit for your Amazon on-demand virtual machines. For details, refer to the AWS documentation: How do I request an EC2 vCPU limit increase for my On-Demand Instance? |
1.3.4. Creating an IAM user
-
Before installing OpenShift Container Platform, create an IAM user. For details, refer to the AWS documentation: Creating an IAM user in your AWS account.
-
In addition, perform these important steps:
-
Remove any Service control policies (SCPs) restrictions from your AWS account.
When you create a cluster, an associated AWS OpenID Connect (OIDC) identity provider is also created. The OIDC provider configuration is based on the public key stored in the AWS region us-east-1. Customers using AWS SCP must allow the use of the regionus-east-1even if the cluster is deployed in a different region. If these policies are not configured correctly, permission errors may occur since the OKD installer verifies them.For details, refer to section 1.1. DEPLOYMENT PREREQUISITES of the following document: Red Hat OpenShift Service on AWS 4. Prepare your environment.
-
Properly configure the permissions boundary for the IAM user you created.
Here is an example of a permissions boundary policy. You can use it or completely remove any permissions boundary.
{
    "Version": "2012-10-17",
    "Statement": [
        {
            "Effect": "Allow",
            "NotAction": [
                "iam:*"
            ],
            "Resource": "*"
        },
        {
            "Effect": "Allow",
            "Action": [
                "iam:Get*",
                "iam:List*",
                "iam:Tag*",
                "iam:Untag*",
                "iam:GenerateServiceLastAccessedDetails",
                "iam:GenerateCredentialReport",
                "iam:SimulateCustomPolicy",
                "iam:SimulatePrincipalPolicy",
                "iam:UploadSSHPublicKey",
                "iam:UpdateServerCertificate",
                "iam:CreateInstanceProfile",
                "iam:CreatePolicy",
                "iam:DeletePolicy",
                "iam:CreatePolicyVersion",
                "iam:DeletePolicyVersion",
                "iam:SetDefaultPolicyVersion",
                "iam:CreateServiceLinkedRole",
                "iam:DeleteServiceLinkedRole",
                "iam:CreateInstanceProfile",
                "iam:AddRoleToInstanceProfile",
                "iam:DeleteInstanceProfile",
                "iam:RemoveRoleFromInstanceProfile",
                "iam:UpdateRole",
                "iam:UpdateRoleDescription",
                "iam:DeleteRole",
                "iam:PassRole",
                "iam:DetachRolePolicy",
                "iam:DeleteRolePolicy",
                "iam:UpdateAssumeRolePolicy",
                "iam:CreateGroup",
                "iam:UpdateGroup",
                "iam:AddUserToGroup",
                "iam:RemoveUserFromGroup",
                "iam:PutGroupPolicy",
                "iam:DetachGroupPolicy",
                "iam:DetachUserPolicy",
                "iam:DeleteGroupPolicy",
                "iam:DeleteGroup",
                "iam:DeleteUserPolicy",
                "iam:AttachUserPolicy",
                "iam:AttachGroupPolicy",
                "iam:PutUserPolicy",
                "iam:DeleteUser",
                "iam:CreateRole",
                "iam:AttachRolePolicy",
                "iam:PutRolePermissionsBoundary",
                "iam:PutRolePolicy"
            ],
            "Resource": "*"
        },
        {
            "Effect": "Allow",
            "Action": [
                "iam:CreateAccessKey",
                "iam:DeleteAccessKey",
                "iam:UpdateAccessKey",
                "iam:CreateLoginProfile",
                "iam:DeleteLoginProfile",
                "iam:UpdateLoginProfile",
                "iam:ChangePassword",
                "iam:CreateVirtualMFADevice",
                "iam:EnableMFADevice",
                "iam:ResyncMFADevice",
                "iam:DeleteVirtualMFADevice",
                "iam:DeactivateMFADevice",
                "iam:CreateServiceSpecificCredential",
                "iam:UpdateServiceSpecificCredential",
                "iam:ResetServiceSpecificCredential",
                "iam:DeleteServiceSpecificCredential"
            ],
            "Resource": "*"
        }
    ]
}| To learn more about creating an IAM user, refer to the OKD documentation: Creating an IAM user. |
1.3.5. Required AWS permissions for the IAM user
To deploy all components of an OpenShift Container Platform cluster, the IAM user requires certain permissions that must be attached to that user.
To see an example of these permissions, refer to the OKD documentation: Required AWS permissions for the IAM user.
1.4. Creating additional accounts
Before installing OpenShift Container Platform on AWS, you need to create a Docker Hub and Red Hat account.
This is necessary to form a docker pull secret that will be used later.
1.4.1. Creating a Docker Hub account
-
Some services use images from Docker Hub repositories. To use them, you need an account. For details, refer to the Docker documentation: Docker ID accounts.
-
Additionally, the limit on the number of images uploaded per day may prevent the services from starting. To avoid this, you’ll need to upgrade your subscription to the Pro level. This will change the limit from 200 image pulls per 6 hours to 5,000 image pulls per day. For details, refer to the Docker documentation: Upgrade your subscription.
1.4.2. Creating a Red Hat account
To download the images required to install OpenShift Container Platform, you need a Red Hat account. For details, refer to the Red Hat documentation: Red Hat Login ID and Account.
This is necessary to download the generated pull secret later, as described in Preparing to install the OKD cluster on AWS. It will allow you to authenticate and download container images for OpenShift Container Platform components.
2. Deploying additional resources to install an OKD cluster on AWS
To successfully install the cluster and Platform, you need AWS to run additional resources. The following figure shows them within the infrastructure.

You can set them up yourself by following the instructions below or use the predefined Terraform code.
2.1. Terraform code description
Terraform code was implemented as an example of process automation. You can customize it according to your own parameters and use it for infrastructure deployment.
2.1.1. Initial Terraform code
The initial Terraform code creates resources used in further steps. This includes the following resources:
-
S3 Bucket — file storage for *.tfstate files;
-
DynamoDB Table — a table required to lock the Terraform state.
main.tf
data "aws_caller_identity" "current" {}

module "s3_bucket" {
  source  = "terraform-aws-modules/s3-bucket/aws"
  version = "3.6.0"

  bucket = "terraform-states-${data.aws_caller_identity.current.account_id}"
  acl    = "private"
  # S3 bucket-level Public Access Block configuration
  block_public_acls       = true
  block_public_policy     = true
  ignore_public_acls      = true
  restrict_public_buckets = true

  versioning = {
    enabled = true
  }

  tags = merge(var.tags)
}

module "dynamodb_table" {
  source  = "terraform-aws-modules/dynamodb-table/aws"
  version = "3.1.2"

  name           = var.table_name
  billing_mode   = "PROVISIONED"
  read_capacity  = "1"
  write_capacity = "1"
  hash_key       = "LockID"

  attributes = [
    {
      name = "LockID"
      type = "S"
    }
  ]

  tags = merge(var.tags, tomap({ "Name" = var.table_name }))
}
providers.tf
terraform {
  required_version = "= 1.3.7"
}

provider "aws" {
  region = var.region
}
terraform.tfvars
region = "eu-central-1"
tags = {
  "SysName"    = "EPAM"
  "Department" = "MDTU-DDM"
  "user:tag"   = "mdtuddm1"
}
variables.tf
variable "region" {
  description = "The AWS region to deploy the cluster into, e.g. eu-central-1"
  type        = string
}

variable "s3_states_bucket_name" {
  description = "Prefix for S3 bucket name. Since the name should be unique the account number will be added as suffix, e.g. terraform-states-<AWS_ACCOUNT_ID>"
  type        = string
  default     = "terraform-states"
}

variable "table_name" {
  description = "the name of DynamoDb table to store terraform tfstate lock"
  type        = string
  default     = "terraform_locks"
}

variable "tags" {
  description = "A map of tags to apply to all resources"
  type        = map(any)
}
2.1.2. Main Terraform code
The main Terraform code deploys all the necessary resources.
main.tf
module "vpc" {
  source  = "terraform-aws-modules/vpc/aws"
  version = "3.19.0"

  name = var.platform_name

  cidr            = var.platform_cidr
  azs             = var.subnet_azs
  private_subnets = var.private_cidrs
  public_subnets  = var.public_cidrs

  enable_dns_hostnames   = true
  enable_dns_support     = true
  enable_nat_gateway     = true
  single_nat_gateway     = true
  one_nat_gateway_per_az = false

  tags = var.tags
}

module "ec2_instance" {
  source  = "terraform-aws-modules/ec2-instance/aws"
  version = "4.3.0"

  name = var.node_name

  ami                    = var.node_ami
  instance_type          = var.node_type
  key_name               = module.key_pair.key_pair_name
  vpc_security_group_ids = [aws_security_group.sg_private.id]
  subnet_id              = module.vpc.private_subnets[0]
  user_data              = templatefile("files/user_data.sh.tpl", { cross_account_role = var.cross_account_role_arn })
  iam_instance_profile   = aws_iam_instance_profile.node_profile.name
  enable_volume_tags     = false

  root_block_device = [
    {
      encrypted   = false
      volume_type = var.volume_type
      volume_size = var.volume_size
      tags        = var.tags
    },
  ]

  tags = var.tags
}

module "ec2_bastion" {
  source  = "terraform-aws-modules/ec2-instance/aws"
  version = "4.3.0"

  name = "bastion"

  ami                    = var.node_ami
  instance_type          = "t2.nano"
  key_name               = module.key_pair.key_pair_name
  vpc_security_group_ids = [aws_security_group.sg_public.id]
  subnet_id              = module.vpc.public_subnets[0]
  enable_volume_tags     = false

  tags = var.tags
}

module "key_pair" {
  source  = "terraform-aws-modules/key-pair/aws"
  version = "2.0.1"

  key_name   = var.key_pair
  public_key = trimspace(tls_private_key.main.public_key_openssh)
  tags = merge(var.tags, {
    "Name" = var.key_pair
  })
}
providers.tf
terraform {
  required_version = "= 1.3.7"

  # Fill the gaps instead <...>
  backend "s3" {
    bucket         = "terraform-states-<ACCOUNT_ID>"
    key            = "node/eu-central-1/terraform/terraform.tfstate"
    region         = "eu-central-1"
    acl            = "bucket-owner-full-control"
    dynamodb_table = "terraform_locks"
    encrypt        = true
  }

  required_providers {
    aws = {
      source  = "hashicorp/aws"
      version = ">= 4.51.0"
    }
  }
}

provider "aws" {
  region = var.region
}
iam-node-role.tf
data "aws_iam_policy_document" "assume_role_policy" {
  statement {
    actions = ["sts:AssumeRole"]

    principals {
      type        = "Service"
      identifiers = ["ec2.amazonaws.com"]
    }

  }
}

resource "aws_iam_role" "node_role" {
  name                  = var.role_name
  description           = "IAM role to assume to initial node"
  assume_role_policy    = data.aws_iam_policy_document.assume_role_policy.json
  force_detach_policies = true

  inline_policy {
    name = "CrossAccountPolicy"

    policy = jsonencode({
      Version = "2012-10-17"
      Statement = [
        {
          Action   = "sts:AssumeRole"
          Effect   = "Allow"
          Resource = var.cross_account_role_arn
        },
      ]
    })
  }
  tags = merge(var.tags, tomap({ "Name" = var.role_name }))
}

resource "aws_iam_instance_profile" "node_profile" {
  name = var.role_name
  role = aws_iam_role.node_role.name

  tags = var.tags
}
elastic-ip.tf
resource "aws_eip" "bastion_ip" {
  instance = module.ec2_bastion.id

  tags = merge(var.tags, {
    "Name" = "bastion-ip"
  })
}
security-groups.tf
resource "aws_security_group" "sg_public" {
  name   = "sg public for bastion"
  vpc_id = module.vpc.vpc_id
  ingress {
    from_port = var.ssh_port
    to_port   = var.ssh_port
    protocol  = "tcp"
    #    cidr_blocks = var.ingress_cidr_blocks
    prefix_list_ids = [var.prefix_list_ids]
  }

  egress {
    from_port   = 0
    to_port     = 0
    protocol    = "-1"
    cidr_blocks = ["0.0.0.0/0"]
  }
  tags = merge(var.tags, {
    "Name" = "sg-public"
  })
}

resource "aws_security_group" "sg_private" {
  name   = "sg private for node"
  vpc_id = module.vpc.vpc_id
  ingress {
    from_port       = var.ssh_port
    to_port         = var.ssh_port
    protocol        = "tcp"
    security_groups = [aws_security_group.sg_public.id]
  }

  egress {
    from_port   = 0
    to_port     = 0
    protocol    = "-1"
    cidr_blocks = ["0.0.0.0/0"]
  }
  tags = merge(var.tags, {
    "Name" = "sg-private"
  })
}
ssh-key.tf
resource "tls_private_key" "main" {
  algorithm = "RSA"
}

resource "null_resource" "main" {
  provisioner "local-exec" {
    command = "echo \"${tls_private_key.main.private_key_pem}\" > private.key"
  }

  provisioner "local-exec" {
    command = "chmod 600 private.key"
  }
}
files/user_data.sh.tpl
#!/bin/bash
export VERSION_STRING=5:20.10.23~3-0~ubuntu-bionic

# Install docker
sudo apt-get update -y
sudo apt-get install \
    ca-certificates \
    curl \
    gnupg \
    lsb-release -y
sudo mkdir -p /etc/apt/keyrings
curl -fsSL https://download.docker.com/linux/ubuntu/gpg | sudo gpg --dearmor -o /etc/apt/keyrings/docker.gpg
echo \
  "deb [arch=$(dpkg --print-architecture) signed-by=/etc/apt/keyrings/docker.gpg] https://download.docker.com/linux/ubuntu \
  $(lsb_release -cs) stable" | sudo tee /etc/apt/sources.list.d/docker.list > /dev/null
sudo apt-get update -y
sudo apt-get install docker-ce=$VERSION_STRING docker-ce-cli=$VERSION_STRING containerd.io docker-compose-plugin -y
sudo usermod -aG docker ubuntu

# Install unzip
sudo apt install unzip -y

# Install aws-cli-v2
curl "https://awscli.amazonaws.com/awscli-exe-linux-x86_64.zip" -o "awscliv2.zip"
unzip awscliv2.zip
sudo ./aws/install

# Configure config for cross account integration
mkdir -p /home/ubuntu/.aws
touch /home/ubuntu/.aws/config
cat <<EOT >> /home/ubuntu/.aws/config
[profile cross-account-role]
role_arn = ${cross_account_role}
credential_source = Ec2InstanceMetadata
EOT
terraform.tfvars
# Check out all the inputs based on the comments below and fill the gaps instead <...>
# More details on each variable can be found in the variables.tf file

region        = "eu-central-1"
platform_name = "okd-4-11" # the name of the cluster and AWS resources
platform_cidr = "10.0.0.0/16"
# The following will be created or used existing depending on the create_vpc value
subnet_azs    = ["eu-central-1a", "eu-central-1b", "eu-central-1c"]
private_cidrs = ["10.0.1.0/24"]
public_cidrs  = ["10.0.101.0/24"]

ssh_port = 22

# Uncomment this line to use a custom IP address for the SSH connection
#ingress_cidr_blocks = ["<CUSTOM_IP>"]

# Using prefix-list from epam-east-eu
prefix_list_ids = "pl-0ede2509a36215538"

node_name = "initial-node"
node_ami  = "ami-0e0102e3ff768559b"
node_type = "t2.medium"
key_pair  = "node_key"

volume_type = "gp3"
volume_size = 150

role_name              = "CustomEC2Role"
cross_account_role_arn = "arn:aws:iam::764324427262:role/CustomCrossAccountRole"

tags = {
  "SysName"    = "EPAM"
  "Department" = "MDTU-DDM"
  "user:tag"   = "mdtuddm1"
}
variables.tf
variable "region" {
  description = "The AWS region to deploy the cluster into, e.g. eu-central-1"
  type        = string
}

variable "platform_name" {
  description = "The name of the node that is used for tagging resources. Match the [a-z0-9_-]"
  type        = string
}

variable "platform_cidr" {
  description = "CIDR of your future VPC"
  type        = string
}

variable "subnet_azs" {
  description = "Available zones of your future or existing subnets"
  type        = list(any)
  default     = []
}

variable "private_cidrs" {
  description = "CIDR of your future VPC"
  type        = list(any)
  default     = []
}

variable "public_cidrs" {
  description = "CIDR of your future VPC"
  type        = list(any)
  default     = []
}

variable "node_name" {
  description = "The name of the node that is used for tagging resources. Match the [a-z0-9_-]"
  type        = string
}

variable "node_ami" {
  description = "The ami of the node"
  type        = string
}

variable "node_type" {
  description = "Type of the node"
  type        = string
}

variable "key_pair" {
  description = "The name of DynamoDb table to store terraform tfstate lock"
  type        = string
}

variable "volume_type" {
  description = "Root volume type of the node"
  type        = string
}

variable "volume_size" {
  description = "Root volume size of the node"
  type        = number
}

variable "ssh_port" {
  description = "Open the 22 port"
  type        = number
}

#Use this for a custom IP address for the SSH connection
#variable "ingress_cidr_blocks" {
#  description = "IP CIDR blocks for bastion"
#  type        = list(string)
#}

variable "prefix_list_ids" {
  description = "IP CIDR blocks for bastion"
  type        = string
}

variable "role_name" {
  description = "The AWS IAM role name for initial node"
  type        = string
}

variable "cross_account_role_arn" {
  description = "The AWS IAM role arn to assume from another AWS account"
  type        = string
}


variable "tags" {
  description = "A map of tags to apply to all resources"
  type        = map(any)
}
|
| If Terraform code was used to deploy additional components, jump to Starting the openshift-install container. |
2.2. Recommended Bastion settings
The following table provides the recommended settings for Bastion.
| # | Setting | Value |
|---|---|---|
1 |
Instance type |
t2.nano |
2 |
vCPUs |
1 |
3 |
RAM |
0.5 GiB |
4 |
CPU Credits/hr |
3 |
5 |
Platform |
Ubuntu |
6 |
AMI name |
ubuntu-bionic-18.04-amd64-server-20210224 |
7 |
Volume |
8 Gb |
2.3. Recommended secondary virtual machine settings
The following table provides the recommended settings for the secondary virtual machine.
| # | Setting | Value |
|---|---|---|
1 |
Instance type |
t2.medium |
2 |
vCPUs |
2 |
3 |
RAM |
4 GiB |
4 |
CPU Credits/hr |
24 |
5 |
Platform |
Ubuntu |
6 |
AMI name |
ubuntu-bionic-18.04-amd64-server-20210224 |
7 |
Volume |
150 Gb |
2.4. Configuring AWS cross-account access
To install the cluster and Platform, you need to download the Docker image of the container and Installer to the additional virtual machine. This is only possible if a special IAM role is created.
Go to the AWS IAM service and create a role for the EC2 service with the following permissions:
Trusted entities
{
    "Version": "2012-10-17",
    "Statement": [
        {
            "Sid": "",
            "Effect": "Allow",
            "Principal": {
                "Service": "ec2.amazonaws.com"
            },
            "Action": "sts:AssumeRole"
        }
    ]
}
Inline permissions policies
{
    "Version": "2012-10-17",
    "Statement": [
        {
            "Action": "sts:AssumeRole",
            "Effect": "Allow",
            "Resource": "arn:aws:iam::764324427262:role/CustomCrossAccountRole"
        }
    ]
}
Then you need to attach the IAM role you created to the additional virtual machine.
| For details on creating an IAM role and attaching it to a virtual machine, refer to the AWS documentation: IAM roles for Amazon EC2. |
2.5. Configuring the additional virtual machine
2.5.1. Connecting to the additional virtual machine
To connect to the additional virtual machine from your computer, you need to create an SSH tunnel. Use the following command:
$ ssh -i <SSH_KEY> -L 1256:<NODE_PRIVATE_IP>:22 -N -f ubuntu@<BASTION_PUBLIC_IP>
After creating an SSH tunnel, you can connect to the additional virtual machine. Use the following command:
$ ssh -i <SSH_KEY> ubuntu@localhost -p 1256
|
2.5.2. Installing the required tools
Before going further, install the following necessary tools on the additional virtual machine.
-
unzip
To check whether the tools were installed correctly, use the following commands:
$ unzip -v
$ docker --version
$ aws --version
2.5.3. Using the profile for AWS cross-account access
To sign in using a role that has access to the Docker image of the container and Installer, perform the following steps.
-
Sign in as the IAM user.
$ export AWS_ACCESS_KEY_ID=<access-key-ID>
$ export AWS_SECRET_ACCESS_KEY=<secret-access-key>
-
Create the .aws folder and then create the config file inside of it:
$ mkdir -p ~/.aws
$ touch ~/.aws/config
-
Add the necessary role values to the config file.
$ cat <<EOT >> ~/.aws/config
[profile cross-account-role]
role_arn = arn:aws:iam::764324427262:role/CustomCrossAccountRole
credential_source = Ec2InstanceMetadata
EOT
2.6. Starting the openshift-install container
To install the cluster using the openshift-install Docker image, perform the following steps.
-
Sign in to AWS Elastic Container Registry (ECR).
$ sudo aws ecr get-login-password --profile cross-account-role --region eu-central-1 | docker login --username AWS --password-stdin 764324427262.dkr.ecr.eu-central-1.amazonaws.com -
Download the Docker image.
$ docker pull 764324427262.dkr.ecr.eu-central-1.amazonaws.com/openshift-install:v3 -
Tag the Docker image you downloaded.
$ docker tag 764324427262.dkr.ecr.eu-central-1.amazonaws.com/openshift-install:v3 openshift-install:v3 -
Create a new folder to keep all the cluster data.
$ mkdir ~/openshift-cluster -
Switch to the folder you created.
$ cd ~/openshift-cluster -
Run the
openshift-installcontainer.$ sudo docker run --rm -it --name openshift-install-v3 \ --user root:$(id -g) \ --net host \ -v $(pwd):/tmp/openshift-cluster \ --env AWS_ACCESS_KEY_ID=<КЛЮЧ_ДОСТУПУ> \ --env AWS_SECRET_ACCESS_KEY=<secret-access-key> \ openshift-install:v3 bash
3. Preparing to install the OKD cluster on AWS
In OpenShift Container Platform version 4.11, you can install a customized cluster on infrastructure that the installation program provisions on AWS.
|
To install the cluster, perform the following steps:
-
Inside the container, switch to the /tmp/openshift-cluster folder.
$ cd /tmp/openshift-cluster -
Perform the steps described on the following OKD page until the Deploying the cluster step: Installing a cluster on AWS with customizations.
To configure the installation, create the install-config.yaml file and add the necessary parameters there before installing the cluster. After creating the install-config.yaml file, fill in the required parameters presented in the context menu. This configuration file only includes the parameters required for minimal cluster deployment. To learn more about customizing the settings, refer to the official OKD documentation.
- Recommended parameters for install-config.yaml:
-
install-config.yaml
apiVersion: v1 baseDomain: <BASE_DOMAIN>(1) compute: - architecture: amd64 hyperthreading: Enabled name: worker platform: aws: zones: - eu-central-1c rootVolume: size: 80 type: gp3 type: r5.2xlarge replicas: 3 controlPlane: architecture: amd64 hyperthreading: Enabled name: master platform: aws: zones: - eu-central-1c rootVolume: size: 80 type: gp3 type: r5.2xlarge replicas: 3 metadata: name: <CLUSTER_NAME> networking: clusterNetwork: - cidr: 10.128.0.0/14 hostPrefix: 23 machineNetwork: - cidr: 10.0.0.0/16 networkType: OpenShiftSDN platform: aws: region: eu-central-1 userTags: 'user:tag': <CLUSTER_NAME>(2) publish: External pullSecret: <PULL_SECRET>(4) sshKey: <SSHKEY>(3)-
(1)
<BASE_DOMAIN> — the domain name you created and configured earlier. For details, see Configuring Route 53 and Configuring an external domain.
-
(2)
<CLUSTER_NAME>— the name of the future OKD cluster.
-
(3)
<SSHKEY>— one or more SSH keys used to access the cluster machines. You can use the same key that was created during the OKD cluster installation, or any other key.For details, refer to the OKD documentation: Optional configuration parameters.
-
(4) <PULL_SECRET> — the secret you created earlier (for details, see Creating additional accounts). You need to get this secret from the Red Hat OpenShift Cluster Manager.
To learn more, refer to step 5 on this OKD page: Obtaining the installation program. You need to add your Red Hat and Docker Hub credentials to the pull secret. A combined secret will look as follows:
{
   "auths":{
      "cloud.openshift.com":{
         "auth":"b3Blb=",
         "email":"test@example.com"
      },
      "quay.io":{
         "auth":"b3Blb=",
         "email":"test@example.com"
      },
      "registry.connect.redhat.com":{
         "username":"test",
         "password":"test",
         "auth":"b3Blb=",
         "email":"test@example.com"
      },
      "registry.redhat.io":{
         "username":"test",
         "password":"test",
         "auth":"b3Blb=",
         "email":"test@example.com"
      },
      "index.docker.io/v2/":{
         "username":"test",
         "password":"test",
         "auth":"b3Blb=",
         "email":"test@example.com"
      }
   }
}
+ For convenience, the pull secret should be written to the install-config.yaml file in one line. The final secret will look as follows:
+ .An example of a one-line *pull secret*
Details
'{"auths":{"cloud.openshift.com":{"auth":"b3Blb=","email":"test@example.com"},"quay.io":{"auth":"b3Blb=","email":"test@example.com"},"registry.connect.redhat.com":{"username":"test","password":"test","auth":"b3Blb=","email":"test@example.com"},"registry.redhat.io":{"username":"test","password":"test","auth":"b3Blb=","email":"test@example.com"},"index.docker.io/v2/":{"username":"test","password":"test","auth":"b3Blb=","email":"test@example.com"}}}'The Installer deletes the install-config.yaml file when creating the cluster. We recommend backing up the install-config.yaml file if you need to deploy multiple clusters. -
4. Running the OKD4 installer and deploying an empty OKD4 cluster
After install-config.yaml is created, run the following command to deploy the OKD cluster:
$ ./openshift-install create cluster --dir /tmp/openshift-cluster/cluster-state --log-level=info| The cluster deployment process usually takes up to 1 hour. |
Upon successful deployment, the following cluster access and credential information displays in your terminal:
-
login;
-
password;
-
a link to the cluster’s web console
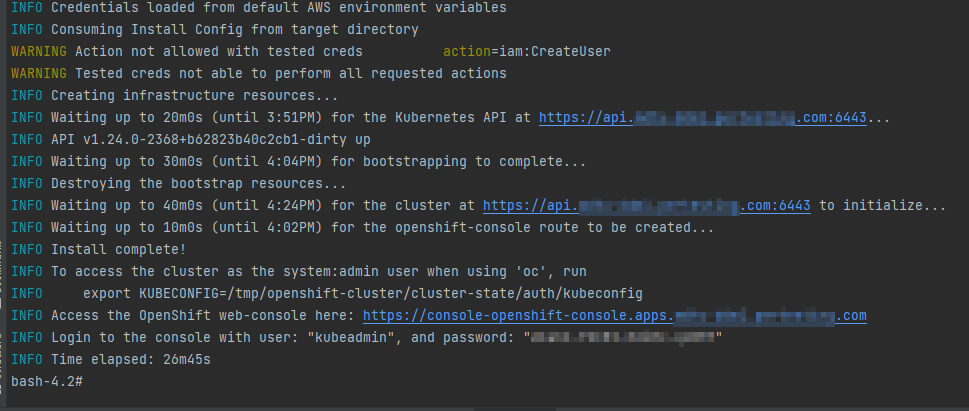
The installation program generates a series of cluster definition files for your cluster in the installation directory, which are necessary for its uninstallation.
| To learn more, refer to the Prerequisites section on this OKD page: Uninstalling a cluster on AWS. |
This directory will also contain the /auth folder with two authentication files: for working with the cluster through the web console and the OKD command line interface (OKD CLI).
5. Replacing self-signed certificates with trusted certificates
To replace self-signed certificates with trusted ones, you first need to obtain these certificates.
This section describes obtaining free certificates from Let’s Encrypt and installing them on your server.
Let’s Encrypt certificates are obtained using the acme.sh utility.
| To learn about using Let’s Encrypt via the ACME protocol, refer to the Let’s Encrypt documentation: ACME Client Implementations. |
- To replace the certificates, perform the following steps:
-
-
Set the environment variable. The variable must point to the kubeconfig file.
$ export KUBECONFIG=cluster-state/auth/kubeconfig -
Create the letsencrypt.sh file and paste the following script into it:
-
Details
#!/bin/bash
yum install -y openssl
mkdir -p certificates
export CERT_HOME=./certificates
export CURDIR=$(pwd)
cd $CERT_HOME

# Clone the acme.sh utility from the GitHub repository
git clone https://github.com/neilpang/acme.sh
sed -i "2i AWS_ACCESS_KEY_ID=\"${AWS_ACCESS_KEY_ID}\"" ./acme.sh/dnsapi/dns_aws.sh
sed -i "3i AWS_SECRET_ACCESS_KEY=\"${AWS_SECRET_ACCESS_KEY}\"" ./acme.sh/dnsapi/dns_aws.sh
cd $CURDIR
# Get API Endpoint URL
export LE_API="$(oc whoami --show-server | cut -f 2 -d ':' | cut -f 3 -d '/' | sed 's/-api././')"
# Get Wildcard Domain
export LE_WILDCARD="$(oc get ingresscontroller default -n openshift-ingress-operator -o jsonpath='{.status.domain}')"
${CERT_HOME}/acme.sh/acme.sh --register-account -m user_${RANDOM}@example.com
${CERT_HOME}/acme.sh/acme.sh --issue -d ${LE_API} -d *.${LE_WILDCARD} --dns dns_aws
export CERTDIR=$CERT_HOME/certificates
mkdir -p ${CERTDIR}

# Transfer certificates from the default acme.sh path to a more convenient directory using the --install-cert - key
${CERT_HOME}/acme.sh/acme.sh --install-cert -d ${LE_API} -d *.${LE_WILDCARD} --cert-file ${CERTDIR}/cert.pem --key-file ${CERTDIR}/key.pem --fullchain-file ${CERTDIR}/fullchain.pem --ca-file ${CERTDIR}/ca.cer
# Create secret
oc create secret tls router-certs --cert=${CERTDIR}/fullchain.pem --key=${CERTDIR}/key.pem -n openshift-ingress
# Update Custom Resource for Router
oc patch ingresscontroller default -n openshift-ingress-operator --type=merge --patch='{"spec": { "defaultCertificate": { "name": "router-certs" }}}'-
Make the script executable.
$ chmod +x ./letsencrypt.sh -
Run the script.
$ bash -x ./letsencrypt.sh -
Exit the container after running the script. To do this, use the following command. The container will be deleted automatically.
$ exit
6. Preparing and launching the Installer to deploy and update the Platform on the OKD cluster
Before launching the Installer, you need to prepare the workstation where it will run.
6.1. Deploying from scratch
6.1.1. Prerequisites
Before running the Platform installation script, perform the following steps:
-
Download the appropriate version of the Installer by running the following sequence of commands.
$ mkdir ~/installer $ cd ~/installer $ sudo aws s3 cp --profile cross-account-role s3://mdtu-ddm-platform-installer/<VERSION>/mdtu-ddm-platform-<VERSION>.tar.gz mdtu-ddm-platform-<VERSION>.tar.gz -
Unpack the Installer to a separate directory.
$ mkdir installer-<VERSION> $ tar -xf mdtu-ddm-platform-(version).tar.gz -C ./installer-<VERSION> -
Copy kubeconfig from the installed cluster.
$ cp ~/openshift-cluster/cluster-state/auth/kubeconfig ./installer-<VERSION>
-
Transfer the certificates and
digital-signature-opsservice support files to the certificates directory and go to the Installer directory.$ cp -r /path/to/folder/certificates/ ./installer-<VERSION> $ cd installer-<VERSION>
6.1.2. Configuring MinIO
When deploying the Platform from scratch, no additional configuration is required for MinIO.
6.1.3. Configuring Vault
When deploying the Platform from scratch, no additional configuration is required for Vault.
6.1.4. Deploying the Platform from the Installer
-
Run the following commands:
$ IMAGE_CHECKSUM=$(sudo docker load -i control-plane-installer.img \| sed -r "s#.*sha256:(.*)#\\1#" \| tr -d '\n')$ echo $IMAGE_CHECKSUM$ sudo docker tag ${IMAGE_CHECKSUM} control-plane-installer:<VERSION> -
Start the installation process of the new Platform with the images:
$ sudo docker run --rm \ --name control-plane-installer-<VERSION> \ --user root:$(id -g) \ --net host \ -v $(pwd):/tmp/installer \ --env KUBECONFIG=/tmp/installer/kubeconfig \ --env idgovuaClientId=f90ab33dc272f047dc330c88e5663b75 \ --env idgovuaClientSecret=cba49c104faac8c718e6daf3253bc55f2bf11d9e \ --env deploymentMode=<DEPLOYMENT_MODE> \ --entrypoint "/bin/sh" control-plane-installer:<VERSION> \ -c "./install.sh -i"-
--rm— this flag will automatically delete the container when it exits. You can remove the flag if you need to inspect the state and logs of the completed container, or if you have an unstable Internet connection. -
DEPLOYMENT_MODE— this variable can be set todevelopmentorproduction.
-
6.1.5. Deployment status
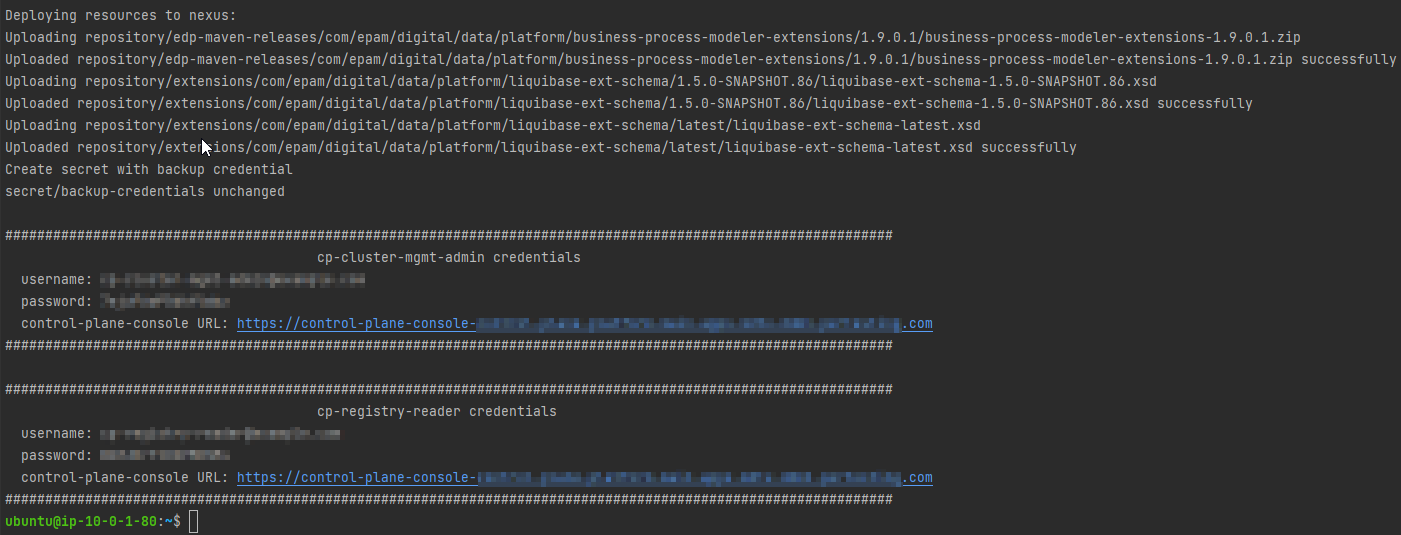
The following log indicates the Platform update process was successful:
- If you removed the
--rmflag during the Deploying the Platform from the Installer step, you need to do the following: -
-
Run the following command to verify that the container has exited with a status of 0, which indicates that it has completed successfully.
$ docker ps --all --latest
-
Remove the container using the following command:
$ docker rm $(docker ps --latest -q)
-
6.1.6. Post-deployment required steps
-
After installing the Platform, make sure the
cluster-managementpipeline has started and passed successfully (with a green status). Only after this the Platform will be ready for deploying registries. Without this action, the registries will not deploy.You can locate the
cluster-managementpipeline using the following path:OKD Web UI > control-plane NS > Routes > jenkins url > cluster-mgmt > MASTER-Build-cluster-mgmt.
-
Request access to the IIT widget as described here: https://eu.iit.com.ua/sign-widget/v20200922/.
After all the steps are completed, you can shut down Bastion and the additional virtual machine. |
6.2. Updating
6.2.1. Prerequisites
Before running the Platform installation script, perform the following steps:
-
Download the appropriate version of the Installer by running the following sequence of commands.
$ mkdir ~/installer $ cd ~/installer $ sudo aws s3 cp --profile cross-account-role s3://mdtu-ddm-platform-installer/<VERSION>/mdtu-ddm-platform-<VERSION>.tar.gz mdtu-ddm-platform-<VERSION>.tar.gz -
Unpack the Installer to a separate directory.
$ mkdir installer-<VERSION> $ tar -xf mdtu-ddm-platform-(version).tar.gz -C ./installer-<VERSION> -
Copy kubeconfig from the installed cluster.
$ cp ~/openshift-cluster/cluster-state/auth/kubeconfig ./installer-<VERSION>
-
Transfer the certificates and
digital-signature-opsservice support files to the certificates directory and go to the Installer directory.$ cp -r /path/to/folder/certificates/ ./installer-<VERSION> $ cd installer-<VERSION>
6.2.2. Configuring MinIO
-
Copy Terraform state data for MinIO from the previous release.
$ cp ~/installer/installer-<VERSION>/terraform/minio/aws/terraform.tfstate ./terraform/minio/aws/ -
Copy the MinIO key from the previous release.
$ cp ~/installer/installer-<VERSION>/terraform/minio/aws/private_minio.key ./terraform/minio/aws/
6.2.3. Configuring Vault
-
Copy Terraform state data for Vault from the previous release.
$ cp ~/installer/installer-<VERSION>/terraform/vault/aws/terraform.tfstate ./terraform/vault/aws/ -
Copy the Vault key from the previous release.
$ ~/installer/installer-<VERSION>/terraform/vault/aws/private.key ./terraform/vault/aws/
6.2.4. Updating the Platform from the Installer
-
Run the following commands:
$ IMAGE_CHECKSUM=$(sudo docker load -i control-plane-installer.img \| sed -r "s#.*sha256:(.*)#\\1#" \| tr -d '\n')$ echo $IMAGE_CHECKSUM$ sudo docker tag ${IMAGE_CHECKSUM} control-plane-installer:<VERSION> -
Update the Platform version with the images:
$ sudo docker run --rm \ --name control-plane-installer-<VERSION> \ --user root:$(id -g) \ --net host \ -v $(pwd):/tmp/installer \ --env KUBECONFIG=/tmp/installer/kubeconfig \ --env idgovuaClientId=f90ab33dc272f047dc330c88e5663b75 \ --env idgovuaClientSecret=cba49c104faac8c718e6daf3253bc55f2bf11d9e \ --env deploymentMode=<DEPLOYMENT_MODE> \ --entrypoint "/bin/sh" control-plane-installer:<VERSION> \ -c "./install.sh -u"-
--rm— this flag will automatically delete the container when it exits. You can remove the flag if you need to inspect the state and logs of the completed container, or if you have an unstable Internet connection. -
DEPLOYMENT_MODE— this variable can be set todevelopmentorproduction, depending on the previous installation.
Run the script twice if the generated log does NOT match the point Update status.
-
6.2.5. Update status
The following log indicates the Platform update process was successful:
- If you removed the
--rmflag during the Updating the Platform from the Installer step, you need to do the following: -
-
Run the following command to verify that the container has exited with a status of 0, which indicates that it has completed successfully.
$ docker ps --all --latest -
Remove the container using the following command:
$ docker rm $(docker ps --latest -q)
-
6.2.6. Required steps after update
- After updating the Platform from the Installer:
-
-
Navigate to the Update section.
-
Perform the necessary specific update steps for your version of the Platform.
-
As part of the particular update steps, refresh the Platform’s infrastructure components via the Control Plane interface.
-
7. Common errors during the Platform deployment
In this section, we review errors that may occur when deploying the Platform from scratch and provide methods to resolve them.
7.1. Bootstrap machine error when deploying the OKD cluster
Problem description
The following error occurs during cluster deployment:
level=error msg=Attempted to gather ClusterOperator status after installation failure: listing ClusterOperator objects: Get "https://api.<CLUSTER_URL>:6443/apis/config.openshift.io/v1/clusteroperators": dial tcp <CLUSTER_IP>:6443: connect: connection refused
level=error msg=Bootstrap failed to complete: Get "https://api.<CLUSTER_URL>:6443/version": dial tcp <CLUSTER_IP>:6443: connect: connection refused
level=error msg=Failed waiting for Kubernetes API. This error usually happens when there is a problem on the bootstrap host that prevents creating a temporary control plane.
This error is related to the bootstrap virtual machine and usually happens when there is a problem on the bootstrap host that prevents creating a temporary Control Plane.
Solution
-
Run the command to remove the cluster, leaving the
--dirparameter the same.
$ ./openshift-install destroy cluster --dir /tmp/openshift-cluster/cluster-state --log-level info
-
Wait until the cluster is removed, then run the command to reinstall it.
$ ./openshift-install create cluster --dir /tmp/openshift-cluster/cluster-state --log-level=info
7.2. Vault token error when deploying the Platform
Problem description
When deploying the Platform, during the Vault installation stage, an error may occur where the vault_root_token variable returns an empty value:
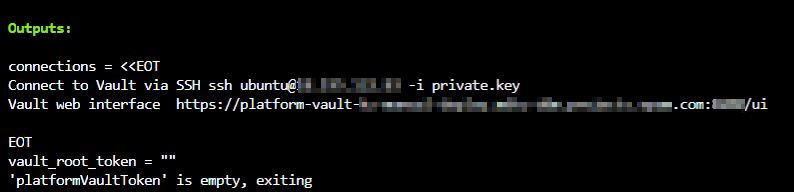
This error can be caused by Vault not starting successfully or skipping some of the Platform installation steps.
Solution
-
Sign in to your AWS account and locate the
platform-vault-<CLUSTER_NAME>virtual machine. -
Connect to the virtual machine using EC2 Instance Connect or SSH.
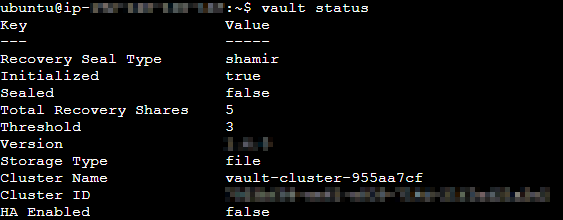
-
Check the Vault status. The
Initializedparameter must be set totrue.
$ vault status
+
-
If the status is different, restart Vault.
$ systemctl restart vault
-
If this error occurred during the Platform update, check if the Vault key was copied from the previous release as described in Configuring Vault.
-
Try running the Platform update process again as described in Updating the Platform from the Installer.
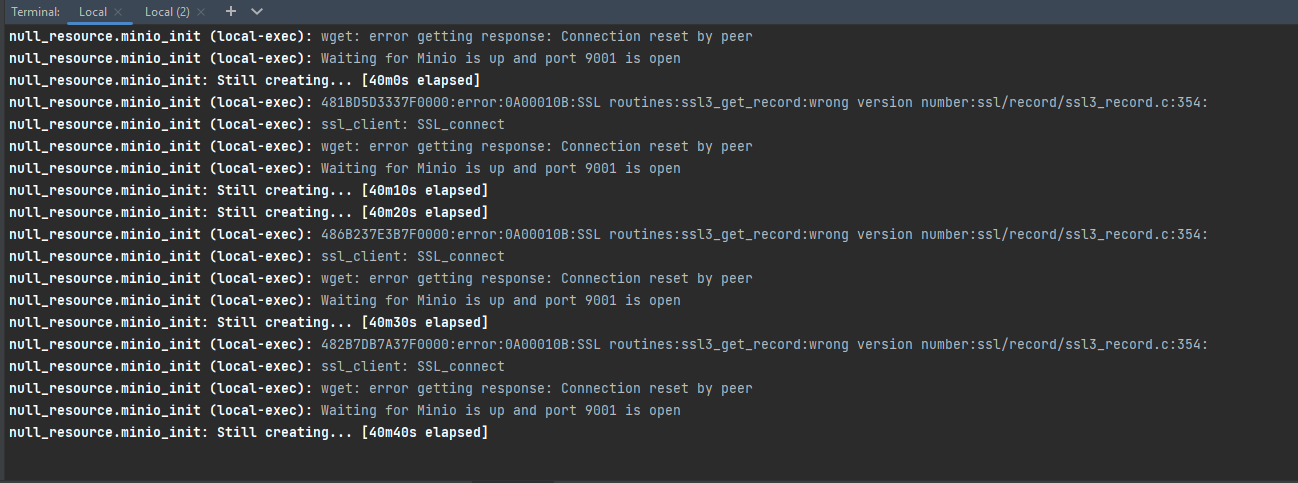
7.3. MinIO SSL certificate error when deploying the Platform
Problem description
When deploying the Platform, during the MinIO installation stage, the following error may occur:

Solution
-
Go to the Installer directory and start the container for Platform installation using the following command:
$ cd ~/installer/installer-<VERSION>
$ sudo docker run -it --rm \
    --name control-plane-installer-<VERSION> \
    --user root:$(id -g) \
    --net host \
    -v $(pwd):/tmp/installer \
    --env KUBECONFIG=/tmp/installer/kubeconfig \
    --env idgovuaClientId=f90ab33dc272f047dc330c88e5663b75 \
    --env idgovuaClientSecret=cba49c104faac8c718e6daf3253bc55f2bf11d9e \
    --env deploymentMode=<DEPLOYMENT_MODE> control-plane-installer:<VERSION> bash
-
Switch to the appropriate directory and set the environment variables.
$ cd /tmp/installer/terraform/minio/aws
$ export AWS_ACCESS_KEY_ID=$(oc get secret/aws-creds -n kube-system -o jsonpath='{.data.aws_access_key_id}' | base64 -d)
$ export AWS_SECRET_ACCESS_KEY=$(oc get secret/aws-creds -n kube-system -o jsonpath='{.data.aws_secret_access_key}' | base64 -d)
$ export CLUSTER_NAME=$(oc get node -l node-role.kubernetes.io/master -o 'jsonpath={.items[0].metadata.annotations.machine\.openshift\.io/machine}' | sed -r 's#.*/(.*)-master.*#\1#')
$ export clusterNameShort="${CLUSTER_NAME::-6}"
$ export baseDomain=$(oc get dns cluster --no-headers -o jsonpath='{.spec.baseDomain}')
$ export route53HostedZone="${baseDomain/${clusterNameShort}./}"
-
Remove MinIO using Terraform.
$ terraform init
$ terraform destroy -var cluster_name="${clusterNameShort}" -var baseDomain="${route53HostedZone}" -auto-approve
-
Wait until Minio is removed. Exit the container and retry the Platform installation process as described in Deploying the Platform from the Installer if you are deploying the platform from scratch, or Updating the Platform from the Installer, if you are updating the platform.
7.4. Error sending images to Nexus when deploying the Platform
Problem description
During Platform deployment, when sending images to Nexus, the following error may occur:
This error is related to skopeo, a tool that sends images to Nexus. If the image fails to load in 10 minutes, skopeo returns a timeout error.
Solution
Install the Platform from an additional virtual machine as described in Deploying additional resources to install an OKD cluster on AWS.