Saving multiple entities within a single transaction
- 1. Problem statement
- 2. Overview
- 3. Modeling a business process to create and use nested entities
- 3.1. Modeling and configuring the business process
- 3.1.1. Creating a pool for the business process
- 3.1.2. Modeling the start event
- 3.1.3. Modeling user forms to enter and sign data
- 3.1.4. Modeling the script task to create a simple object
- 3.1.5. Modeling the service task to create a user profile
- 3.1.6. Modeling the script task to create a nested object
- 3.1.7. Modeling the service task to create multiple entities within a single transaction
- 3.2. Using a complex object in a business process
- 3.1. Modeling and configuring the business process
- 4. API-level implementation
| 🌐 This document is available in both English and Ukrainian. Use the language toggle in the top right corner to switch between versions. |
1. Problem statement
When using the dataFactoryConnectorCreateDelegate delegate with the corresponding endpoint to write two or more entities to the database, you run into the following issue: it can only be done sequentially, using separate transactions.
As a result, one transaction may finish successfully, while the next one may fail for any reason. This scenario can lead to data inconsistency and the need to delete the successful transaction from the database and re-execute all procedures.
This approach complicates modeling, lengthens the business process, and increases the database load by increasing the number of transactions when creating entities.
Suppose we need to record data about the user (1), their educational profile (2), and user settings (3). This requires three consecutive database transactions:
-
Record the user’s personal data as a simple
personProfileobject to theperson_profiletable. The operation is successful. -
Record the user’s education data as a simple
personEduProfileobject to theperson_edu_profiletable. The operation fails. -
Record user settings as a simple
userSettingsobject to theuser_settingstable. The transaction does not start.
As a result, only one transaction is successful and the database is not consistent. It is necessary to roll back the database to the previous state — that is, delete each completed transaction through the DELETE endpoint and perform all three transactions again.
To deal with this issue, we implemented a special delegate that enables saving multiple entities to different database tables simultaneously within a single transaction.
2. Overview
To support saving multiple entities within a single transaction[1], we developed a standard business process extension — the ${dataFactoryConnectorNestedCreateDelegate} delegate. This delegate uses the Create nested entities in data factory template, presented as the dataFactoryConnectorNestedCreateDelegate.json file.
The delegate is used to create multiple entities in the data factory within a single transaction.
|
The Platform has a similar delegate with the Create entity in data factory template, but it allows you to create only one entity within a transaction. This means that as a result of one service task of a business process, only one record can be created in the data store. |
The ${dataFactoryConnectorNestedCreateDelegate} delegate enables you to create multiple records from one service task.
To function, the delegate relies on the data factory’s capability to create nested entities. At the data factory level, this feature is implemented as a separate special endpoint that receives complex (nested) objects with multiple entities from the business process level and creates corresponding records in different database tables in one transaction.
The API contract describes what the request body should look like to be able to create multiple entities in the database.
|
After processing data at the API level, the data factory distributes it to the appropriate tables automatically. |
3. Modeling a business process to create and use nested entities
|

3.1. Modeling and configuring the business process
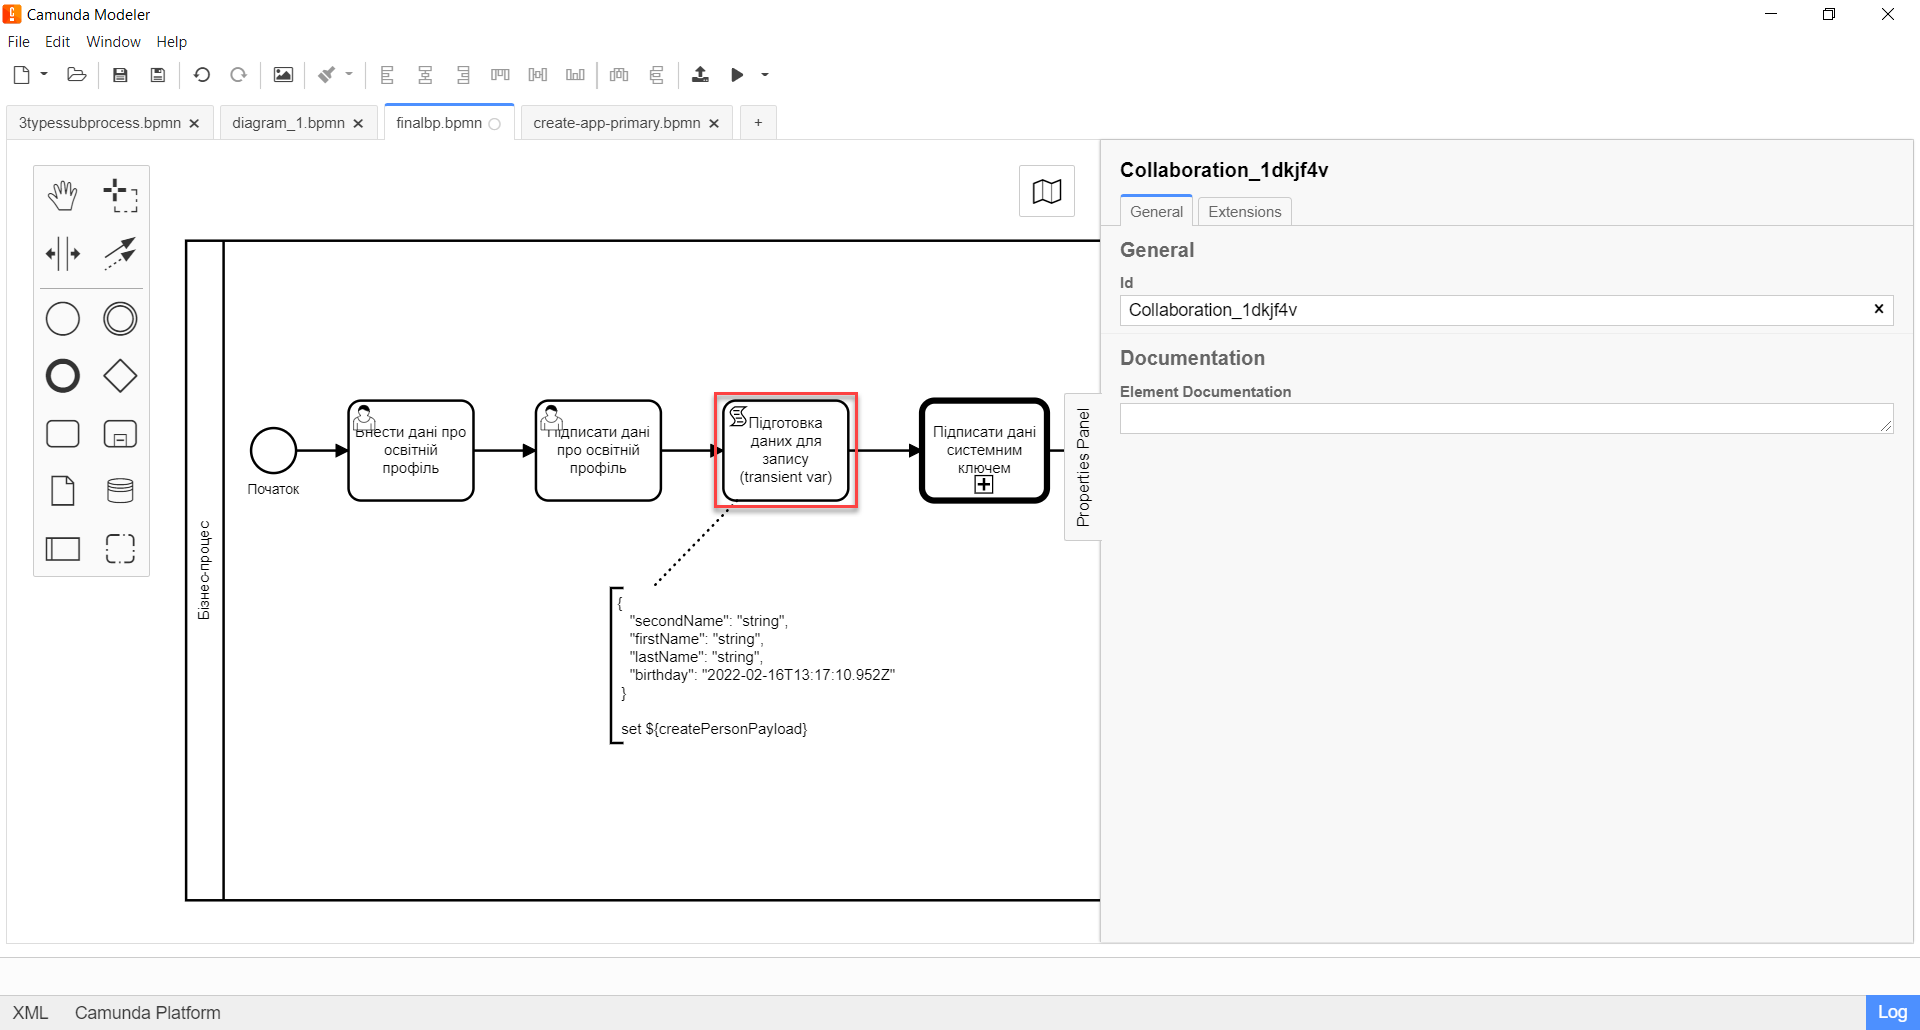
Let’s use the business process for creating nested entities as an example of configuring the Create nested entities in data factory delegate and modeling the following entities: creating a user, creating a user’s educational profile, as well as creating orders based on which an educational profile is added.
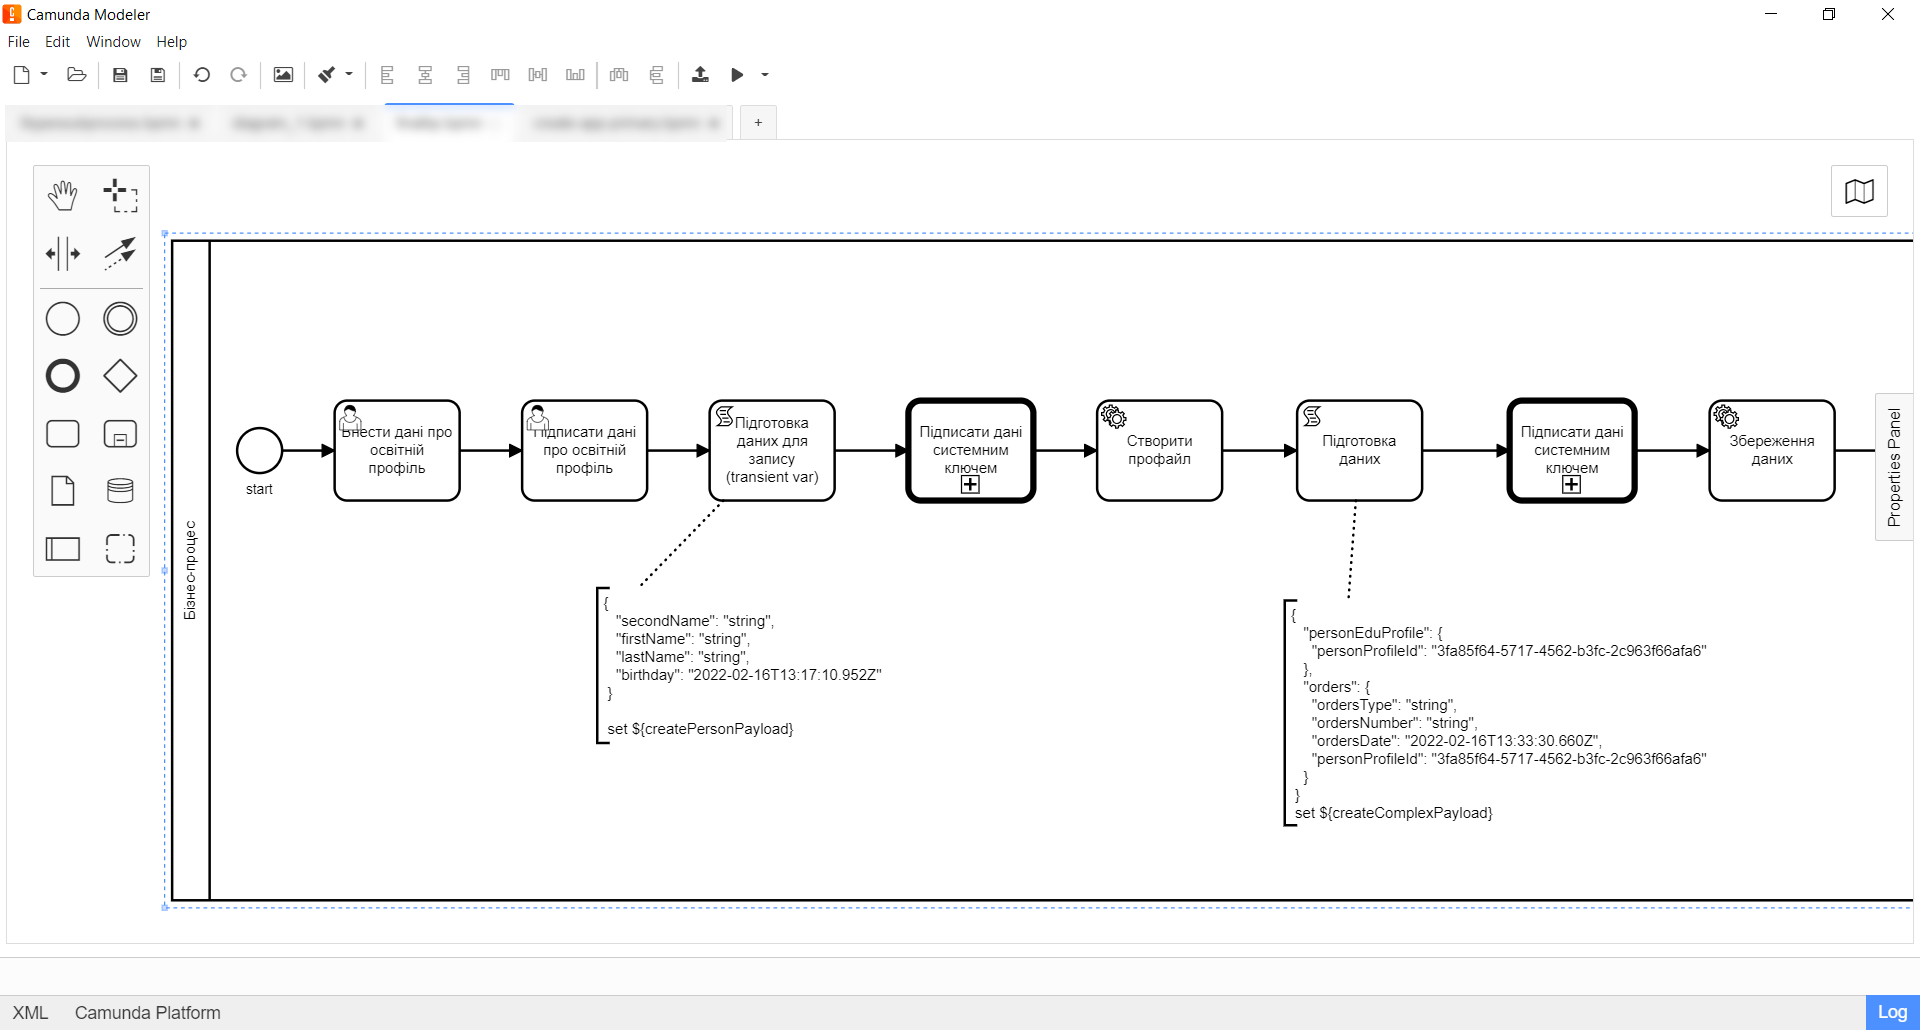
3.1.1. Creating a pool for the business process
-
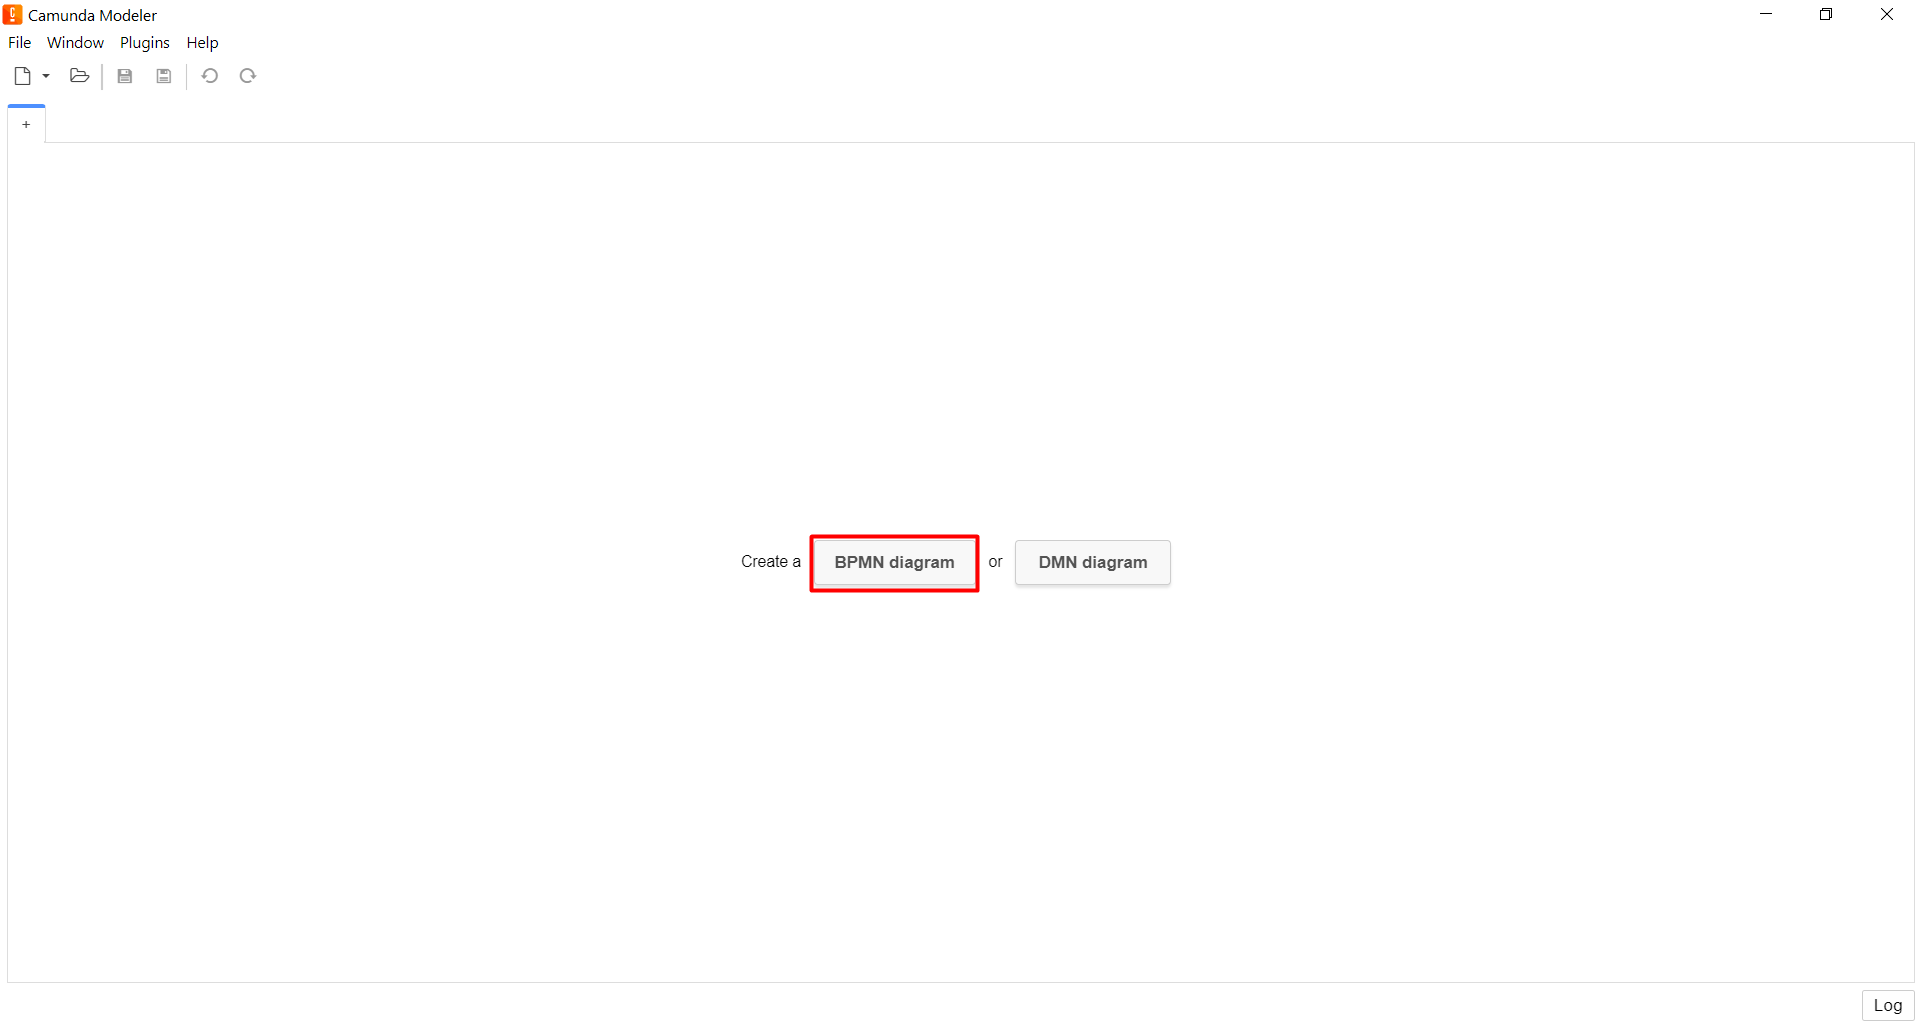
Open the Camunda Modeler application and create a new BPMN diagram. To do this, open the File menu in the upper-left corner and select New File > BPMN Diagram.
-
From the toolbar on the left, drag the Create pool/Participant element to the modeling canvas.
-
Fill out the following fields:
-
Participant Name: Enter the name of the pool that will be displayed in the modeler — for example,
Business process. -
Process Id: Enter the business process ID — for example,
nested_entity_test_process. -
Process Name: Enter the business name of the process — for example,
nested entity test process.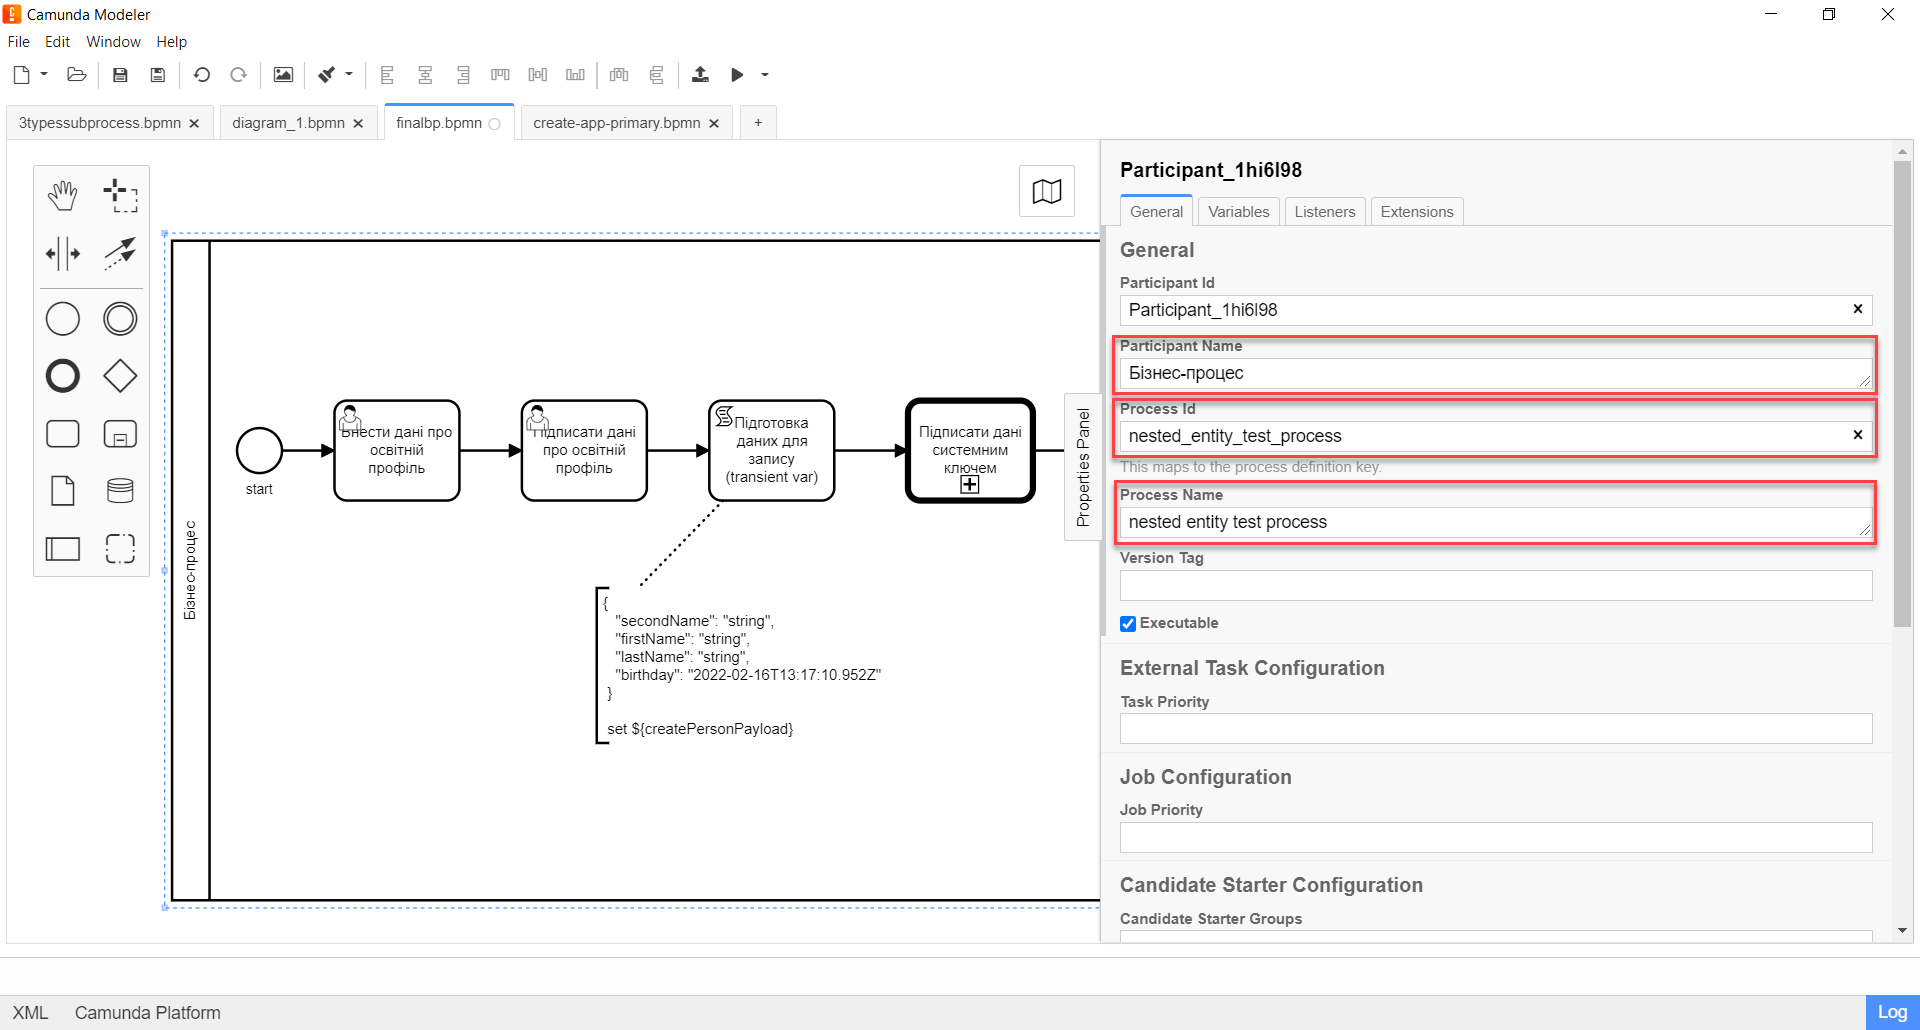
-
3.1.2. Modeling the start event
Create a start event to trigger the business process by the user. For this, perform the following steps:
-
In the toolbar on the left, find the CreateStartEvent item (a circle) and drag it to the modeling canvas.
-
In the properties panel on the right, fill out the following parameters:
-
Name: Enter the name of the start event — for example,
Start. -
Initiator: Enter
initiator.The initiatorvariable will contain information about the user who started the business process.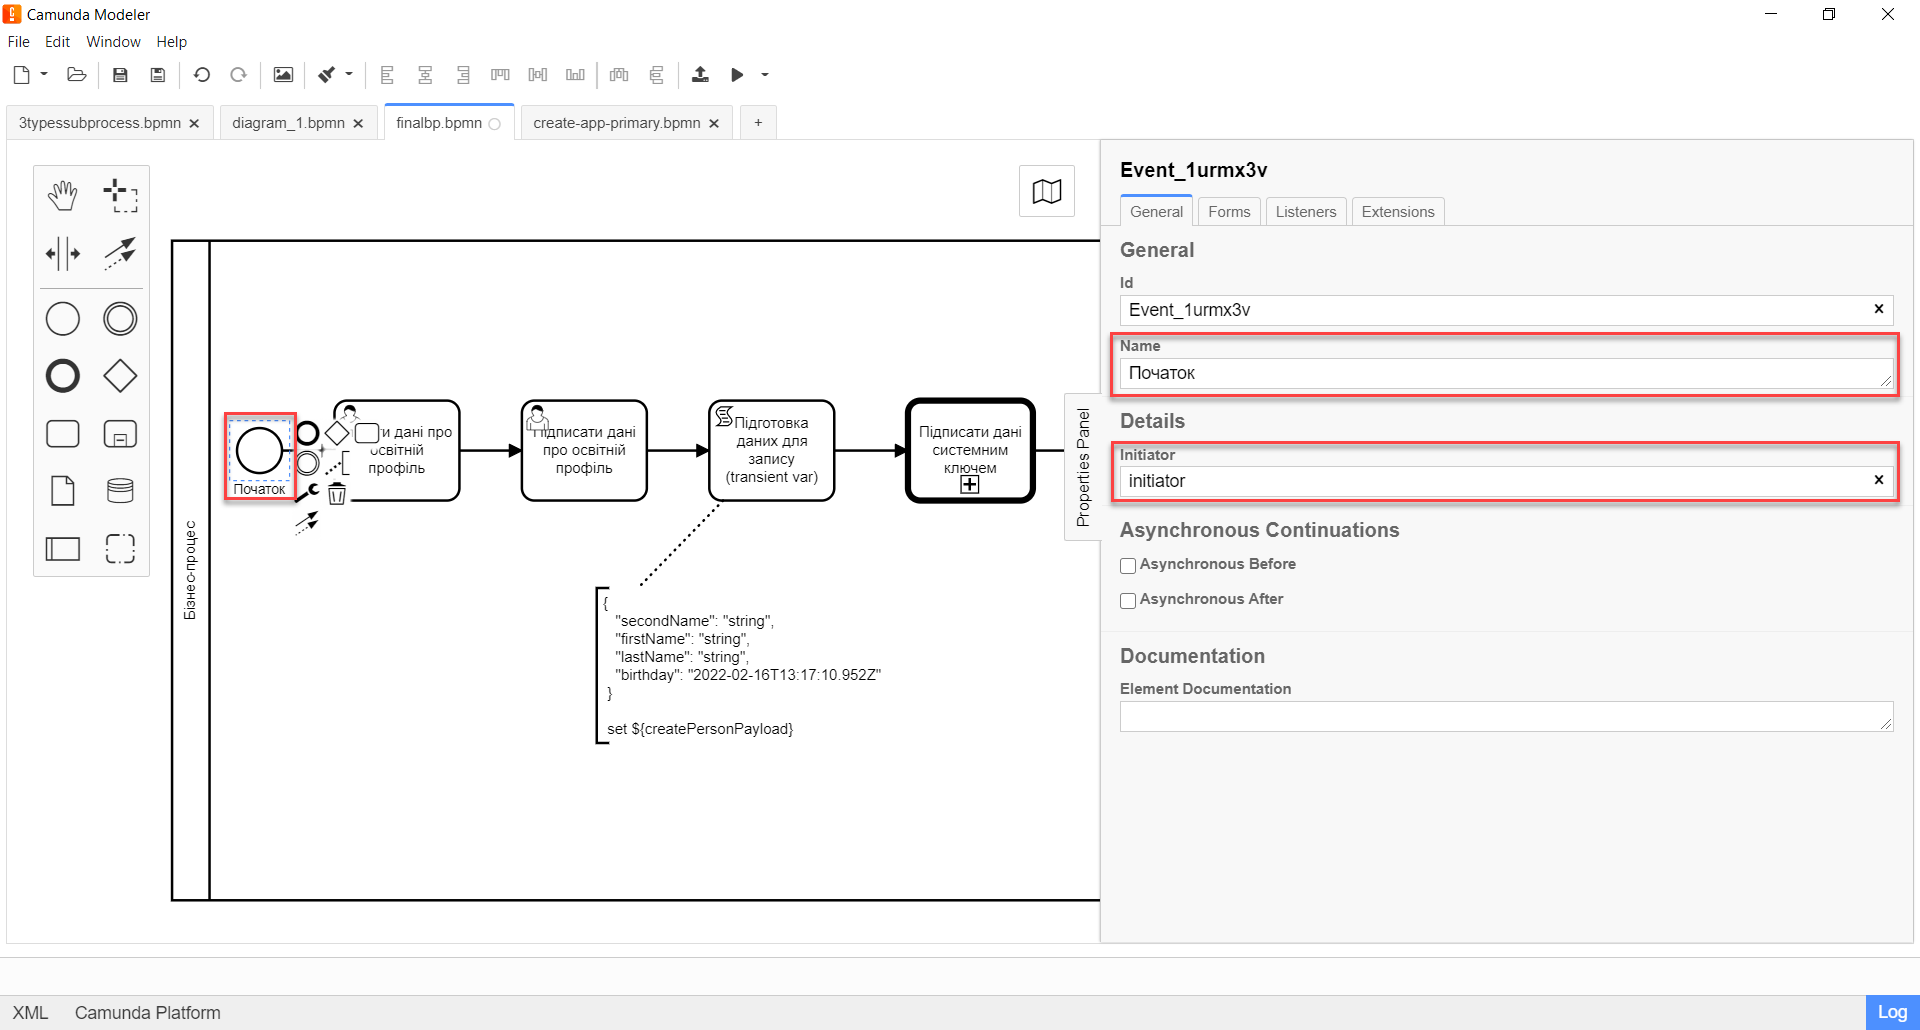
-
3.1.3. Modeling user forms to enter and sign data
The modeler must create two user tasks (forms):
-
A form for entering the user’s personal data.
-
A form for signing the data.
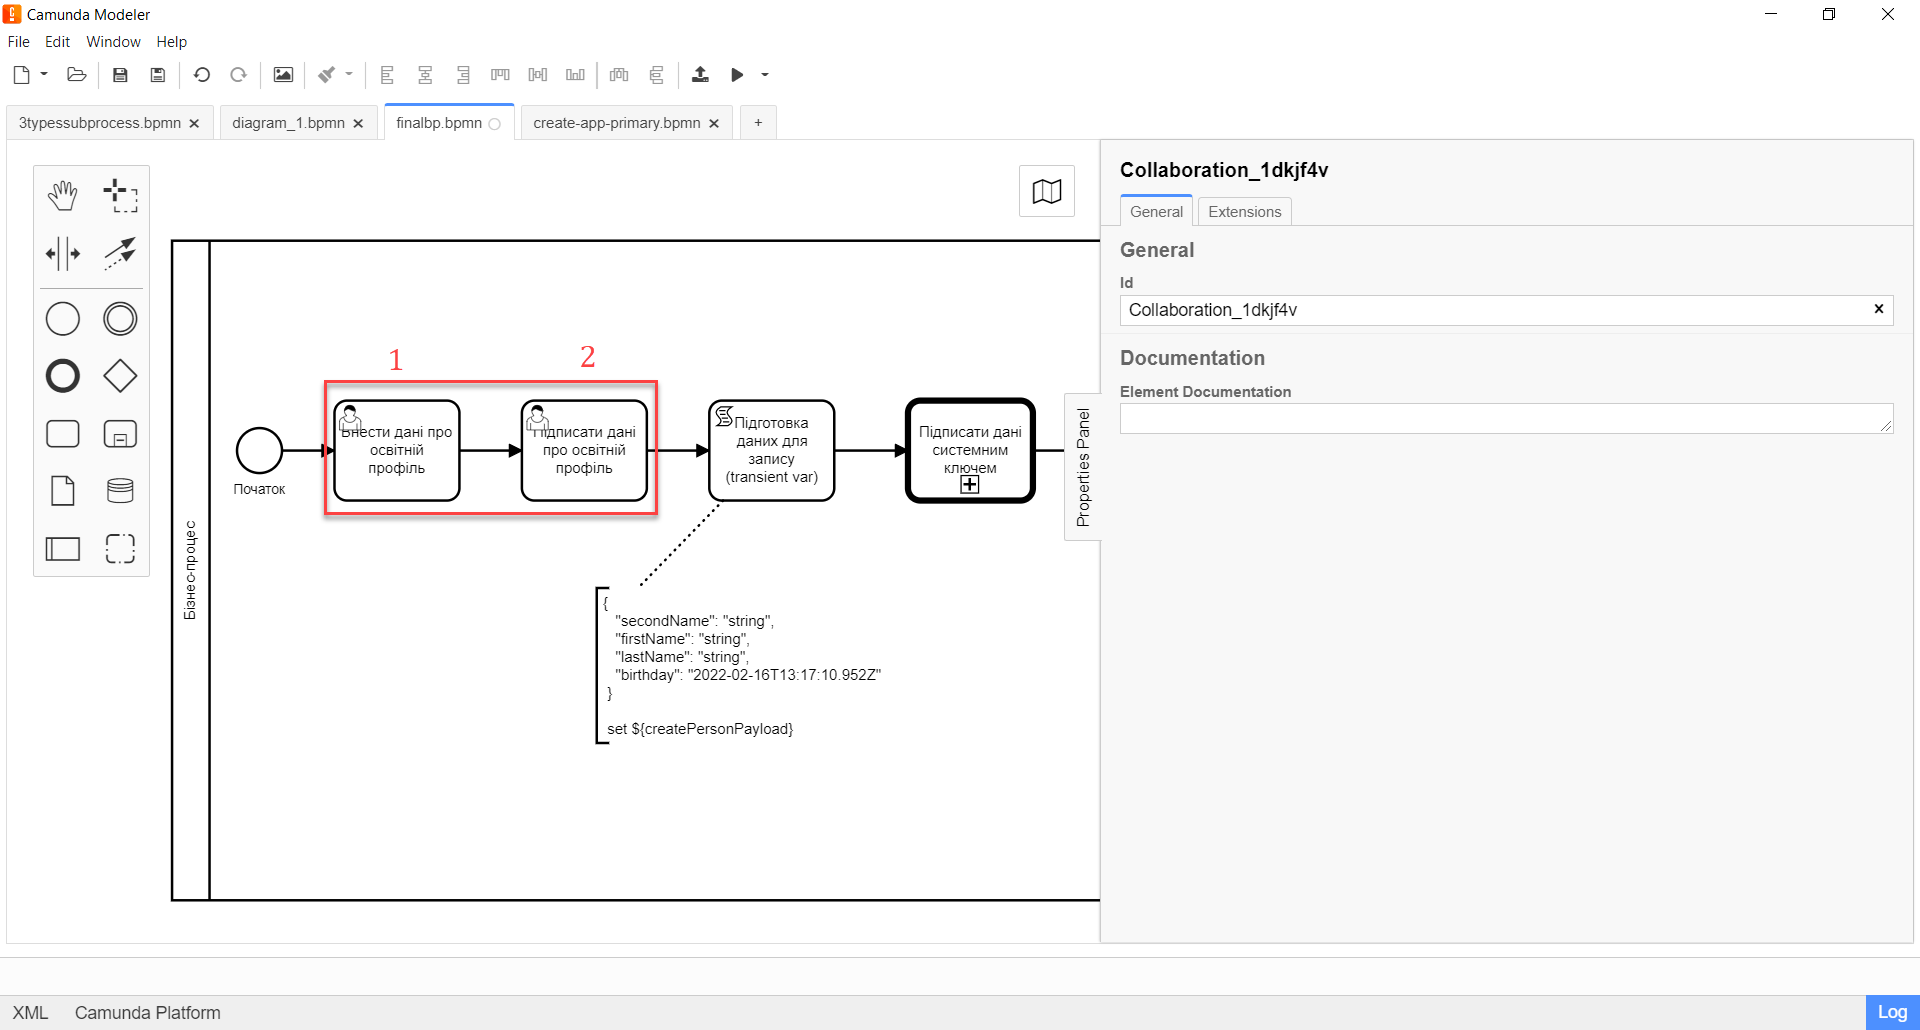
Perform the following steps:
-
Model the User form for entering user profile data and associate it with the business process form using the
Form keyparameter.-
In the Id field, enter the task identifier — for example,
addPersonProfileActivity. This is the task definition key. -
In the Name field, enter the task name — for example,
Enter educational profile data. -
In the Form key field, enter the business process form key —
add-dataprof. -
In the Assignee field, enter the variable for the user who initiated the execution of the business process —
${initiator}.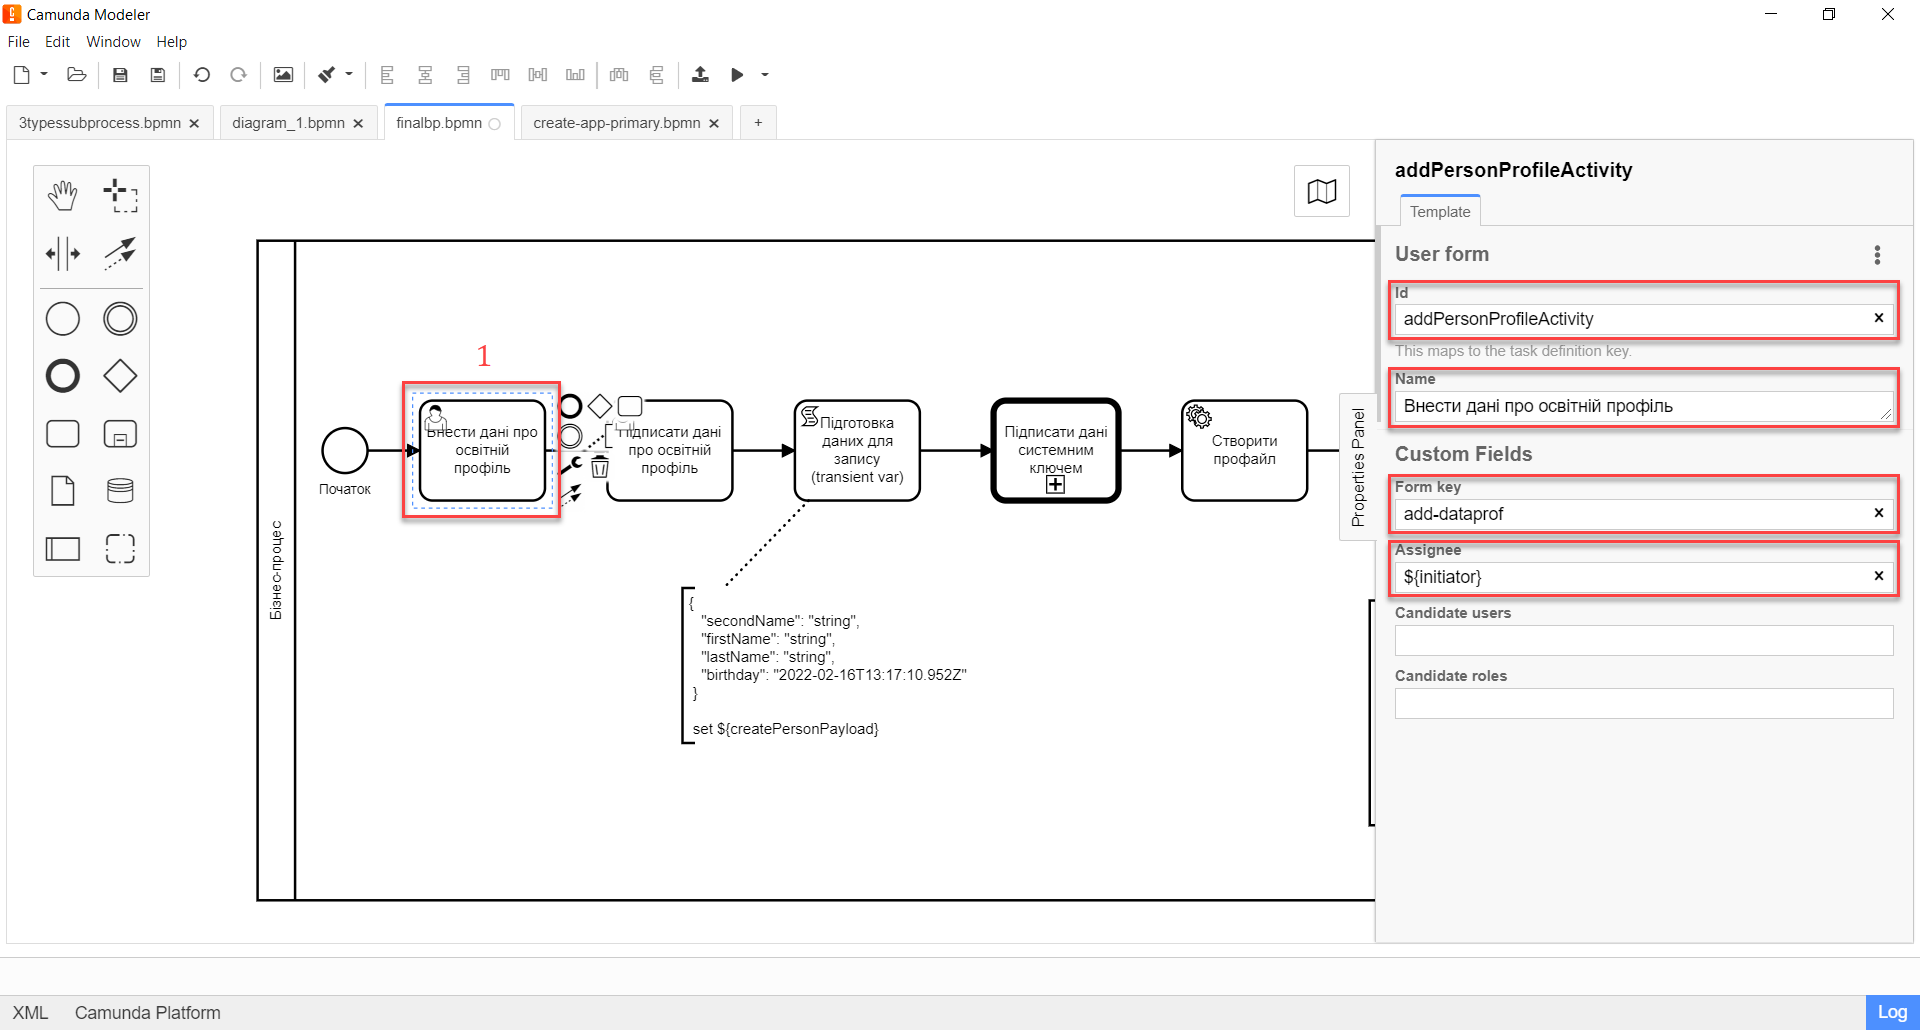
-
-
Model the User form for signing user profile data using a qualified electronic signature (QES) and associate it with the business process form using the
Form keyparameter.-
In the Id field, enter the task identifier — for example,
signPersonProfileActivity. This is the task definition key. -
In the Name field, enter the task name — for example,
Sign educational profile data. -
In the Form key field, enter the business process form key —
add-signd. -
In the Assignee field, enter the variable for the user who initiated the execution of the business process —
${initiator}.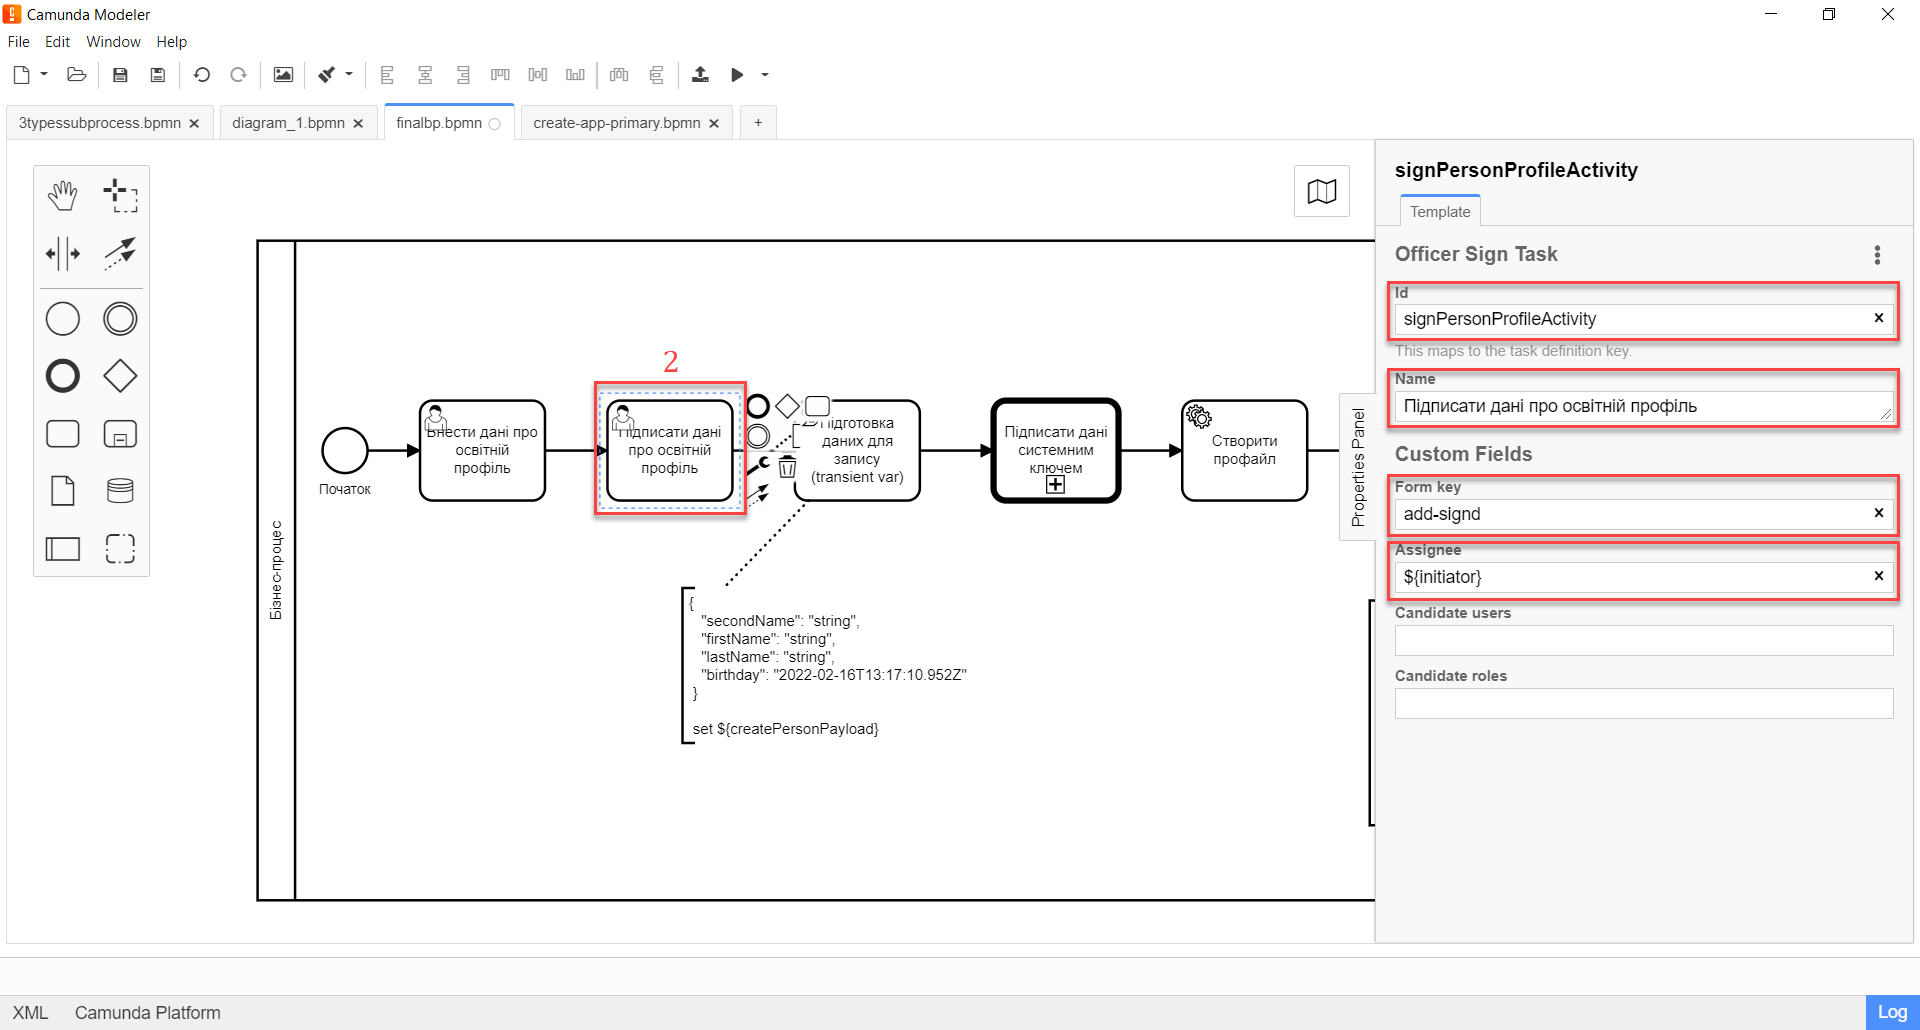
-
In terms of the UI, after starting the business process, the officer will see the form for entering profile data. Once they provide the data, the officer will see the form for signing the data using QES. The data is passed to the business process via the Form key parameter to be used in the next task of the process.
|
3.1.4. Modeling the script task to create a simple object
The data provided via the form and signed by the QES is transferred to the Script task, where a Groovy script creates a JSON object from the data and writes it to the createPersonPayload variable.
-
Create a new task and set the task type by clicking the wrench icon and selecting Script Task from the menu.
-
In the properties panel on the right, fill out the following parameters:
-
In the Name field, enter the task name — for example,
Prepare data for writing (transient var). -
In the Script Format field, enter the script format —
groovy. -
In the Script Type field, select the
Inline Scripttype. -
In the Script field, enter the body of the Groovy script.
Example 2. A Groovy script that creates a JSON object for further writing into the databasedef cephData = [:] def formData = submission('signPersonProfileActivity').formData cephData['lastName'] = formData.prop('last_name').value() cephData['firstName'] = formData.prop('first_name').value() cephData['secondName'] = formData.prop('second_name').value() cephData['birthday'] = formData.prop('birthday').value() set_transient_variable('createPersonPayload', S(cephData, 'application/json'))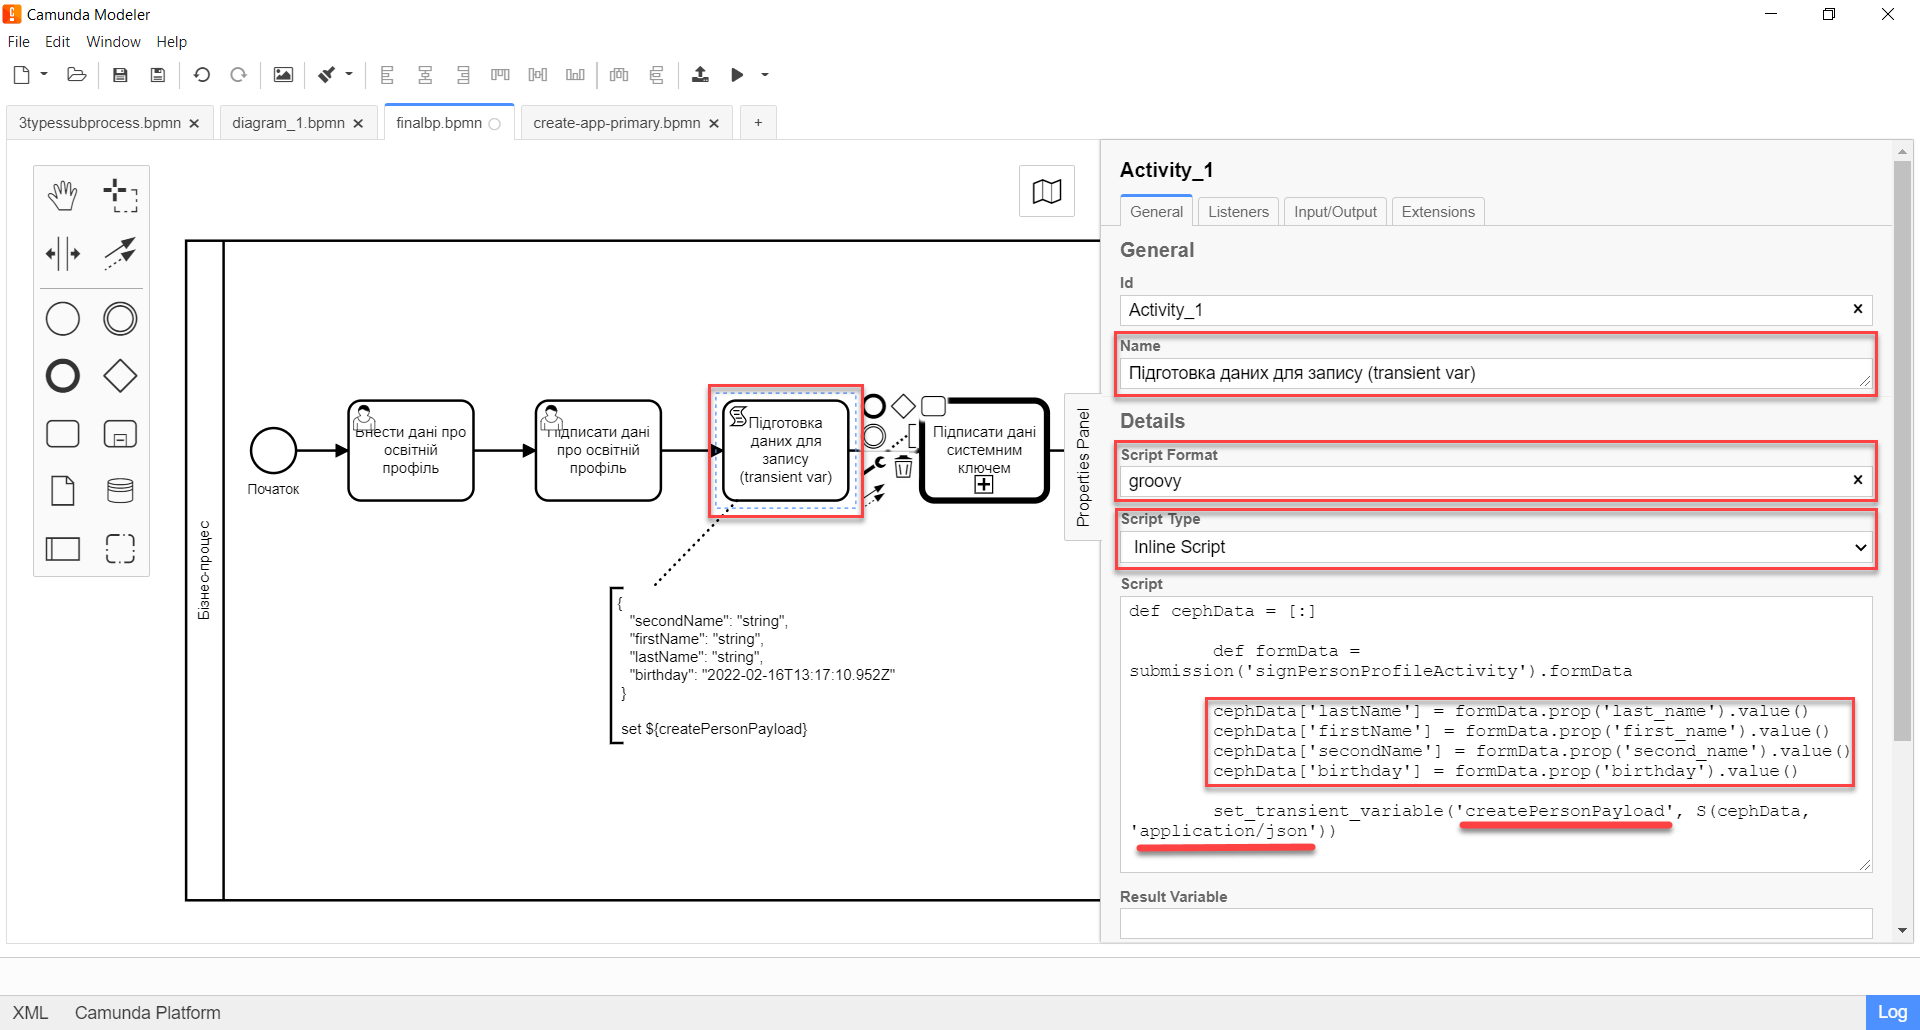
-
-
As the output of this task, we get the generated JSON saved to the
createPersonPayloadvariable, which will be used further in the business process.Example 3. A JSON object saved to the 'createPersonPayload' variable{ "secondName": "string", "firstName": "string", "lastName": "string", "birthday": "2022-02-16T13:17:10.952Z" }
3.1.5. Modeling the service task to create a user profile
Next, the data is used in the "Create profile" service task.
In this task, we need to create one entity in the database via the Create entity in data factory delegate using the signed data (Payload) from the ${createPersonPayload} variable and send a request to the person-profile API endpoint (resource).
Along with the data, we’re passing the key for verifying the system signature by the data factory, which is taken from the ${person_profile_system_signature_ceph_key} variable.
As a result, we receive an API response, which is saved to the createPersonProfileResponse variable.
-
Model a new task.
-
Set the task type by clicking the wrench icon and selecting Service Task from the menu.
-
Go to the properties panel on the right and apply the Create entity in data factory delegate. To do this, click
Open Catalogand select the appropriate template. -
Fill out the following fields:
-
In the Id field, enter the service task identifier — for example,
createProfile. -
In the Name field, enter the task name — for example,
Create profile. -
In the Resource field, enter the API endpoint where the request should be executed —
person-profile.The API endpoint looks like this: /<resource name>. In the Resource field, you must enter the value indicated after the slash (/). -
In the Payload field, enter the request body — a JSON object, i.e. the data from the
${createPersonPayload}variable, which must be saved to the data factory.The JSON object, or payload, must already be created as part of the script task. -
In the X-Access-Token field, enter the resource access token.
The access token is taken either from the initiator (for example, $initiator().accessToken}) or the completer of the task (for example, ${completer('taskDefinitionId').accessToken}).
-
If there are no user tasks before the service task in the business process, the process initiator token is used.
-
If there is a user task before the service task, the task completer token is used.
This way, we can create an entity in the database on behalf of the user who initiated the business process OR executed the user task.
-
-
In the X-Digital-Signature-source field, enter the QES source — that is, pass the ID of the user form where the QES was applied to the
sign_submission()function:${sign_submission('signPersonProfileActivity').signatureDocumentId}. -
In the X-Digital-Signature-Derived-source field, enter the system signature source — that is, the variable containing the system key:
${person_profile_system_signature_ceph_key}. -
In the Result variable field, enter the name of the variable to which the API response will be saved —
createPersonProfileResponse.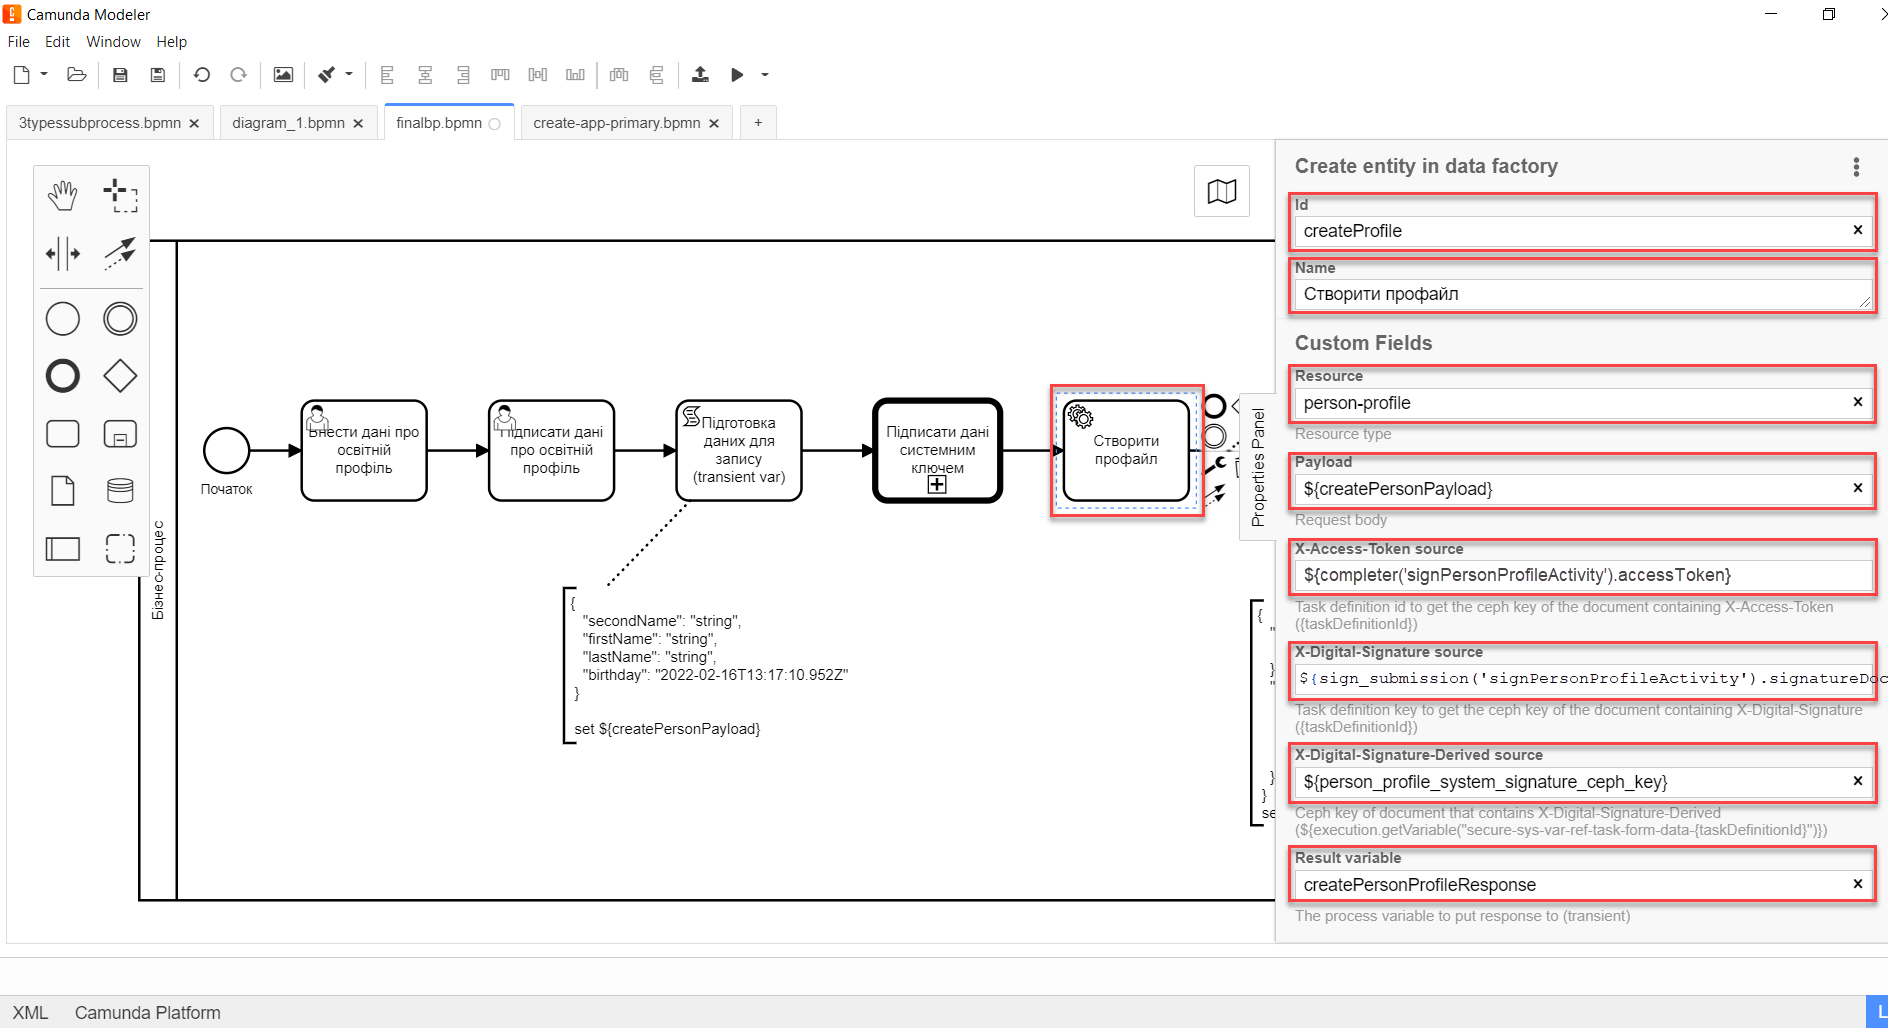
-
The result is one transaction that writes one simple object — personProfile — to the person_profile table in the database.
|
3.1.6. Modeling the script task to create a nested object
Next, we need to use the script task to create a nested object containing these nested entities:
-
The
personEduProfileobject — the user’s educational profile containing a nested object with the ID of the newly created user (personProfileId). -
The
ordersobject containing a list of order attributes — that is, additional settings (grounds) for creating an educational profile.
A complex JSON object with nested entities is saved to the createComplexPayload variable.

-
Create a new task and set the task type by clicking the wrench icon and selecting Script Task from the menu.
-
In the properties panel on the right, fill out the following parameters:
-
In the Name field, enter the task name — for example,
Prepare data. -
In the Script Format field, enter the script format —
groovy. -
In the Script Type field, select the
Inline Scripttype. -
In the Script field, enter the body of the Groovy script.
Example 4. A Groovy script that creates a complex JSON object for further writing into the databasedef personProfileId = createPersonProfileResponse.responseBody.prop('id').value() def personEduProfile = ['personProfileId':personProfileId] def formData = submission('signPersonProfileActivity').formData def orders = [:] orders['ordersType'] = formData.prop('order_type').value() orders['ordersNumber'] = formData.prop('order_number').value() orders['ordersDate'] = formData.prop('order_date').value() orders['personProfileId'] = personProfileId def cephData = ['personEduProfile':personEduProfile,'orders':orders] set_transient_variable('createComplexPayload', S(cephData, 'application/json'))
-
-
As the output of this task, we get the generated JSON saved to the
createComplexPayloadvariable, which will be used further in the business process.Example 5. A JSON object saved to the 'createComplexPayload' variable{ "personEduProfile": { "personProfileId": "3fa85f64-5717-4562-b3fc-2c963f66afa6" }, "orders": { "ordersType": "string", "ordersNumber": "string", "ordersDate": "2022-02-16T13:33:30.660Z", "personProfileId": "3fa85f64-5717-4562-b3fc-2c963f66afa6" } }
3.1.7. Modeling the service task to create multiple entities within a single transaction
Next, the data is used in the "Save data" service task.
In this task, we need to create several entities in the database within a single transaction via the Create nested entities in data factory delegate using the signed data (Payload) from the ${createСomplexPayload} variable.
- During this task, the business process does the following:
-
-
Sends the signed data (
${createComplexPayload}) to thenested-transaction-entityAPI endpoint (resource). -
Passes the resource access token.
-
Passes the user’s QES with the request.
-
Passes the system key from the
${transaction_system_signature_ceph_key}variable.
-
The API response is saved to the response variable.
-
Model a new task.
-
Set the task type by clicking the wrench icon and selecting Service Task from the menu.
-
Go to the properties panel on the right and apply the Create entity in data factory delegate. To do this, click
Open Catalogand select the appropriate template.For an example of configuring the Create nested entities in data factory delegate, see this section. -
Fill out the following fields:
-
In the Id field, enter the service task identifier —
createComplex. -
In the Name field, enter the task name — for example,
Save data. -
In the Resource field, enter the API endpoint where the request should be executed —
nested-transaction-entity.The API endpoint looks like this: /nested/<resource name>. In the Resource field, you must enter the value indicated after the second slash (/). -
In the Payload field, enter the request body — a JSON object, i.e. the data from the
${createComplexPayload}variable, which must be saved to the data factory.The JSON object, or payload, must already be created as part of the script task. -
In the X-Access-Token field, enter the resource access token.
The access token is taken either from the initiator (for example, $initiator().accessToken}) or the completer of the task (for example, ${completer('taskDefinitionId').accessToken}).
-
If there are no user tasks before the service task in the business process, the process initiator token is used.
-
If there is a user task before the service task, the task completer token is used.
This way, we can create the entities in the database on behalf of the user who initiated the business process OR executed the user task.
-
-
In the X-Digital-Signature-source field, enter the QES source — that is, pass the ID of the user form where the QES was applied to the
sign_submission()function:${sign_submission('signPersonProfileActivity').signatureDocumentId}. -
In the X-Digital-Signature-Derived-source field, enter the system signature source — that is, the variable containing the system key:
${transaction_system_signature_ceph_key}. -
In the Result variable field, enter the name of the variable to which the API response will be saved —
response.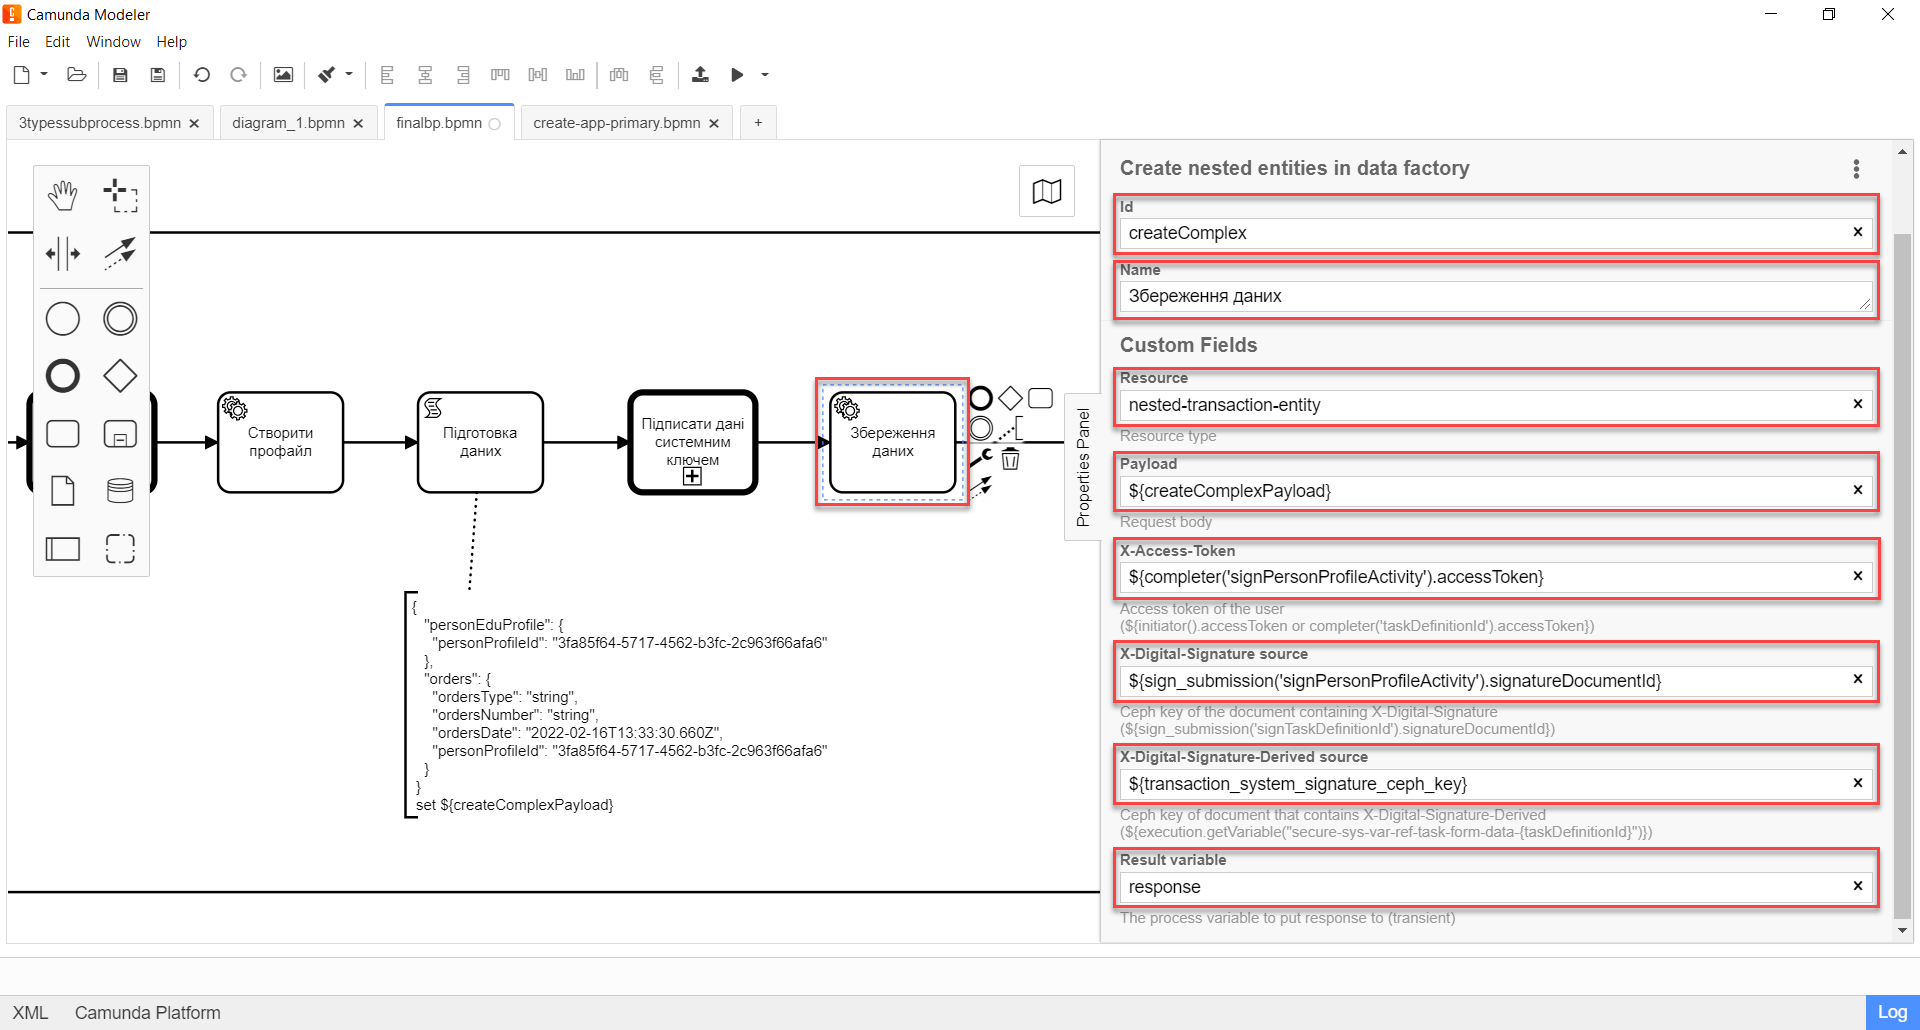
-
-
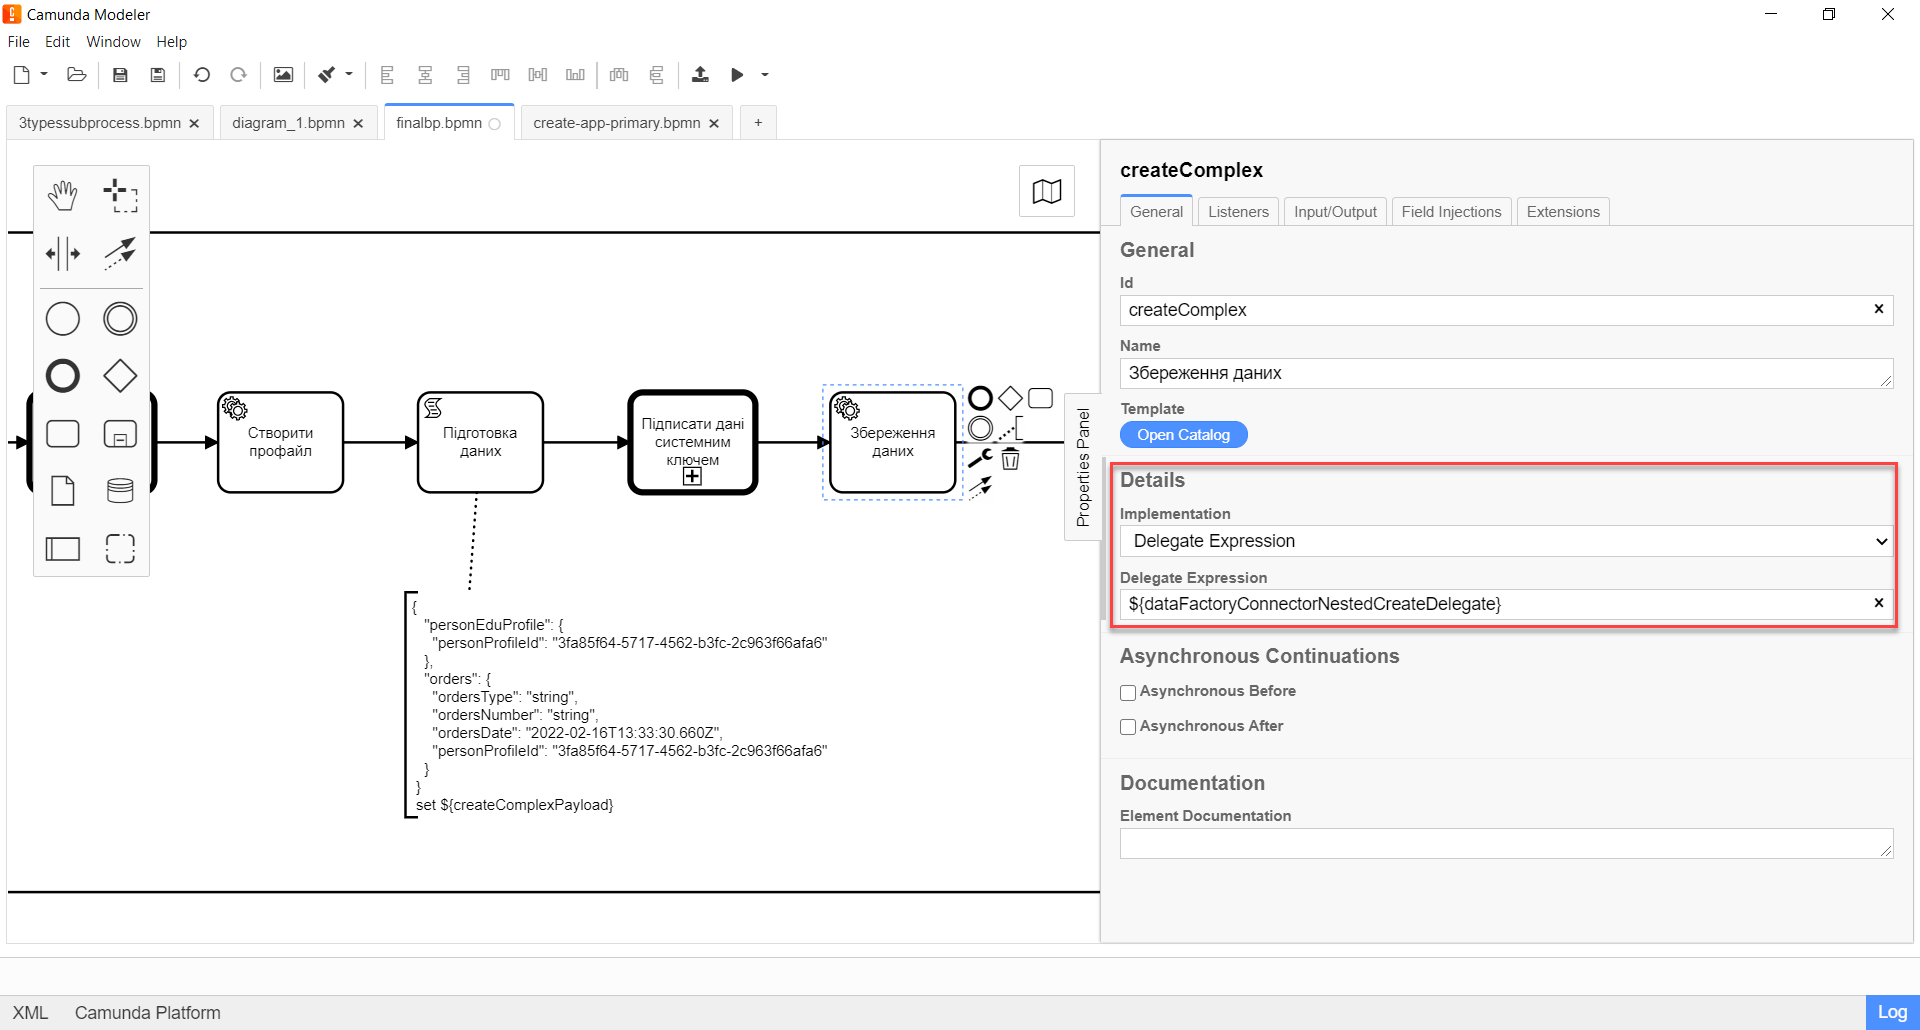
Unlink the template from the task to view its implementation details, which are pre-populated automatically to simplify modeling. To do this, expand the menu in the upper-right corner and click
Unlink. Then, check the following fields:-
The Implementation field is set to the
Delegate Expressiontype. -
The Delegate Expression field contains the delegate name —
$dataFactoryConnectorNestedCreateDelegate.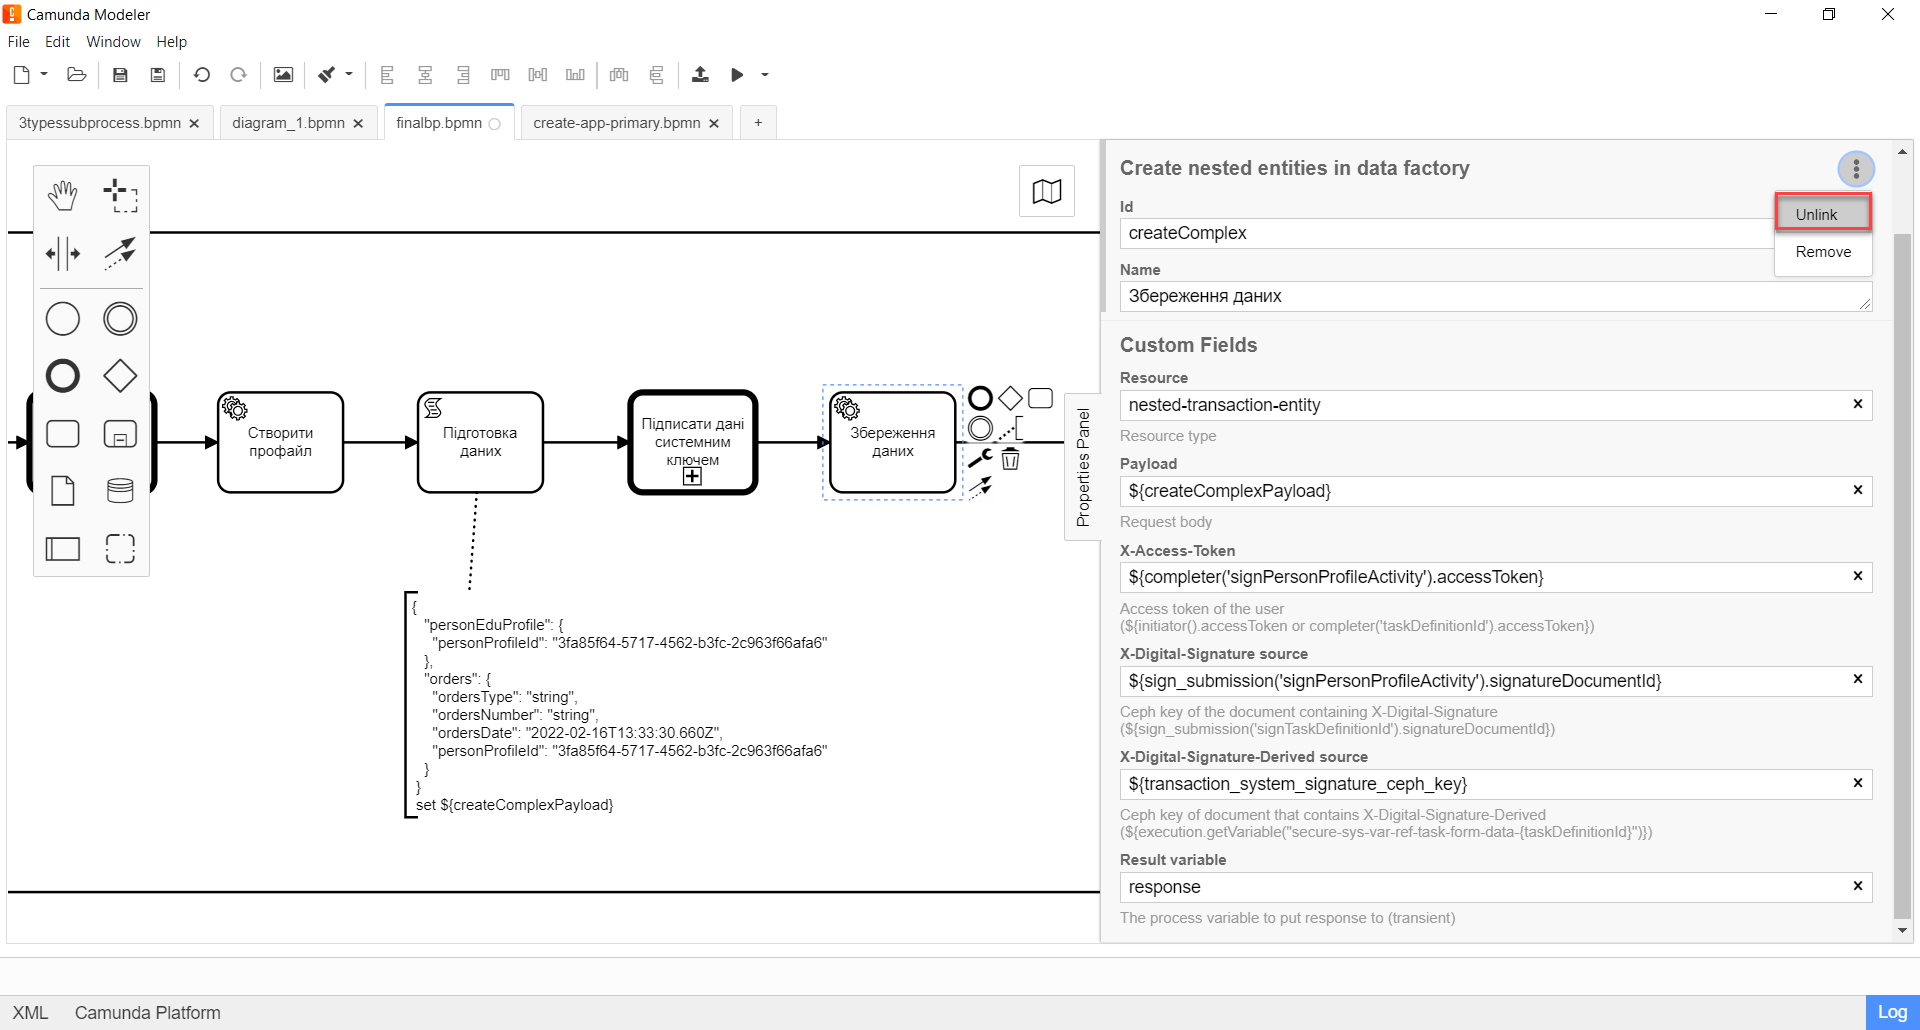
The result is one transaction that writes a complex object with several nested entities —
personEduProfileandorders— to theperson_edu_profileandorderdatabase tables, respectively. These tables reference theperson_profiletable using thepersonProfileIdforeign key.This way, the transaction is executed across three database tables simultaneously. The data factory API distributes the data from the request body into the corresponding tables automatically.
-
-
Finish the business process or continue as needed.
3.2. Using a complex object in a business process
Let’s consider an example of further using the complex object in the same business process after its data has been saved to the database during the previous transaction.
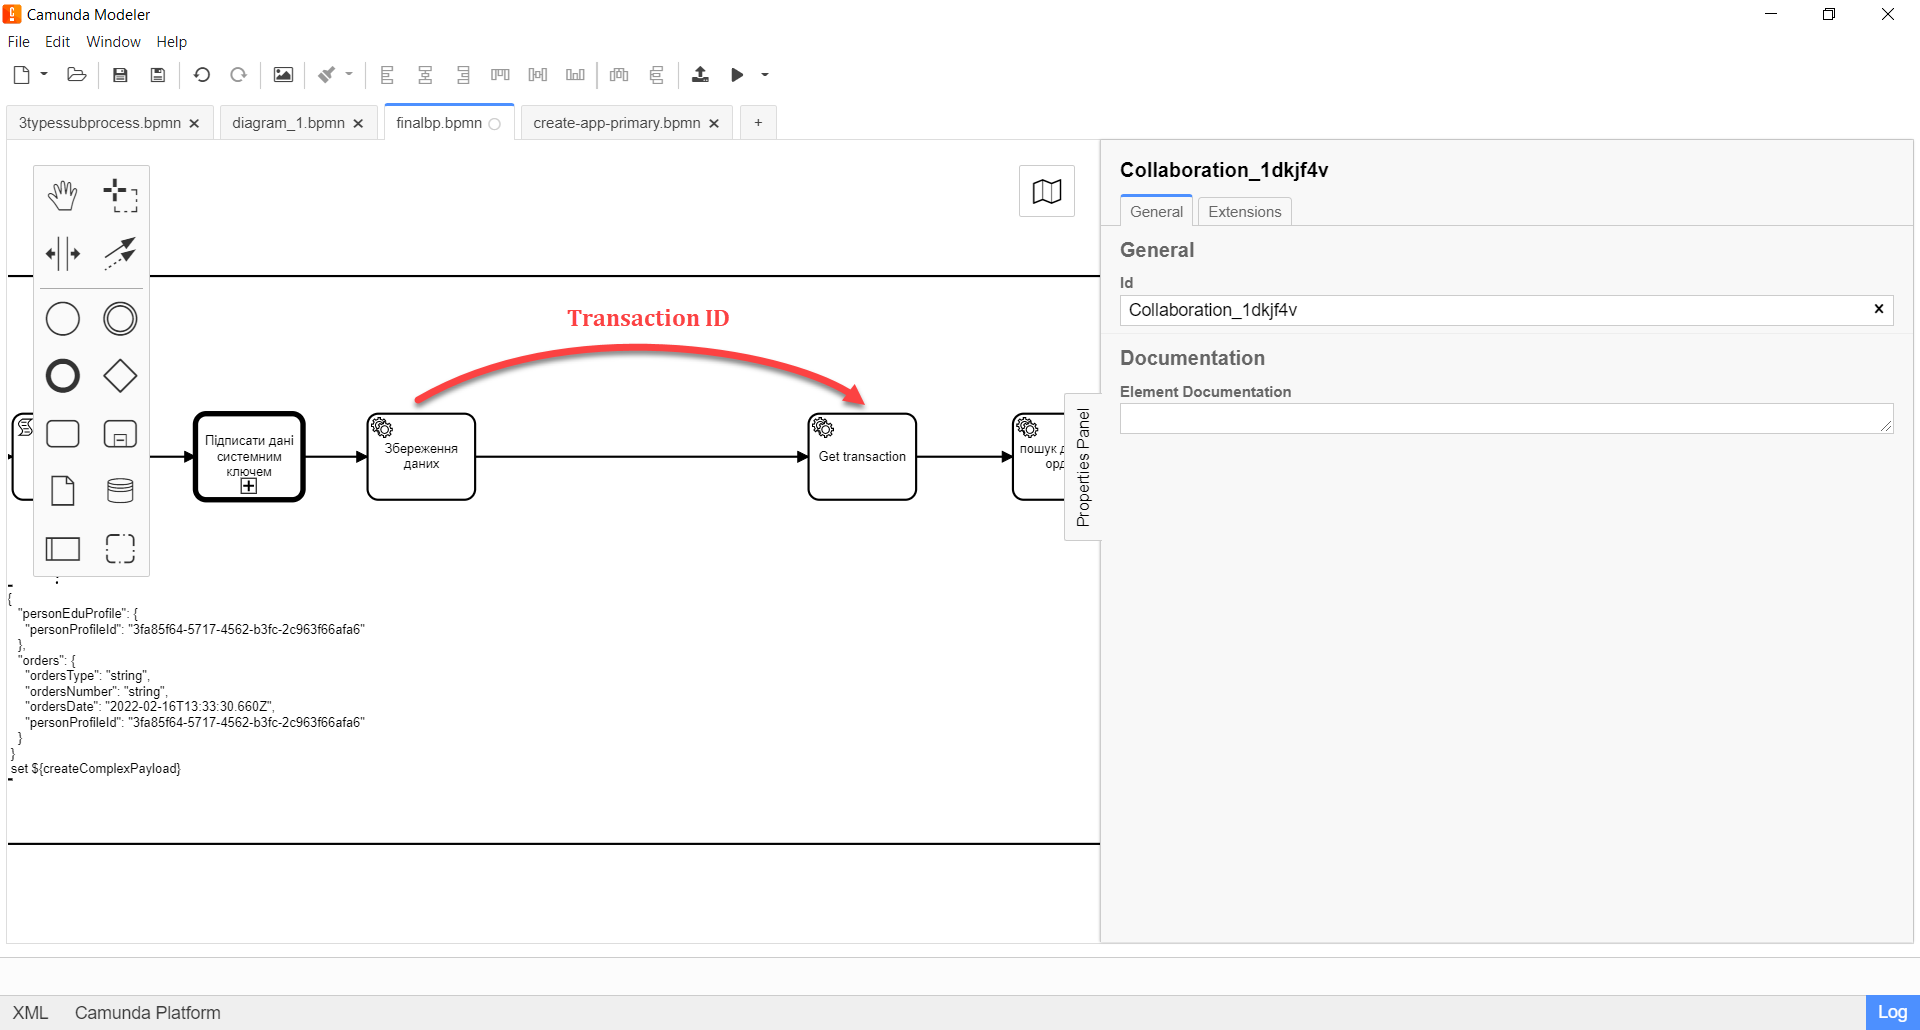
3.2.1. Modeling the "Get transaction" service task
To continue using the complex object and its entities, you need to first obtain the ID of the transaction in which this object was recorded.
For this, you need to send a GET request to the Get transaction endpoint and specify the transaction ID from the response variable of the last service task — ${response.value.responseBody.prop('id').value()}, as well as the resource access token.
-
Model a new task.
-
Set the task type by clicking the wrench icon and selecting Service Task from the menu.
-
Go to the properties panel on the right and apply the Read entity from data factory delegate. To do this, click
Open Catalogand select the appropriate template. -
Fill out the following fields:
-
In the Name field, enter the task name — for example,
Get transaction. -
In the Resource field, enter the API endpoint where the request should be executed —
transaction.The API endpoint looks like this: /<resource name>. In the Resource field, you must enter the value indicated after the slash (/). -
In the Resource id field, enter the transaction ID from the
responsevariable of the last service task —${response.value.responseBody.prop('id').value()}that needs to be passed to the data factory. -
In the X-Access-Token field, enter the resource access token —
${completer('signPersonProfileActivity').accessToken}.The access token is taken either from the initiator (for example, $initiator().accessToken}) or the completer of the task (for example, ${completer('taskDefinitionId').accessToken}).
-
If there are no user tasks before the service task in the business process, the process initiator token is used.
-
If there is a user task before the service task, the task completer token is used.
This way, we can perform an entity lookup in the database on behalf of the user who initiated the business process OR executed the user task.
-
-
In the Result variable field, enter the name of the variable to which the API response will be saved —
txResponse.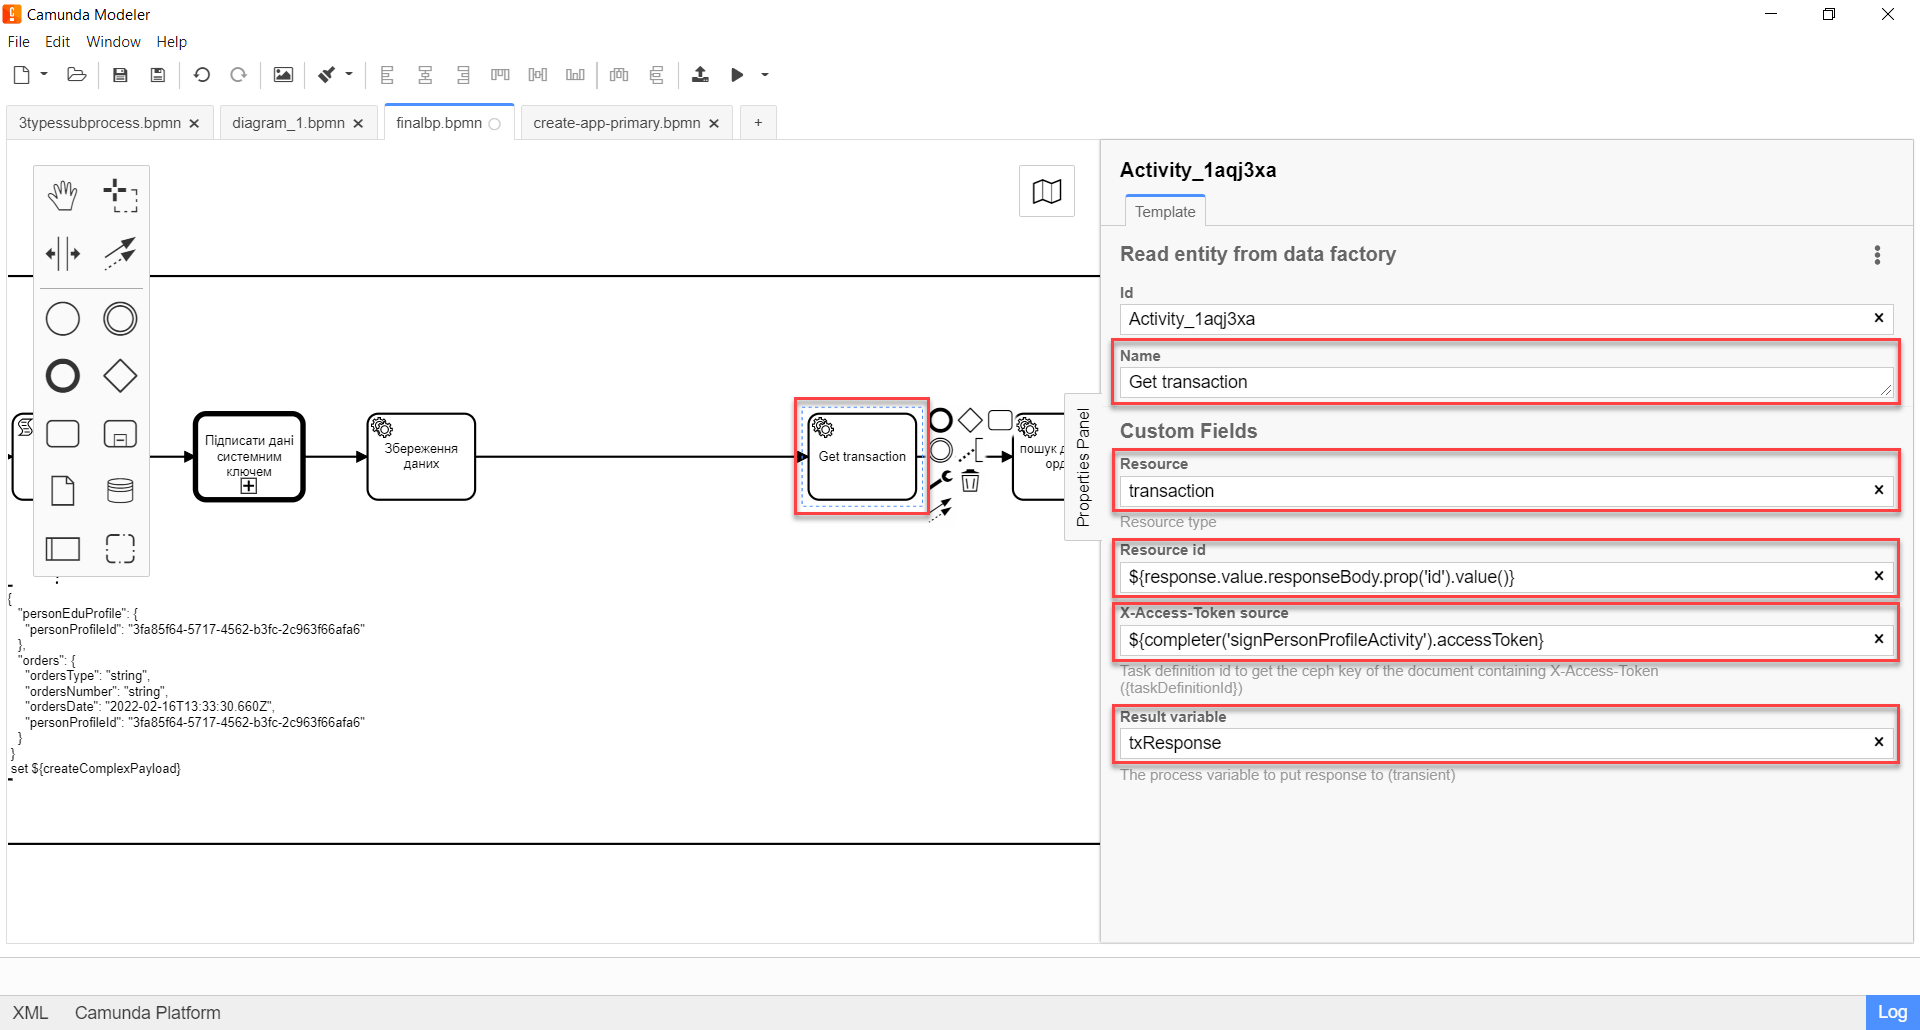
3.2.2. Modeling the "Search data by order" service task
Once we get the transaction ID as a result of the previous task, we can search for data saved in the scope of the transaction. In this case, we will search by the orders object.
For this, you need to send a GET request to the orders endpoint and specify the transaction ID from the txResponse variable of the last service task — ${txResponse.value.responseBody.prop('ordersId').value()}, as well as the resource access token.
-
Model a new task.
-
Set the task type by clicking the wrench icon and selecting Service Task from the menu.
-
Go to the properties panel on the right and apply the Read entity from data factory delegate. To do this, click
Open Catalogand select the appropriate template. -
Fill out the following fields:
-
In the Name field, enter the task name — for example,
Search data by order. -
In the Resource field, enter the API endpoint where the request should be executed —
orders.The API endpoint looks like this: /<resource name>. In the Resource field, you must enter the value indicated after the slash (/). -
In the Resource id field, enter the transaction ID from the
txResponsevariable of the last service task —${txResponse.value.responseBody.prop('ordersId').value()}that needs to be passed to the data factory. -
In the X-Access-Token field, enter the resource access token —
${completer('signPersonProfileActivity').accessToken}.The access token is taken either from the initiator (for example, $initiator().accessToken}) or the completer of the task (for example, ${completer('taskDefinitionId').accessToken}).
-
If there are no user tasks before the service task in the business process, the process initiator token is used.
-
If there is a user task before the service task, the task completer token is used.
This way, we can perform an entity lookup in the database on behalf of the user who initiated the business process OR executed the user task.
-
-
In the Result variable field, enter the name of the variable to which the API response will be saved —
ordResponse.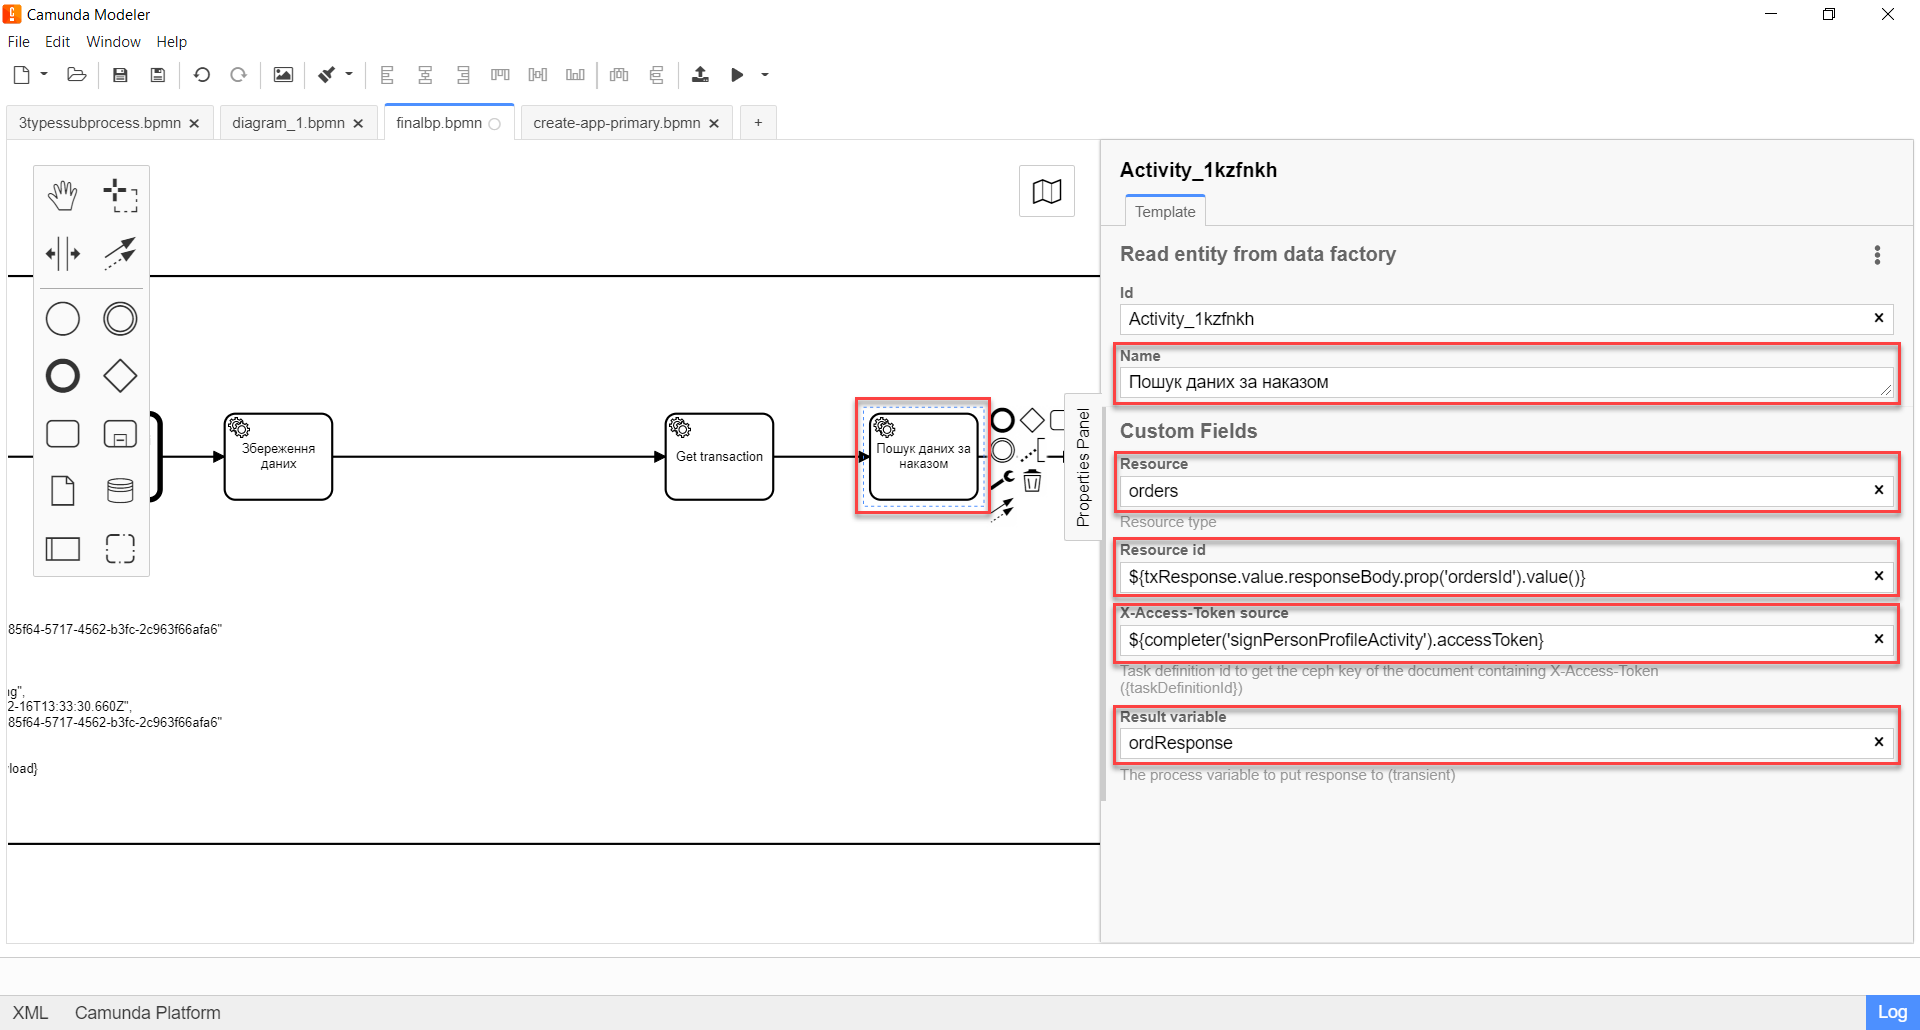
-
-
Finish the business process or continue as needed.
4. API-level implementation
A separate request type requires a separate delegate. The REST controller supports certain types of requests, or methods: POST, GET, PUT, and DELETE. Each method has its delegate.
|
The Although the
|
{
  "personEduProfile": {
    "personProfileId": "3fa85f64-5717-4562-b3fc-2c963f66afa6"
  },
  "orders": {
    "ordersType": "string",
    "ordersNumber": "string",
    "ordersDate": "2022-02-16T13:33:30.660Z",
    "personProfileId": "3fa85f64-5717-4562-b3fc-2c963f66afa6"
  }
}- HTTP code:
200 OK
- Response body:
{
   "id":"d1394f5d-5274-4831-90ac-0dfdb6d7bd35"
}
|
There is no need to create a separate controller with different endpoints for different purposes. It is sufficient to use a single dedicated endpoint capable of receiving and processing a complex JSON object that will transfer all the necessary user data and settings simultaneously and whose parameters can be saved to different tables in a single database transaction. |