Configuring access to registry’s public data
- 1. Overview
- 2. Usage scenarios
- 3. Action plan for configuration and use
- 4. Registry regulations modeling
- 5. Publishing the API in the registry regulations
- 6. Viewing published APIs in Swagger
- 7. Configuring access to public data
- 8. Grafana metrics monitoring
- 9. Creating a service account for executing public requests
| 🌐 This document is available in both English and Ukrainian. Use the language toggle in the top right corner to switch between versions. |
1. Overview
Third-party systems and users can retrieve public information from the registry in its current state and process and visualize it without authentication using the public API access points.
This document consists of two main parts: creation and publication of access points at the level of the registry regulations and access configuration at the registry’s configuration level.
2. Usage scenarios
- The platform provides the following functionality for working with public data in the registry
-
-
Publication of search queries
-
Configuration of public API resources
-
Creation of integration points for the public API by the technical administrator of the registry
-
Accessing documentation and using the public API
-
Monitoring the status and use of public search criteria
-
Adjusting rate limits for existing integration points
-
3. Action plan for configuration and use
Follow the action plan below to configure and use the public APIs in the registry:
- Configuration at the registry regulations level:
- Configuration at the registry’s configuration level:
4. Registry regulations modeling
-
Open the Administrative Portal and create a candidate version.
Learn more about this on the page Creating merge requests. -
Navigate to Tables > Structure description file and add a new changeset with a Search Condition.
-
Read more about the structure description file on the page Modeling the structure of registry database tables in an XML code editor.
-
Learn more about search criteria (Search Conditions) on the page Liquibase extensions for data modeling.
-
-
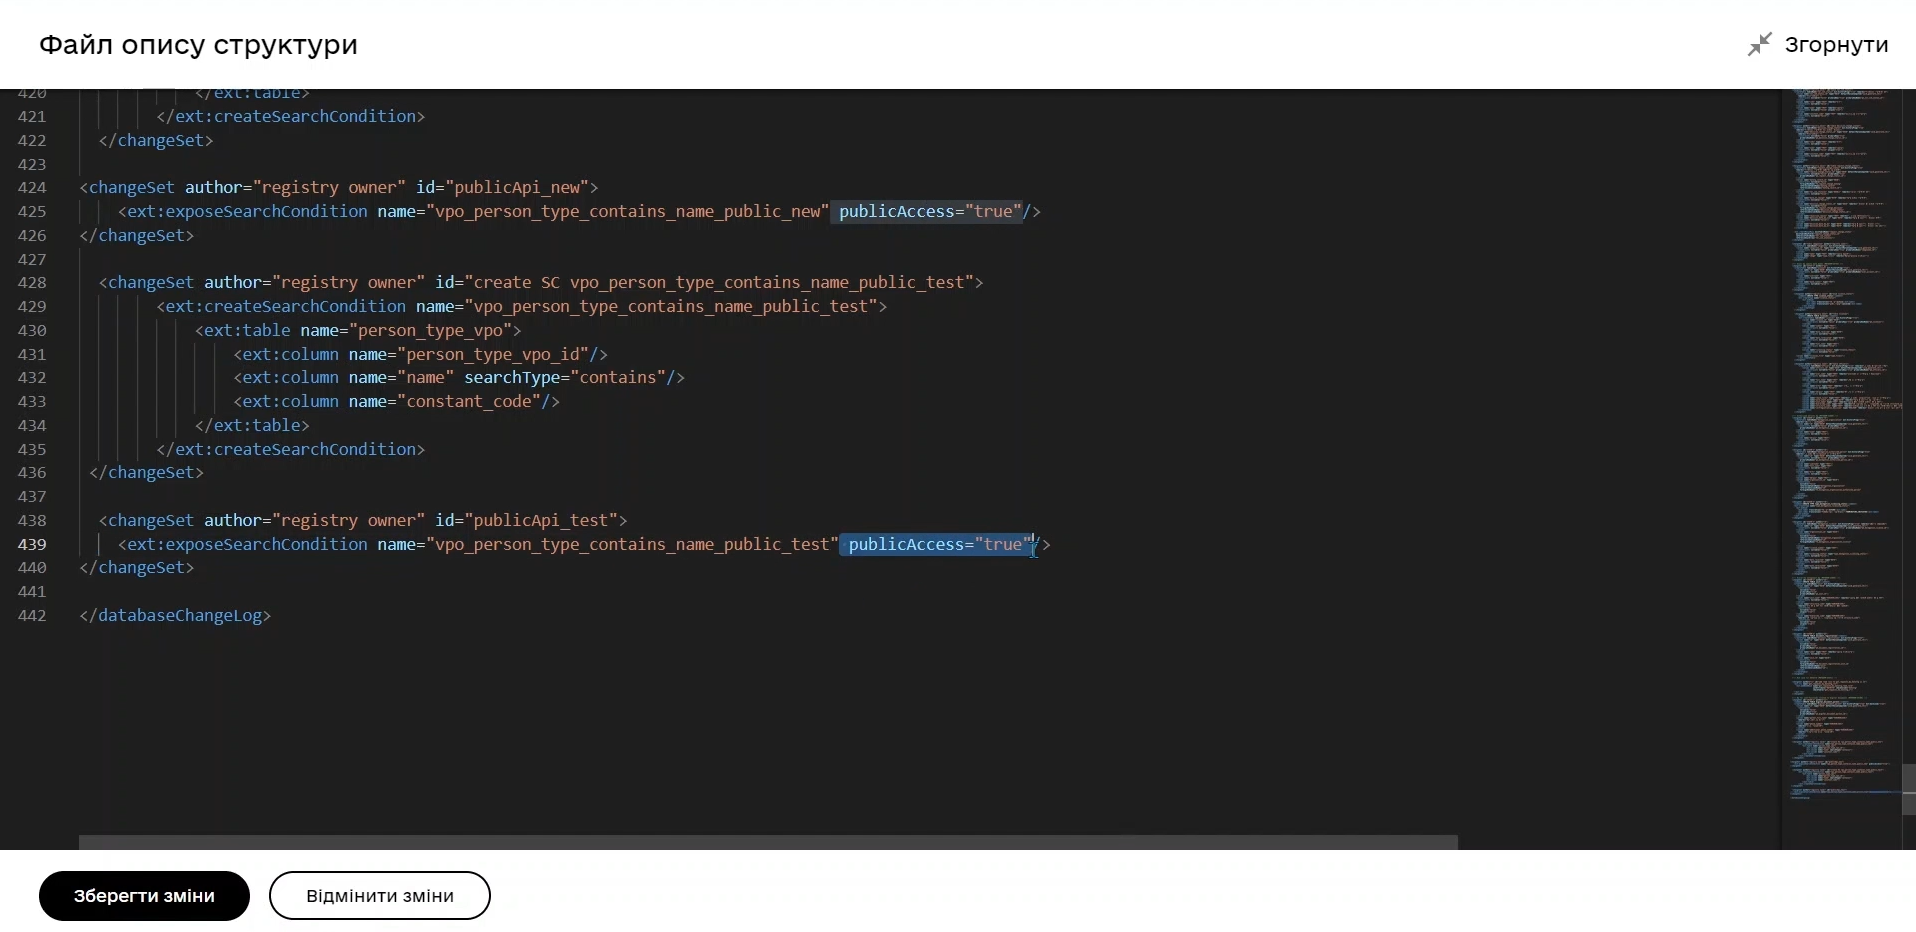
Determine which specific search criterion you want to make public. Add a new changeset with the
exposeSearchConditiontag and thepublicAccessattribute.<exposeSearchCondition publicAccess="true" name="vpo_person_type_contains_name_public_test"/>For more detailed information on exposeSearchCondition, see API access setting tag in the registry.We recommend setting up page-based pagination (type
page) to manage the display of data returned fromexposeSearchCondition(count). Also, set thelimitto the number of registry data items returned in the response.Learn more about the
limitandpaginationin the following documentation sections: -
Proceed to the next section for publishing the data model in the regulation.
5. Publishing the API in the registry regulations
Publish the data model by applying changes to the master version of the regulations. The API access point for the data will be generated based on each defined search criterion.
| Learn more about publishing changes to the regulation in the section Applying changes to the master version. |
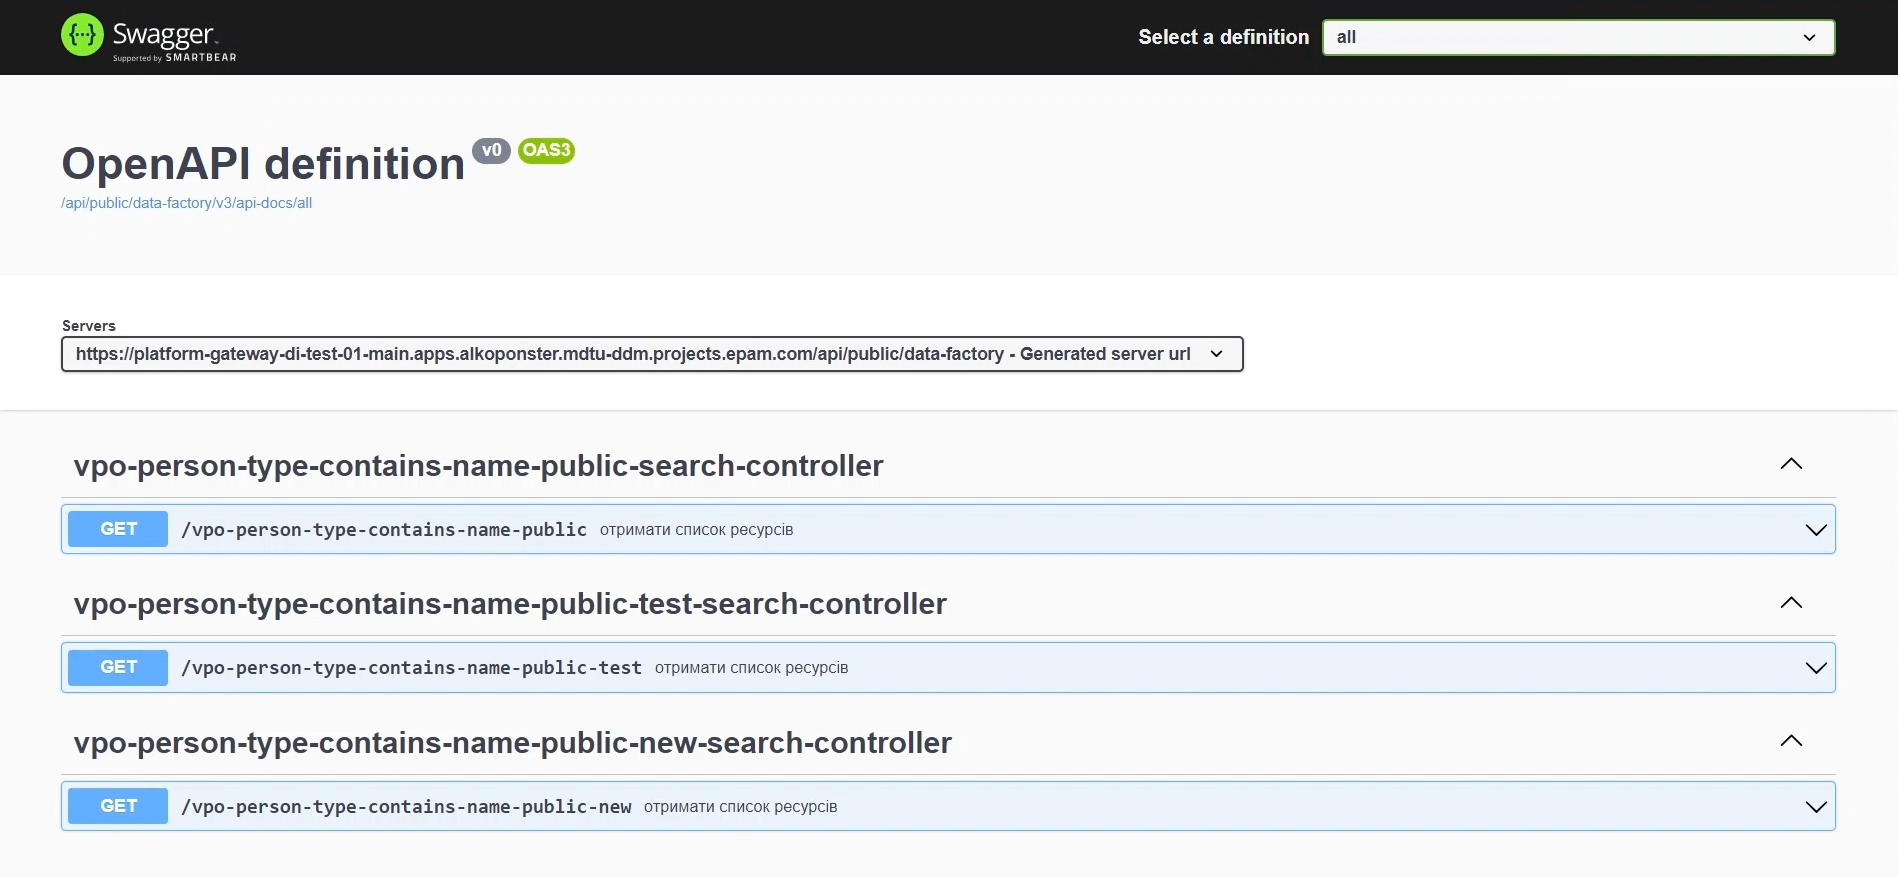
6. Viewing published APIs in Swagger
After completing all stages of publication, you can review the submitted search queries available for public access in the OpenAPI specification. To do this:
-
Navigate to the OpenShift cluster management web interface.
-
Select the project with your registry, open Networking > Routes, and follow the link to the
platform-gateway-kong-proxyservice.Be sure to add
/openapito the end of the URL; otherwise, you will be directed to a sandbox environment with pet endpoints. Your browser URL should look like this:https://example.com/api/public/data-factory/openapi
-
Open openapi and find the published public endpoints.
-
Copy the endpoint name to the clipboard and proceed to the next setup step.
|
TTL-based caching is set for links to API documentation for GET requests to reduce the load on the Kong API Gateway service. The response is cached using the You can configure the cache value at the plugin configuration level through Gerrit. The default value is 15 minutes. The cache is stored in the memory of the API Gateway. |
7. Configuring access to public data
7.1. Configuring access to public data and setting rate limits
Enable access to public data and set rate limits.
-
Log in to the Control Plane admin panel.
-
On the Registry information tab, find the Public access section.
-
Click the
Grant accessbutton. -
In the new window, fill in the fields:
-
Service request name: enter the service request name. For example,
city-lab. -
Integration point: indicate the integration point, configured by the regulation developer at the Registry regulations modeling stage and published in the API registry service. For example,
/search-laboratories-by-city. -
Set rate limits for access — the number of requests from users/systems per unit of time, for example, per hour, month, etc.
-
-
Click the
Grantbutton.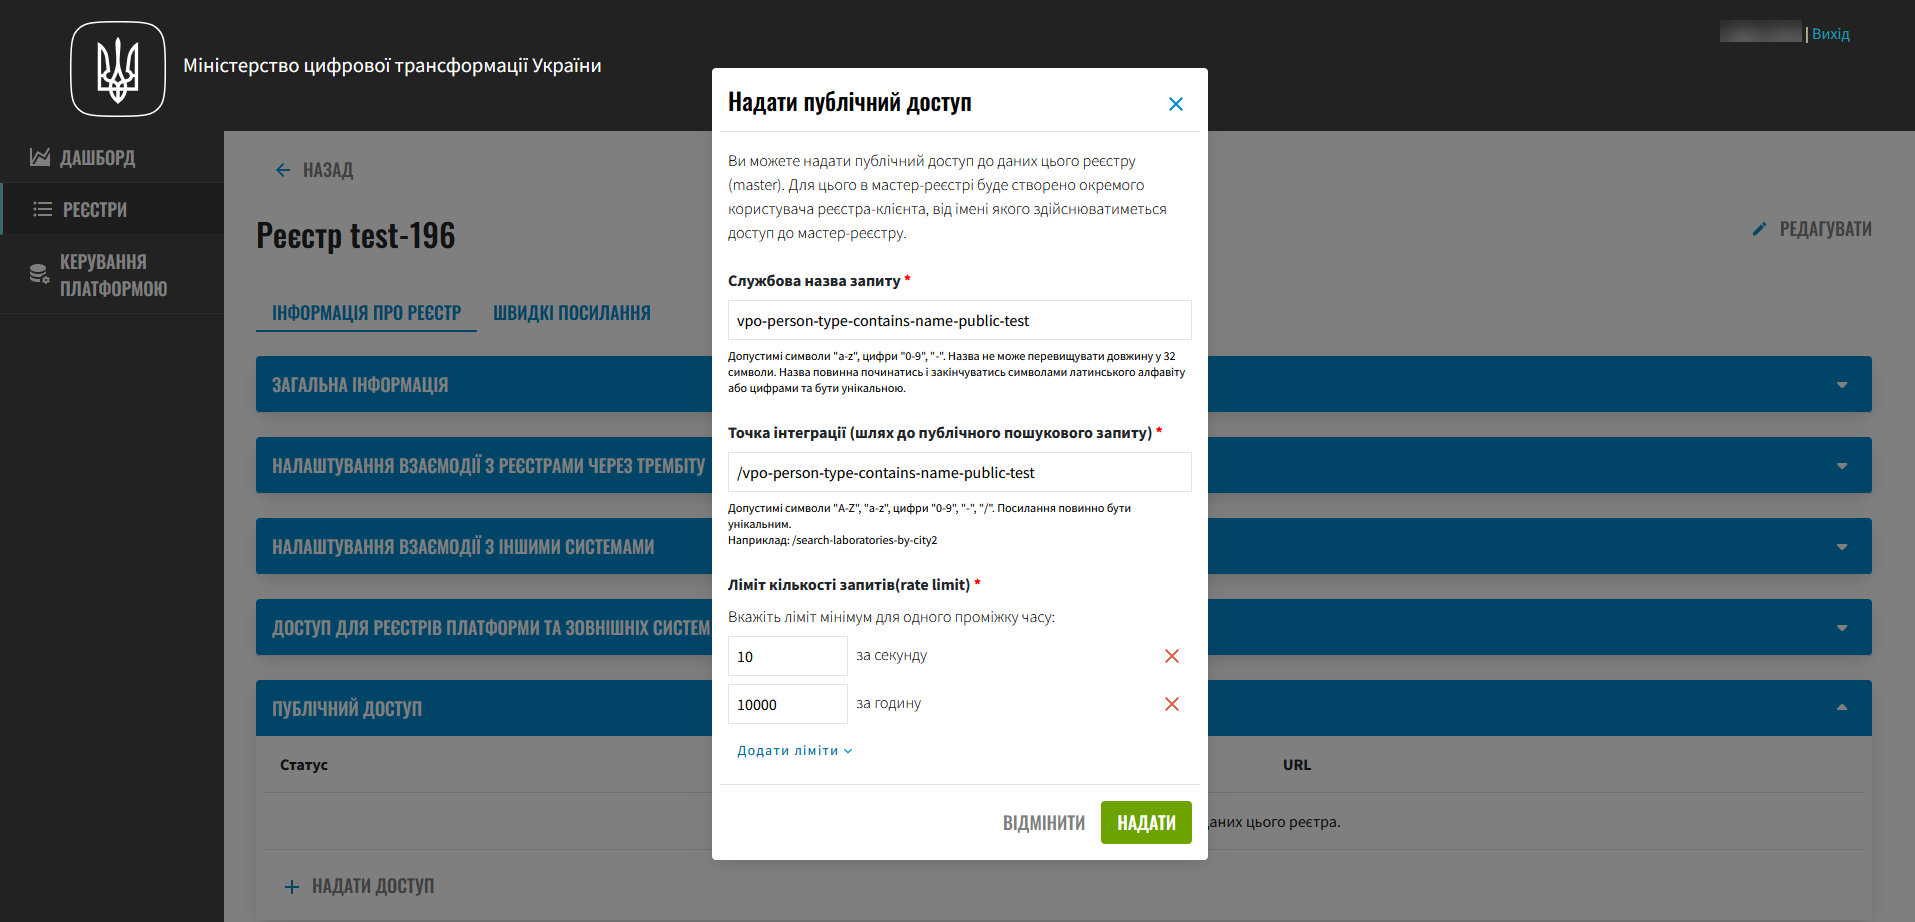
-
Go to the Update Requests section, open and confirm the new request. The proposed changes will be applied to the registry settings in the deploy-templates/values.yaml file.
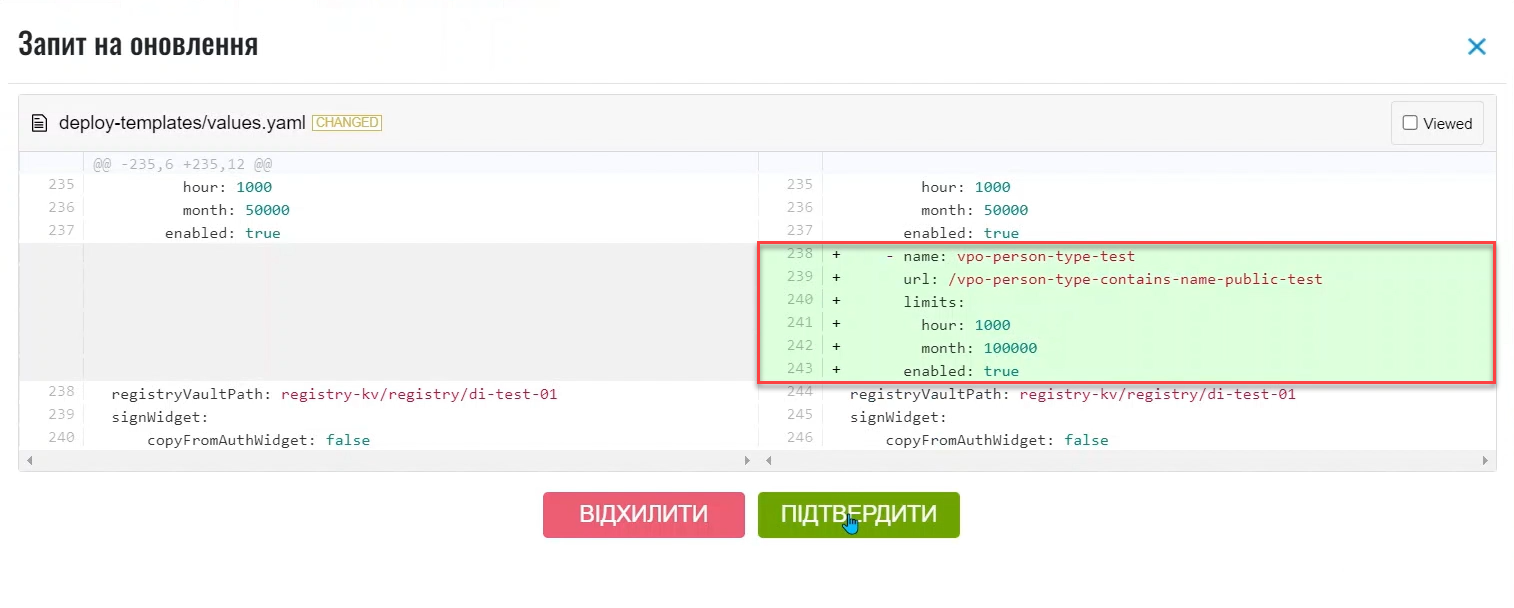
See more about confirming changes on the Approving registry configuration update requests page. After configuration, the registry setup will look like this:
publicApi:
  - name: vpo-person-type-test
    url: /vpo-person-type-contains-name-public-test
    limits:
        second: 5
        hour: 100
    enabled: true
  - ...
Once the deployment pipeline is executed, public access to the data via the specified API endpoint will be available.
7.2. Checking the operation of public access
-
Open the browser in Incognito mode and paste the link to the added search query copied in the Viewing published APIs in Swagger section.

-
An unauthenticated user/system will receive data in JSON format.

When the limit is reached, an API Gateway response is generated with code 429 and a body:
{ "message": "API rate limit exceeded" }
7.3. Access management
-
Edit integration points and rate limits: ::
-
Click on the edit icon 🖉 next to the relevant request.
-
Make the necessary changes and confirm them.
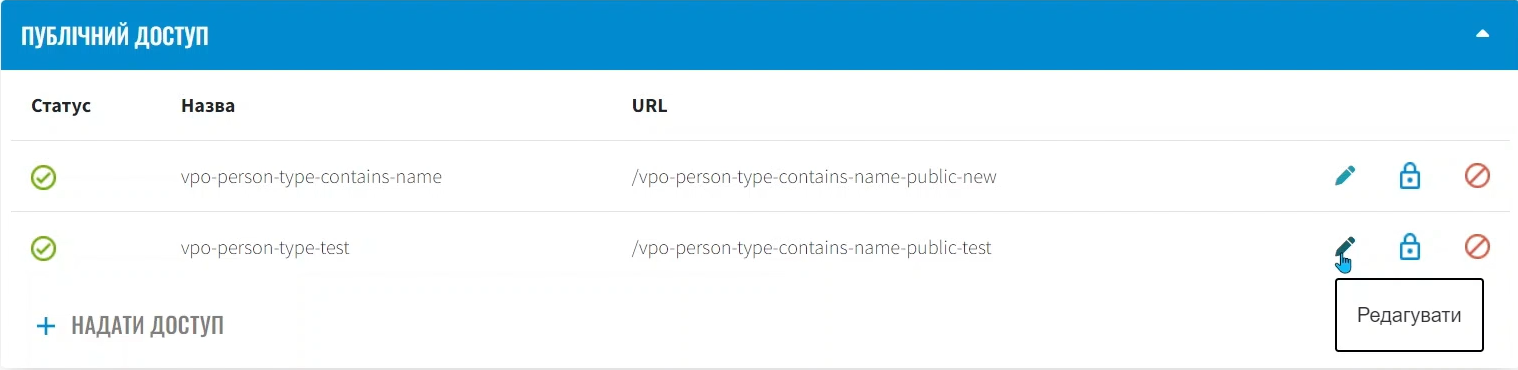
-
-
Block access by clicking the block icon 🔒. Technically, this will mean suspending access to a particular API endpoint.
Access can be restored by clicking on unblock (double click on the blocked item 🔒). 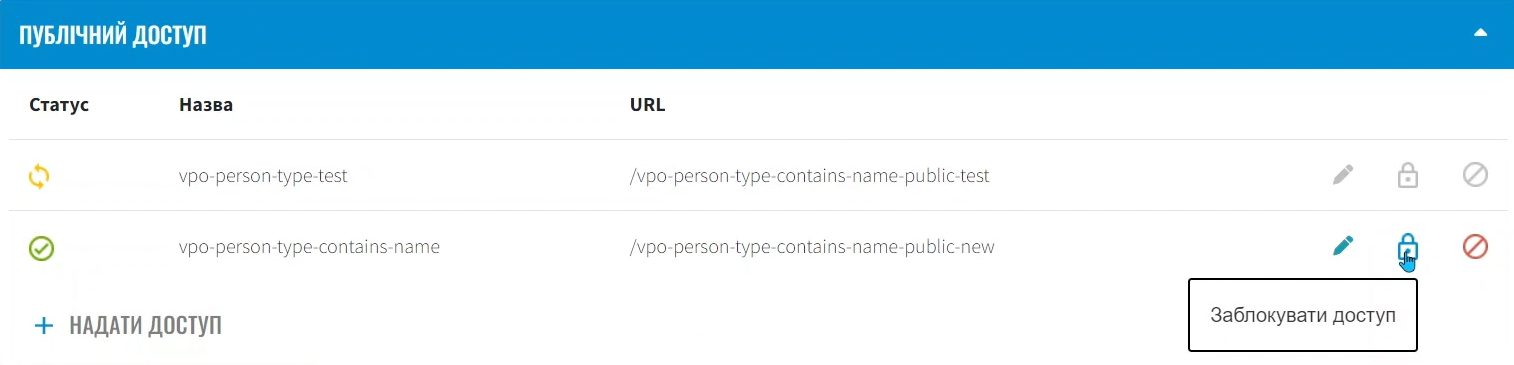
-
Revoke access entirely by clicking on the delete icon 🚫.
After each action, check and confirm the application of changes in the Update Requests section.
| If you delete existing integration points or temporarily disable them, the user will receive an HTTP 404 error message when trying to access them. |
|
Changing the status icons following the public API in the Public access section means that the created update request has been applied to the |
8. Grafana metrics monitoring
The Platform has a Grafana dashboard designed for monitoring performance metrics and the number of requests to public integration points from unauthenticated users and third-party systems.
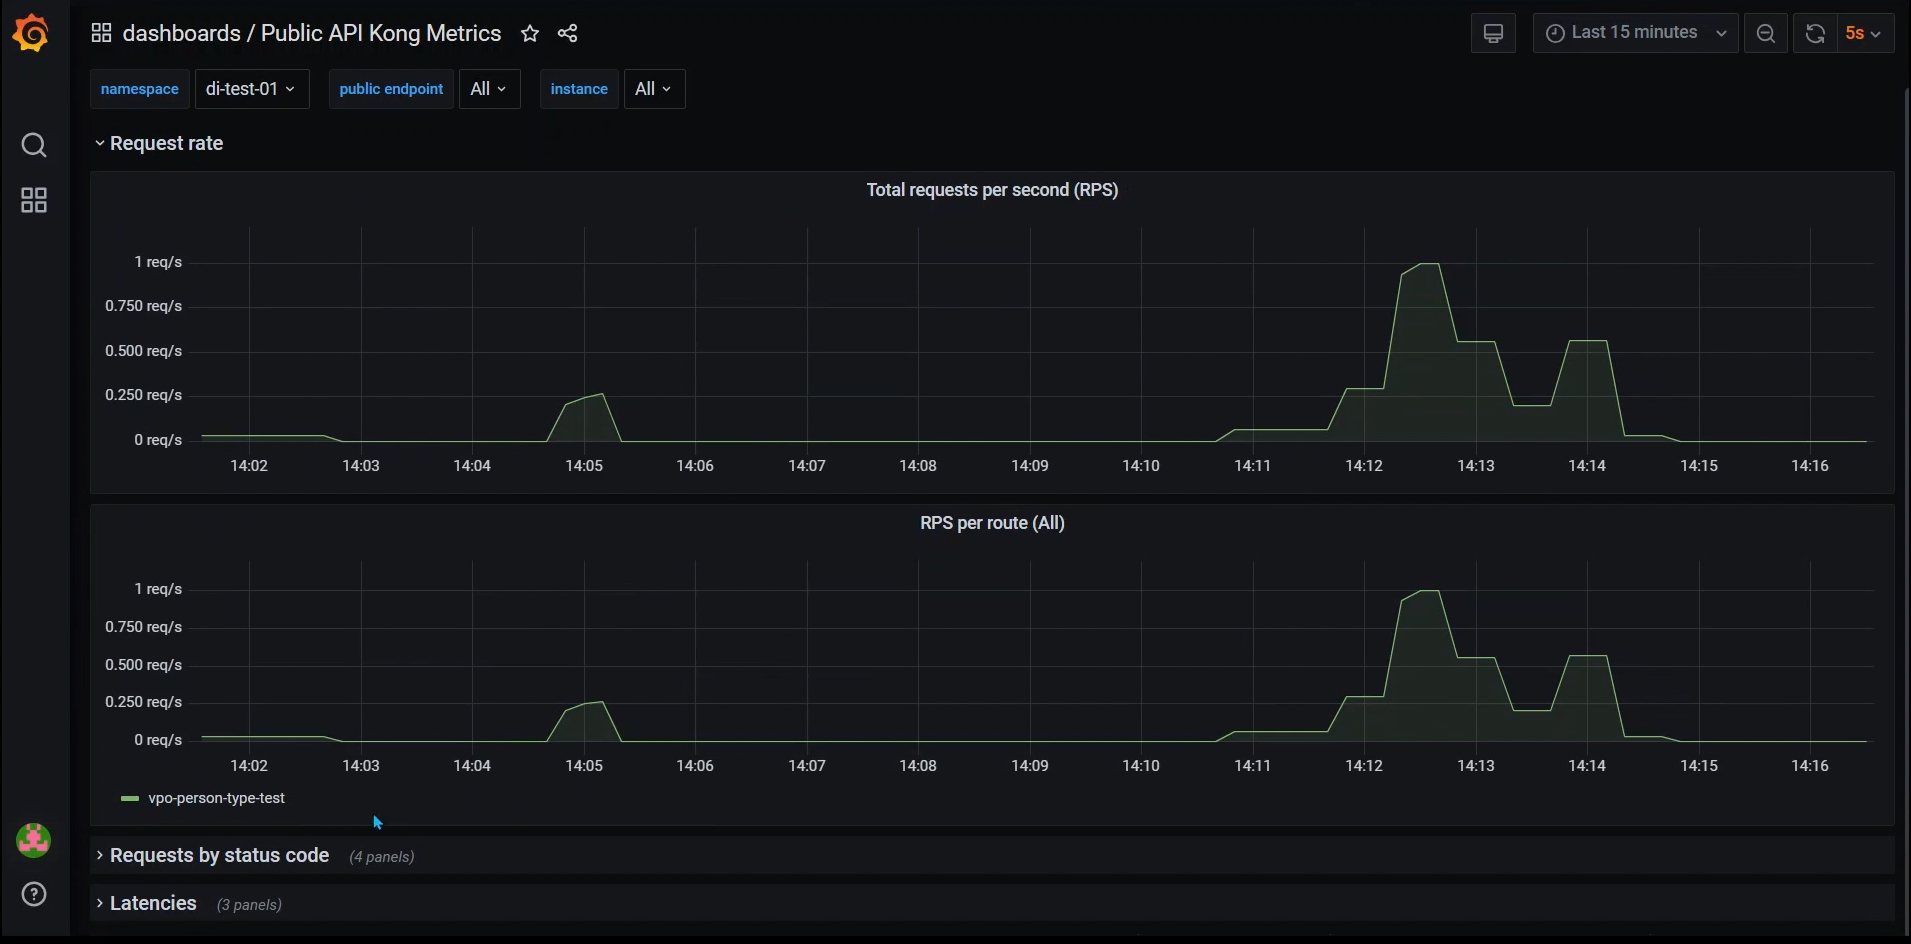
The technical registry administrator can use the data from the dashboard to track dynamics and the status of metrics. This data can help determine the need for optimization settings, such as adjusting request limits.
| For detailed monitoring information, you can review the page Monitoring metrics of public API. |
9. Creating a service account for executing public requests
Although formally the integration points are public, to maintain consistency in audit and logging within the Platform, such requests will be made on behalf of a service user from the Keycloak realm external-system. The system will automatically create a service user public-user for authorization at the platform-gateway level.
Ensure that such a system user is created in the appropriate realm of the Keycloak service. To do this:
-
Open the Keycloak authentication and authorization service.
-
Find the
-external-systemrealm for your registry. -
Open the Clients menu >
public-user.