Configuring custom DNS for Keycloak
| 🌐 This document is available in both English and Ukrainian. Use the language toggle in the top right corner to switch between versions. |
1. Introduction
Platform administrators can configure custom DNS names for the Keycloak user and role management service using the Control Plane admin console.
- Why you should use this feature:
-
-
Custom DNS names enable you to create convenient and easy-to-remember URLs for users to sign in to the user portals.
-
This setup ensures proper certificate validation and authentication via Keycloak for correct service-to-service interactions on private networks.
-
This provides administrators with a simple and efficient way to manage Keycloak settings, making it easier to work with the system.
- Functional scenarios:
-
-
Configuring DNS names for Keycloak via the admin console at the Platform level.
-
Setting a DNS name for the user portal sign-in pages via the admin console at the registry level.
-
Removing DNS names added to Keycloak.
-
- General principles and provisions:
-
-
The Platform administrator configures available DNS names for Keycloak.
-
The Platform administrator uploads the SSL certificate file in the .pem format for the domain along with the DNS name.
-
The registry administrator configures DNS names for the registry user portals.
-
The registry administrator selects a domain for Keycloak from a list.
-
The list of domains available in the system comes from the Platform’s Keycloak DNS names.
-
Individual SSL certificates in the .pem format can be downloaded for each user portal in portal settings.
-
The Platform administrator ensures certificate rotation for Keycloak and user portals.
-
The system allows editing previously installed SSL certificates and DNS names.
-
The admin console checks whether the provided SSL certificate matches the domain, is not self-signed, and has not expired.
-
For security reasons, access to the HashiCorp Vault to read certificates works ONLY through a separate service (system) account.
-
If the registry is deployed without user portals (officer portal or citizen portal), the corresponding UI elements for configuring DNS names are hidden.
-
The URL for Keycloak and user portals is limited to 63 characters and must be validated by the system.
-
2. Configuring DNS names for the Platform’s Keycloak component
To configure custom DNS names and upload SSL certificates for Keycloak, follow these steps:
-
Sign in to the Control Plane admin console.
-
Go to Platform management and open the Keycloak DNS section.
This section displays the system’s default DNS value that cannot be edited.
For additional DNS names, configure your DNS records on your DNS provider side. For details, jump to Additional configuration outside the OpenShift cluster and registry. 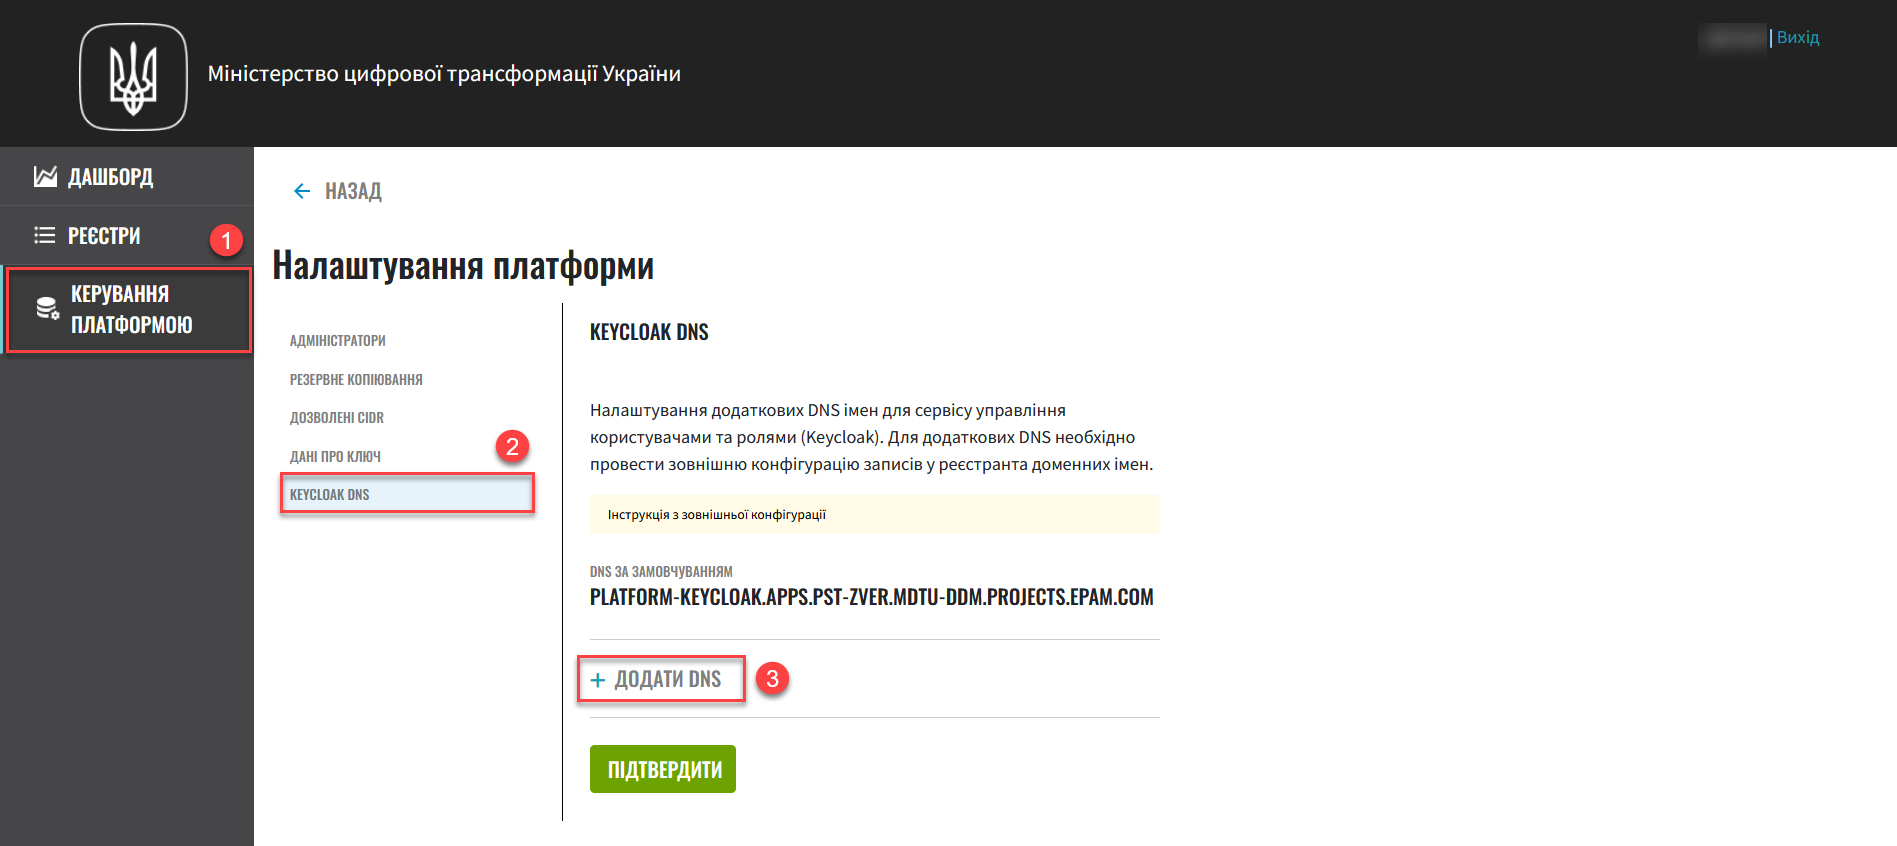
-
Click the Add DNS button.
-
In the Add DNS window, enter the domain name for Keycloak into the Keycloak domain name field and upload Keycloak certificate using the Upload SSL certificate button.
The admin console gets the default DNS configuration from the Keycloak CR (Custom Resource) specification in the user-managementcomponent. -
In the Add DNS window, click the Confirm button to save your settings and start the validation checks.
To close the window without saving your changes, click Cancel. 
The Keycloak DNS page lists all the DNS records you added.
-
To edit additional DNS records, click the pencil icon next to one of the additional DNS records. Change the domain name and certificate in the editing window.
Cancel and Confirm buttons work the same as when adding a new DNS record. The same validation happens when you save the settings. -
You can remove an additional DNS record if it is not used by any of the registries. To delete a DNS record, click the recycle bin icon next to it and confirm your action in a window that opens.
If an additional DNS name is used by any registry, you need to first change this domain in the corresponding registry settings to something else. -
When you are finished working with additional DNS, click Confirm to save your changes. The changes are saved once the system validates them.
As a result, the system generates a registry configuration update request. You can view request details in the Platform management > Update requests section.
-
Confirm the changes and wait until the MASTER-Build-cluster-mgmt Jenkins process completes and applies the new configuration.
3. Configuring DNS names for the registry’s Keycloak component
DNS names configured as described in Configuring DNS names for the Platform’s Keycloak component can be used when creating or editing a registry.
-
Sign in to the Control Plane admin console.
-
Open the
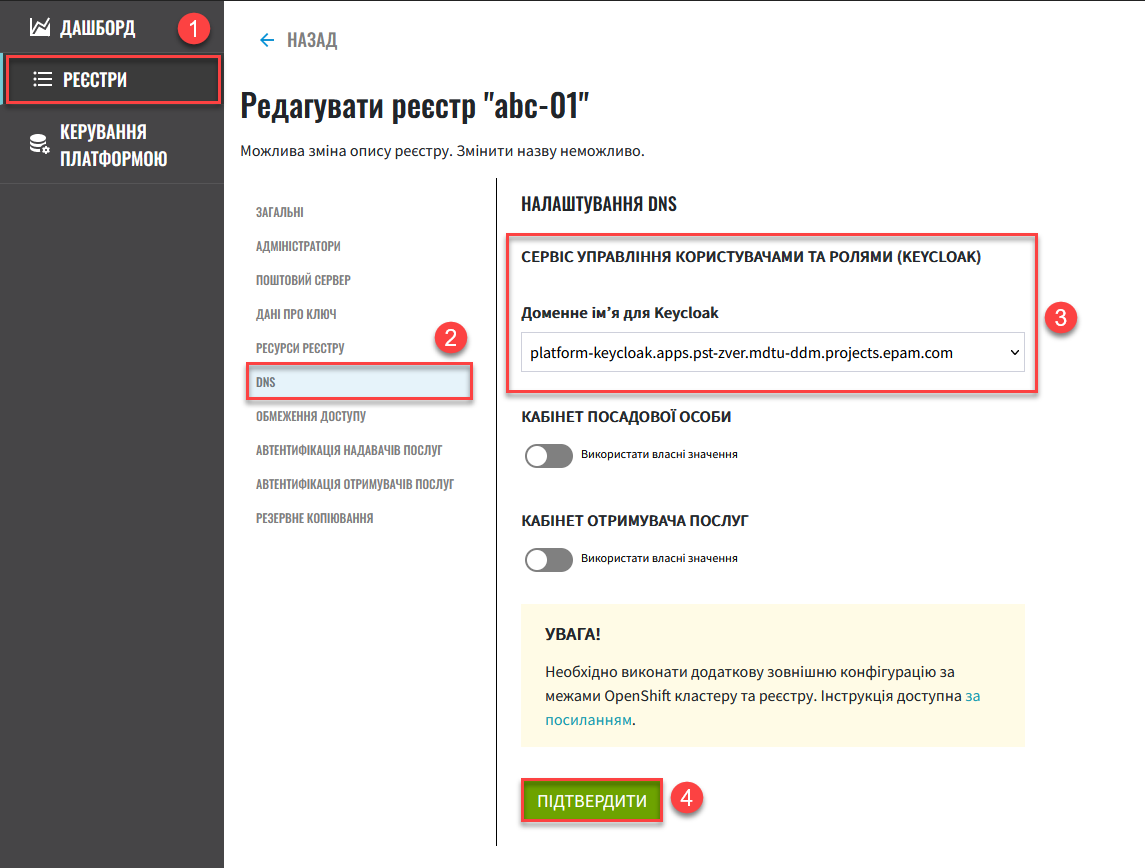
Registriessection and select the registry you wish to edit. -
On the registry information page, click the
Editbutton in the upper-right corner. -
On the registry edit page, open the DNS section.
-
Under User and role management service (Keycloak), select the DNS name from the Keycloak domain name list.
-
Click Confirm to save your changes. The changes are saved once the system validates them.
As a result, the system generates a registry configuration update request. You can view request details in the Registries > Update requests section.
-
Confirm the changes and wait until the MASTER-Build-<registry-name> Jenkins process completes and applies the new configuration.
4. Additional configuration outside the OpenShift cluster and registry
Perform additional configuration outside the OpenShift cluster and registry.
-
Create a
CNAMErecord with your DNS provider.This record should point to the Load Balancer bound to the OpenShift router (HAProxy). An OpenShift router domain is different for each cluster.
CNAMErecords must always point to another domain name, not an IP address.A
CNAME(Canonical Name) record is a type of DNS record that maps a domain name (alias) to a true or canonical domain name.Here is an example of a
CNAMErecord:www.example.net. CNAME www.example.com.
You can view the current CNAME records using the Google Public DNS service.
A
CNAMErecord cannot be set for apex domains (such as example.com); a subdomain must be specified (such as www.example.com). -
Please contact the technical administrator’s support service of the Platform instance through your channel and submit a request to add a new address to the test eu.iit.com.ua widget.
This functionality is specific to the Ukrainian implementation and may not apply or function as described in other contexts or regions. Please consult the local guidelines or documentation if you are implementing this outside Ukraine. The Keycloak’s new DNS name becomes available after the external configuration takes effect.
Typically, DNS names are updated within one hour, although a global update can take up to 48 hours but in exceptional cases can last up to 72 hours.
5. Applying configuration changes
When you confirm the changes in the admin console, the following happens at the Platform and registry levels.
- Platform settings:
-
-
The SSL certificates you uploaded for custom Keycloak domains are saved to the HashiCorp Vault secrets and encryption management subsystem.
-
Domain records and SSL certificate paths are added to the deploy-templates/values.yaml file of the
cluster-mgmtcomponent. For example:keycloak: customHosts: - host: keycloak.example.com certificatePath: registry-kv/.... - host: keycloak-login.instance.com certificatePath: registry-kv/....
-
- Registry settings:
-
-
The SSL certificates you uploaded for custom user portal domains are saved to HashiCorp Vault.
-
Domain records and SSL certificate paths are added to the deploy-templates/values.yaml file in the corresponding registry repository. For example:
portals:
  officer:
    customHost:
       enabled: true
       host: officer.example.com
       certificatePath: registry-kv/....
-
SSL certificate storage convention
HashiCorp Vault’s SSL certificate storage convention defines the paths for Platform and registry certificates.
Platform certificates are saved to:
registry-kv/cluster/domains/<domain-name>

key:caCertificate value:<caValue>
key:certificate value:<certificateValue>
key:key value:<keyValue>
Registry certificates are saved to:
registry-kv/registry/<registry-name>/domains/<portal-name>/<domain-name>

key:caCertificate value:<caValue>
key:certificate value:<certificateValue>
key:key value:<keyValue>