Connect to data factory
| 🌐 This document is available in both English and Ukrainian. Use the language toggle in the top right corner to switch between versions. |
| Name | Description |
|---|---|
The business name of the integration extension |
Connect to data factory |
The internal name of the integration extension |
|
The file name in the extension library |
dataFactoryConnectorDelegate.json |
1. General overview
The Connect to data factory extension — is a general delegate for integrating business processes with the Data Factory, which is configured using the developed template of the same name Connect to data factory (dataFactoryConnectorDelegate.json).
Using this delegate, you can send any request to any API endpoint to obtain any data. That is, you can use any integration point (endpoint) developed at the Data Factory level, which is reflected in the REST API Registry, i.e. in the Swagger UI, to send a request.
| This general delegate is capable of replacing all other delegates with specific purposes. |
- The delegate supports interaction with HTTP methods, namely:
-
POST— to create an entity/resource. Corresponds to theCREATEdatabase operation. -
GET— to search for or read data. Corresponds to theREADdatabase operation. -
PUT— to update an entity. Corresponds to theUPDATEdatabase operation. -
DELETE— to delete an entity. Corresponds to theDELETEdatabase operation. -
PATCH— to partially update (modify) an entity. Corresponds to theUPDATEdatabase operation..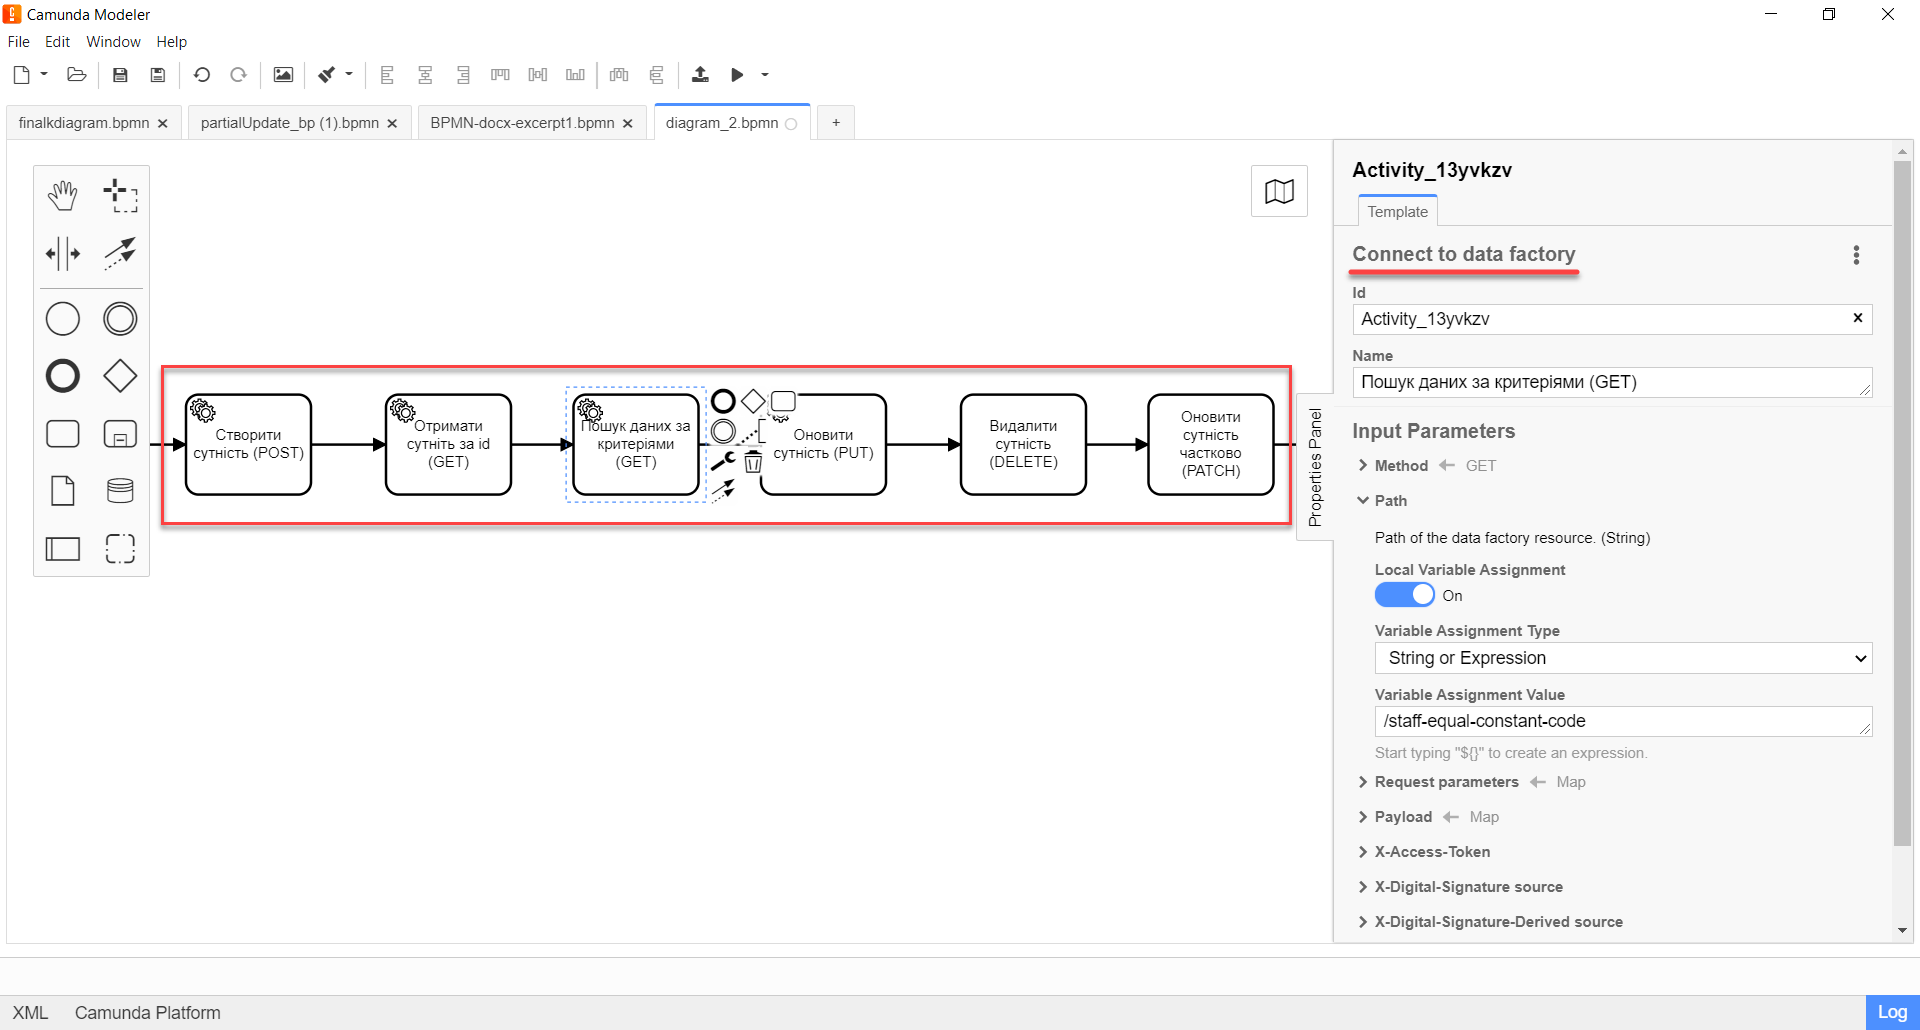
| Before configuring the template in Camunda Modeler, make sure that the dataFactoryConnectorDelegate.json file is in the resources → element-templates folder of the application. |
This instruction considers cases of delegate interaction with different types of endpoints using the example of the ownership entity.
|
2. Configuration of interaction with the POST endpoint
The POST HTTP method is used to create an entity/resource in the registry database.
To configure the delegate template in Camunda Modeler, follow these steps:
-
To create Service Task.
-
On the configuration panel to the right, click on the
Open Catalogbutton, select the appropriate Connect to data factory template from the list, and clickApplyto confirm.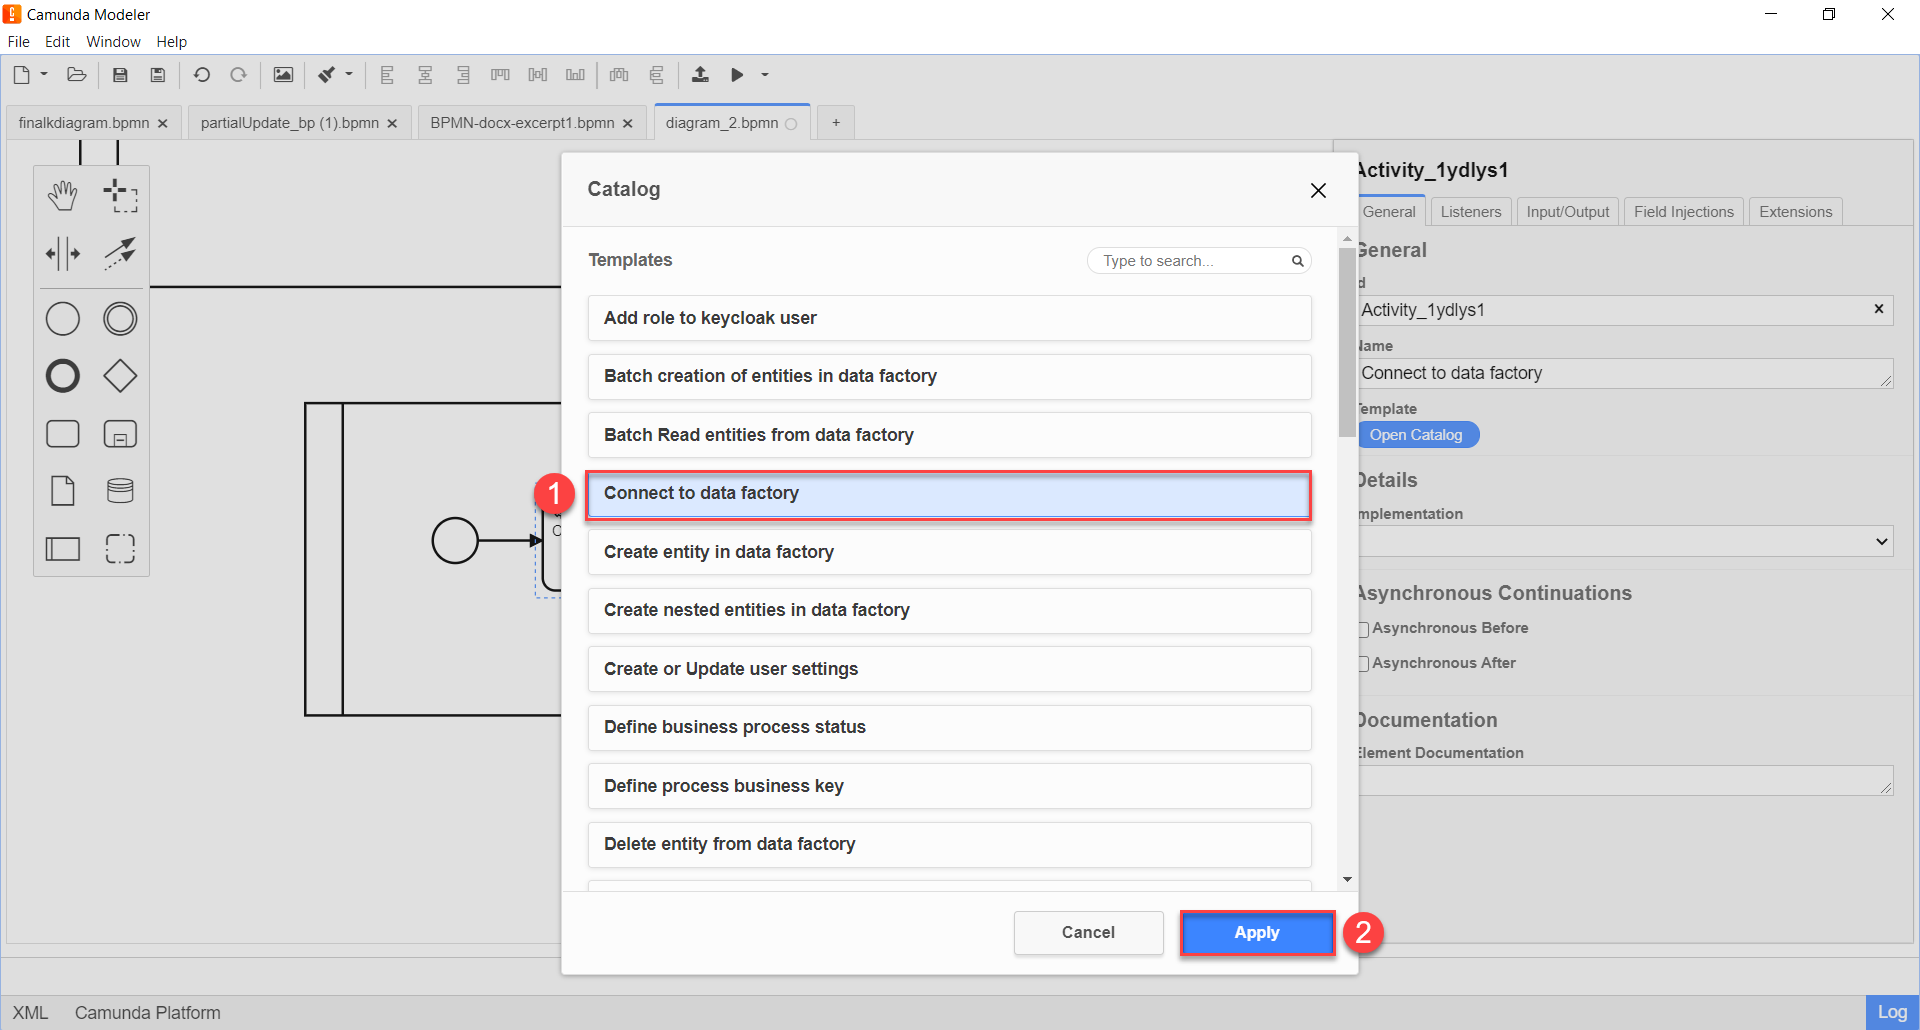
-
Configure the selected template as follows:
-
In the
Namefield, specify the name of the task. For example,Create entity (POST). -
* Expand the Method block in the Custom Fields section and select the HTTP method
POSTto interact with the Data Factory from the dropdown list.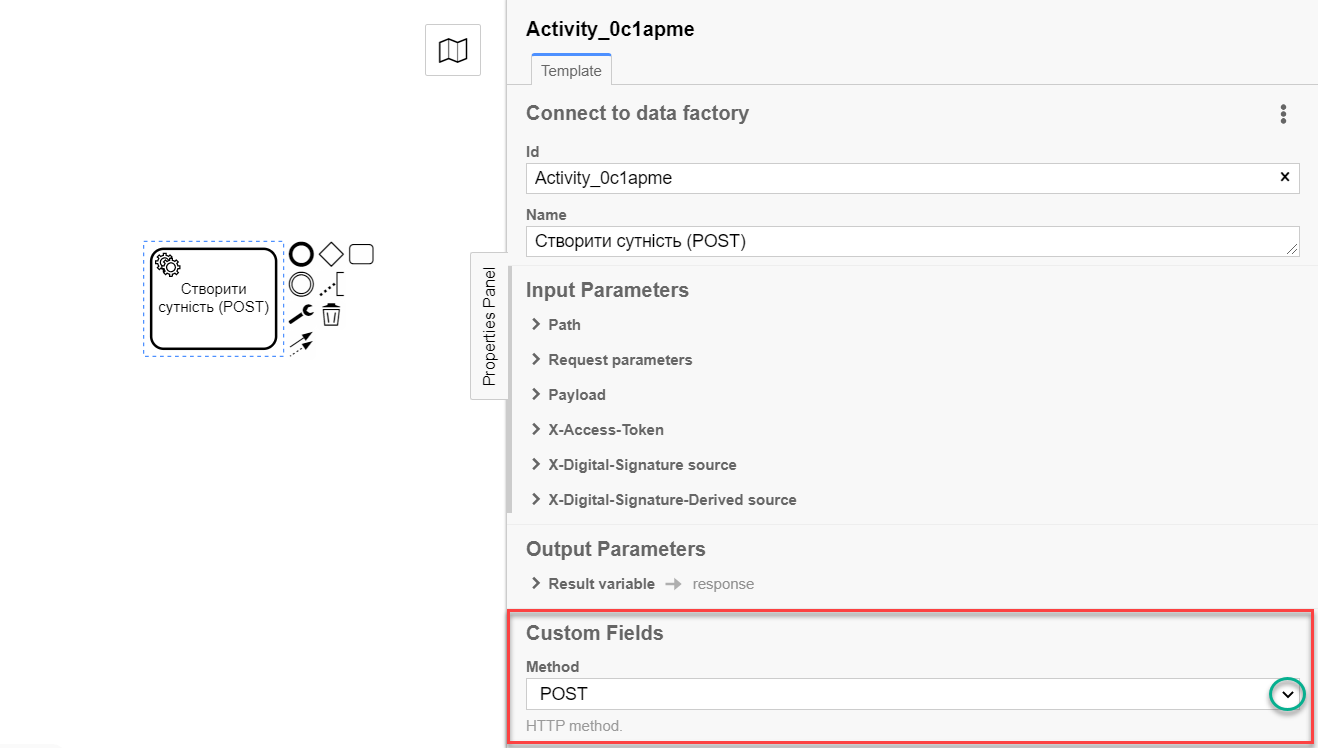
-
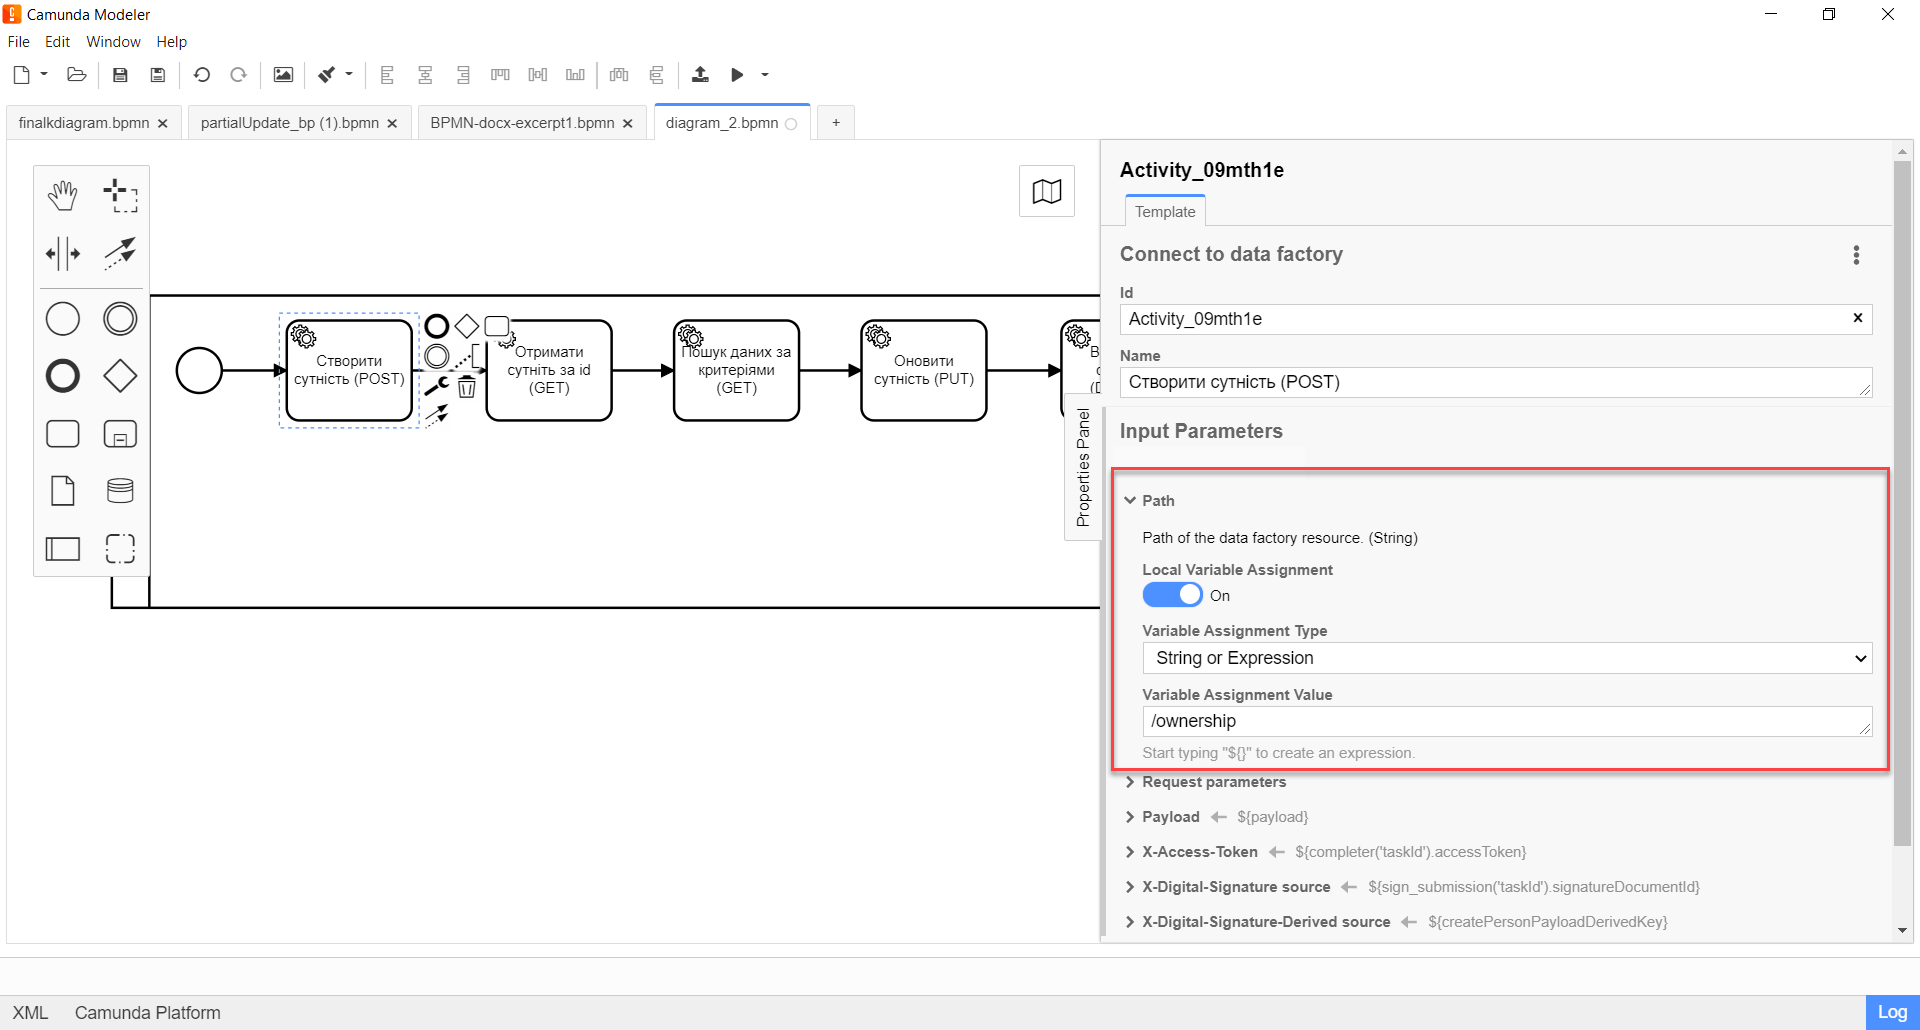
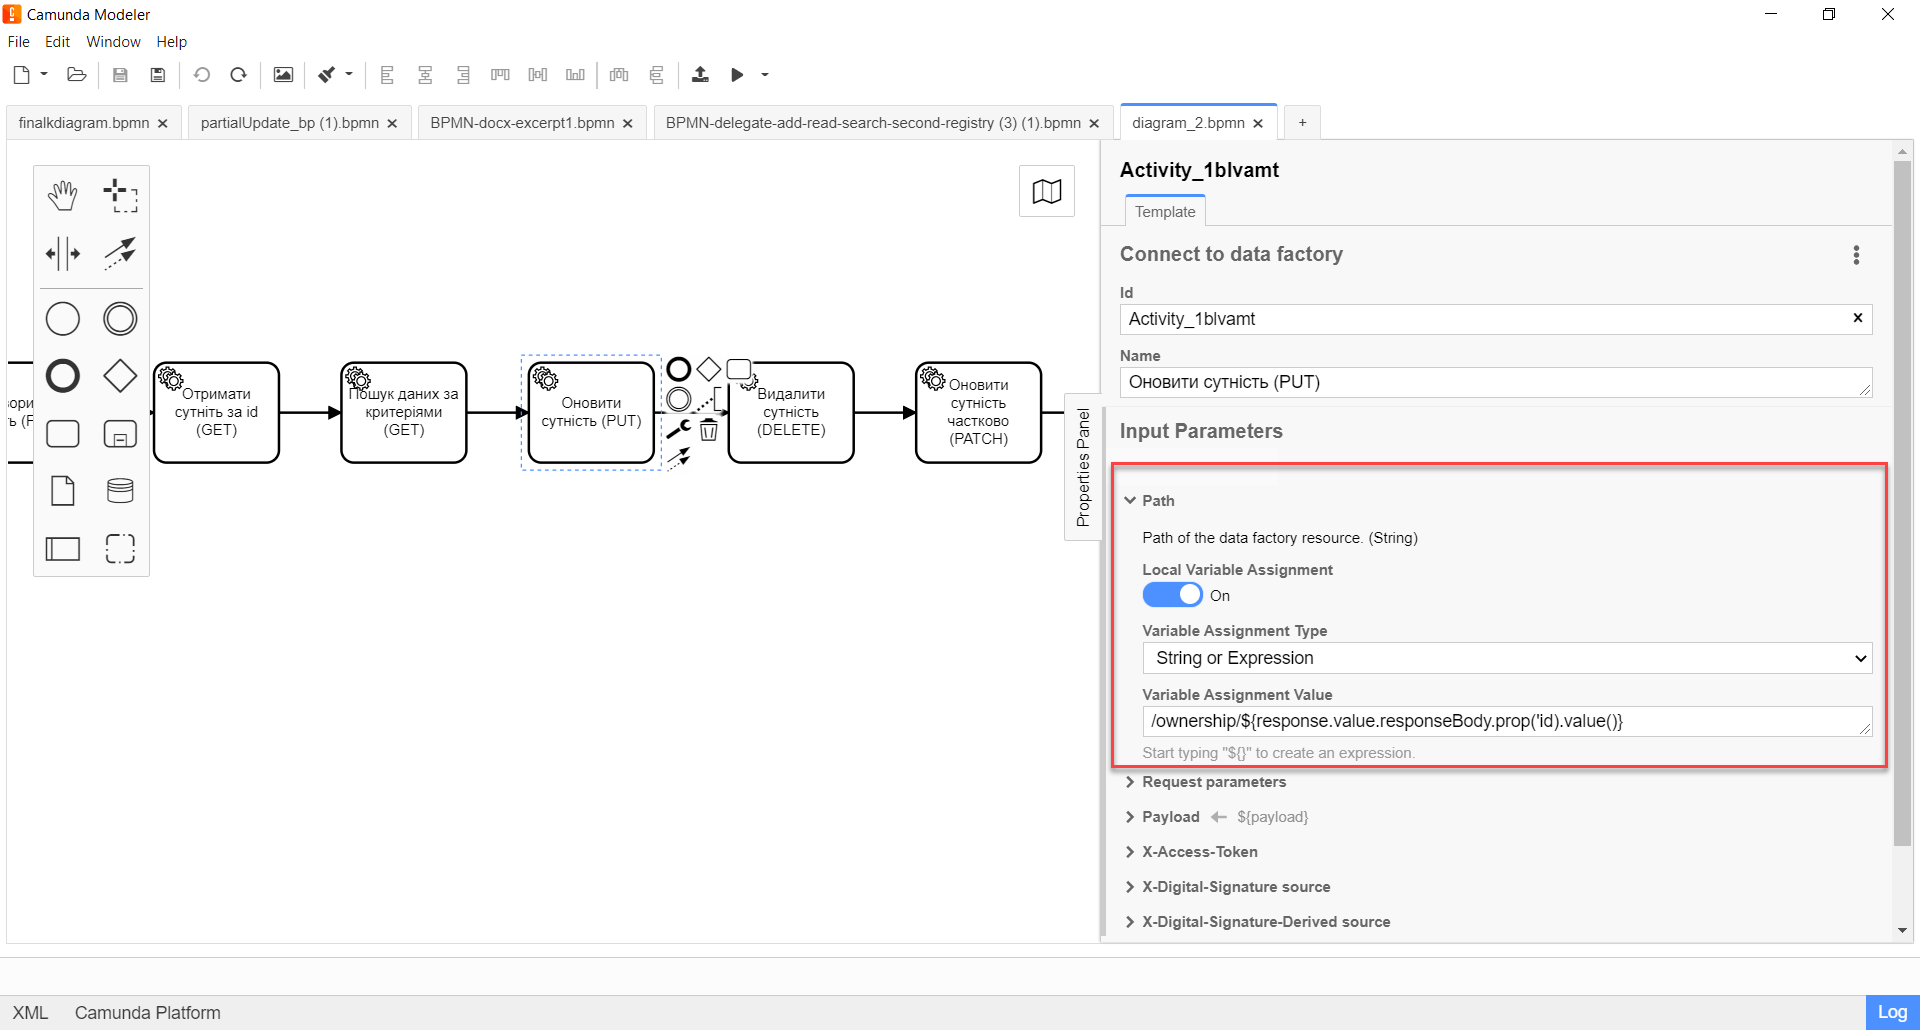
Expand the Path block and specify the path to the resource in the Data Factory, i.e. the name of the endpoint to which you need to send the request:
-
Enable the
Local Variable Assignment→ONoption. This will allow creating a local variable for the endpoint. -
In the
Variable Assignment Typefield, select the variable assignment type from the dropdown list —String or Expression. -
In the
Variable Assignment Valuefield, specify the endpoint —/ownership.The endpoint name must be specified with a forward slash ( /) as a prefix.
-
-
The
POSTmethod does not require additional request parameters, except for the request body, so leave the Request Parameters block blank.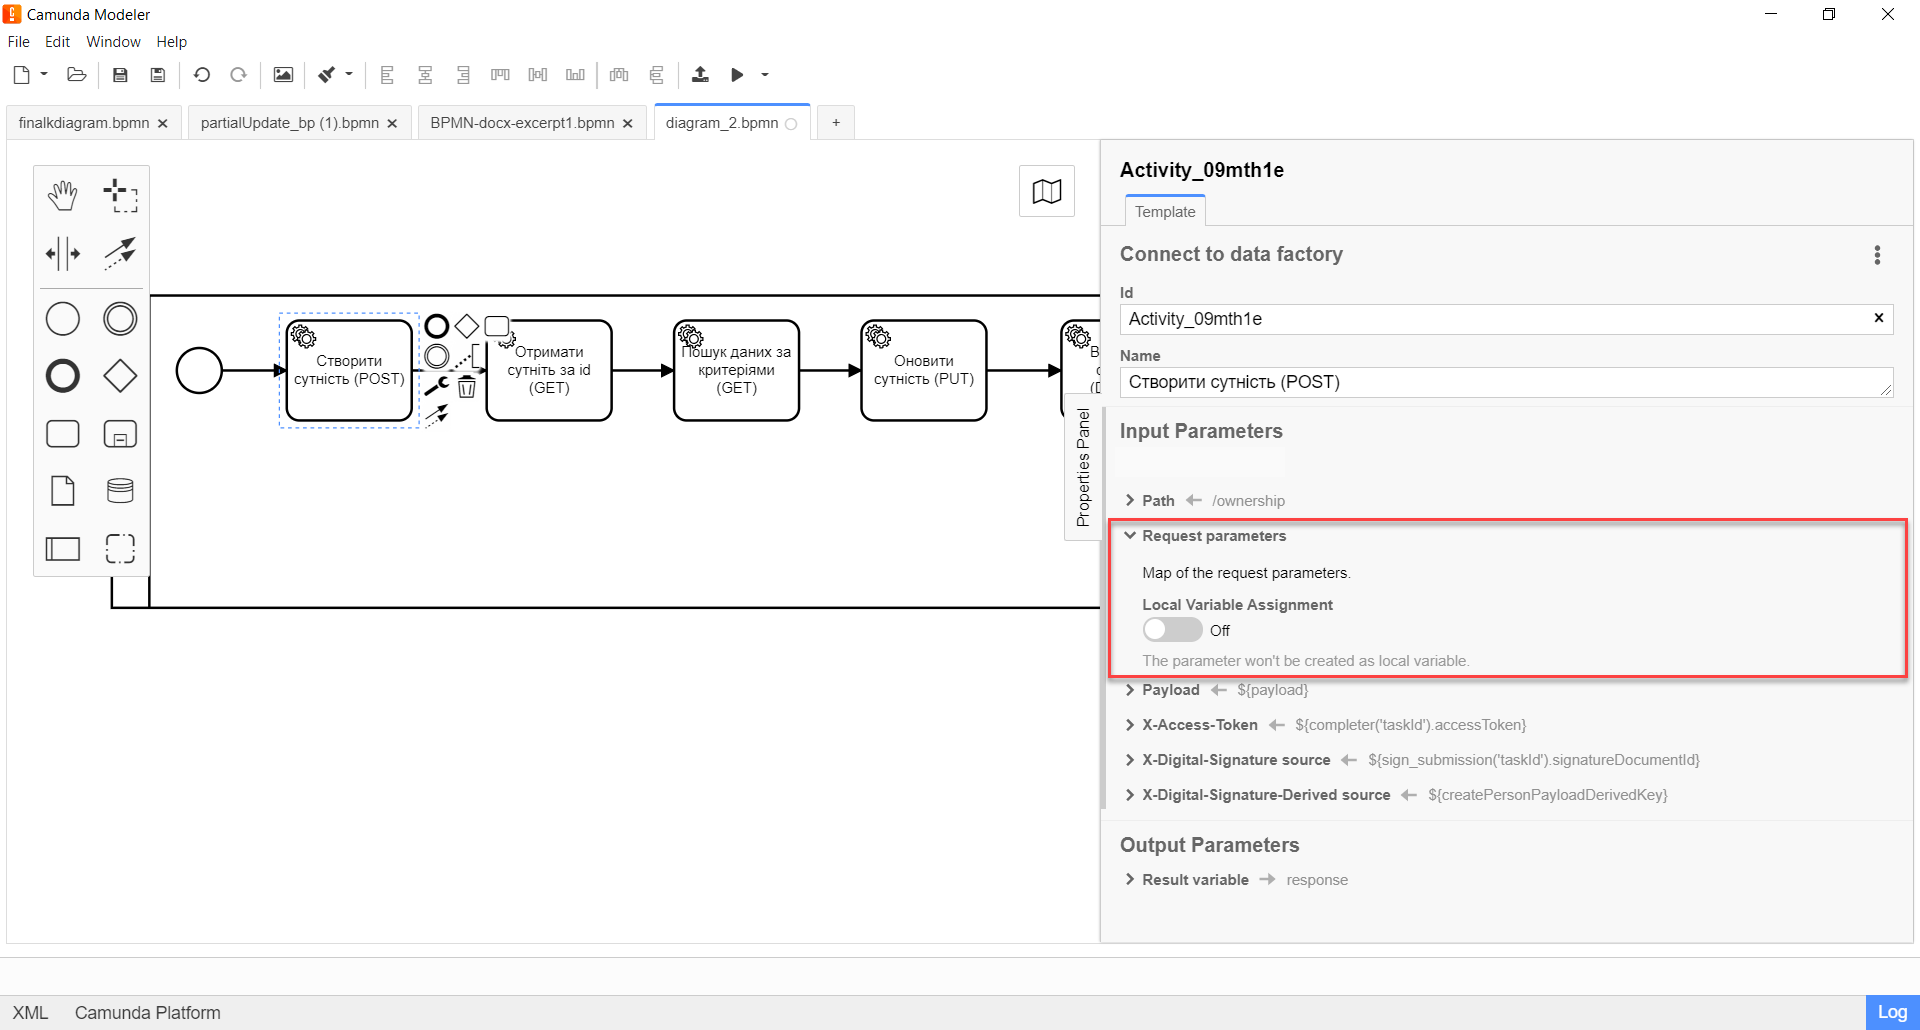
-
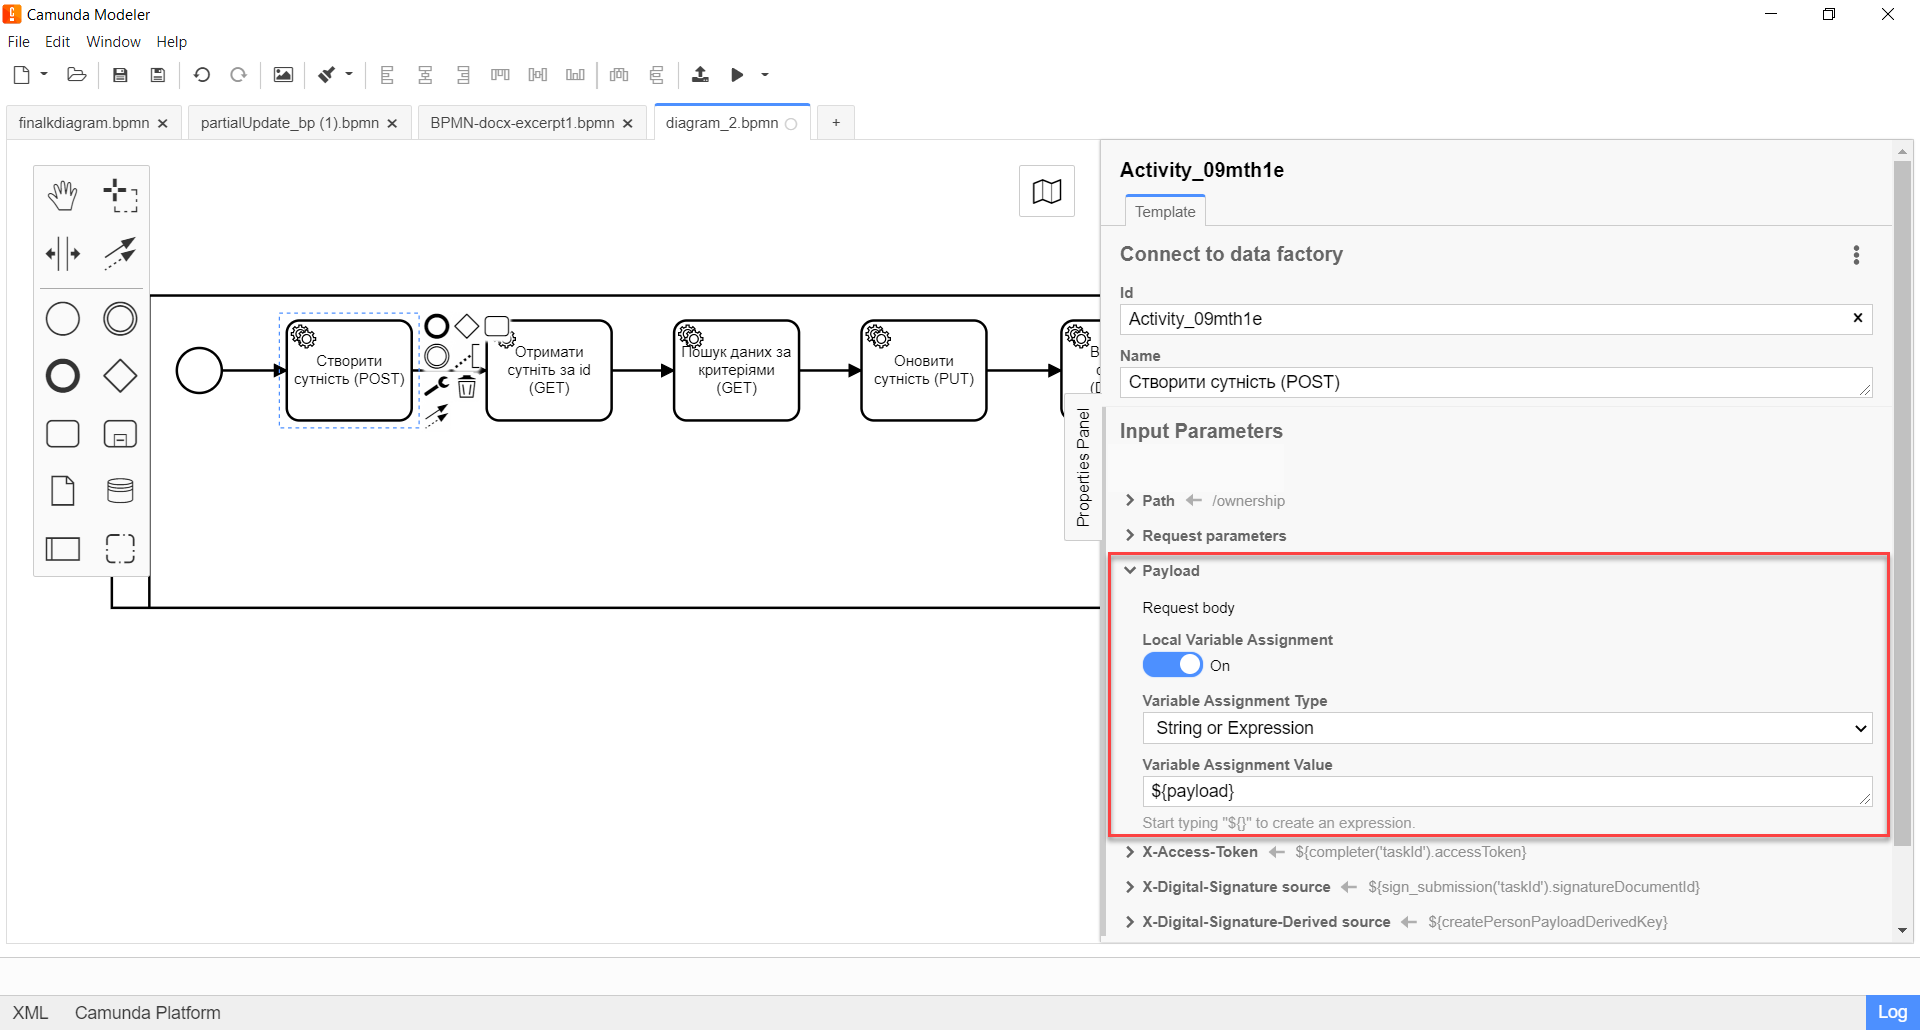
Expand the Payload block and specify the input parameters, that is, the request body:
-
Enable the
Local Variable Assignment→ONoption. This will allow creating a local variable for the request body. -
In the
Variable Assignment Typefield, select the variable assignment type from the dropdown list —String or Expression. -
In the
Variable Assignment Valuefield, enter the request body — a JSON structure with parameters that need to be written to the database. For example,${payload}.In our example, we pass the
${payload}variable, which saved the data in one of the previous tasks of the business process.Example 1. Schema of the request body according to the REST API Registry{ "ownershipId": "b45b90c0-c53d-4fd3-aa82-02e8e7392345", "code": "string", "name": "string" }
-
-
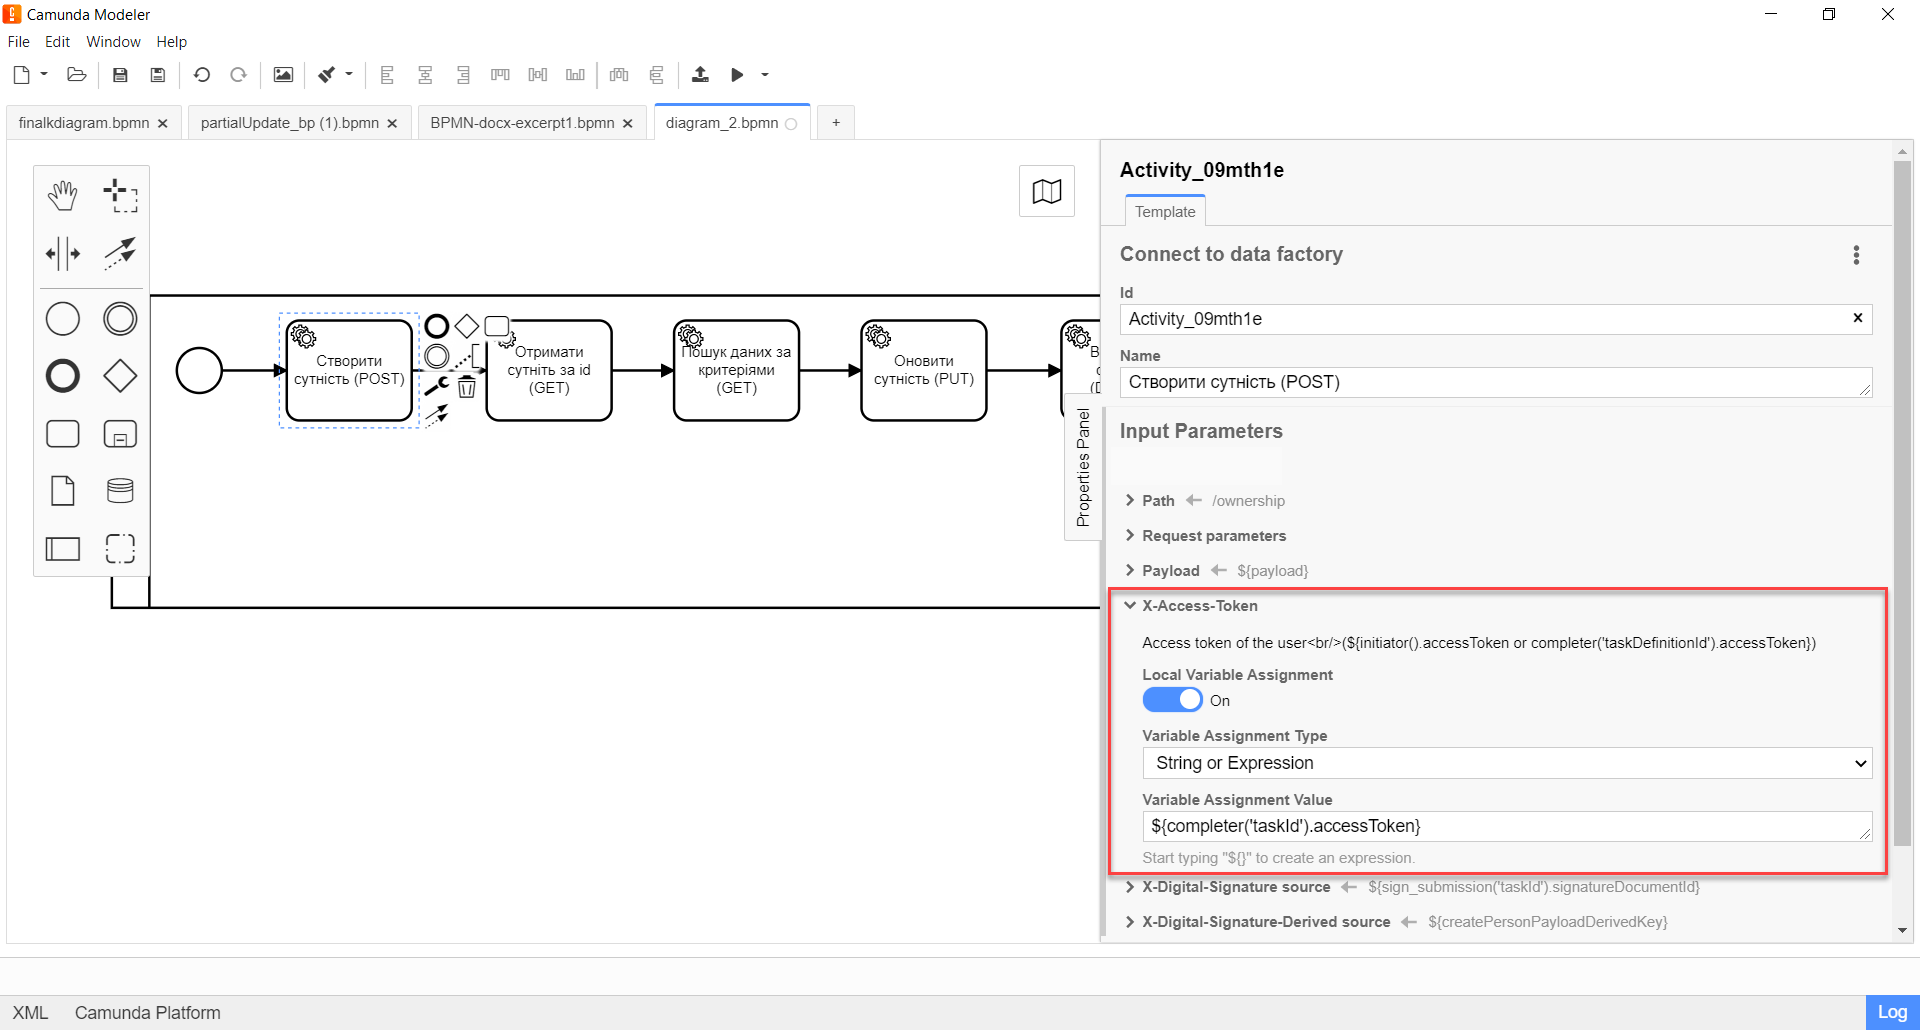
Expand the X-Access-Token block and enter the access token for the resource:
-
Enable the
Local Variable Assignment→ONoption. This will allow creating a local variable for the access token. -
In the
Variable Assignment Typefield, select the variable assignment type from the dropdown list —String or Expression.
-
-
+
|
The access token is taken either from the initiator (for example, |
+
-
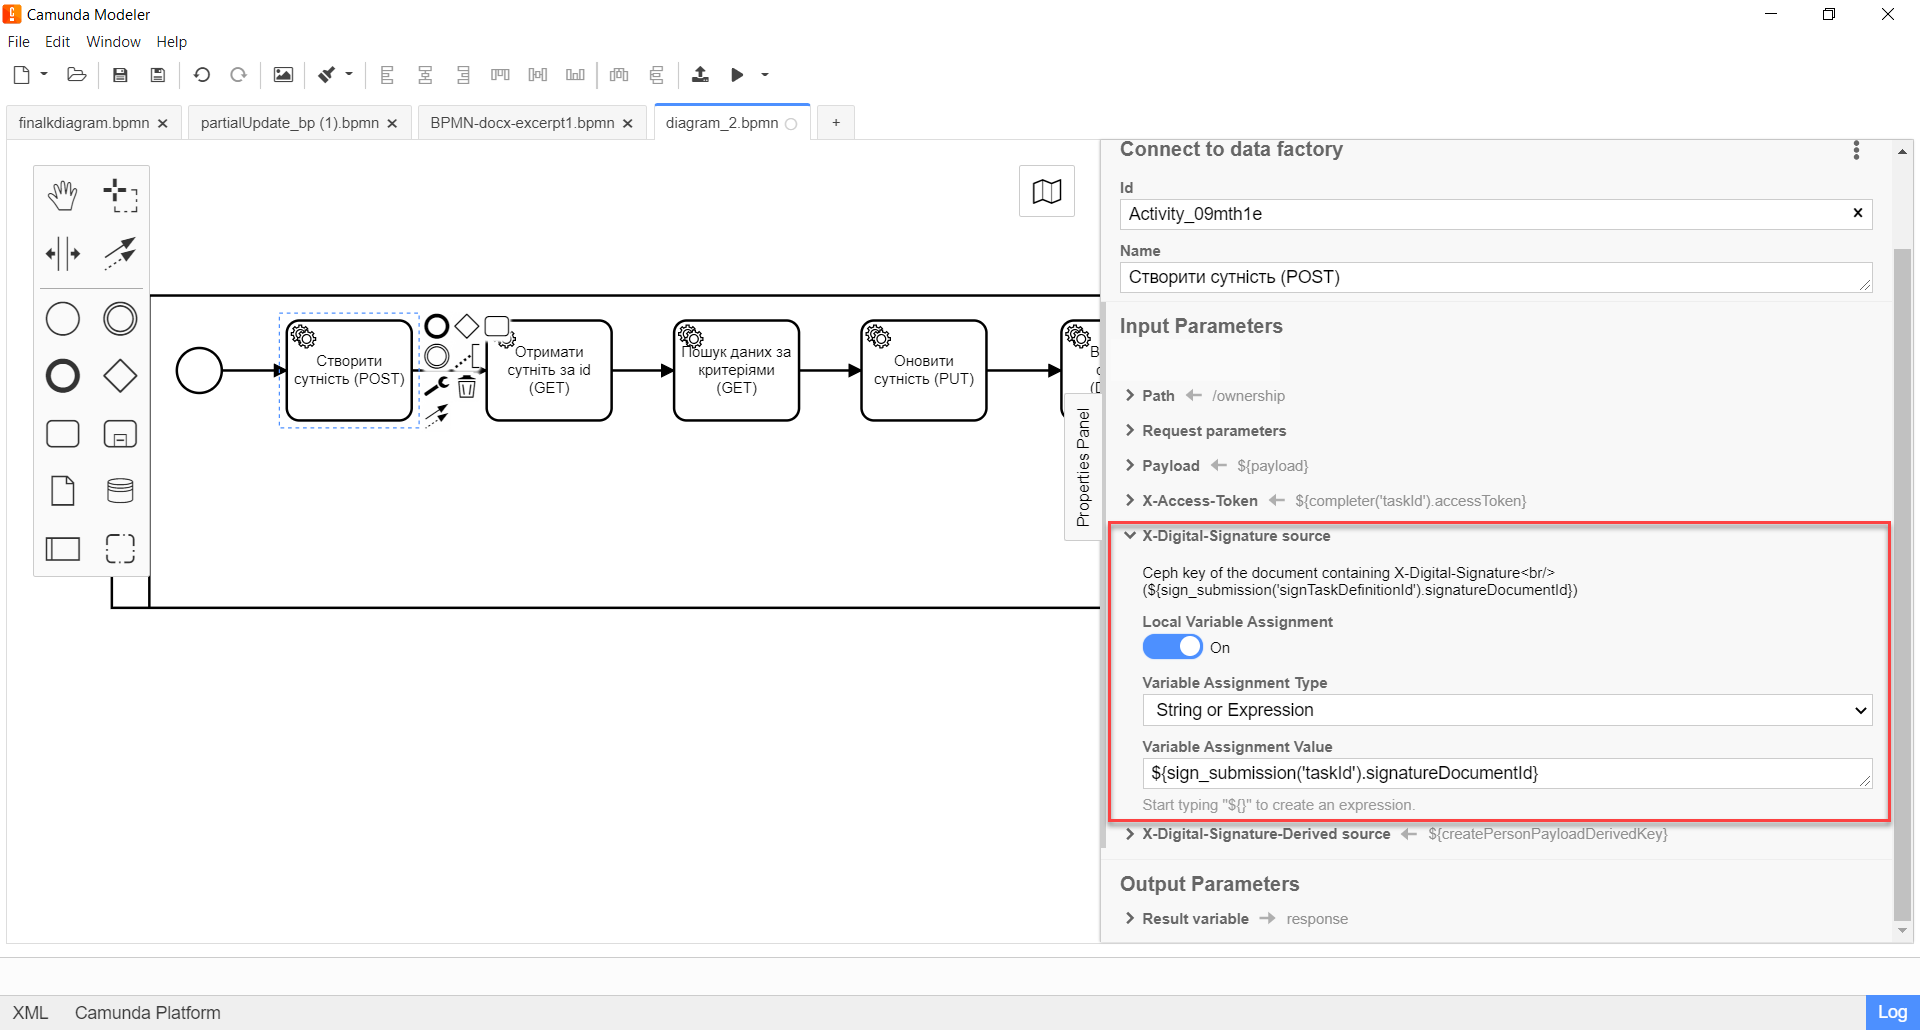
Expand the X-Digital-Signature source block and specify the source for the Ceph document, where the user’s signature (QES - Qualified Electronic Signature) is stored, which was applied to the data of the UI form during entry:
-
Enable the
Local Variable Assignment→ONoption. This will allow creating a local variable for the QES. -
In the
Variable Assignment Typefield, select the variable assignment type from the dropdown list —String or Expression. -
In the
Variable Assignment Valuefield, enter the user’s signature (QES). For example,${sign_submission('taskId').signatureDocumentId}.In our example, we pass the QES from the user form where it was applied using the
sign_submission()function (more about using JUEL functions in business processes at the link.)
-
-
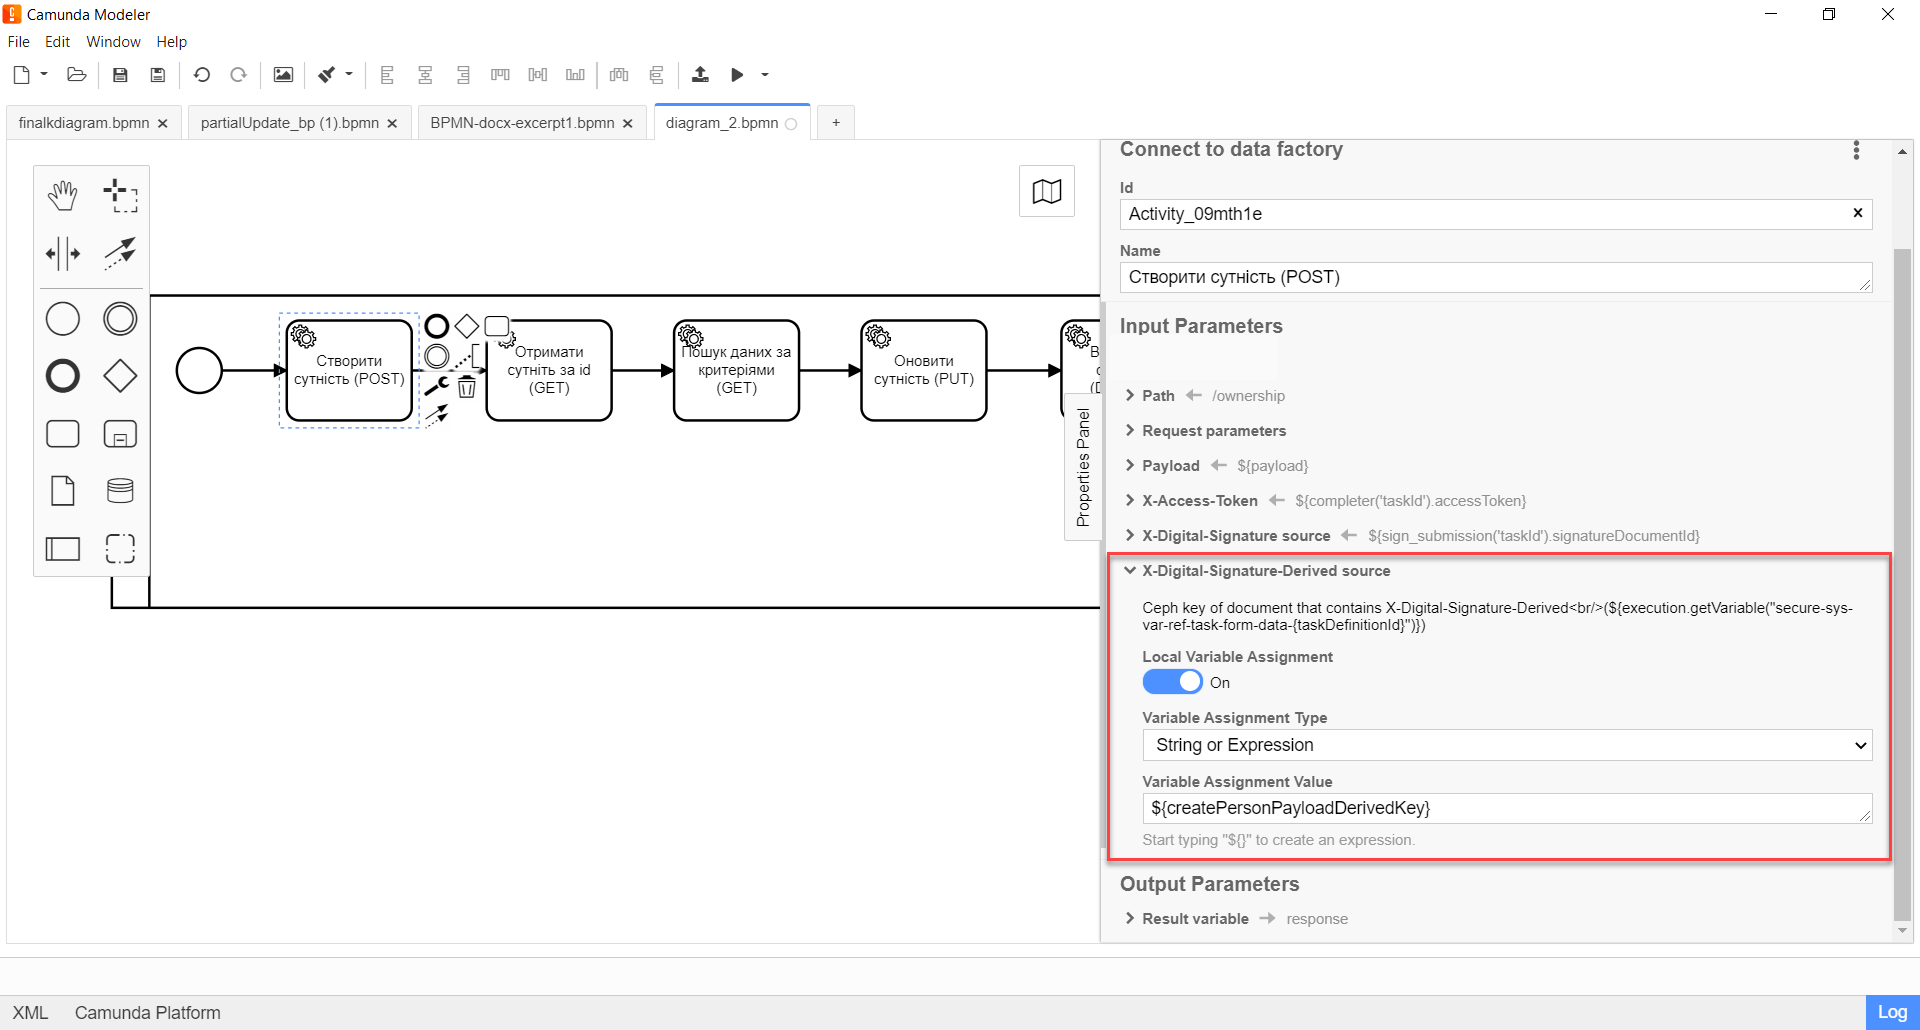
Expand the X-Digital-Signature-Derived source block and specify the source for the Ceph document, where the system signature, automatically applied to the request body, is stored:
-
Enable the
Local Variable Assignment→ONoption. This will allow creating a local variable for the system signature. In theVariable Assignment Typefield, select the variable assignment type from the dropdown list —String or Expression. -
In the
Variable Assignment Valuefield, pass the system signature. For example,${createPersonPayloadDerivedKey}.In our example, we pass the ${createPersonPayloadDerivedKey}variable, which has saved the system signature in one of the previous tasks of the business process.
-
-
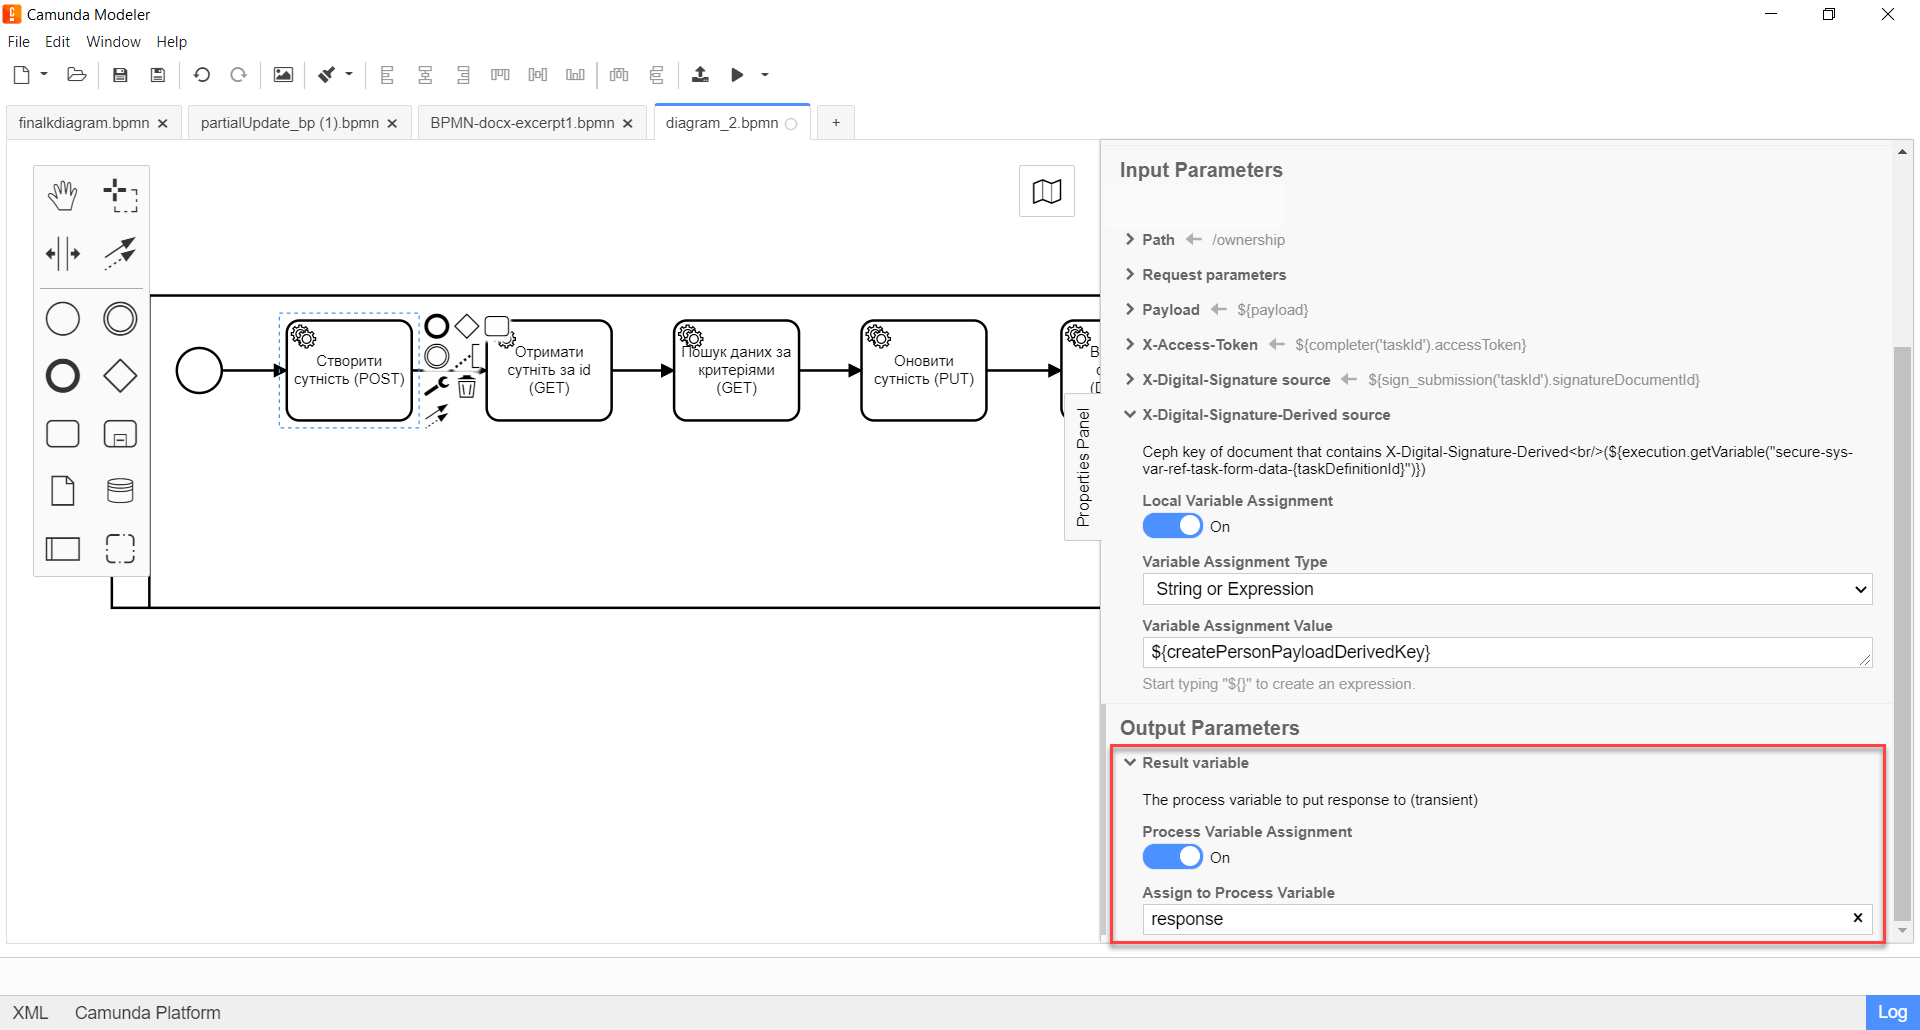
Expand the Result variable block and specify the name of the process variable to which the result must be written (by default —
response):-
Enable the
Local Variable Assignment→ONoption. -
In the
Variable Assignment Typefield, select the variable assignment type from the dropdown list —String or Expression. -
In the
Variable Assignment Valuefield, enter the name of the result variable (responseby default).The service does not return a response body for a
POSTrequest. As a result, only response code and description are returned.Example 2. Response code and its description according to the REST API Registry201 OK, the resource has been successfully created
-
3. Configuration of interaction with the GET endpoint
The GET HTTP method is used to retrieve entity data (SELECT by id from the table in the database) or to search for data based on certain criteria (SELECT from the view) in the database registry. It is used to retrieve objects. Does not modify the resource state.
| Qualified Electronic Signature and system signature are not used in a GET request. |
- Getting entity data by id
-
This case describes an example of getting a resource by its ID from a specific table in the database.
To set up the delegate template in Camunda Modeler, you need to follow these steps:
-
To create Service Task.
-
On the settings panel on the right, click the
Open Catalogbutton, select the corresponding Connect to data factory template from the list, and clickApplyto confirm. -
Configure the selected template:
-
In the
Namefield, specify the name of the task. For example,Get entity by id (GET). -
Expand the Method block under the Custom Fields section and select the
GETHTTP method from the dropdown list to interact with the Data Factory.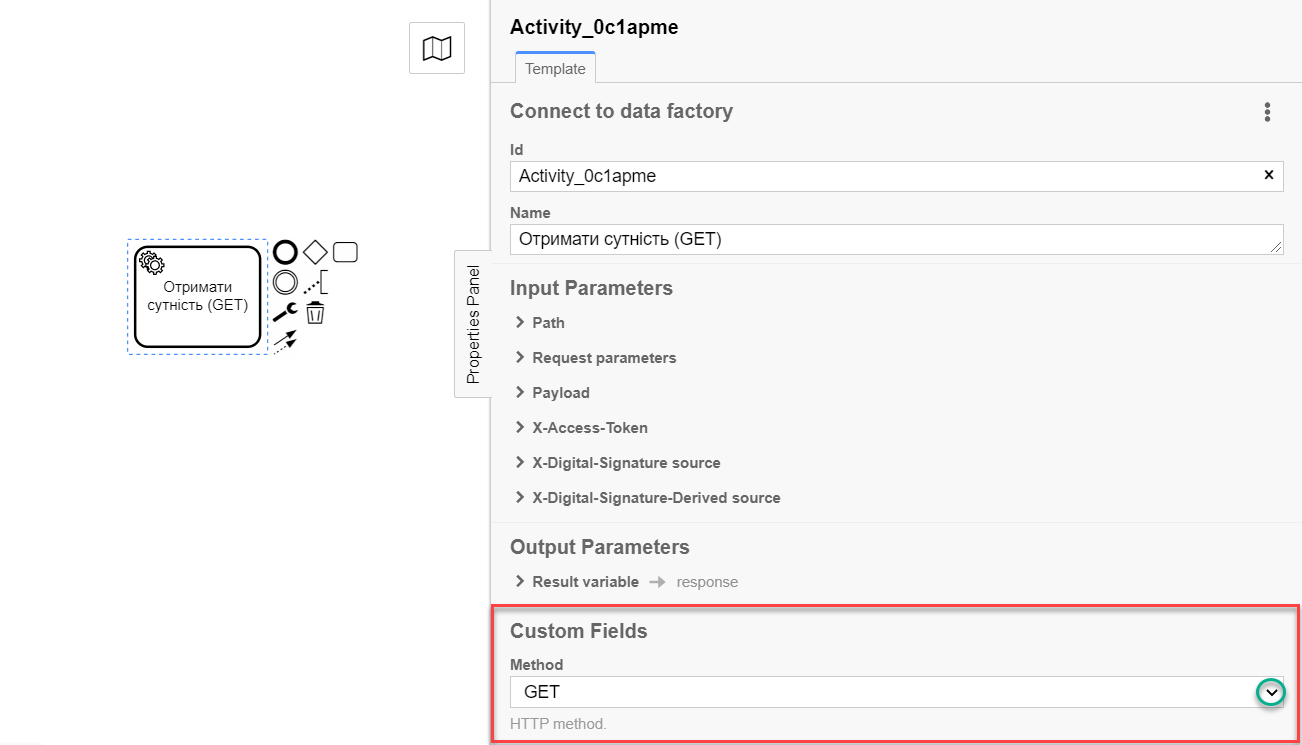
-
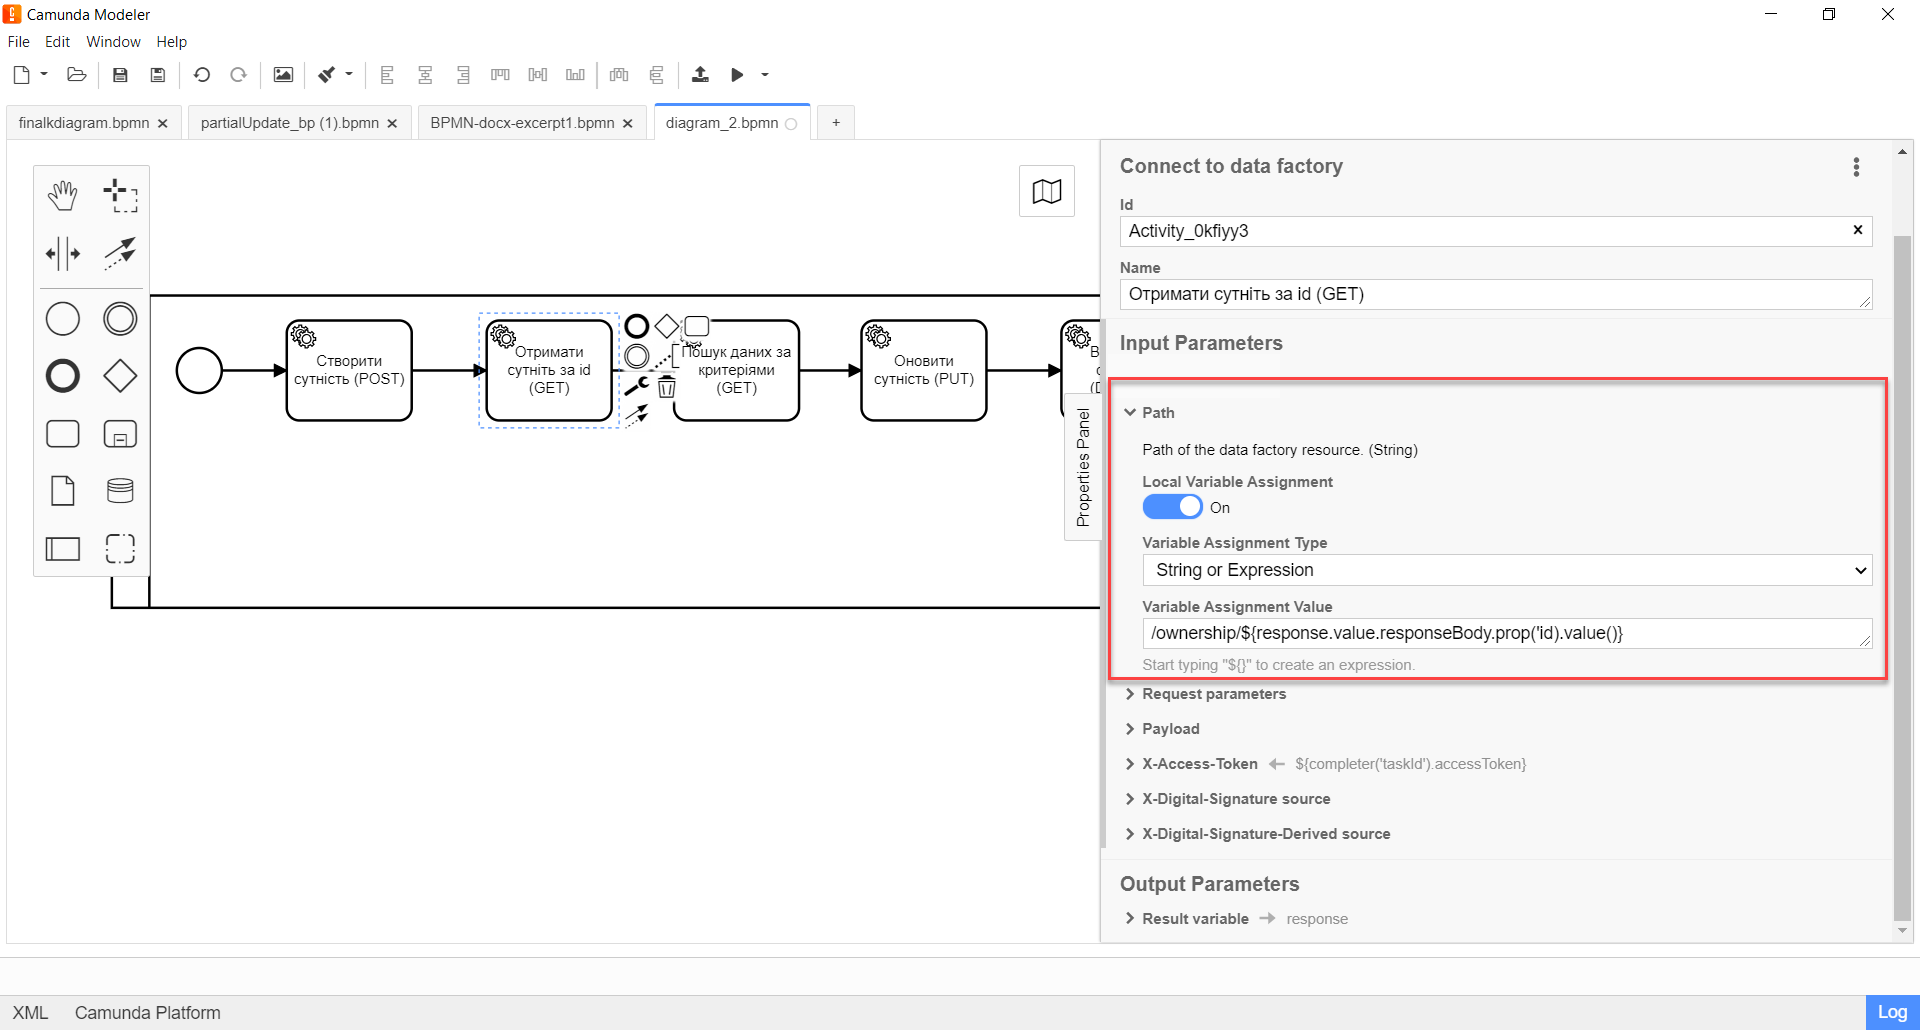
Expand the Path block and specify the path to the resource in the Data Factory, that is, the name of the endpoint to which you want to send a request:
-
-
-
Enable the
Local Variable Assignment→ONoption. This will allow creating a local variable for the endpoint. -
In the
Variable Assignment Typefield, select the variable assignment type from the dropdown list —String or Expression. -
In the
Variable Assignment Valuefield, enter the endpoint. For example,/ownership/${response.value.responseBody.prop('id).value()}.The endpoint name must be specified using a forward slash (/) as a prefix.
It is mandatory to pass the entity identifier. The ID can be passed in several ways. For example:
-
Through a variable as
${response.value.responseBody.prop('id).value()}; -
Through a variable as
/${id}; -
Using the
submission()function as${submission('taskId').formData.prop('id').value()} -
Using a constant UUID value directly as -
/b45b90c0-c53d-4fd3-aa82-02e8e7392345.
-
-
This case does not require additional request parameters, except for path params, so leave the Request parameters and Payload blocks empty.
-
Expand the X-Access-Token block and enter the access token for the resource:
-
Enable the
Local Variable Assignment→ONoption. This will allow creating a local variable for the access token. -
In the
Variable Assignment Typefield, select the variable assignment type from the dropdown list —String or Expression. -
In the
Variable Assignment Valuefield, enter the access token. For example,${completer('taskId').accessToken}.The access token is taken from EITHER the initiator (for example,
$initiator().accessToken}), OR from the executor of the last user task (for example,${completer('taskDefinitionId').accessToken}).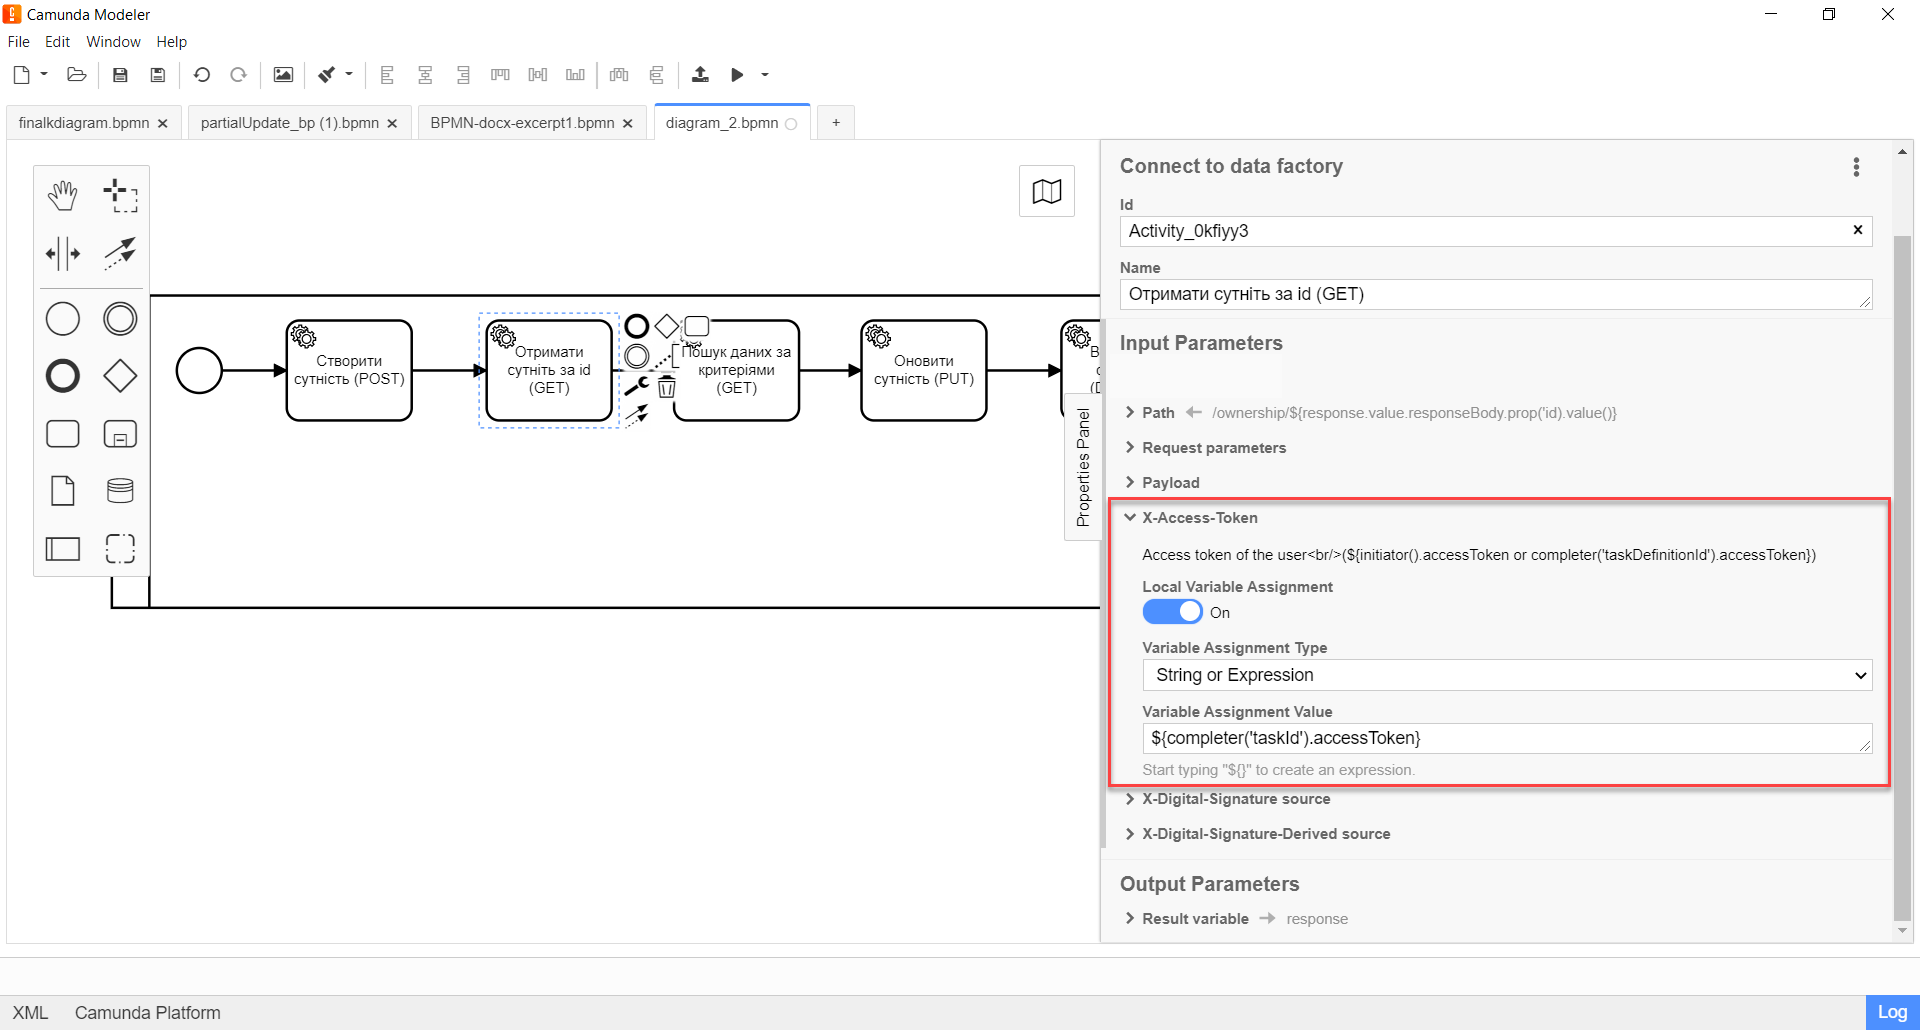
-
Expand the Result variable block and specify the name of the process variable to which the result must be written (by default —
response):
-
Enable the
Local Variable Assignment→ONoption. -
In the
Variable Assignment Typefield, select the variable assignment type from the dropdown list —String or Expression. -
In the
Variable Assignment Valuefield, enter the name of the result variable (response— by default).The service returns the resource by its ID in response to a GET request.
Example 3. Example response body according to REST API Registry{ "ownershipId": "b45b90c0-c53d-4fd3-aa82-02e8e7392345", "code": "string", "name": "string" }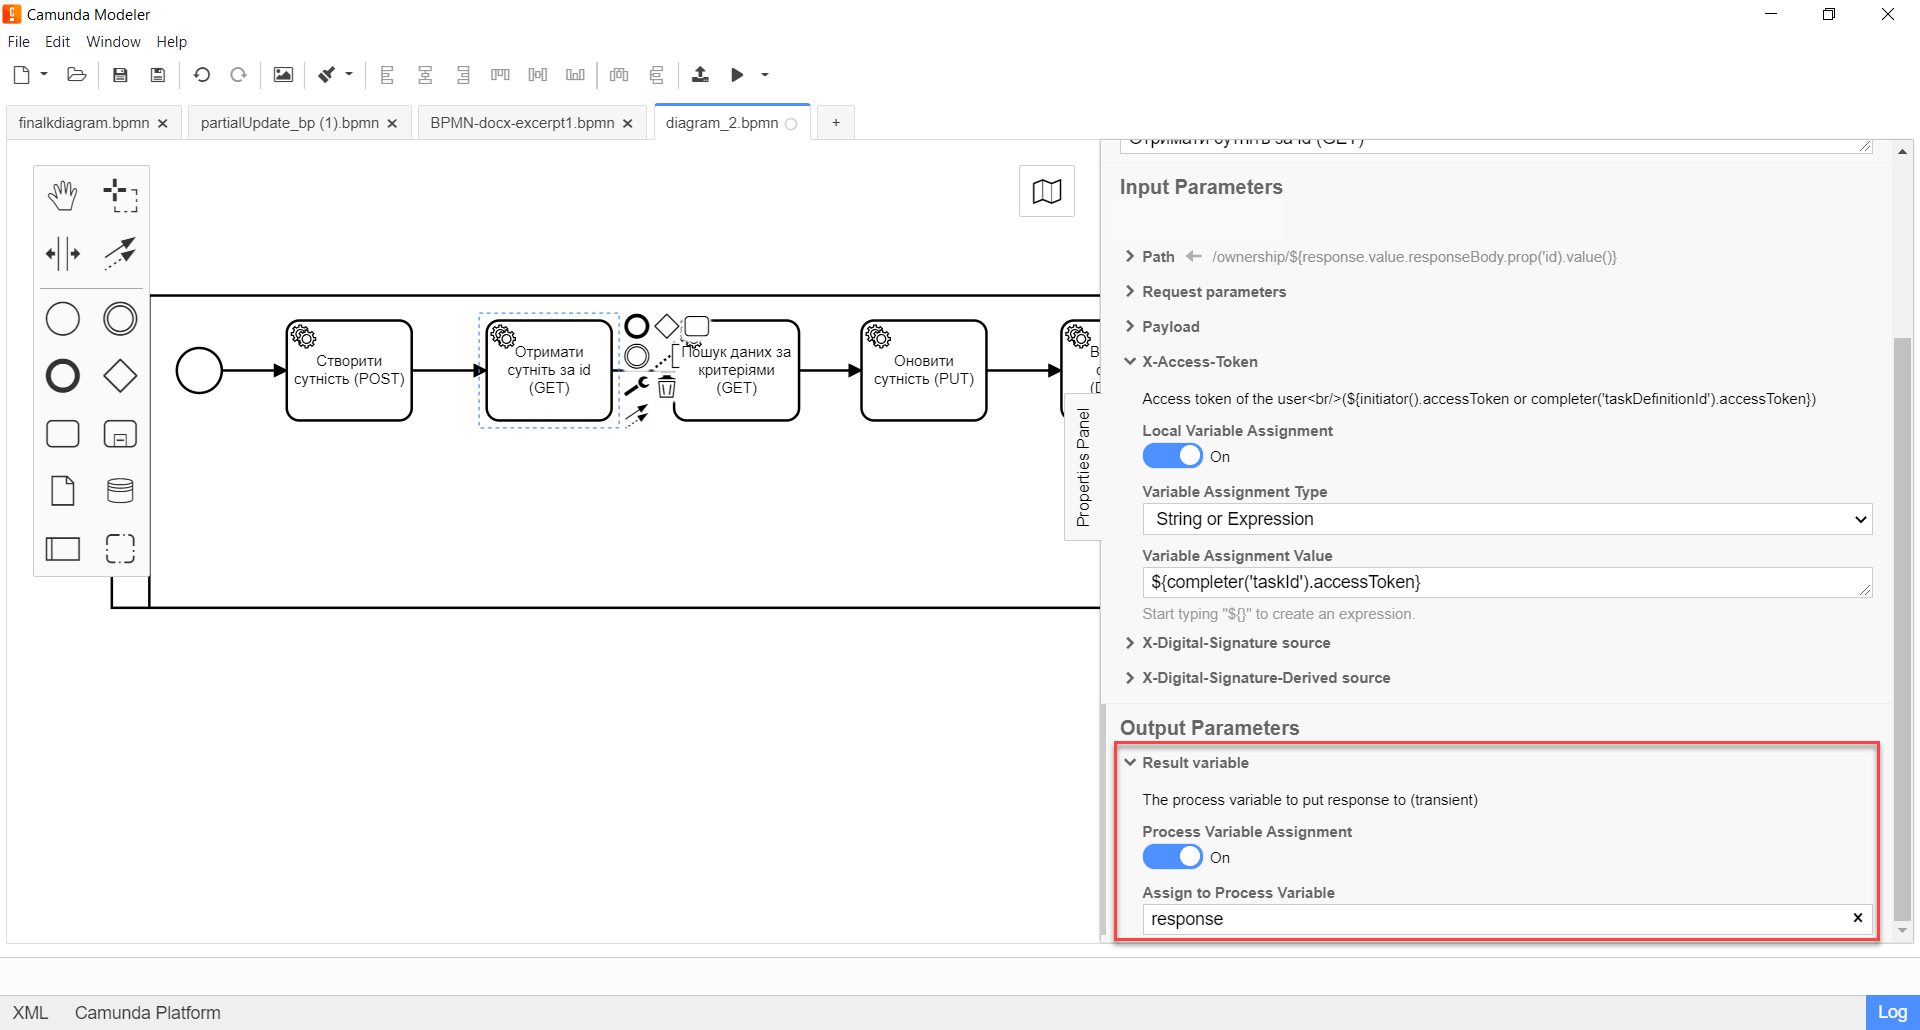
- Search for data based on criteria
This case describes an example of retrieving a list of resources by sending a request to the endpoint generated based on the corresponding view (Search Condition) in the Data Factory.
To set up the delegate template in Camunda Modeler, you need to follow these steps:
-
To create Service Task.
-
On the settings panel on the right, click the
Open Catalogbutton, select the corresponding Connect to data factory template from the list, and clickApplyto confirm. -
To configure the selected template:
-
In the
Namefield, specify the name of the task. For example,Search for data based on criteria (GET).
-
Expand the Method block under the Custom Fields section and select the
GETHTTP method from the dropdown list to interact with the Data Factory.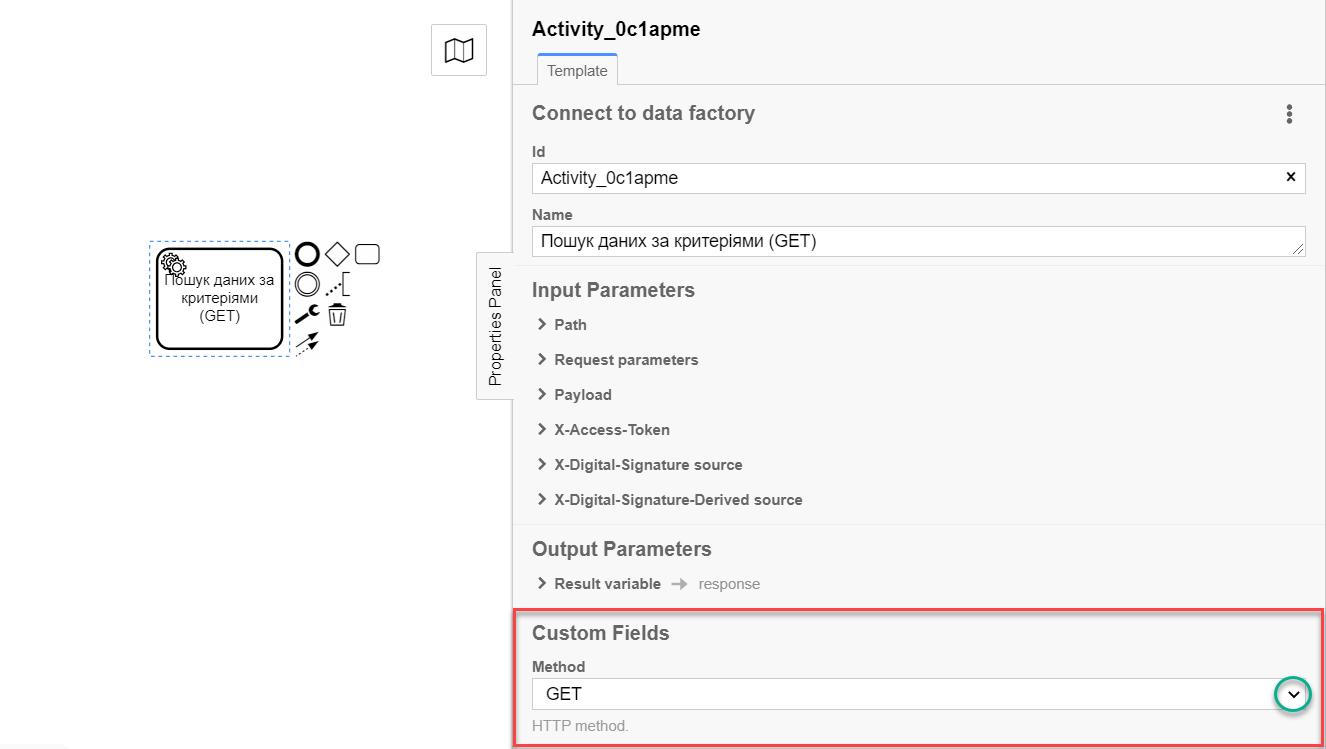
-
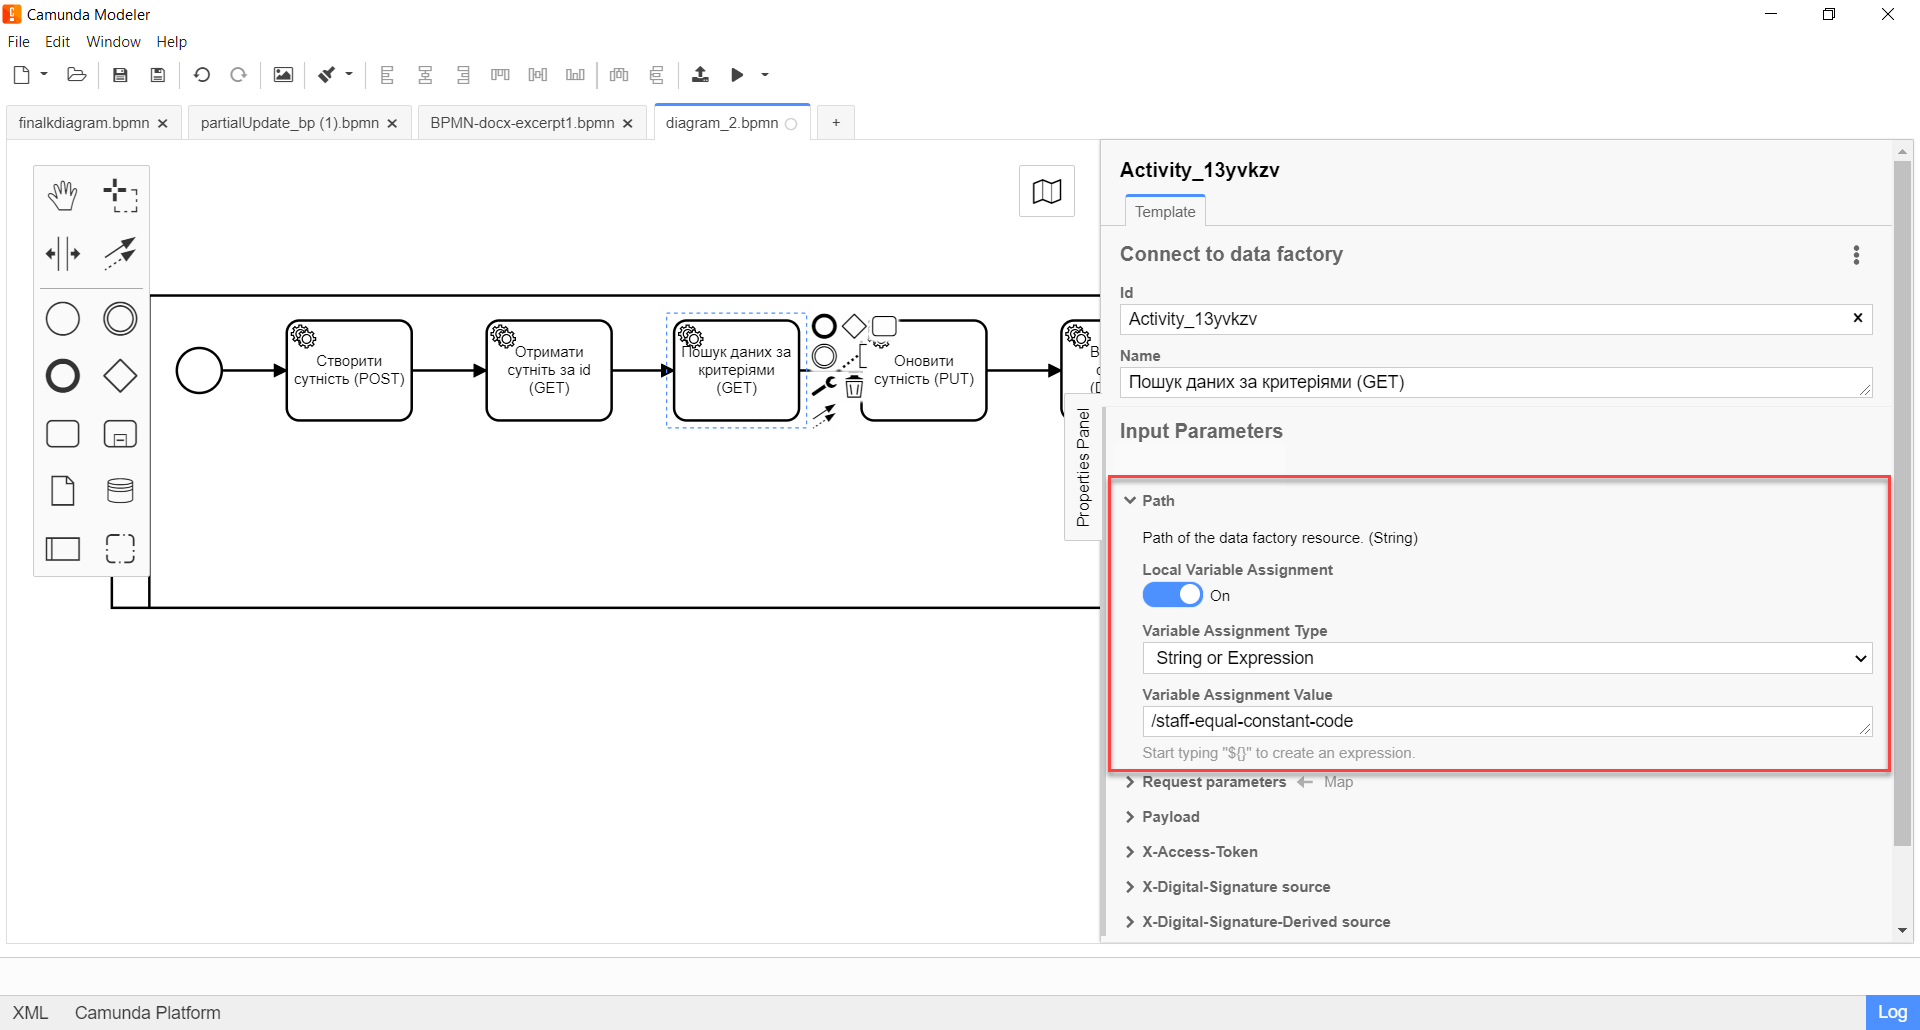
Expand the Path block and specify the path to the resource in the Data Factory, that is, the name of the endpoint to which you want to send a request:
-
Enable the
Local Variable Assignment→ONoption. This will allow creating a local variable for the endpoint.
-
In the Variable Assignment Type field, select the variable assignment type from the dropdown list —
String or Expression.
-
In the Variable Assignment Value field, enter the resource. For example,
/staff-equal-constant-code.-
The name of the resource corresponds to the name of the endpoint for the Search Condition in the Data Factory.
-
The resource name must be specified using a forward slash (
/) as a prefix.
-
-
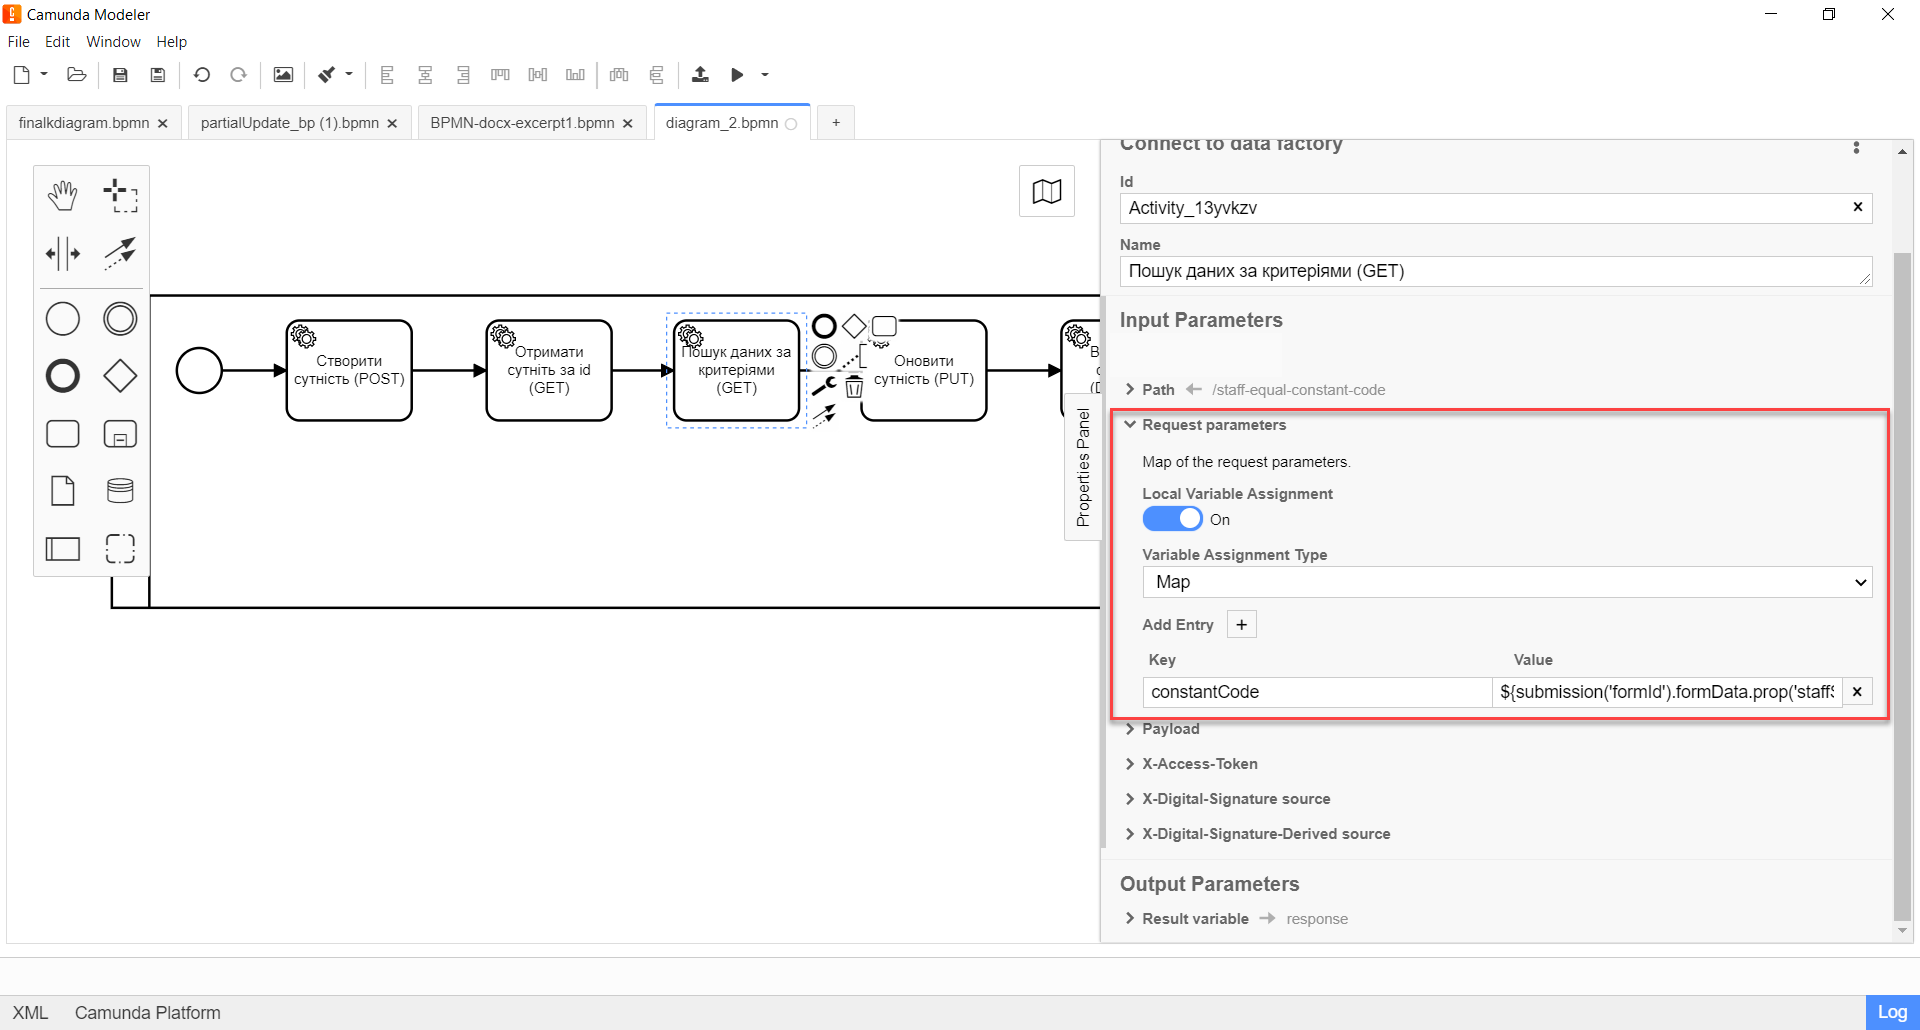
This case requires setting additional request parameters - query parameters. Expand the Request parameters block and specify the query parameters as key-value pairs (Map).
-
Enable the
Local Variable Assignment→ONoption. This will allow creating a local variable for the Search Condition endpoint. -
In the
Variable Assignment Typefield, select the variable assignment type from the dropdown list —Map. -
In the
Variable Assignment Valuefield, enter the search key - constantCode and its value —${submission('formId').formData.prop('staffStatusCode').value()}.
In our case, the search key value constantCode is passed through the
submission()function (more about using JUEL functions in business processes can be found in the — link). Other parameters are optional.Example 4. Example of request query parameters in JSON format according to REST API Registry{ "offset": 0, "constantCode": "string", "limit": 0 }+
-
-
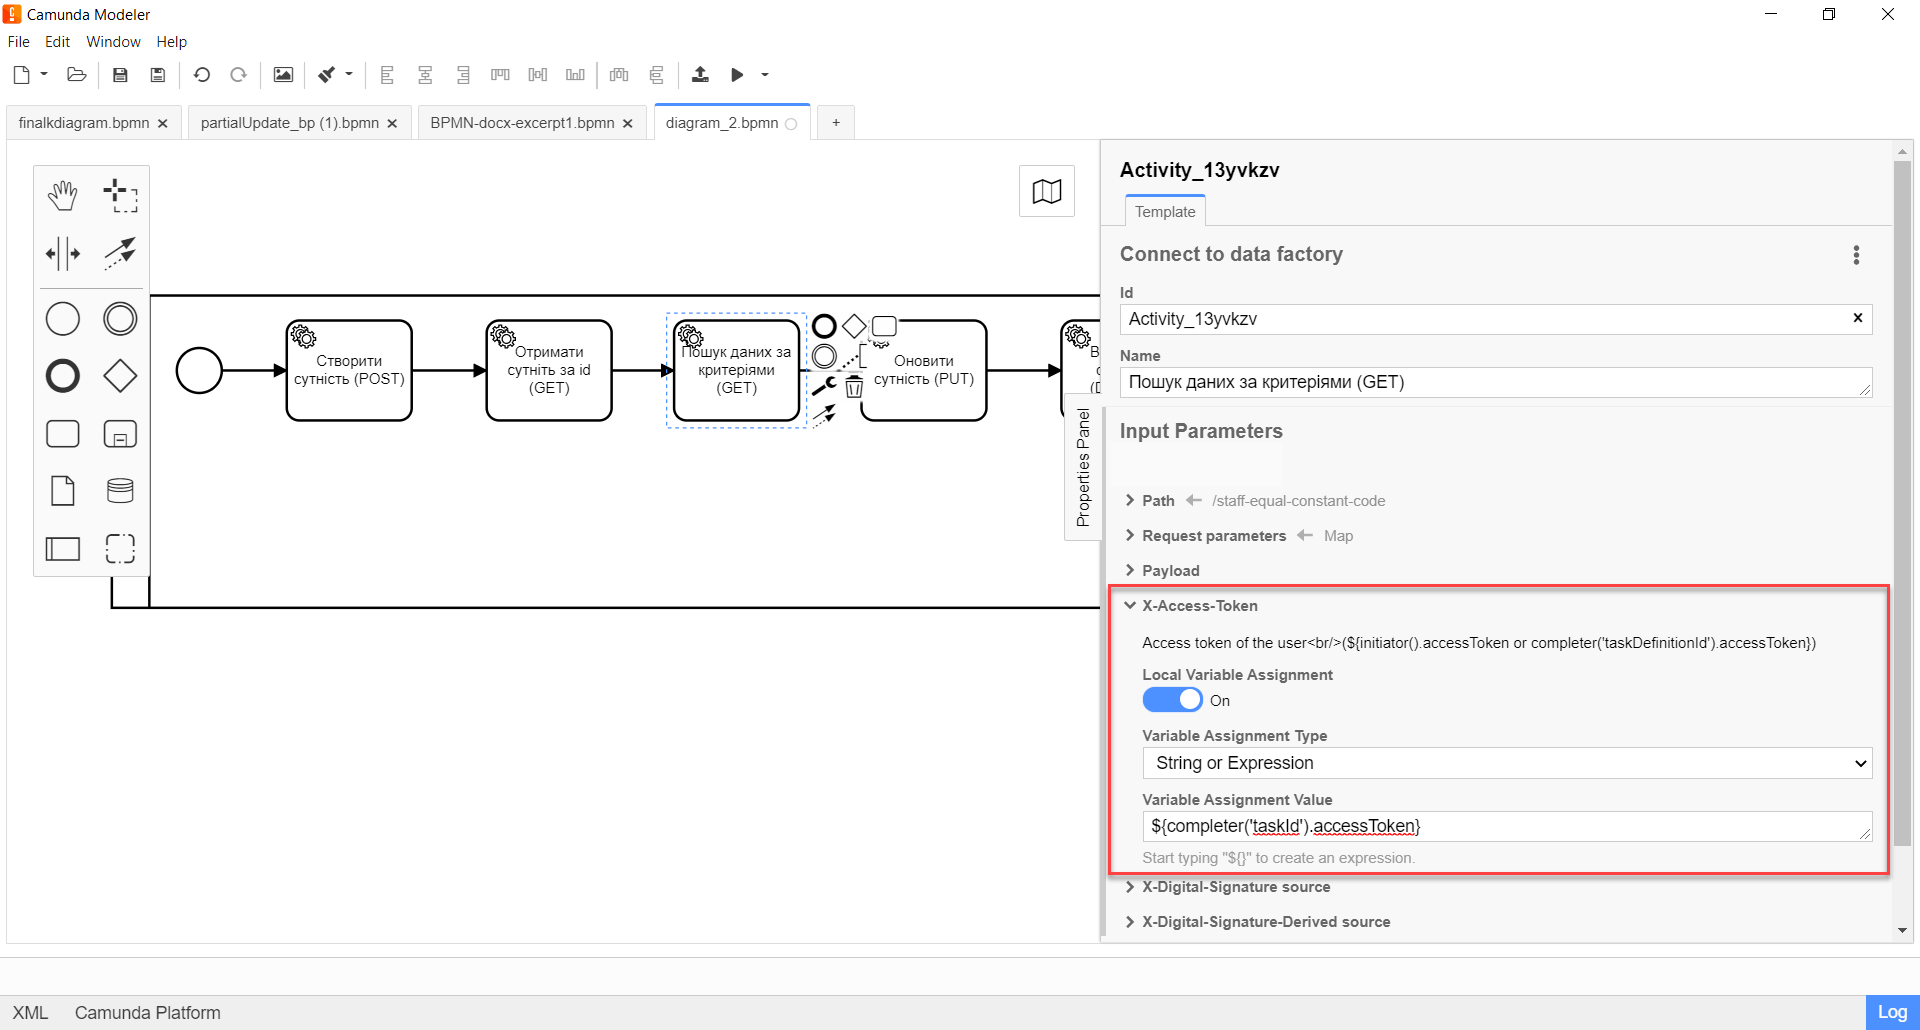
Expand the X-Access-Token block and enter the access token for the resource:
-
Enable the
Local Variable Assignment→ONoption. This will allow creating a local variable for the access token. -
In the
Variable Assignment Typefield, select the variable assignment type from the dropdown list —String or Expression. -
In the
Variable Assignment Valuefield, enter the access token, for example,${completer('taskId').accessToken}.
The access token is taken from EITHER the initiator (for example,
$initiator().accessToken}), OR from the executor of the last user task (for example,${completer('taskDefinitionId').accessToken}).+
-
-
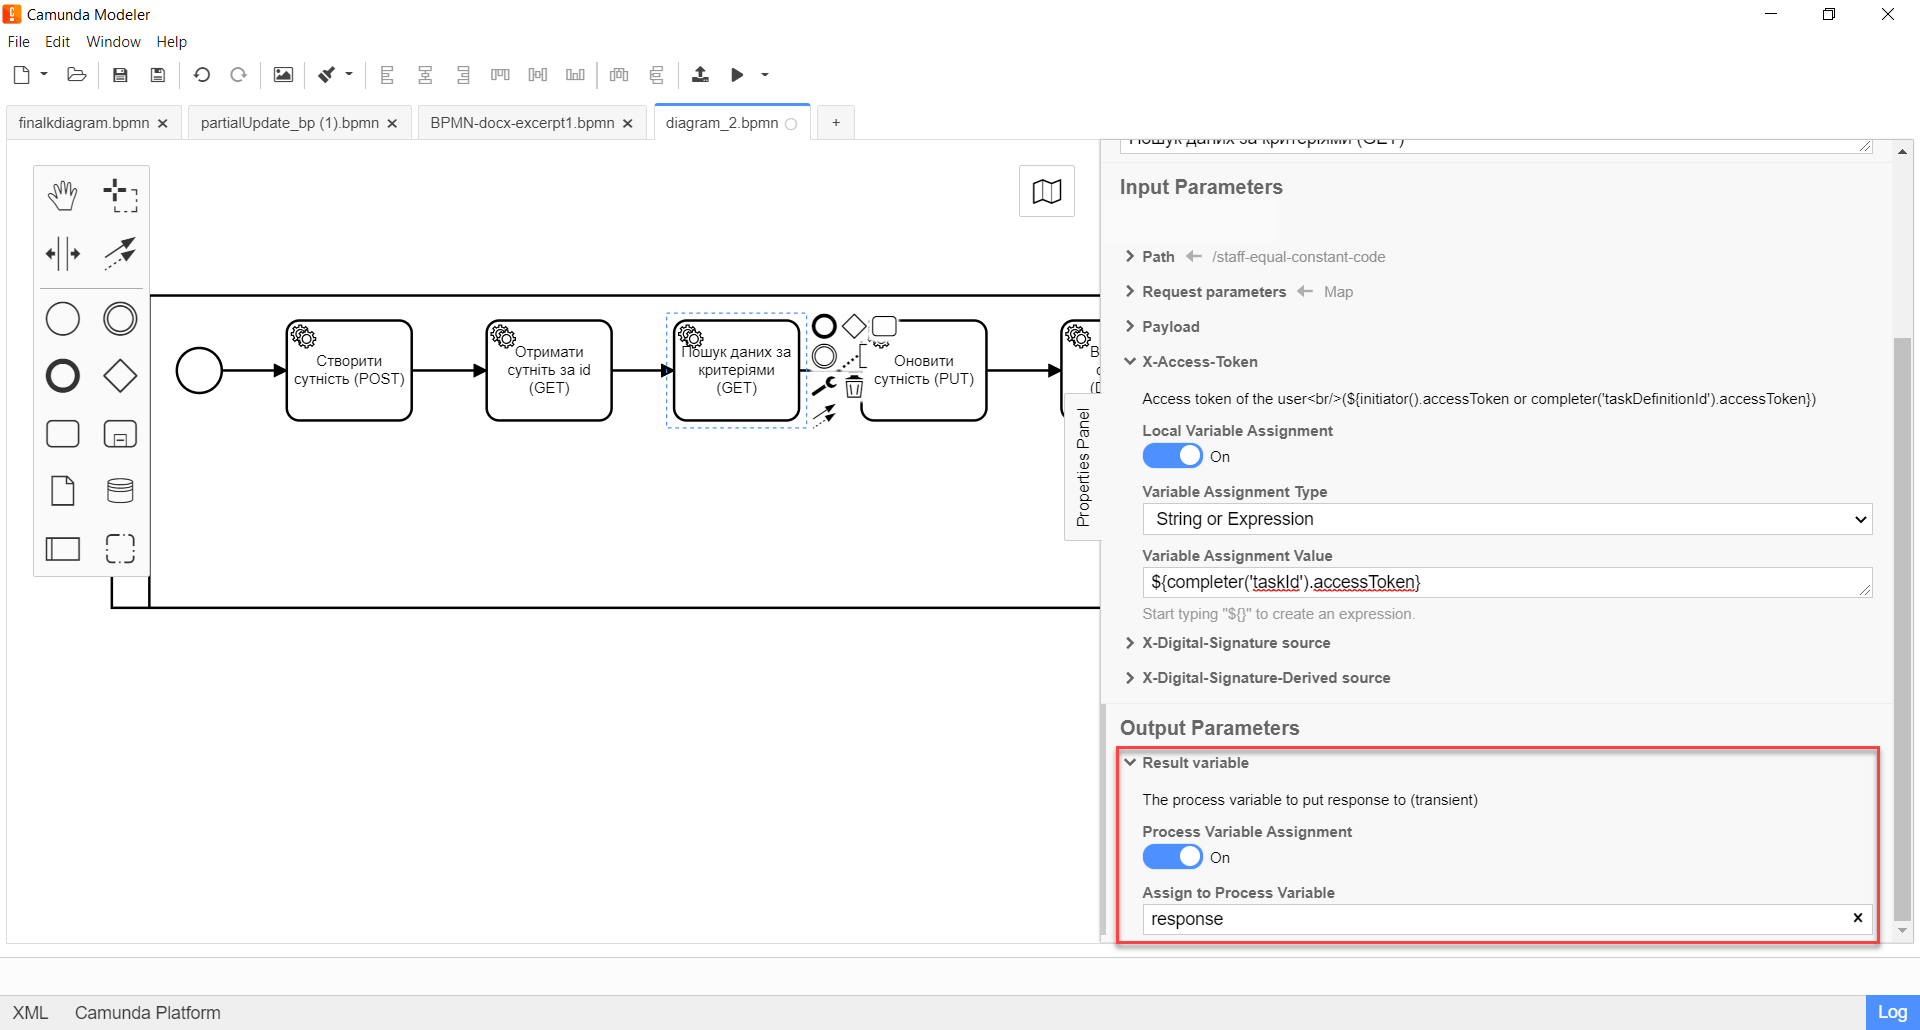
Expand the Result variable block and specify the name of the process variable to which the result must be written (by default —
response):-
Enable the
Local Variable Assignment→ONoption. -
In the
Variable Assignment Typefield, select the variable assignment type from the dropdown list —String or Expression. -
In the
Variable Assignment Valuefield, enter the name of the result variable (responseby default).
In response to a GET request, the service returns an array of objects/resources based on search criteria.
Example 5. Example response body from the service according to REST API Registry[ { "staffStatusId": "3fa85f64-5717-4562-b3fc-2c963f66afa6", "constantCode": "string", "name": "string" } ]+
-
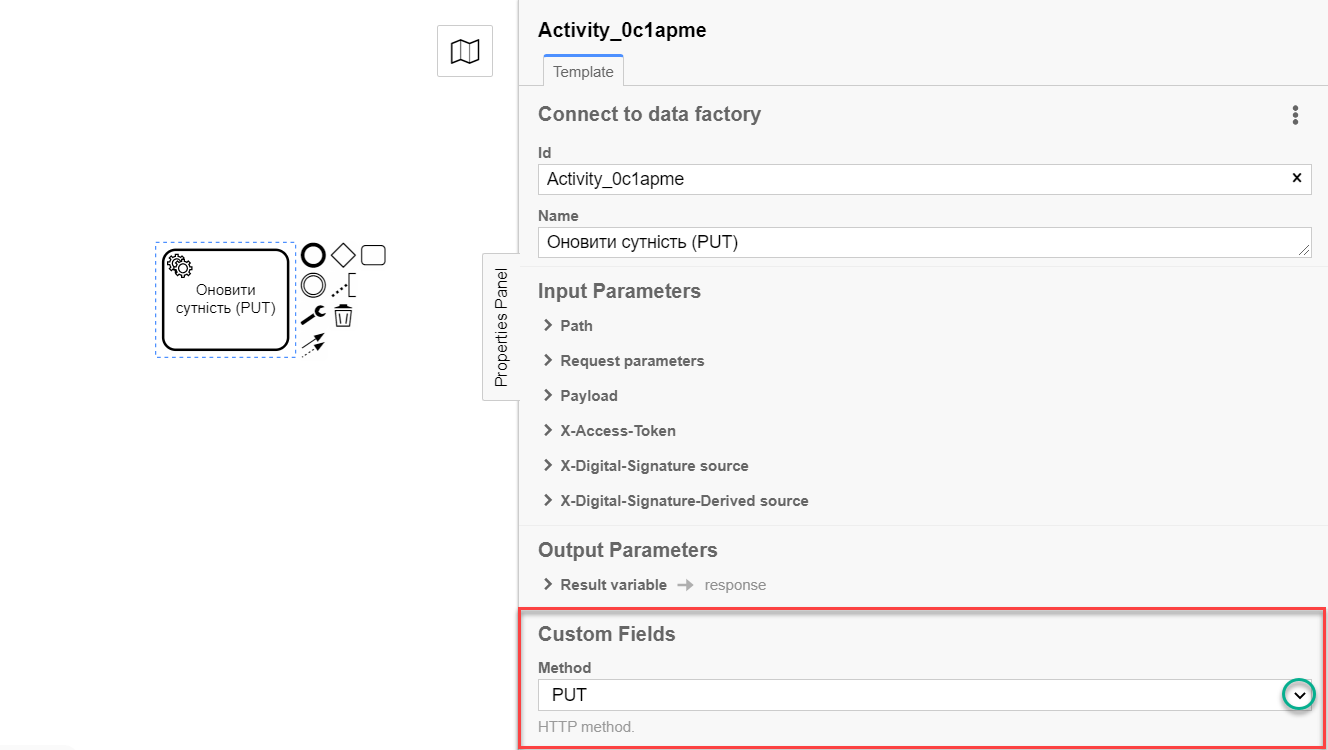
4. Configuration of interaction with a PUT endpoint
The PUT HTTP method is used to update an entity/resource in the registry database. It is used to modify an existing resource based on its ID.
|
The principle of configuring the delegate to update an entity is identical to the Configuration of interaction with the POST endpoint with a few exceptions:
Example 6. Response code and description according to REST API Registry
|
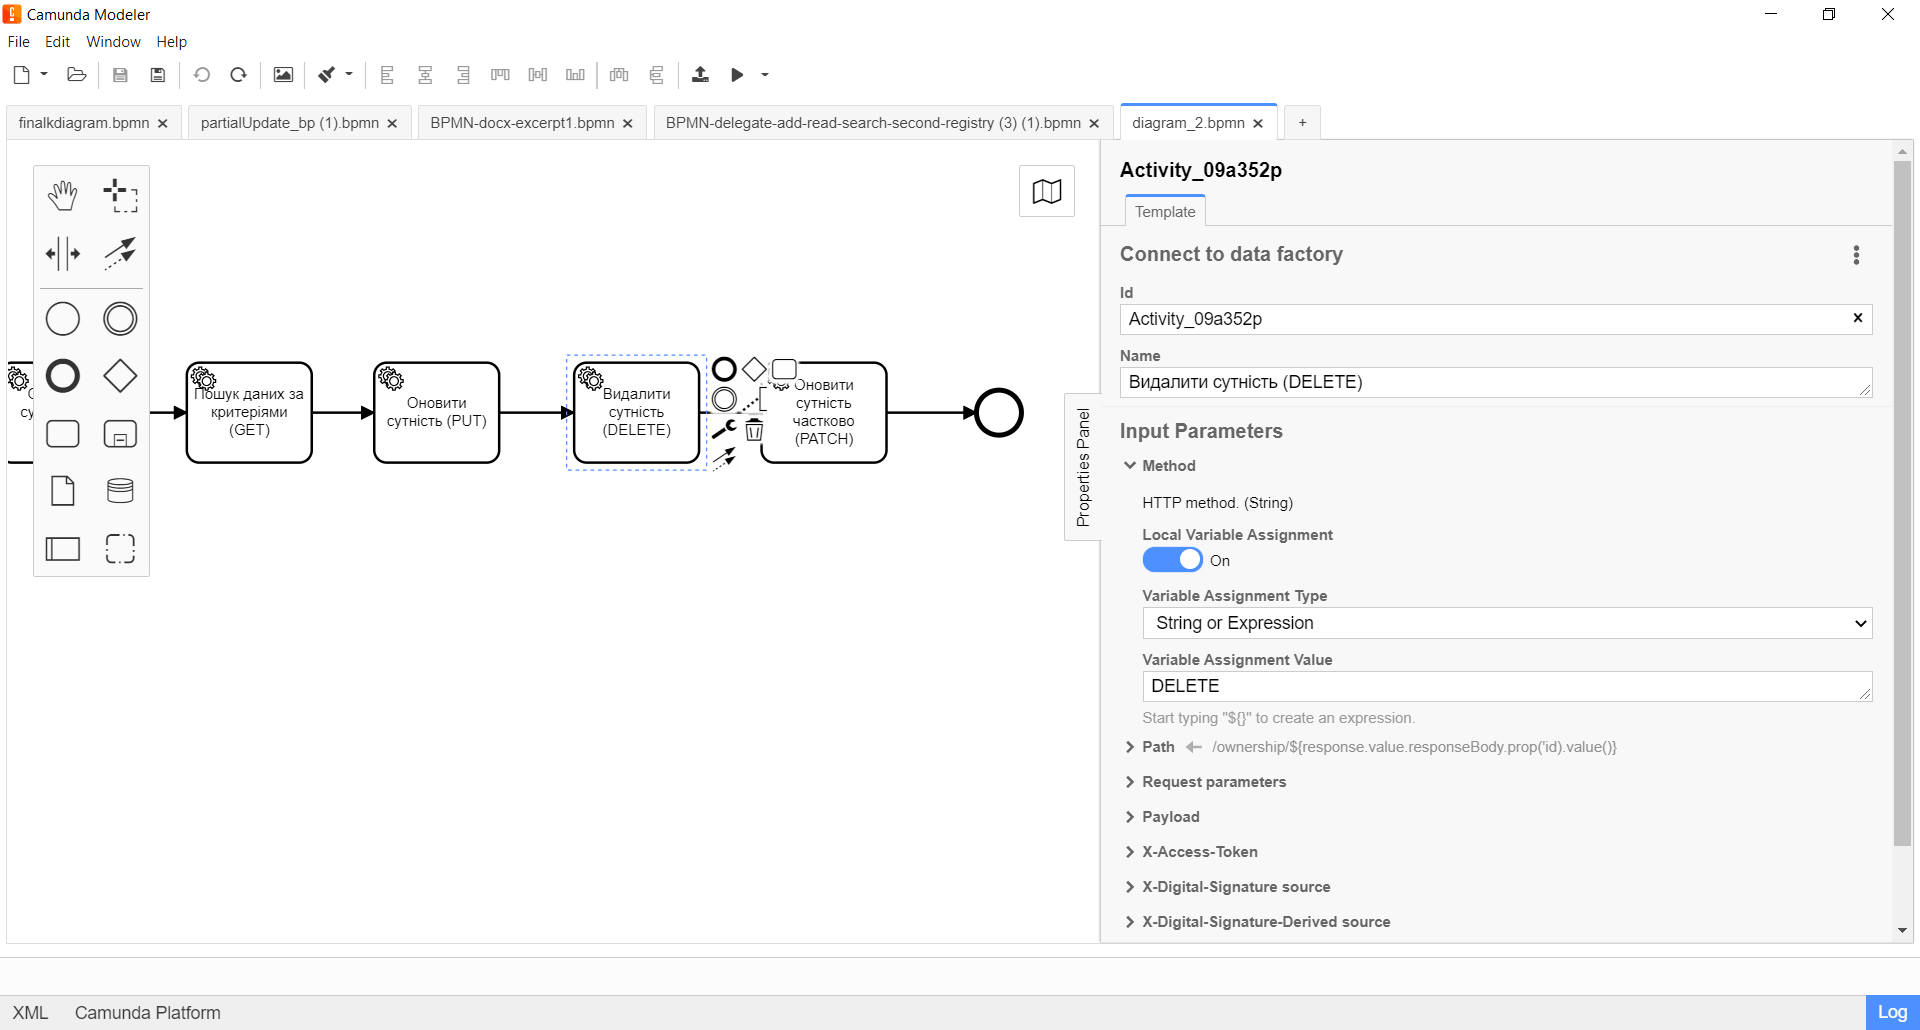
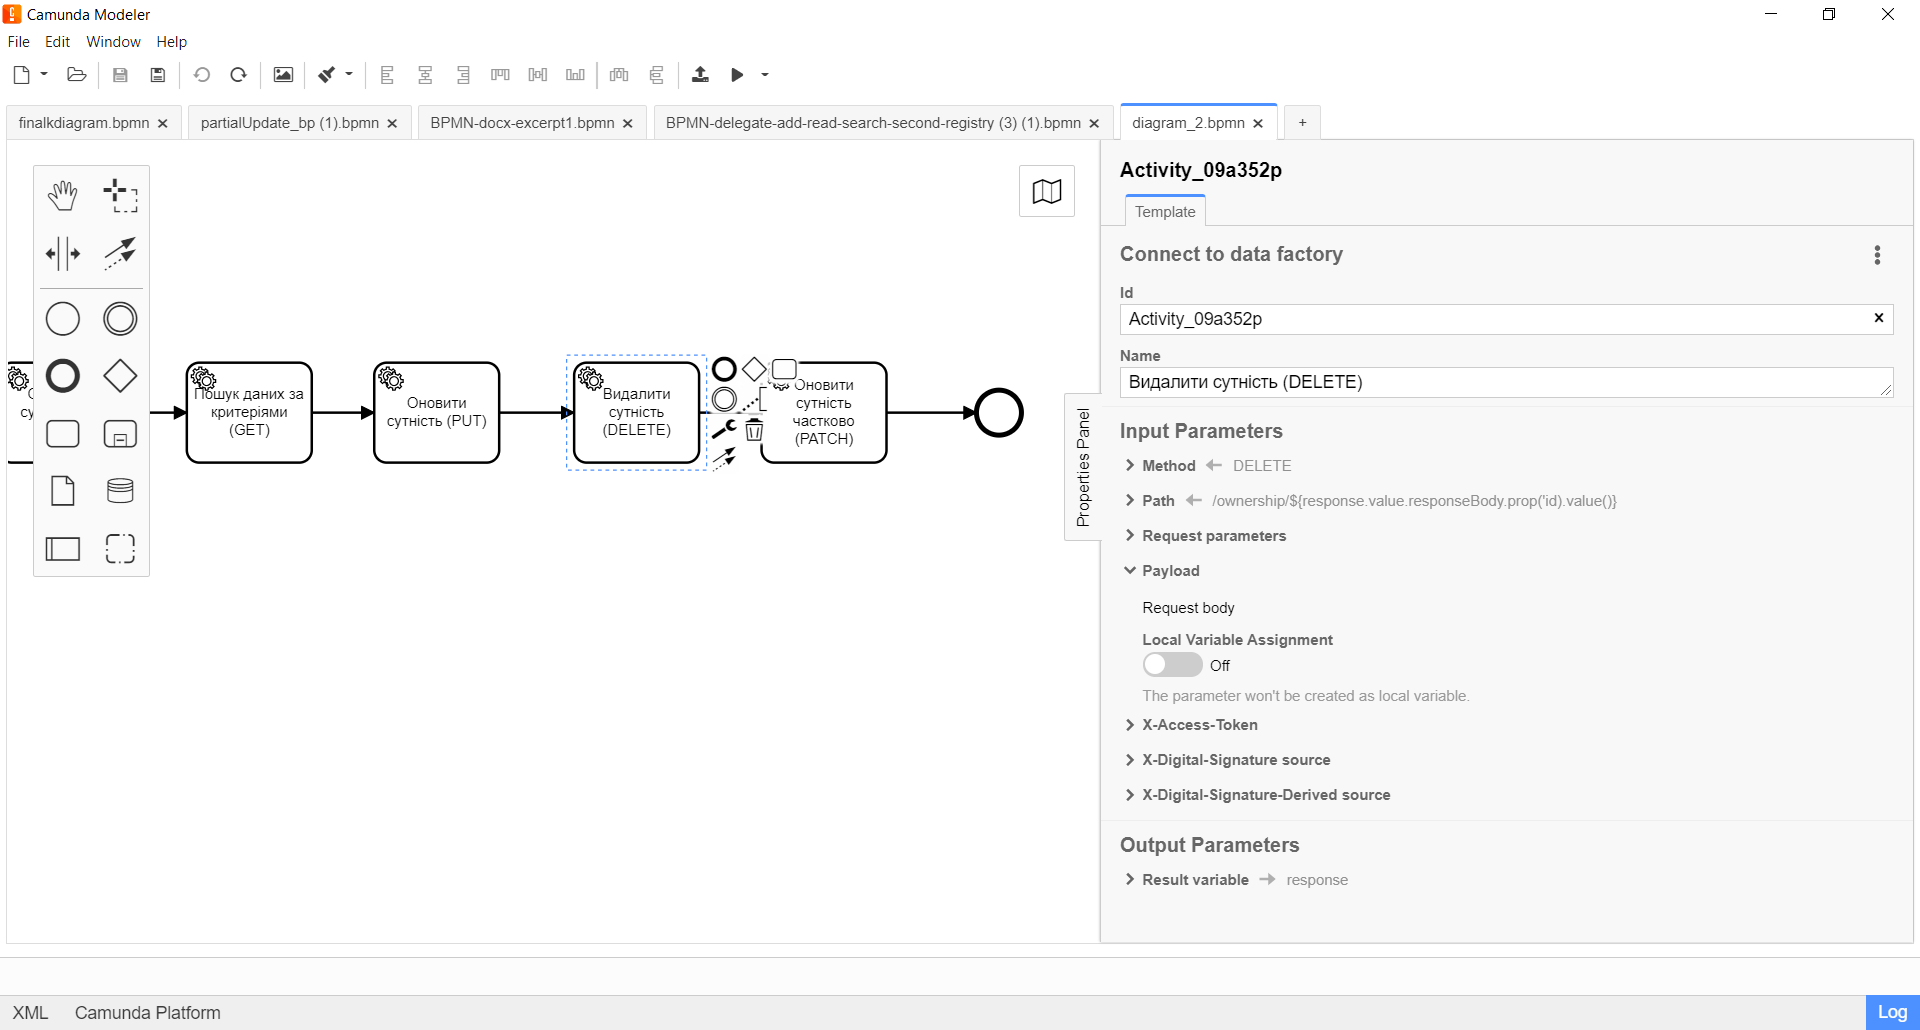
5. Configuration of interaction with a DELETE endpoint
The DELETE HTTP method is used to delete an entity/resource in the registry database. It is used to delete a resource based on its ID.
|
The principle of configuring the delegate to delete an entity is identical to the Configuration of interaction with a PUT endpoint with two exceptions:
|
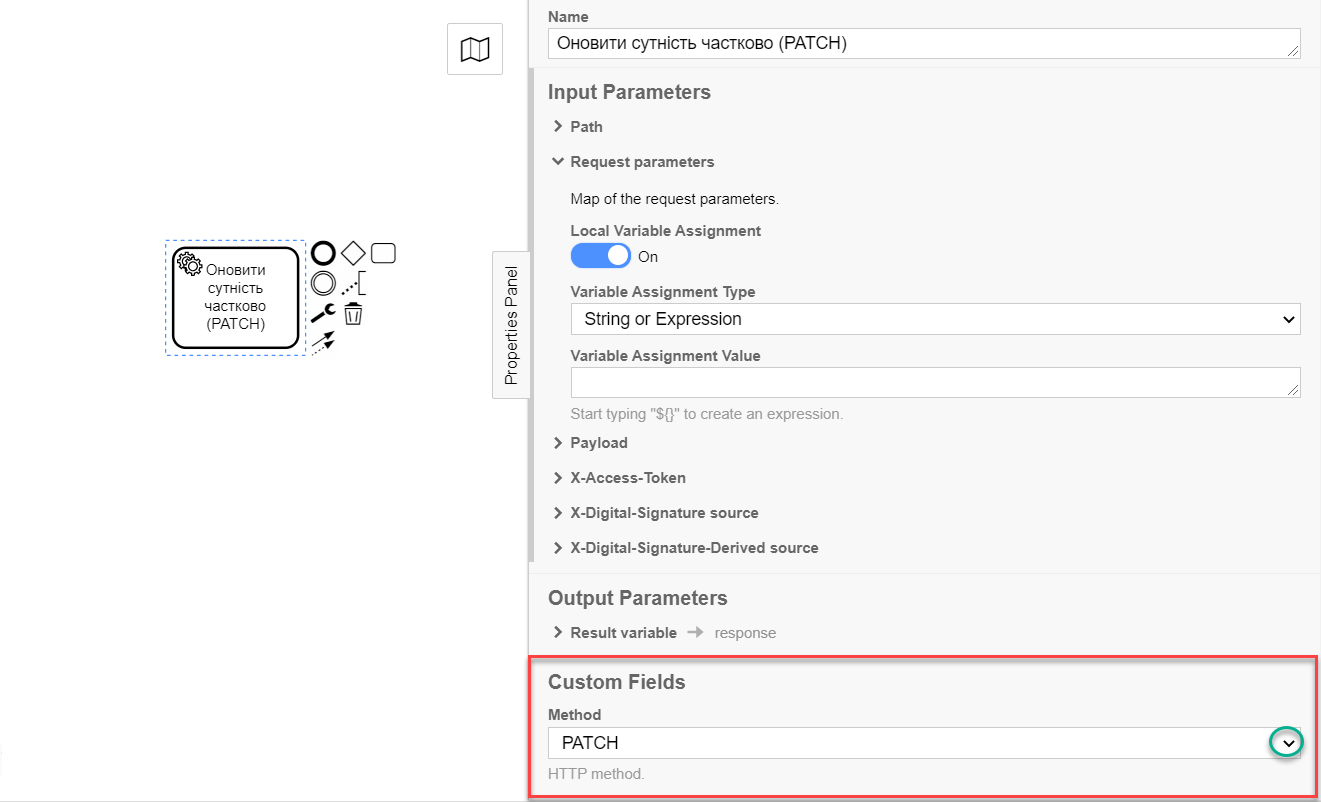
6. Configuration of interaction with a PATCH-endpoint
The PATCH HTTP method is used to partially update an entity/resource in the registry database. It is used to modify specific resource parameters based on its ID.
|
The principle of configuring the delegate to partially update an entity is identical to the Configuration of interaction with a PUT endpoint with one exception:
|